

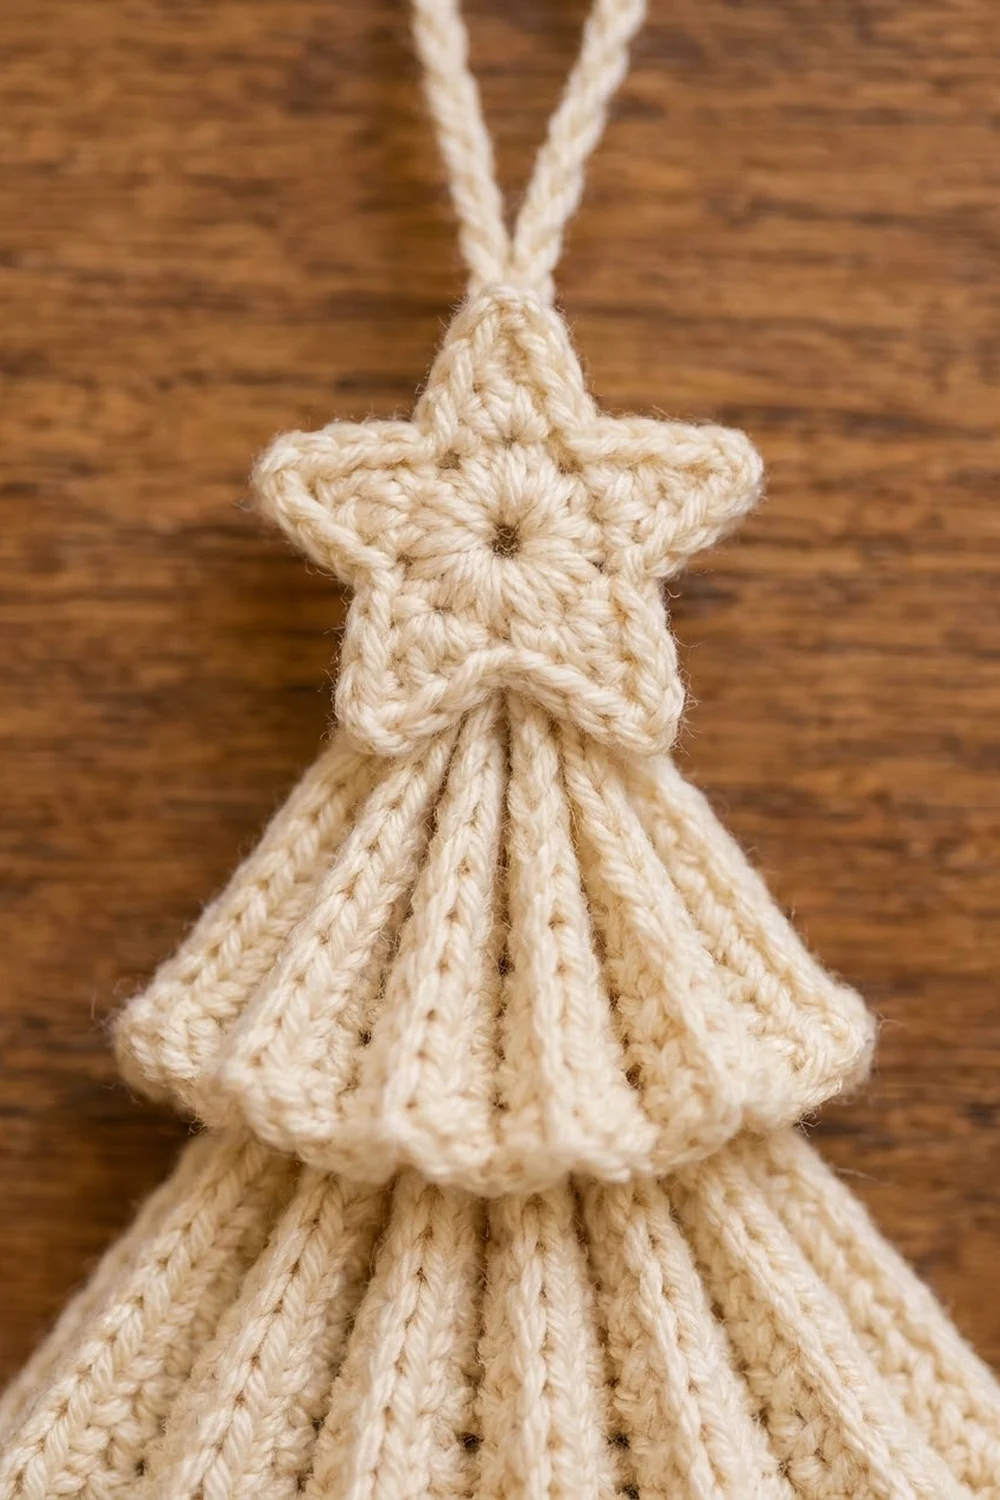
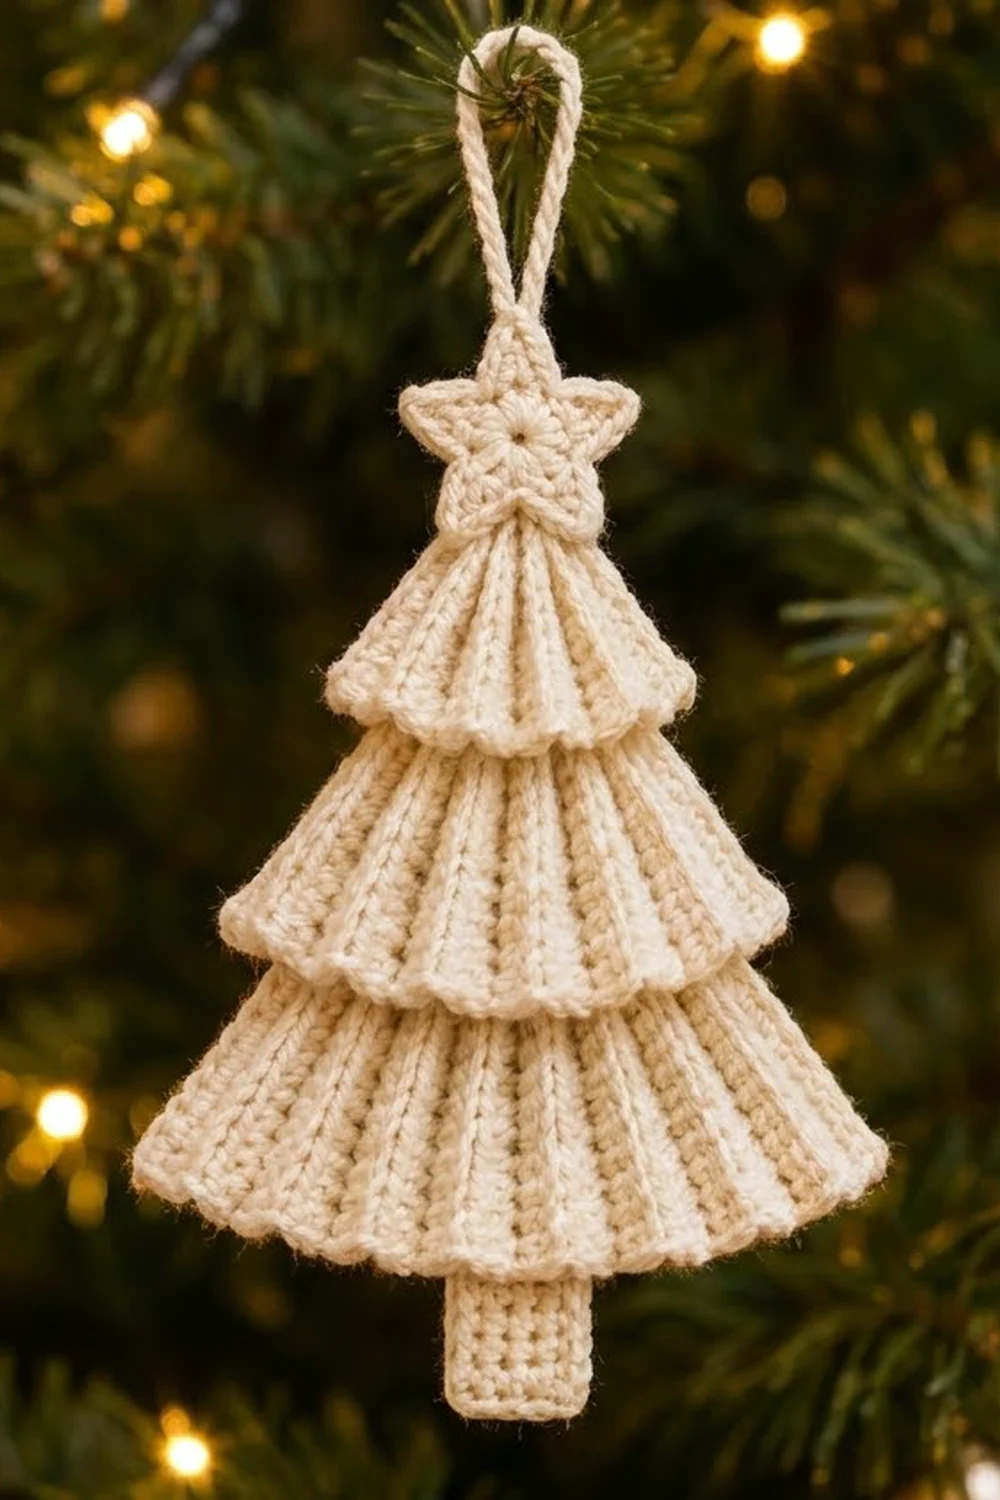
This little tree looks like it was folded from paper, but it’s all yarn. It has three stacked tiers covered in neat vertical ribs, a small wavy scallop along each hem, a five-point star on top and a short trunk below. Hang it by its slim cord loop.
The ornament uses one cream yarn, which gives it a quiet, snowy, Scandinavian look. It works well on a green tree, tied to a gift or hung in a window. Because it’s a single color, all of the interest comes from texture, so the ribs and scallops really show.
The finished tree measures about 4.5 in (11.4 cm) wide and 7.5 in (19.1 cm) tall, not counting the loop. The loop adds about 2 in (5.1 cm). This pattern uses US crochet terms.
Construction overview: each tier is a short strip worked sideways in back-loop single crochet. Two decrease rows gather one long edge, which turns the strip into a fan. A scallop border finishes the other long edge. Then you make a small star, a ribbed trunk and a cord loop, and sew everything into one ornament.
Finished Size and Construction
- Finished size: 4.5 in (11.4 cm) wide x 7.5 in (19.1 cm) tall, plus a 2 in (5.1 cm) loop
- Skill level: Easy / Advanced Beginner
- Terminology: US
- Yarn weight: DK (3)
- Hook: 3.5 mm (E-4)
- Number of pieces: one ornament, made from 6 components (3 tiers, 1 star, 1 trunk, 1 loop)
- Layout: tiers stacked vertically, each upper tier overlapping the next by 0.8 in (2.0 cm)
- Tier sizes (finished height): bottom 2.6 in (6.6 cm), middle 2.4 in (6.1 cm), top 2.2 in (5.6 cm)
- Bottom tier before border: 2.2 in (5.6 cm) tall, including gather rows
- Border depth: about 0.45 in (1.1 cm): one single crochet row plus one scallop row
Materials
Yarn: use a smooth DK yarn. Cotton or a cotton blend gives the crispest ribs, and a matte acrylic also works. Avoid fuzzy or brushed yarns, because they blur the ribbing.
- Cream / ivory: 20 g, about 46 m (50 yd) per ornament
Tools:
– 3.5 mm (E-4) crochet hook
– Tapestry needle
– Scissors
– Stitch markers (2)
– Ruler or tape measure
– Pins and a blocking mat
– Spray bottle
The yarn amount includes about a 30% margin for your gauge swatch and sewing tails.
Abbreviations (US Terms)
- ch – chain
- sl st – slip stitch
- sc – single crochet
- hdc – half double crochet
- dc – double crochet
- sc2tog – single crochet 2 together
- sk – skip
- st(s) – stitch(es)
- MR – magic ring
- BLO – back loop only
Special stitch – scallop: sk 1 st, 3 hdc in next st, sk 1 st, sc in next st. Each scallop uses 4 stitches of the row below.
Gauge and Checkpoints
Gauge: 18 sts and 20 rows = 4 in (10.2 cm) in sc BLO. One stitch is about 0.22 in (0.6 cm) and one row is 0.2 in (0.5 cm).
Use the bottom tier as your gauge test. It is the largest part, and every other measurement depends on it.
Checkpoints:
1. After bottom tier Row 24: strip is 1.8 in (4.6 cm) tall x 4.8 in (12.2 cm) long.
2. After Gather Row 2: the gathered edge is 1.3 in (3.3 cm) wide.
3. After the scallop row: the tier is about 2.6 in (6.6 cm) tall, and the hem spans 4.5 in (11.4 cm) when the tier is laid flat as a fan.
If your strip is too big, go down to a 3.25 mm (D-3) hook. If it’s too small, go up to a 3.75 mm (F-5). Change the hook rather than the stitch counts, because the scallop math depends on the counts.
Tiers (make 3)
All three tiers use the same method and differ only in counts. Ch 1 at the start of a row never counts as a stitch.
| Tier | Foundation ch | Sts per row | Rows | Strip size |
|---|---|---|---|---|
| Bottom | 9 | 8 | 24 | 1.8 x 4.8 in (4.6 x 12.2 cm) |
| Middle | 8 | 7 | 20 | 1.6 x 4.0 in (4.1 x 10.2 cm) |
| Top | 7 | 6 | 16 | 1.3 x 3.2 in (3.3 x 8.1 cm) |
Bottom Tier
Row 1: Ch 9, sc in 2nd ch from hook and in each ch across. (8 sc)
Rows 2–24: Ch 1, turn, sc BLO in each st across. (8 sc)
After Row 24 you have 24 rows. The BLO ridges run along the 8-stitch direction, so when the strip is turned with its long edge horizontal, they stand as vertical ribs.
Turn the strip so you can work along one long edge (the row ends). This edge becomes the gathered top.
Gather Row 1: Ch 1, sc2tog over each pair of row ends across. (12 sts)
Gather Row 2: Ch 1, turn, sc2tog across. (6 sts)
Fasten off and leave a 10 in (25.4 cm) tail for sewing. The top edge now pulls in to 1.3 in (3.3 cm) and the strip fans out into a trapezoid.
Middle Tier
Row 1: Ch 8, sc in 2nd ch from hook and in each ch across. (7 sc)
Rows 2–20: Ch 1, turn, sc BLO across. (7 sc)
Gather Row 1: Ch 1, sc2tog over each pair of row ends. (10 sts)
Gather Row 2: Ch 1, turn, sc2tog across. (5 sts)
Fasten off and leave a 10 in (25.4 cm) tail. The gathered edge is 1.1 in (2.8 cm) wide.
Top Tier
Row 1: Ch 7, sc in 2nd ch from hook and in each ch across. (6 sc)
Rows 2–16: Ch 1, turn, sc BLO across. (6 sc)
Gather Row 1: Ch 1, sc2tog over each pair of row ends. (8 sts)
Gather Row 2: Ch 1, turn, sc2tog across. (4 sts)
Fasten off and leave a 10 in (25.4 cm) tail. The gathered edge is 0.9 in (2.3 cm) wide.
Star Topper
Rnd 1: MR, ch 1, 10 sc in ring, sl st to first sc. (10 sc) Pull the ring closed, leaving a small center hole.
Rnd 2: Ch 4, sc in 2nd ch from hook, hdc in next ch, dc in next ch, sk next st of Rnd 1, sl st in next st; repeat from * 4 more times. (5 points)
Each repeat uses 2 stitches of Rnd 1 (5 x 2 = 10), so the last sl st lands in the first sc. Fasten off and leave an 8 in (20.3 cm) tail. The star measures about 1.25 in (3.2 cm) from point to point.
Trunk
Row 1: Ch 9, sc in 2nd ch from hook and across. (8 sc)
Rows 2–5: Ch 1, turn, sc BLO across. (8 sc)
The trunk is 1.8 in (4.6 cm) tall x 1.0 in (2.5 cm) wide, with vertical ribs that match the tiers. Fasten off and leave an 8 in (20.3 cm) tail.
Hanging Loop
Ch 21. Sl st in 2nd ch from hook and in each ch back. (20 sl st)
You get a firm cord about 4 in (10.2 cm) long. Twist it gently and fold it in half to make a 2 in (5.1 cm) loop. Fasten off and leave a 6 in (15.2 cm) tail.
Border: Scallop Edge (each tier)
The border goes along the hem of each tier, which is the long row-end edge opposite the gather rows. Border gauge: each scallop covers 4 row ends, or 0.8 in (2.0 cm), which lines up with the rib pattern.
With the right side facing, join yarn at one corner of the hem.
Edge Row 1: Ch 1, 2 sc in first row end, sc in each remaining row end.
– Bottom: 24 + 1 extra = 25 sc
– Middle: 20 + 1 extra = 21 sc
– Top: 16 + 1 extra = 17 sc
Edge Row 2: Ch 1, turn, sc in first st, scallop; repeat across, ending with the sc of the last scallop in the last st.
– Bottom: 6 scallops (7 sc + 18 hdc = 25 sts)
– Middle: 5 scallops (6 sc + 15 hdc = 21 sts)
– Top: 4 scallops (5 sc + 12 hdc = 17 sts)
Fasten off and weave in the ends.
Why the math works: the scallop row needs a count of 4k + 1, meaning one starting sc plus 4 stitches for each scallop. All row counts (24, 20, 16) divide evenly by 4, so adding the single extra stitch in Edge Row 1 gives exactly 4k + 1: 25 = 4 x 6 + 1, 21 = 4 x 5 + 1 and 17 = 4 x 4 + 1. Every scallop ends on an sc, so both corners of the hem match.
Assembly
- Stack the tiers. Lay the top tier, right side up, over the middle tier so the top tier’s hem overlaps the middle tier by 0.8 in (2.0 cm). The middle tier’s gather rows are hidden behind it. Whipstitch the middle tier’s gather rows to the back of the top tier’s ribs with the middle tier’s tail. Stitch through back loops only so nothing shows on the front.
- Add the bottom tier the same way, with the middle tier overlapping it by 0.8 in (2.0 cm).
- Attach the trunk. Center it behind the bottom tier, tucking 0.8 in (2.0 cm) of its top behind the gather area so 1.0 in (2.5 cm) shows. Sew it on from the back.
- Attach the star. Center it on the front over the top tier’s gathered edge, overlapping by 0.3 in (0.8 cm). Sew around the center ring and the base of the two lower points.
- Attach the loop. Sew both ends of the loop behind the star so the loop stands straight up.
Size checkpoint: the assembled tree should measure 4.5 in (11.4 cm) wide and about 7.5 in (19.1 cm) tall from the star’s top point to the bottom of the trunk.
Final Blocking
- Lightly mist the whole ornament until it is damp but not wet.
- Lay it face up on a blocking mat.
- Pin the trunk straight and centered.
- Fan out each tier evenly. Pin the two hem corners of the bottom tier 4.5 in (11.4 cm) apart, the middle tier 3.75 in (9.5 cm) apart and the top tier 3.0 in (7.6 cm) apart.
- Pin the center of each scallop so it curves gently downward.
- Pin out the five star points.
- Let it dry completely, at least 6 hours, before unpinning.
Final Quality-Control Checklist
- [ ] Bottom tier hem spans 4.5 in (11.4 cm)
- [ ] Scallop counts are 6, 5 and 4 from bottom to top
- [ ] Each overlap is 0.8 in (2.0 cm) and no gather rows show
- [ ] Trunk shows 1.0 in (2.5 cm) and is centered
- [ ] Star is centered and has 5 even points
- [ ] Loop is firmly attached and stands upright
- [ ] Total height is about 7.5 in (19.1 cm), not counting the loop
- [ ] All ends are woven in on the back
Troubleshooting
Ribs look flat or blurry. Make sure every stitch after Row 1 goes into the back loop only. A smoother, tighter-plied yarn also helps.
Tier won’t fan out. Gather Row 2 was probably skipped or worked too loosely. Rework it with firmer tension.
Scallops don’t come out even. Recount Edge Row 1. It must be 25, 21 or 17 stitches, depending on the tier.
Tiers curl forward. Block them again, and sew the overlaps a little lower on the back of the tier above.
Star points flop. Pull the dc tight, and pin the points well during blocking.
Ornament tilts when hanging. Re-center the loop directly behind the star’s top point.
Care
Spot clean with cool water and mild soap, then reshape and lay flat to dry. Store flat or hanging rather than crushed, so the fans keep their shape.
Final Notes
Everything is set by gauge: 18 sts and 20 rows = 4 in (10.2 cm). That makes 8-stitch, 7-stitch and 6-stitch strips of 24, 20 and 16 rows. Two gather rows bring them down to 6, 5 and 4 stitches, and each hem becomes 25, 21 and 17 stitches, worked as 6, 5 and 4 scallops. Stacked with 0.8 in (2.0 cm) overlaps and finished with a star and trunk, they make a tree 4.5 in (11.4 cm) wide and 7.5 in (19.1 cm) tall. Make one, then make a whole forest for your tree.
Happy crocheting!