

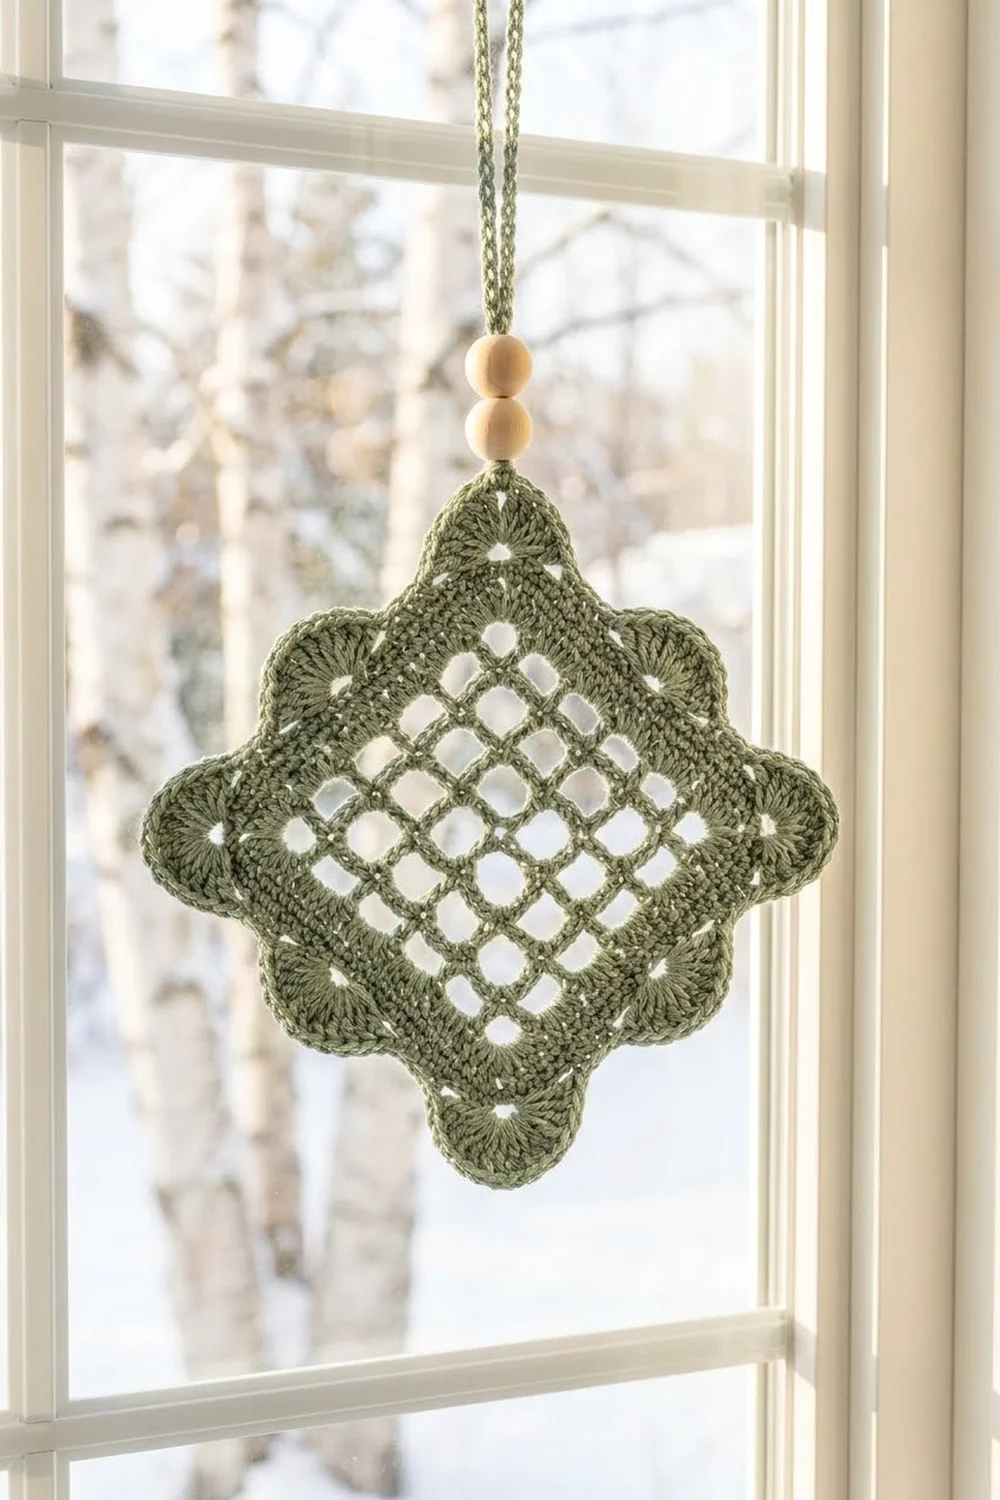
This diamond suncatcher is a light, airy window ornament. An open lattice of thin lines fills the center, a neat single-crochet frame holds it in shape, and a soft scalloped shell edge goes all the way around. Two natural wood beads sit at the top point, just below a doubled chain hanging loop.
The sample uses one color, a muted sage green cotton. That color looks calm against winter light and fits Scandinavian, farmhouse, and minimalist rooms. Because the center is mostly open, the view outside shows through the lattice.
The pattern uses US crochet terms throughout. The blocked diamond measures about 6.75 in (17.1 cm) wide and 8 in (20.3 cm) tall. With the hanging loop, the total length is about 12 in (30.5 cm).
You make it as one flat piece. First you work a square open mesh in rows. Then you work three border rounds around it: two single-crochet rounds and one shell round. Finally you add the chain loop and beads, and block the square on point into a tall diamond.
Finished Size and Construction
- Finished size (blocked): 6.75 in (17.1 cm) wide × 8 in (20.3 cm) tall, not counting the hanger
- Total hanging length: about 12 in (30.5 cm)
- Skill level: Easy / Advanced Beginner
- Terminology: US
- Yarn weight: DK / light worsted (#3) cotton
- Hook: 4.0 mm (G-6)
- Number of pieces: 1
- Layout: a single square worked flat, hung on point as a diamond
- Piece size (unblocked square): 5.25 in (13.3 cm) per side
- Size before border: 3.5 in (8.9 cm) square mesh
- Border depth: 0.875 in (2.2 cm) per edge (0.375 in / 1.0 cm frame plus 0.5 in / 1.3 cm shells)
Materials
Yarn: Use a smooth, mercerized or combed cotton in DK / light worsted weight. Cotton keeps the lattice crisp and holds its blocked shape in a sunny window. Avoid fuzzy or very stretchy yarns, because they blur the open lines.
- Sage green: 10 g, about 25 m (27 yd)
One ornament uses about 15 m (16 yd), including the hanger. The quantities above include a safety margin for your gauge swatch and for weaving in ends.
Tools:
- 4.0 mm (G-6) crochet hook
- 2 natural wood beads, 12 mm, with holes at least 4 mm wide
- Dental floss threader or a short piece of fine wire folded in half (for threading the beads)
- Tapestry needle
- Scissors
- Blocking board or foam mat, rustproof pins
- Spray bottle; optional spray starch
Abbreviations (US Terms)
- ch – chain
- sl st – slip stitch
- sc – single crochet
- dc – double crochet
- tr – treble crochet
- sk – skip
- sp – space
- beg – beginning
- rep – repeat
- st(s) – stitch(es)
Special stitches:
- Side shell: 9 dc worked in the same stitch.
- Corner shell: (5 dc, ch 2, 5 dc) worked in the same corner ch-2 sp. At the start of a round, ch 3 counts as the first dc.
Gauge and Checkpoints
Gauge is measured on the mesh itself:
One mesh cell (1 tr post + 4 ch) = 0.875 in (2.2 cm) wide and 0.875 in (2.2 cm) tall.
Work the mesh section first and treat it as your test piece. It takes only a few minutes, and it decides the final size of everything else.
Checkpoints:
- After Row 1: 3.5 in (8.9 cm) wide from first post to last post.
- After Row 4: 3.5 in (8.9 cm) square.
- After Border Round 2: 4.25 in (10.8 cm) square.
- After Border Round 3: 5.25 in (13.3 cm) square, measured across the shells.
- After blocking on point: 8 in (20.3 cm) tall × 6.75 in (17.1 cm) wide.
A tolerance of ±0.25 in (0.6 cm) at any checkpoint is fine.
If your mesh is too big: go down to a 3.5 mm hook and start again. If it is too small: go up to a 4.5 mm hook. Change only the hook. Never change the stitch counts, because the border math depends on them.
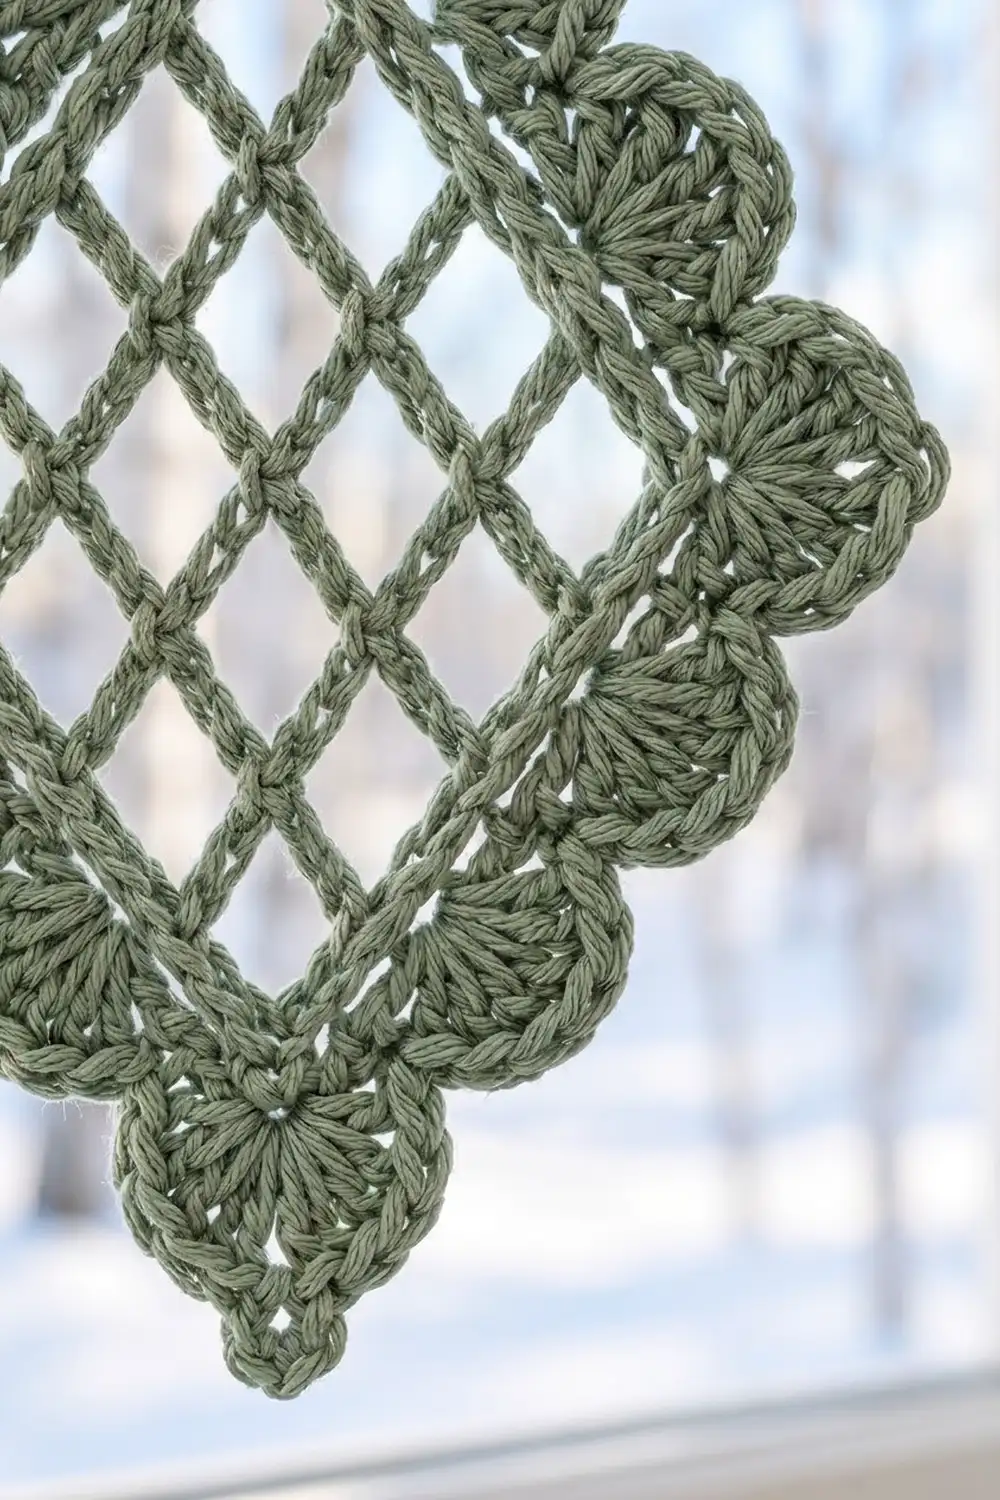
Main Pattern: Lattice Mesh
The mesh is a 4-by-4 grid of open squares. When you hang the square on point, these squares turn into the diamond-shaped holes of the lattice.
Foundation: Ch 28.
Row 1: Tr in the 13th ch from hook. The first 12 ch count as a tr, a ch-4 top bar, and 4 skipped base ch. Ch 4, sk 4 ch, tr in next ch; rep from * 2 more times. Turn.
(5 posts counting the beg ch, 4 ch-4 sps)*
Check that Row 1 is 3.5 in (8.9 cm) wide.
Row 2: Ch 8 (counts as tr + ch 4). Sk the first ch-4 sp and tr in the next tr. Ch 4, tr in next tr; rep from * 1 more time. Ch 4, tr in the 5th ch of the beg ch-12, counting from the first tr of Row 1. This chain sits at the top of the corner post. Turn.
(5 posts, 4 ch-4 sps)*
Row 3: Ch 8 (counts as tr + ch 4). Sk the first ch-4 sp and tr in the next tr. Ch 4, tr in next tr; rep from * 1 more time. Ch 4, tr in the 4th ch of the turning ch-8. Turn.
(5 posts, 4 ch-4 sps)*
Row 4: Repeat Row 3. Do not turn and do not fasten off.
(5 posts, 4 ch-4 sps; 16 open squares in total)
Checkpoint: The mesh measures 3.5 in (8.9 cm) square. If the rows are a little shorter than the width, that’s fine; blocking evens them out.
Border
Border Gauge
6 sc = 1 in (2.5 cm) along the mesh edges. In Round 1, each side gets 21 sc between the corners across 3.5 in (8.9 cm), which matches this gauge.
Round 1 (Frame)
Ch 1. Work (sc, ch 2, sc) in the top of the last tr made. This is corner A.
- Side 1 (row ends): Rotate to work down the row ends. Work 5 sc around the post of Row 4, sc in the row junction, 4 sc around the post of Row 3, sc in the junction, 4 sc around the post of Row 2, sc in the junction, and 5 sc around the post of Row 1. That’s 21 sc.
- Corner B: (sc, ch 2, sc) in the foundation ch at the base of the corner post.
- Side 2 (foundation): Work 5 sc in the first ch-4 sp, sc in the base of the next post, 4 sc in the next sp, sc in the next post, 4 sc in the next sp, sc in the next post, and 5 sc in the last sp. That’s 21 sc.
- Corner C: (sc, ch 2, sc) in the foundation corner.
- Side 3 (row ends): Work it like Side 1, going upward: 5 sc, 1 sc, 4 sc, 1 sc, 4 sc, 1 sc, 5 sc. That’s 21 sc.
- Corner D: (sc, ch 2, sc) in the top of the Row 4 turning ch.
- Side 4 (top of Row 4): 5 sc in the first sp, sc in the next tr, 4 sc, sc, 4 sc, sc, and 5 sc in the last sp. That’s 21 sc.
Join with a sl st to the first sc.
Count: 23 sc per side (the 21 side sts plus the 2 corner sc), 92 sc in total, and 4 ch-2 corner sps. Each corner sc belongs to one side only, so nothing is counted twice.
Round 2 (Frame)
Ch 1, sc in the same st as the join. *(sc, ch 2, sc) in the corner ch-2 sp, sc in each sc to the next corner; rep from * around, ending with sc in each sc to the first sc. Join with a sl st to the first sc.
Count: 25 sc per side (23 from the round below plus 2 new corner sc), 100 sc in total, and 4 ch-2 corner sps.
Checkpoint: The square measures 4.25 in (10.8 cm). The two frame rounds add 0.375 in (1.0 cm) on each edge.
Round 3 (Shells)
Sl st in the next sc, then sl st into the corner ch-2 sp.
First corner: Ch 3 (counts as dc), 4 dc in the same sp, ch 2, 5 dc in the same sp.
Each side: Sc in the first sc. *Sk 3 sc, 9 dc in the next sc, sk 3 sc, sc in the next sc; rep from * 2 more times. The last sc of the side lands in the 25th st, the one just before the next corner.
Each remaining corner: Corner shell (5 dc, ch 2, 5 dc) in the ch-2 sp.
Work the sides and corners in order around the square. On the final side, the last sc goes into the st holding the starting sl st. Join with a sl st to the top of the beg ch-3 and fasten off.
Count: 12 side shells (108 dc), 4 corner shells (40 dc), 148 dc in total, 16 sc, and 4 ch-2 points.
Why the math works: Each side shell repeat uses 8 sts: 3 skipped, 1 shell st, 3 skipped, and 1 sc. One sc plus three repeats gives 1 + 3 × 8 = 25, which is exactly the Round 2 count per side. Every side therefore starts and ends with an sc next to a corner shell, and all four sides match. The ch-2 at the center of each corner shell becomes the small point at each diamond tip.
Checkpoint: The square measures 5.25 in (13.3 cm) across the shells.
Hanging Loop and Beads
- Pick one corner to be the top. Join the yarn in that corner shell’s ch-2 sp.
- Ch 45, about 8 in (20.3 cm) long.
- Sl st into the same ch-2 sp to close a doubled loop. Fasten off and weave in the end.
- Push the folded top of the loop through the dental floss threader, or through folded wire.
- Thread both beads onto both strands and slide them down until they sit snug against the top point.
- The finished loop stands about 4 in (10.2 cm) above the beads.
Final Blocking
- Weave in all ends along the frame rounds, not through the open mesh.
- Soak the piece in cool water for 10 minutes. Gently press the water out with a towel; don’t wring it.
- Lay the piece on the blocking board with one corner at the top. Pin the top and bottom points 8 in (20.3 cm) apart.
- Pin the two side points 6.75 in (17.1 cm) apart. The square becomes a tall diamond, and the mesh holes stretch into diamonds too. If you prefer an even square on point, pin all four points about 7.4 in (18.8 cm) apart instead.
- Pin each side shell into a round fan, and pin each corner ch-2 into a sharp point.
- Check that the lattice lines are straight. Nudge any crooked post into line with a pin.
- If you want extra crispness, mist with spray starch.
- Let it dry completely before you unpin it, usually 12 to 24 hours.
Final Quality-Control Checklist
- The mesh has 16 open holes in a 4-by-4 grid, and every post is a full tr.
- Each side of Round 1 has 23 sc, and each side of Round 2 has 25 sc.
- Each side has 3 side shells of 9 dc, plus 4 corner shells of 10 dc.
- All four points have a visible ch-2 tip.
- The blocked size is 8 in (20.3 cm) × 6.75 in (17.1 cm), within ±0.25 in (0.6 cm).
- The beads sit tight at the top point, and the loop hangs straight.
- No ends show inside the lattice.
Troubleshooting
- The mesh is rectangular, not square: Rows are usually shorter than the width. Pull each tr loop up a little taller, or block more firmly in height.
- The frame ripples: Your sc tension is loose. Go down 0.5 mm for Rounds 1 and 2 only.
- The frame pulls the mesh into a cup: You worked too few sc. Recount each side to 21 sc between the corners in Round 1.
- The shells don’t fit evenly: One side has the wrong count. Each side of Round 2 must have exactly 25 sc.
- The corners look flat: Make sure each corner shell has 5 dc on each side of its ch-2, then pin the points sharply when blocking.
- The beads won’t slide on: Use beads with a hole of 5 mm or wider, or thread them using a single strand of the loop folded over.
- The ornament hangs crooked: The hanger is off-center. Rejoin it exactly in the ch-2 at the corner tip.
Care
Hand wash in cool water with mild soap, press the water out in a towel, and lay flat to dry, re-pinning the points if needed. Keep the beads out of long soaks so the wood doesn’t swell.
Final Notes
The measurements build on each other. A 3.5 in (8.9 cm) square mesh of 16 holes becomes 4.25 in (10.8 cm) after the two sc frame rounds (23 and then 25 sc per side). The shell round, with 1 + 3 × 8 = 25 sts per side, brings it to 5.25 in (13.3 cm). Blocked on point, it makes an 8 in × 6.75 in (20.3 cm × 17.1 cm) diamond. If you hit the first checkpoint, the rest of the sizes should follow. A small stack of these in sage green looks lovely in a winter window.
Happy crocheting!