

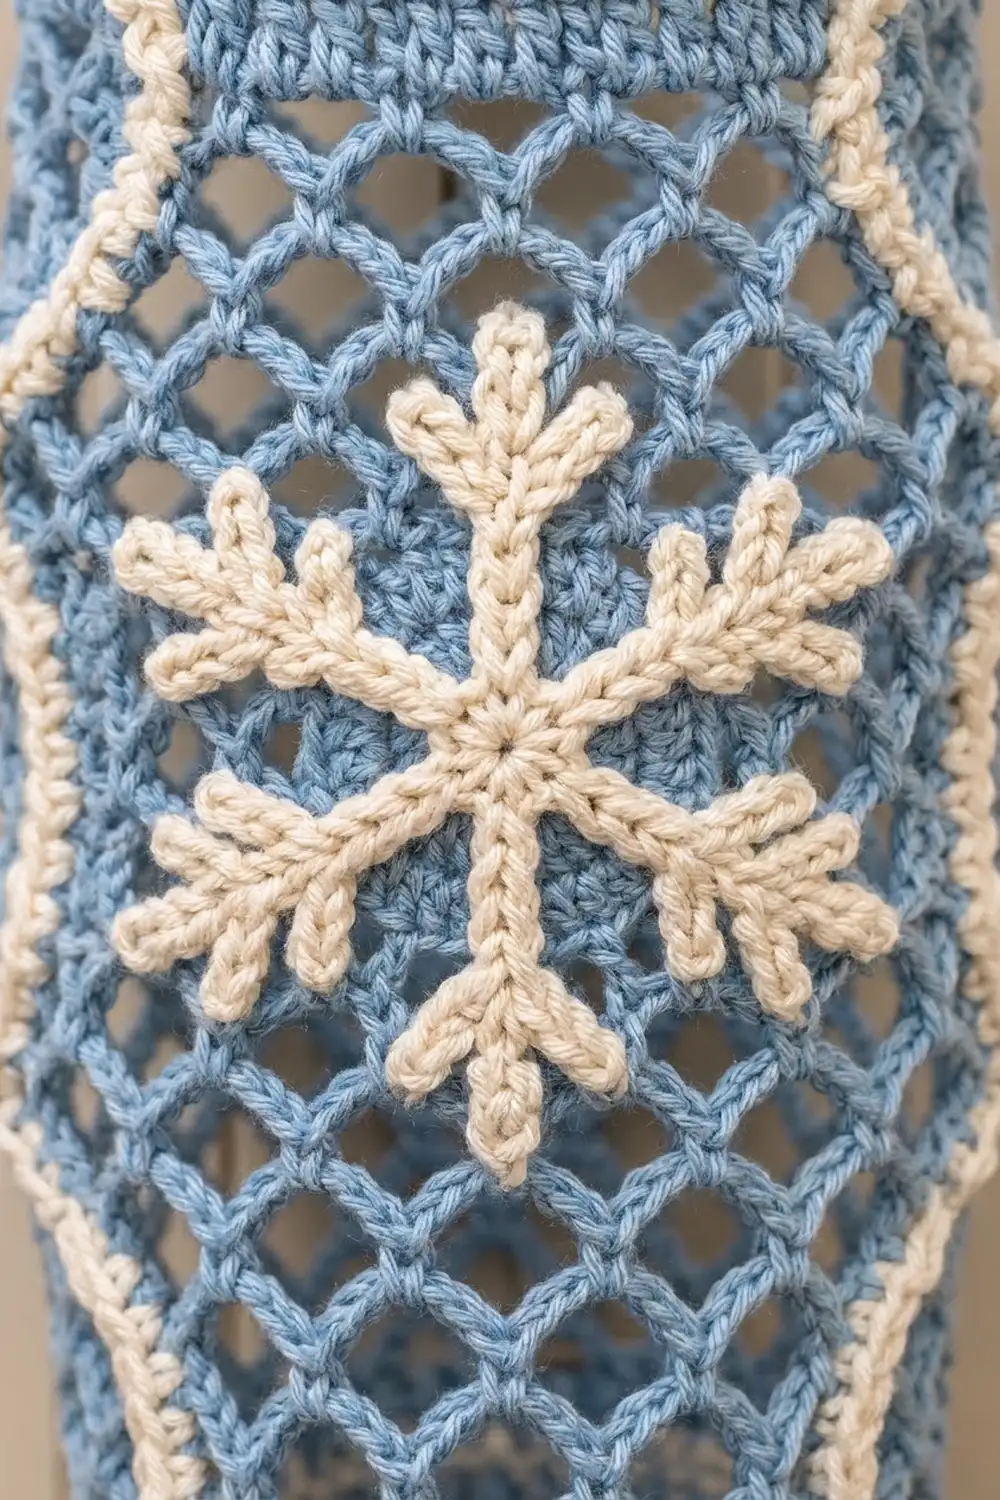
This holder keeps your plastic grocery bags in one place and looks good doing it. The body is an open fishnet mesh in light blue, so you can see how full it is. A cream snowflake sits on the front, and cream cords trace the side edges. Together they give the flattened holder a tall hexagon outline.
You stuff bags in through the wide top opening and pull them out one at a time through the narrow bottom opening. A blue strap with cream edging comes off the back of the rim. A slot near the top of the strap slips over a cabinet knob or hook.
The finished holder measures about 7 in (17.8 cm) wide at the widest point and about 16 in (40.6 cm) tall, plus a strap of about 6.5 in (16.5 cm). This pattern uses US crochet terms throughout.
You work the body in joined rounds from the bottom opening up. First come solid single-crochet rounds, then mesh rounds with ch-4 and ch-5 loops that shape the body, then a solid top rim. The strap is worked in rows straight off the rim. Last, you make a snowflake appliqué and two cords and sew them on.
Finished Size and Construction
- Finished size (laid flat): 7 in (17.8 cm) wide x 16 in (40.6 cm) tall, plus a 6.5 in (16.5 cm) strap
- Skill level: Easy-intermediate
- Terminology: US crochet terms
- Yarn weight: Worsted (#4)
- Hook: 5.0 mm (H-8)
- Number of pieces: 1 body (strap worked on), 1 snowflake appliqué, 2 edge cords
- Layout: One flattened tube with the snowflake centered on the front
- Bottom opening: 36 sts, 9 in (22.9 cm) around, 4.5 in (11.4 cm) flat
- Top opening: 45 sts, 11.25 in (28.6 cm) around, about 5.6 in (14.2 cm) flat
- Size before edging: 7 in (17.8 cm) wide x 16 in (40.6 cm) tall
- Edging depth: The strap edging adds 0.25 in (0.6 cm) to each long side
Materials
Pick a smooth worsted-weight cotton or cotton blend. Cotton holds the mesh shape and doesn’t stretch much when the holder is full. Acrylic also works, but it can sag a little under weight.
- Light Blue (main color): 100 g, about 180 m
- Cream (contrast color): 40 g, about 72 m
These quantities include a margin of about 15 percent for checking gauge and fixing small mistakes.
Tools:
- 5.0 mm (H-8) crochet hook
- 4 locking stitch markers
- Tapestry needle
- Scissors
- Measuring tape
- Pins and a blocking surface
Abbreviations (US Terms)
- ch – chain
- sc – single crochet
- sl st – slip stitch
- st(s) – stitch(es)
- sk – skip
- rnd(s) – round(s)
- ch-4 loop / ch-5 loop – the chain space made by ch 4 or ch 5 between two sc in the mesh
Mesh round: Sl st into the first loop of the previous round, ch 1, sc in the same loop, ch [number given], sc in next loop. Repeat around. Finish with ch [number given] and a sl st in the first sc. Every mesh round has 18 sc and 18 loops.
Gauge and Checkpoints
- Solid sc: 16 sc x 18 rnds = 4 in (10.2 cm)
- Mesh: 18 ch-5 loops = 14 in (35.6 cm) around, or 7 in (17.8 cm) flat; 5 mesh rnds = 3 in (7.6 cm)
Use the piece itself as your gauge test. Work Rnds 1–6, then measure before you go on.
- After Rnd 6: The tube is 4.5 in (11.4 cm) wide flat and about 1 1/3 in (3.4 cm) tall.
- After Rnd 15: The ch-5 mesh is close to 7 in (17.8 cm) wide flat.
- After Rnd 30: The mesh from Rnd 7 up is about 13.6 in (34.5 cm) tall.
- After Rnd 35: The top rim is about 5.6 in (14.2 cm) wide flat, and the body is about 16 in (40.6 cm) tall.
Too big? Switch to a 4.5 mm hook. Too small? Switch to a 5.5 mm hook. If only the mesh is off, keep your hook and change each loop by one chain. The stitch counts stay the same either way.
Body
Work the body from the bottom up in joined rounds, without turning. Join each round with a sl st in the first st. The ch 1 at the start of a round does not count as a stitch.
Foundation: With Light Blue, ch 36. Sl st in the first ch to join into a ring. Don’t let the chain twist.
Rnd 1 (Light Blue): Ch 1, sc in each ch around. Join. (36 sc)
Rnds 2–4 (Light Blue): Ch 1, sc in each st around. Join. (36 sc) Fasten off.
Rnds 5–6 (Cream): Join Cream in any st. Ch 1, sc in each st around. Join. (36 sc) Fasten off.
Checkpoint: the tube is 4.5 in (11.4 cm) wide flat.
Rnd 7 (Light Blue, mesh set-up): Join Light Blue in any st. Ch 1, sc in same st, ch 3, sk 1, sc in next st, ch 3, sk 1. Repeat around. Join with a sl st in the first sc. (18 sc, 18 ch-3 loops)
Each repeat uses 2 sts of Rnd 6, so 18 repeats x 2 = 36.
Rnds 8–10 (lower taper): Work a mesh round with ch 4. (18 sc, 18 ch-4 loops)
Rnds 11–27 (main body): Work a mesh round with ch 5. (18 sc, 18 ch-5 loops)
Going from ch-4 to ch-5 loops makes the body wider, which forms the angled lower edges of the hexagon. You never add or remove loops.
Rnds 28–30 (shoulders): Work a mesh round with ch 4. (18 sc, 18 ch-4 loops)
The shorter loops pull the mesh back in to form the shoulders.
Rnd 31 (Light Blue, conversion round): Ch 1, sc in next sc, 2 sc in next ch-4 loop, sc in next sc, sc in next ch-4 loop. Repeat 9 times total. Join. (45 sc)
Count: 18 sc worked one into each existing sc + 27 sc worked into the loops (9 loops x 2 sc + 9 loops x 1 sc) = 45 sc.
Rnd 32 (Light Blue): Ch 1, sc in each st around. Join. (45 sc) Fasten off.
Rnds 33–35 (Cream): Join Cream. Ch 1, sc in each st around. Join. (45 sc) Fasten off.
Checkpoint: the top rim is about 5.6 in (14.2 cm) wide flat, and the body is about 16 in (40.6 cm) tall.
Strap
Lay the body flat so the round joins run up one side fold. Number the Rnd 35 sts starting at the join. Sts 1–22 are on the front and sts 23–45 are on the back. Place markers in sts 32 and 37. The strap is worked over these 6 sts, centered on the back.
Row 1 (Light Blue): Join in st 32. Ch 1, sc in same st and next 5 sts. Turn. (6 sc)
Rows 2–20: Ch 1, sc in each st across. Turn. (6 sc)
Rows 21–26, first half (knob slot): Ch 1, sc in the first 3 sts only. Turn. Work 6 rows on these 3 sts, then fasten off. (3 sc)
Rows 21–26, second half: Join Light Blue in the 4th st of Row 20. Ch 1, sc in the remaining 3 sts. Turn. Work 6 rows on these 3 sts. Don’t fasten off. (3 sc)
Row 27: Ch 1, sc in 3 sts of this half, then sc in 3 sts of the first half. Turn. (6 sc)
This closes the slot, which is about 1.25 in (3.2 cm) long and fits a standard cabinet knob.
Rows 28–29: Ch 1, sc in each st across. Turn. (6 sc) Fasten off.
The finished strap has 29 rows and is about 6.5 in (16.5 cm) long and 1.5 in (3.8 cm) wide.
Snowflake Appliqué
Use Cream.
Rnd 1: Make a magic ring. Ch 1, 12 sc in ring. Join. (12 sc)
Rnd 2: Ch 1, 2 sc in next st, sc in next st. Repeat 6 times total. Join. (18 sc)
Rnd 3 (arms): Sl st in next st, ch 8. Working back down the chain: sl st in 2nd ch from hook (tip), sc in next ch, [ch 4, sl st in 2nd ch from hook, sc in next 2 ch] twice (outer V), sc in next 2 ch of the arm, [ch 3, sl st in 2nd ch from hook, sc in next ch] twice (inner V), sc in next 3 ch of the arm, sl st in the same center st where the arm began, sc in next 2 sts of Rnd 2. Repeat 6 times total. Join. (6 arms)
Each repeat uses 3 sts of Rnd 2 (1 sl st + 2 sc), so 6 x 3 = 18. Each arm works the 7 chains after the skipped chain: 1 tip + 1 + 2 + 3 = 7, with the branch pairs worked in between.
Fasten off and leave a 24 in (61.0 cm) tail for sewing. The snowflake is about 4.5 in (11.4 cm) across.
Edge Cords (Make 2)
With Cream, ch 56.
Row 1: Sc in the back bump of the 2nd ch from hook and in each ch across. (55 sc)
Fasten off and leave a 20 in (50.8 cm) tail. Each cord is about 13.75 in (34.9 cm) long, which matches the mesh height from Rnd 7 to Rnd 30.
Border and Edging
The top and bottom bands are already part of the body. This section covers the strap edging and attaching the cords and snowflake.
Edging gauge: Work 1 sc per strap row and 1 sc per strap st. This matches the 16 sc and 18 rows per 4 in (10.2 cm) gauge, so the edges stay flat.
Strap edging (Cream): Join Cream at the base of the strap’s right edge, where it meets Rnd 35.
- Right side: Ch 1, sc in the end of each row up to Row 29. (29 sc)
- Top: 3 sc in first st of Row 29, sc in next 4 sts, 3 sc in last st. (10 sc)
- Left side: Sc in the end of each row down to Row 1. (29 sc)
Fasten off. Total: 68 sc (29 + 10 + 29).
Why the math works: the 6 sts across the top already include the 2 corner sts. Each corner gets 3 sc instead of 1, so the top count is 4 + 3 + 3 = 10. The extra sts let the edging turn the corners without cupping.
Side cords: Lay the body flat with the strap centered on the back. Pin one cord along each side fold, from the top of Rnd 6 to the base of Rnd 31. Tuck the cord ends into the solid bands. Whipstitch each cord to the sc of every mesh round it crosses. Because the cords follow the folds, they trace the narrow bottom, straight middle, and angled shoulders.
Snowflake: Center the snowflake on the front, halfway between Rnd 6 and Rnd 31. Pin the center and the arm tips first. Then sew the center, each arm, and each branch tip to the mesh with small stitches. Don’t pull the stitches tight, or the mesh will pucker.
Final Blocking
- Weave in all ends along the solid rounds or the backs of the cords.
- Spritz the holder until it is damp but not soaked.
- Lay it flat with the cords on the side folds.
- Pin the widths: 4.5 in (11.4 cm) at the bottom band, 7 in (17.8 cm) through the middle, and 5.6 in (14.2 cm) at the top rim.
- Pin the body to 16 in (40.6 cm) long and the strap to 6.5 in (16.5 cm).
- Pin each pair of snowflake branches into a neat V, one branch on each side of the arm.
- Let it dry completely before you unpin it.
Final Quality-Control Checklist
- Rnds 1–6 have 36 sc, and Rnds 31–35 have 45 sc.
- Every mesh round has 18 loops.
- The tube isn’t twisted, and the round joins line up along one fold.
- The strap is 6 sts wide and centered on the back.
- The knob slot is about 1.25 in (3.2 cm) long and lies flat.
- The strap edging has 68 sc, with 3 sc in each top corner.
- Both cords lie flat along the folds.
- The snowflake is centered and the mesh around it doesn’t pucker.
- The widths measure 4.5 in (11.4 cm), 7 in (17.8 cm), and 5.6 in (14.2 cm).
Troubleshooting
Mesh leans to one side: Joined mesh rounds can drift. Make sure each round starts with a sl st into the first loop, not into the sc. Blocking also helps.
Middle is too narrow: Use ch-6 loops for Rnds 11–27, or go up a hook size.
Bags fall out of the bottom: The bottom band is too loose. Rework Rnds 1–6 with a smaller hook.
Top rim ripples: For Rnd 31, work 1 sc in each sc and 1 sc in each loop (18 + 18 = 36 sc). Then work Rnd 32 as sc in next 3 sts, 2 sc in next st to get back to 45 sc.
Snowflake curls: The arm chains are tighter than the sc. Work the ch 8 with a larger hook, and block the snowflake flat before sewing it on.
Strap stretches: Use cotton yarn, or work a line of surface sl st up the back of the strap.
Care
Hand wash in cool water, reshape, and lay flat to dry. Cotton and acrylic versions can also go through a gentle machine wash in a mesh laundry bag.

Final Notes
Here is the measurement chain from bottom to top. The 36-sc bottom band is 4.5 in (11.4 cm) flat. It opens into 18 mesh loops: the ch-4 loops are about 5.75 in (14.6 cm) flat and the ch-5 loops are 7 in (17.8 cm) flat. The ch-4 shoulder rounds pull the mesh back in, and the 45-sc rim finishes at about 5.6 in (14.2 cm) flat. The body is 16 in (40.6 cm) tall, plus a 6.5 in (16.5 cm) strap. If you check each stage as you go, the holder will come out the right size.
Happy crocheting!