

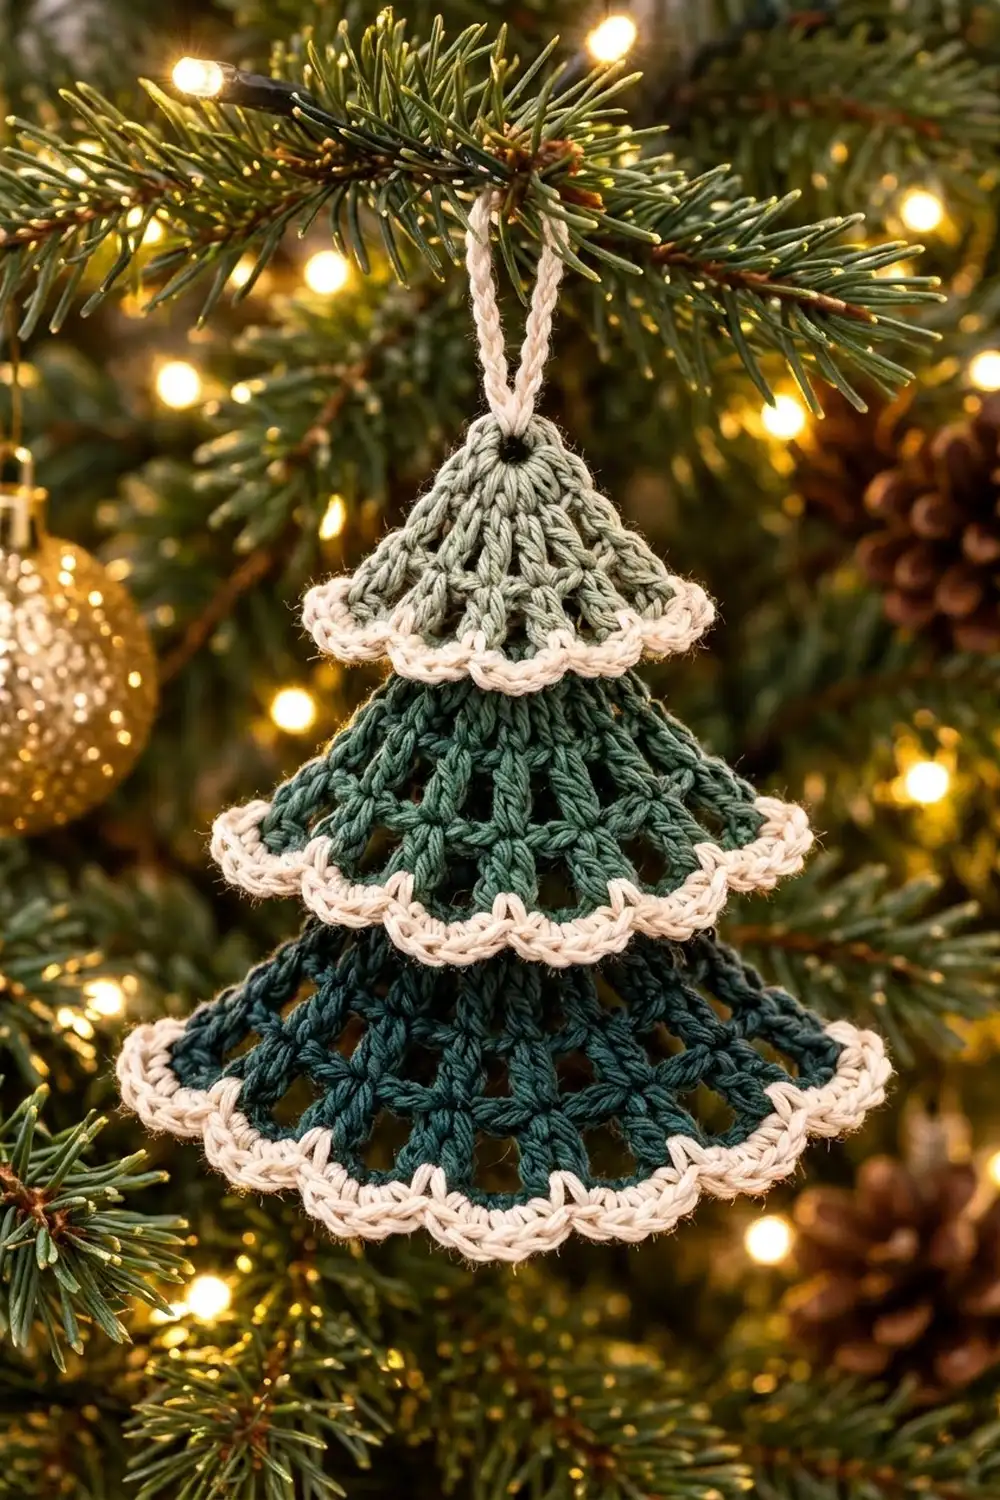
This little tree is made from three lacy fans stacked into a classic tiered Christmas tree shape. Each tier is an open mesh of double crochet spokes. Each one ends in a soft cream scalloped edge that looks like a dusting of snow on the branches.
The colors go from light to dark down the tree: sage green at the top, forest green in the middle, and deep spruce-teal at the bottom. Cream is used for every scalloped edge and for the hanging cord. The finished look is calm and Scandinavian, and it suits a natural or vintage-style tree.
The pattern uses US crochet terms. The finished ornament is 4.75 in (12.1 cm) wide and 5 in (12.7 cm) tall, or about 7 in (17.8 cm) including the hanging loop.
You’ll crochet three fans from the same starting rows. The top fan stops after Row 2, the middle fan after Row 3, and the bottom fan after Row 4. Each fan gets a two-row cream scalloped edging. Then you make a slip-stitch cord, stack the tiers on it and sew them in place.
Finished Size and Construction
- Finished size: 4.75 in (12.1 cm) wide x 5 in (12.7 cm) tall, plus a 2 in (5.1 cm) loop
- Skill level: Easy
- Terminology: US
- Yarn weight: DK / light worsted (#3), cotton or cotton blend
- Hook: 3.5 mm (E-4)
- Number of pieces: 3 fan tiers + 1 cord
- Layout: 3 tiers stacked vertically, overlapping, centered on one cord
- Piece size (blocked radius, from ring center to scallop tip): top 1.75 in (4.4 cm), middle 2.25 in (5.7 cm), bottom 2.75 in (7.0 cm)
- Size before edging (radius): top 1.25 in (3.2 cm), middle 1.75 in (4.4 cm), bottom 2.25 in (5.7 cm)
- Edging depth: 0.5 in (1.3 cm) on every tier
Materials
Choose a smooth, mercerized or matte cotton DK. Cotton gives crisp stitch definition, and it blocks well enough that the lace opens up and the scallops stay round. Avoid fuzzy yarns, because they fill in the mesh.
- Sage green (Color A): 4 g, about 10 m
- Forest green (Color B): 6 g, about 14 m
- Dark spruce-teal (Color C): 8 g, about 19 m
- Cream (Color D): 6 g, about 14 m (three edgings plus the cord)
You will also need:
- 3.5 mm (E-4) crochet hook
- Tapestry needle
- Scissors
- Rust-proof pins and a blocking mat
- Spray bottle or light spray starch (optional)
All quantities are for one ornament and include a margin of about 20% for gauge swatches and weaving in ends.
Abbreviations (US Terms)
- ch – chain
- sl st – slip stitch
- sc – single crochet
- dc – double crochet
- sk – skip
- sp – space
- st(s) – stitch(es)
- tch – turning chain
- rep – repeat
- RS – right side
Special stitches
- V-stitch (V): (dc, ch 1, dc) in the same stitch.
- Scallop: 5 dc in the same stitch.
Gauge and Checkpoints
Make the top tier first; it works as your gauge swatch. Block it lightly and measure from the center of the ring to the edge of the fabric.
- After Row 1: radius 0.75 in (1.9 cm)
- After Row 2: radius 1.25 in (3.2 cm)
- After Row 3: radius 1.75 in (4.4 cm)
- After Row 4: radius 2.25 in (5.7 cm)
- Edging: the sc band adds 0.2 in (0.5 cm) and the scallops add 0.3 in (0.8 cm), 0.5 in (1.3 cm) in total
Each dc row should add 0.5 in (1.3 cm).
If your top tier measures more than 1.25 in (3.2 cm) after Row 2, go down to a 3.25 mm hook. If it measures less than 1.25 in (3.2 cm), go up to a 3.75 mm hook. Small differences are fine for an ornament. Just keep all three tiers on the same hook so they stay in proportion.

Fan Tier Base (All Tiers)
Every tier starts the same way. Start each tier with its own color: Color A for the top, Color B for the middle and Color C for the bottom.
Ring: Make a magic ring. You can also ch 4 and sl st to the first ch to form a ring.
Row 1 (RS): Ch 4 (counts as dc + ch 1). Work [dc, ch 1] 3 times into the ring, then dc in the ring. Turn.
(5 dc, 4 ch-1 sps)
Pull the ring tail until the ring is about 0.25 in (0.6 cm) across, not fully closed. The cord will pass through this opening later. The 5 spokes should fan out to about 120°.
Row 2: Ch 4 (counts as dc + ch 1), dc in the same st to make the first V. Then ch 1, V in the next dc; rep from * 3 more times. The last V goes in the 3rd ch of the tch. Turn.
(5 V-sts: 10 dc, 9 ch-1 sps, 5 inside the Vs and 4 between them)
Top tier only: Fasten off here and go to Edging.
Row 3: Ch 5 (counts as dc + ch 2), dc in the next dc. Then ch 2, dc in the next dc; rep from * across, with the last dc in the 3rd ch of the tch. Turn.
(10 dc, 9 ch-2 sps)
This row keeps the same spoke count but opens up the spaces. That gives the airy lattice look of the middle tier.
Middle tier only: Fasten off here and go to Edging.
Row 4: Ch 4 (counts as dc + ch 1), dc in the same st to make the first V. Then work across the remaining 9 dc of Row 3 as follows:
- ch 2, dc in the next dc
- ch 2, dc in the next dc
- ch 2, V in the next dc
Work that sequence 3 times. The final V goes in the 3rd ch of the tch. Turn.
(4 V-sts + 6 single dc = 14 dc, 4 ch-1 sps inside the Vs, 9 ch-2 sps between stitch groups)
The Vs fall on Row 3 stitches 1, 4, 7 and 10, so the increases are symmetrical.
Bottom tier: Fasten off and go to Edging.
Make All Pieces
Make the following for one ornament:
| Piece | Color | Rows | Sts in last row |
|---|---|---|---|
| Top tier | A, sage | 1–2 | 10 dc, 9 ch-1 sps |
| Middle tier | B, forest | 1–3 | 10 dc, 9 ch-2 sps |
| Bottom tier | C, spruce | 1–4 | 14 dc, 4 ch-1 + 9 ch-2 sps |
| Cord | D, cream | — | 30 ch |
Stacking layout (front view):
        ( loop )
           |
         /A A\         top tier, ring at 2.25 in above bottom ring
       ~~~~~~~~~
        /B B B\        middle tier, ring at 1.25 in above bottom ring
     ~~~~~~~~~~~~~
      /C C C C C\      bottom tier, ring at 0 in
   ~~~~~~~~~~~~~~~~~
In inches: 2.25 in (5.7 cm) and 1.25 in (3.2 cm) above the bottom ring.
Cord: With Color D, ch 30. Sl st in the back bump of the 2nd ch from the hook and in each ch across. Fasten off.
(29 sl sts; the cord measures about 6.5 in (16.5 cm). Add or remove chains to reach that length.)
Joining
Each tier is sewn to the cord at a single point: its ring. This keeps the fans flat and lets the edging flare freely.
- Lay the bottom tier RS down. Place the cord tail end at the bottom tier’s ring. Sew through the ring stitches and the cord 3 or 4 times.
- Measure 1.25 in (3.2 cm) up the cord. Place the middle tier’s ring there, RS down, and sew it the same way.
- Measure another 1 in (2.5 cm) up the cord, for a total of 2.25 in (5.7 cm). Pass the cord from back to front through the top tier’s ring and sew the ring to the cord.
- The cord now has 4.25 in (10.8 cm) left above the top ring. Fold it into a loop 2 in (5.1 cm) tall. Push the last 0.25 in (0.6 cm) back through the top ring and sew it to the cord on the back.
Sew snugly but don’t pull the stitches tight. Tight stitches pucker the ring and tilt the tier.
Size check: The middle tier’s scallops should end 1 in (2.5 cm) below the bottom ring, which leaves 1.75 in (4.4 cm) of the bottom tier showing. The top tier’s scallops should sit 0.5 in (1.3 cm) above the bottom ring. The total height from the top ring to the bottom scallops should be 5 in (12.7 cm).
Edging (Cream Scalloped Border)
Work the edging along the curved outer edge only, on the last row of each tier. Leave the straight sides green.
Edging gauge: In the sc band, 1 sc per dc, 1 sc per ch-1 sp and 2 sc per ch-2 sp should lie flat without ruffling. Each scallop covers 4 sc.
Why the math works: A scallop repeat uses 4 sc (sk 1, 5 dc in 1, sk 1, sc in 1), and the row needs 1 extra sc to begin. So the sc band must total a multiple of 4 plus 1. Each tier’s band is adjusted to land exactly on that number, with any extra stitches placed symmetrically.
Top Tier (Rows 1–2)
Edging Row A: With the last row facing, join Color D in the first dc and ch 1. Sc in each dc and each ch-1 sp across, but work 2 sc in the first dc and 2 sc in the last dc. Turn.
(19 sc worked 1-per-stitch/space + 2 extra = 21 sc)
Edging Row B: Ch 1, sc in the first sc. Then sk 1, scallop in the next sc, sk 1, sc in the next sc; rep from * 4 more times. Fasten off.
(5 scallops: 25 dc + 6 sc)
Middle Tier (Rows 1–3)
Edging Row A: Join Color D in the first dc and ch 1. Sc in each dc and 2 sc in each ch-2 sp, but work 3 sc in the center (5th) ch-2 sp. Turn.
(10 + 18 = 28 sc worked + 1 extra = 29 sc)
Edging Row B: Ch 1, sc in the first sc. Then sk 1, scallop in the next sc, sk 1, sc in the next sc; rep from * 6 more times. Fasten off.
(7 scallops: 35 dc + 8 sc)
Bottom Tier (Rows 1–4)
Edging Row A: Join Color D in the first dc and ch 1. Work:
- 1 sc in each dc
- 1 sc in each ch-1 sp
- 2 sc in each ch-2 sp, except 3 sc in the center (5th) ch-2 sp
Turn.
(14 + 4 + 18 = 36 sc worked + 1 extra = 37 sc)
Edging Row B: Ch 1, sc in the first sc. Then sk 1, scallop in the next sc, sk 1, sc in the next sc; rep from * 8 more times. Fasten off.
(9 scallops: 45 dc + 10 sc)
Weave in all ends along the green spokes so they don’t show through the cream.
Final Blocking
Block each tier before joining. A light touch-up after joining is fine.
- Wet each tier, or mist it heavily, then press out the extra water in a towel.
- Pin the ring center to the mat.
- Pin the two straight side edges so they open to about 120°.
- Pin the tip of each scallop at the tier’s finished radius: 1.75 in (4.4 cm) for the top, 2.25 in (5.7 cm) for the middle, 2.75 in (7.0 cm) for the bottom.
- Open each mesh space with your fingertip so the spokes run straight from the ring.
- Spray lightly with starch if you want a crisper hang.
- Let each tier dry completely.
- Check the widths across the outer edge: 3 in (7.6 cm) for the top, 3.9 in (9.9 cm) for the middle, 4.75 in (12.1 cm) for the bottom.
Final Quality-Control Checklist
- Each ring opening is about 0.25 in (0.6 cm) and the cord passes cleanly through the top one.
- Top tier has 5 scallops, middle tier has 7, bottom tier has 9.
- The scallops sit evenly, with the center scallop on the center line of each tier.
- Side edges are straight and green, with no cream showing.
- All three tiers hang centered on the cord, without tilting.
- Total size is 4.75 in (12.1 cm) wide x 5 in (12.7 cm) tall, plus a 2 in (5.1 cm) loop.
- No yarn tails are visible from the front.
Troubleshooting
Fan curls into a cone: Too few stitches for your tension. Block flat with pins, or go up one hook size.
Fan ruffles: Your chains are too loose. Chain more firmly, or go down a hook size for the ch-2 spaces.
Scallops don’t fit evenly: Recount Edging Row A. It must be 21, 29 or 37 sc.
Edging cups the fan inward: Work the sc band more loosely, or use a hook one size larger for Row A only.
Tier tilts on the cord: The sewing at the ring is off-center. Re-sew it through the middle of the ring.
Loop twists: Block the cord damp, hanging with a small weight on it.
Care
Hand wash in cool water with mild soap and reshape. Dry the ornament flat, pinning the scallops if needed. Store it flat in tissue paper between seasons.
Final Notes
Each piece builds on the one before it:
- Row 1 measures 0.75 in (1.9 cm), and each dc row adds 0.5 in (1.3 cm).
- The cream edging adds another 0.5 in (1.3 cm).
- That gives tiers of 1.75 in (4.4 cm), 2.25 in (5.7 cm) and 2.75 in (7.0 cm).
- Spaced 1 in (2.5 cm) and 1.25 in (3.2 cm) apart on the cord, they make a 5 in (12.7 cm) tree that is 4.75 in (12.1 cm) wide at the base.
If your first tier hits its checkpoint, the rest of the tree will follow. Make a few in different shades for a whole forest on your branches.
Happy crocheting!