

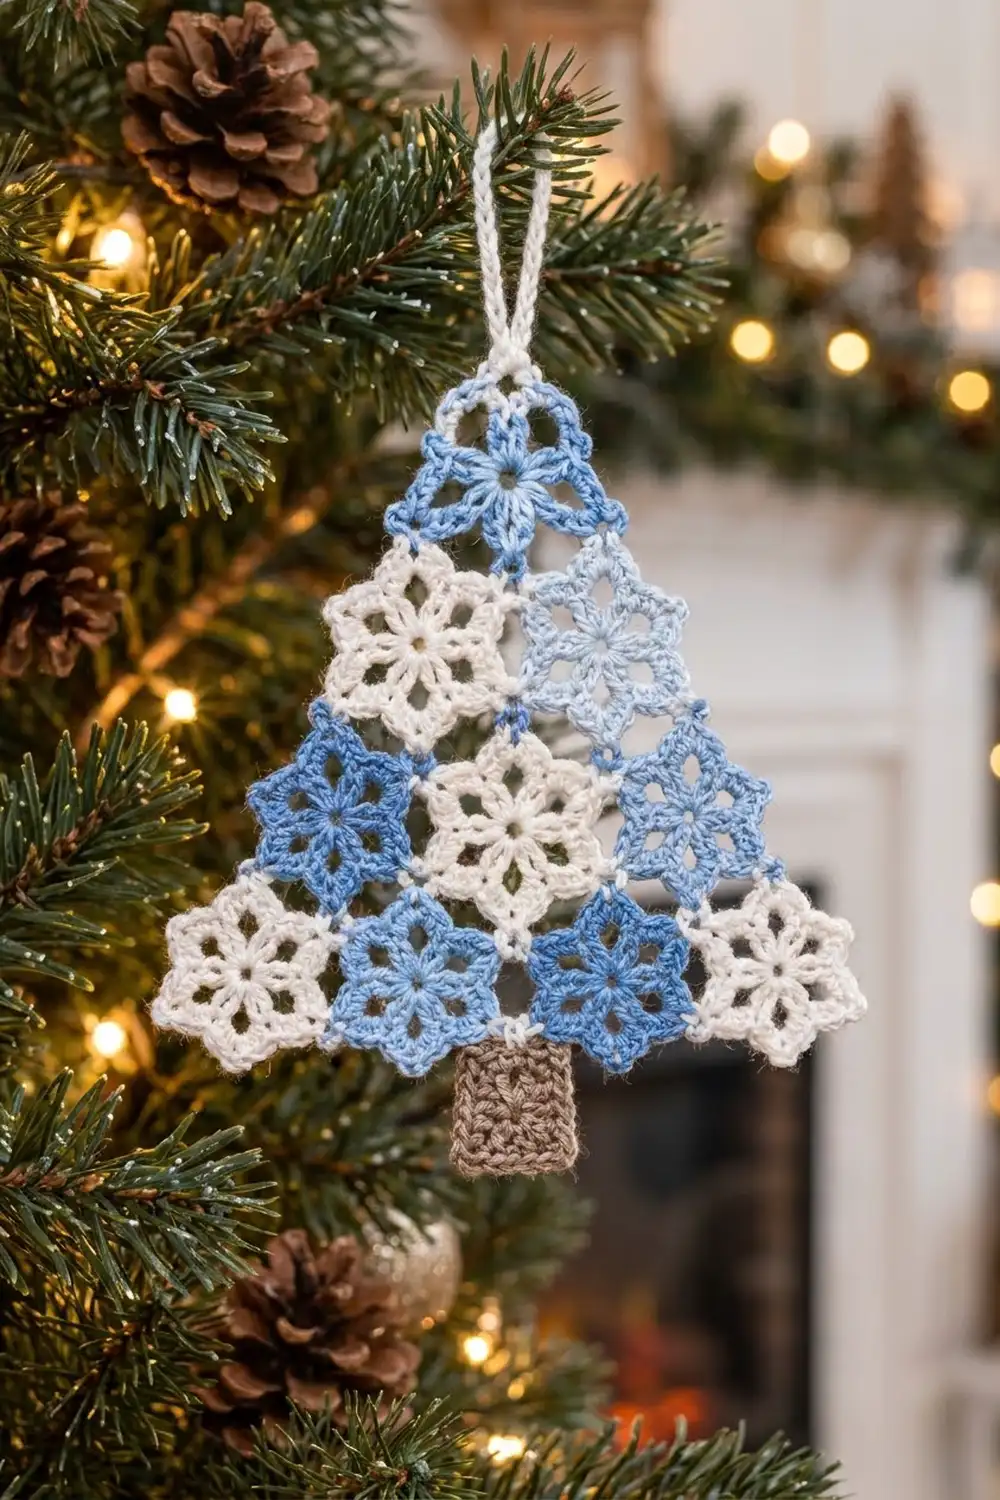
This lacy Christmas tree ornament is made from ten little six-pointed star motifs joined point to point into a crisp triangle. A small taupe square forms the trunk, and a thin white chain loop at the top tip lets it hang from a branch.
The colors are cool and wintry: white, light blue, medium cornflower blue and taupe. One light blue star sits at the top and two white stars form row 2. Row 3 reads blue-white-blue, and row 4 reads white-blue-blue-white. The open holes in every star let tree lights glow through.
The pattern uses US crochet terms. The finished ornament measures about 7 in (17.8 cm) wide and 7.25 in (18.4 cm) tall including the trunk, plus a 1.5 in (3.8 cm) hanging loop.
Construction is simple. Crochet the first star completely, then join each new star to its neighbors on the last round (join-as-you-go) at the chain tips. Make and sew on the trunk, add the hanging loop, and block.
Finished Size and Construction
- Finished size: 7 in (17.8 cm) wide x 7.25 in (18.4 cm) tall with trunk, not counting the loop
- Skill level: Intermediate (join-as-you-go at the points)
- Terminology: US
- Yarn weight: Fingering / super fine (#1) cotton
- Hook: 2.5 mm
- Number of pieces: 10 star motifs + 1 trunk
- Layout: Triangle of 4 rows: 1, 2, 3, 4 motifs
- Piece size: 2 in (5.1 cm) from top tip to bottom tip; 1.75 in (4.4 cm) from side point to side point
- Size before border: 7 in (17.8 cm) wide x 6.5 in (16.5 cm) tall
- Border depth: 0 in (0 cm). The star points are the finished edge, and no rounds are added.
Materials
Choose a smooth, mercerized fingering-weight cotton (about 170 m per 50 g). Mercerized cotton gives crisp points and holds its shape after blocking. Avoid fuzzy or very stretchy yarns, because the lace will blur and the tips will droop.
- White: 10 g / 34 m (5 motifs + hanging loop)
- Medium blue: 8 g / 27 m (4 motifs)
- Light blue: 5 g / 17 m (1 motif)
- Taupe: 5 g / 17 m (trunk)
These amounts include extra yarn for a test motif and for weaving in ends.
Tools:
- 2.5 mm crochet hook
- Tapestry needle
- Scissors
- Stitch marker
- Rust-proof pins and a foam blocking board
- Spray bottle with water
- Ruler or tape measure
Abbreviations (US Terms)
- ch – chain
- sl st – slip stitch
- sc – single crochet
- hdc – half double crochet
- dc – double crochet
- sk – skip
- sp(s) – space(s)
- st(s) – stitch(es)
- MR – magic ring
- rep – repeat
- RS / WS – right side / wrong side
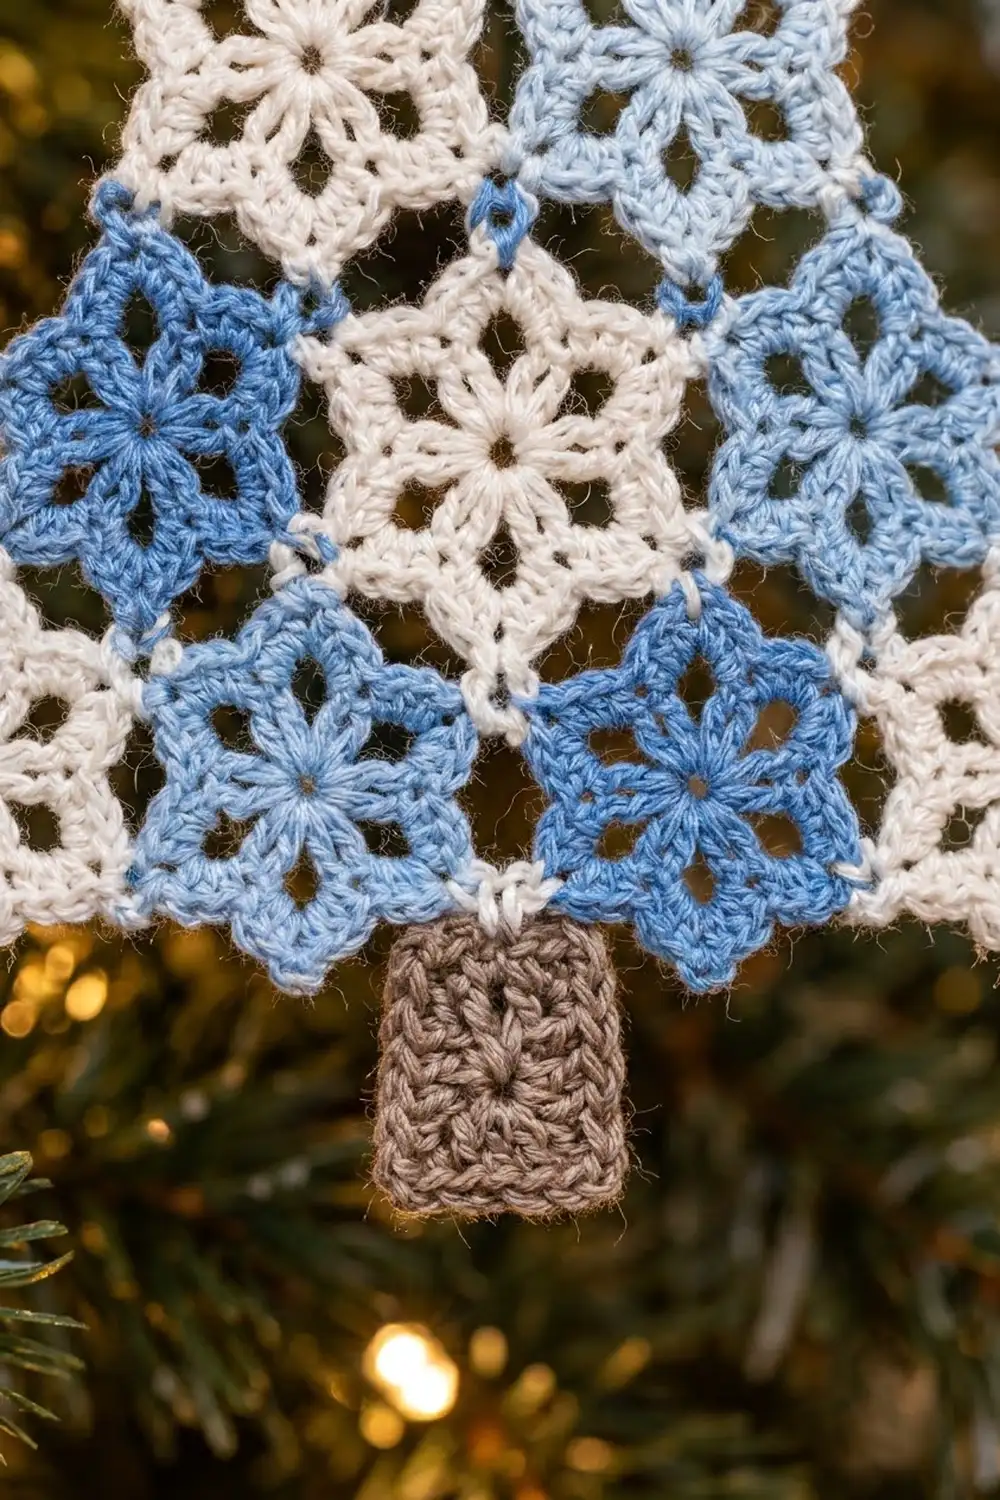
Special stitch – Joining tip: Where a tip would normally be “(hdc, dc, ch 3, dc, hdc),” work (hdc, dc, ch 1, sl st into the ch-3 tip of the neighboring motif, ch 1, dc, hdc) instead. If two motifs already meet at that point, sl st into the existing joining sl st instead of a ch-3 sp.
Gauge and Checkpoints
Make one complete star before anything else. For this pattern, gauge is the size of the motif, not a stitch count over 4 in.
- After Rnd 2: about 0.9 in (2.3 cm) across
- After Rnd 3: about 1.5 in (3.8 cm) between opposite ch-2 sps
- After Rnd 4: 2 in (5.1 cm) from top tip to bottom tip; 1.75 in (4.4 cm) from side point to side point
Trunk gauge: 7 sc and 8 rows = 1 in (2.5 cm).
If your star is bigger than 2 in (5.1 cm), go down to a 2.25 mm hook. If it is smaller, try a 2.75 mm hook. Being off by only 0.125 in (0.3 cm) per star adds up to 0.5 in (1.3 cm) across the bottom row, so it is worth checking. Measure the test star after a light steam or spray, because cotton relaxes a little once it is damp.
Star Motif
Work in rounds with the RS facing. Do not turn.
Rnd 1: MR, ch 1, 12 sc in ring, join with sl st to first sc. Pull the ring closed. (12 sc)
Rnd 2: Ch 3 (counts as dc), dc in same st, ch 2, sk next sc, 2 dc in next sc, ch 2, sk next sc; rep from * 4 more times, join with sl st to top of ch-3. (12 dc in 6 pairs, 6 ch-2 sps)*
The six ch-2 sps make the ring of holes around the center.
Rnd 3: Sl st in next dc, sl st in ch-2 sp, ch 3 (counts as dc), (dc, ch 2, 2 dc) in same sp, ch 1, (2 dc, ch 2, 2 dc) in next ch-2 sp, ch 1; rep from * 4 more times, join with sl st to top of ch-3. (24 dc in 6 shells, 6 ch-2 sps, 6 ch-1 sps)*
Each shell is one petal. Its ch-2 sp is the petal hole, and it becomes the base of a star tip.
Rnd 4 (points): Ch 1, sc in same st as join, sc in next dc, (hdc, dc, ch 3, dc, hdc) in ch-2 sp, sc in each of next 2 dc, sc in ch-1 sp, sc in each of next 2 dc, (hdc, dc, ch 3, dc, hdc) in next ch-2 sp, sc in each of next 2 dc, sc in ch-1 sp; rep from * 4 more times, join with sl st to first sc. Fasten off. (30 sc, 12 hdc, 12 dc = 54 sts, plus 6 ch-3 tips)*
Each point has 5 sc + 2 hdc + 2 dc + 1 ch-3 tip, and six points x 9 sts = 54 sts. The sc sections form the dips between points, and the hdc and dc build up the sides of each point.
Make All Pieces
Make the first star (M1) completely in light blue. Work every other star through Rnd 3 on its own, then join it on Rnd 4.
- Light blue: 1 star (M1)
- White: 5 stars (M2, M3, M5, M7, M10)
- Medium blue: 4 stars (M4, M6, M8, M9)
- Taupe: 1 trunk
Layout grid (L = light blue, W = white, B = medium blue, T = trunk):
         L            Row 1: M1
       W   W          Row 2: M2  M3
     B   W   B        Row 3: M4  M5  M6
   W   B   B   W      Row 4: M7  M8  M9  M10
         T            Trunk under M8/M9
Each star sits point-up. The tips are named like a clock: 12 (top), 2, 4, 6 (bottom), 8 and 10.
Joining
All joins happen on Rnd 4, and only at the tips. The edges between tips never touch, which leaves the open diamonds that make the tree look lacy.
Stitch-to-stitch logic: A joining tip takes the place of one ch-3 tip. The new motif still has 54 sts; the ch 3 just becomes ch 1, sl st, ch 1. No stitches are added or removed.
Order of work: If you crochet right-handed, rounds go counterclockwise, so the tips are worked in the order 12, 10, 8, 6, 4, 2. Start Rnd 4 so that all the free tips come first and the joining tips come last, one after another. Lay the new star in place and turn it to the right starting position before you begin.
Tips to join on each motif:
- M2: 12 to M1 tip 8; 2 to M1 tip 6
- M3: 8 to M2 tip 4; 10 to existing M1/M2 join; 12 to M1 tip 4
- M4: 12 to M2 tip 8; 2 to M2 tip 6
- M5: 8 to M4 tip 4; 10 to existing M2/M4 join; 12 to existing M2/M3 join; 2 to M3 tip 6
- M6: 8 to M5 tip 4; 10 to existing M3/M5 join; 12 to M3 tip 4
- M7: 12 to M4 tip 8; 2 to M4 tip 6
- M8: 8 to M7 tip 4; 10 to existing M4/M7 join; 12 to existing M4/M5 join; 2 to M5 tip 6
- M9: 8 to M8 tip 4; 10 to existing M5/M8 join; 12 to existing M5/M6 join; 2 to M6 tip 6
- M10: 8 to M9 tip 4; 10 to existing M6/M9 join; 12 to M6 tip 4
The pattern repeats: the leftmost star in each row joins 2 tips, the rightmost joins 3, and middle stars join 4. Where three stars meet, the third star joins into the sl st that is already there, so each meeting point has only one knot.
Tension: Make the ch 1 on each side of the joining sl st the same size as your normal chains. A tight join pulls the points inward and puckers the triangle. A loose join makes the tree floppy.
Size checkpoints (measured flat, before blocking):
- After row 2: 3.5 in (8.9 cm) wide x 3.5 in (8.9 cm) tall
- After row 3: 5.25 in (13.3 cm) wide x 5 in (12.7 cm) tall
- After row 4: 7 in (17.8 cm) wide x 6.5 in (16.5 cm) tall
Each new row adds 1.75 in (4.4 cm) of width and 1.5 in (3.8 cm) of height, because each row nests into the gaps of the row above.
Border
This tree has no extra border rounds. The free ch-3 tips from Rnd 4 form the edge, so the border depth is 0 in (0 cm). This section checks the edge count, then adds the trunk and hanging loop.
Border gauge: One free tip every 1.75 in (4.4 cm) along each side of the triangle.
Edge tip count: Each side of the triangle runs along 4 motifs, and each of those motifs gives exactly 1 free tip to that side.
- Left side: 4 motifs x 1 tip = 4 tips (tip 10 of M1, M2, M4, M7)
- Right side: 4 motifs x 1 tip = 4 tips (tip 2 of M1, M3, M6, M10)
- Bottom: 4 motifs x 1 tip = 4 tips (tip 6 of M7, M8, M9, M10)
- Corners: 3 tips (M1 tip 12, M7 tip 8, M10 tip 4)
Total: 12 edge tips + 3 corner tips = 15 free tips. Every other tip on the ten stars is part of a join. If you count 15, your joins are correct. If you count more, you missed a join.
Why the math works: Side points sit 1.75 in (4.4 cm) apart, so 4 motifs make 7 in (17.8 cm) across. Each row steps down 1.5 in (3.8 cm), so 3 steps plus one 2 in (5.1 cm) star make 6.5 in (16.5 cm) of height.
Trunk (taupe): Ch 8.
Row 1: Sc in 2nd ch from hook and in each ch across, turn. (7 sc)
Rows 2–10: Ch 1, sc in each st across, turn. (7 sc)
Fasten off, leaving a 10 in (25.4 cm) tail. The trunk measures 1 in (2.5 cm) wide x 1.25 in (3.2 cm) tall.
Attach the trunk: Center the trunk under the dip between M8 and M9. Slide the top 0.5 in (1.3 cm) behind the stars so its top edge reaches the M5/M8/M9 join. Whipstitch the trunk to the WS of the M8 and M9 edge stitches. The trunk shows 0.75 in (1.9 cm) below the bottom tips, bringing the total height to 7.25 in (18.4 cm).
Hanging loop (white): Join white with a sl st in the ch-3 tip at M1 tip 12, ch 24, sl st in the same ch-3 tip. Fasten off. The loop hangs about 1.5 in (3.8 cm).
Final Blocking
- Weave in all ends along the WS of the sc sections, never through the tips.
- Spray the ornament until it is evenly damp but not dripping.
- Lay it RS up on the blocking board.
- Pin the 3 corner tips first: 7 in (17.8 cm) between the bottom corners and 6.5 in (16.5 cm) from the top tip to the bottom row.
- Pin each of the 15 free tips into a sharp point, pulling straight out from the center of its star.
- Check that the open diamonds between the stars look even.
- Pin the trunk so it is square and straight.
- Let it dry completely before you remove the pins.
Final Quality-Control Checklist
- Every star has 54 sts plus 6 tips (ch-3 or joined)
- 15 free tips: 12 along the sides and 3 at the corners
- Colors match the layout grid
- Joins lie flat with no puckering
- Width is 7 in (17.8 cm) and height is 7.25 in (18.4 cm) with the trunk
- Trunk is centered and straight
- Hanging loop is secure at the top tip
- All ends are hidden
Troubleshooting
- Stars cup or ruffle: Check that Rnd 3 has 24 dc, and change the hook size by 0.25 mm.
- Points look rounded: Keep the ch-3 tips firm and pin them sharply when blocking.
- Triangle leans: A tip was joined in the wrong place. Compare your work with the joining list.
- Gaps between stars look stretched: The joining chains are too tight. Work the ch 1 a little looser.
- Trunk looks off-center: Unpick it and center it under the M8/M9 dip.
- Ornament is floppy: Use mercerized cotton and block with a light spray starch.
Care
Hand wash in cool water, press out the water in a towel, and lay it flat in shape to dry. Store it flat or hanging so the points stay crisp.
Final Notes
Every measurement follows from the first star. A 2 in (5.1 cm) star gives 1.75 in (4.4 cm) from side point to side point. Four stars across give 7 in (17.8 cm), and four nested rows give 6.5 in (16.5 cm). The trunk adds 0.75 in (1.9 cm), for a finished ornament of 7 in x 7.25 in (17.8 cm x 18.4 cm). Check your first star and count your 15 free tips, and the tree will come out right.
Happy crocheting!