

This little tree ornament is a flat triangle worked in soft powder-blue cotton. Rows of small square “windows” climb up the tree, a solid band sits across the base, and fringe plus a chunky tassel trunk hang below. A plain wooden star sits on the top point.
The look is calm Scandinavian-boho: one color, natural wood, and a clear texture of solid and open rows. It works on a real tree, a gift package, or a door knob.
The pattern uses US crochet terms. The finished tree body, including the border, is about 5.5 in (14.0 cm) wide and 5.8 in (14.7 cm) tall. With the tassel, the ornament measures about 8.8 in (22.4 cm) from the top point to the tassel tip, not counting the star.
You work the tree from the top point down in turned rows, adding one stitch at each edge on every row. Solid double crochet rows alternate with mesh rows. Two single crochet rows make the base band. A border round and a reverse single crochet round neaten all three sides. Last, you add the fringe, the tassel, and the star.
Finished Size and Construction
- Finished size: 5.5 in (14.0 cm) wide x 5.8 in (14.7 cm) tall, plus a 3 in (7.6 cm) tassel
- Skill level: Easy / advanced beginner
- Terminology: US crochet terms
- Yarn weight: DK / light worsted (#3), cotton or cotton blend
- Hook: 3.5 mm (E-4)
- Number of pieces: 1 (single flat triangle)
- Layout: One triangle, point up, worked top-down in rows
- Piece size before border: 5.1 in (13.0 cm) wide x 5.4 in (13.7 cm) tall
- Border depth: about 0.2 in (0.5 cm) on each side
Materials
Yarn: Use a smooth, tightly twisted cotton in DK or light worsted weight. Cotton holds the triangle’s shape well, and it brushes out into soft fringe and tassel strands. Avoid fuzzy acrylic, which blurs the windows.
- Powder Blue (light sky blue): 20 g, about 42 m (46 yd)
This covers the body, border, 12 fringe bundles, and the tassel. The quantity includes a safety margin of about 25% for gauge differences and trimming.
Tools:
- 3.5 mm (E-4) crochet hook
- Wooden star cutout, about 2 in (5.1 cm), with a small hole at its top point
- Tapestry needle
- Sharp scissors
- Stiff card, 3.5 in (8.9 cm) tall, for the tassel
- Fine-toothed comb or pet brush, for brushing out fringe (optional)
- Blocking mat and rust-proof pins
- Spray bottle with water
Abbreviations (US Terms)
- ch – chain
- sl st – slip stitch
- sc – single crochet
- dc – double crochet
- sk – skip
- sp – space
- st(s) – stitch(es)
- RS – right side
- rsc – reverse single crochet (crab stitch)
Special stitch – reverse single crochet (rsc): Work from left to right (right-handed). Insert the hook into the next stitch to the right, yarn over, pull up a loop, then yarn over and pull through both loops. This makes a twisted, beaded edge.
Turning chain note: In the dc rows, ch 3 at the start of a row counts as the first dc. In the sc rows, ch 1 does not count as a stitch.
Gauge and Checkpoints
Gauge: 18 dc and 9 dc rows = 4 in (10.2 cm). That means each dc is about 0.22 in (0.6 cm) wide and each dc row is about 0.44 in (1.1 cm) tall. Each sc row is about 0.25 in (0.6 cm) tall.
Since the ornament is small, the triangle itself is your gauge swatch. Make the first 5 rows and measure before you go on.
Checkpoint 1 – after Row 5 (11 sts): The bottom edge should be about 2.4 in (6.1 cm) wide. The triangle should be about 2.2 in (5.6 cm) tall.
Checkpoint 2 – after Row 11 (23 sts): The bottom edge should be about 5.1 in (13.0 cm) wide. The triangle should be about 4.9 in (12.4 cm) tall.
Checkpoint 3 – after Row 13: The piece should measure 5.1 in (13.0 cm) wide x 5.4 in (13.7 cm) tall.
Checkpoint 4 – after the border: The piece should measure 5.5 in (14.0 cm) wide x 5.8 in (14.7 cm) tall.
If your piece is too big, change to a 3.25 mm (D-3) hook. If it is too small, change to a 3.75 mm (F-5) hook. If the width is right but the triangle looks stretched tall, your dc are loose in height. Pull each loop snugly before you finish the stitch. Width and height should stay about equal at every checkpoint.
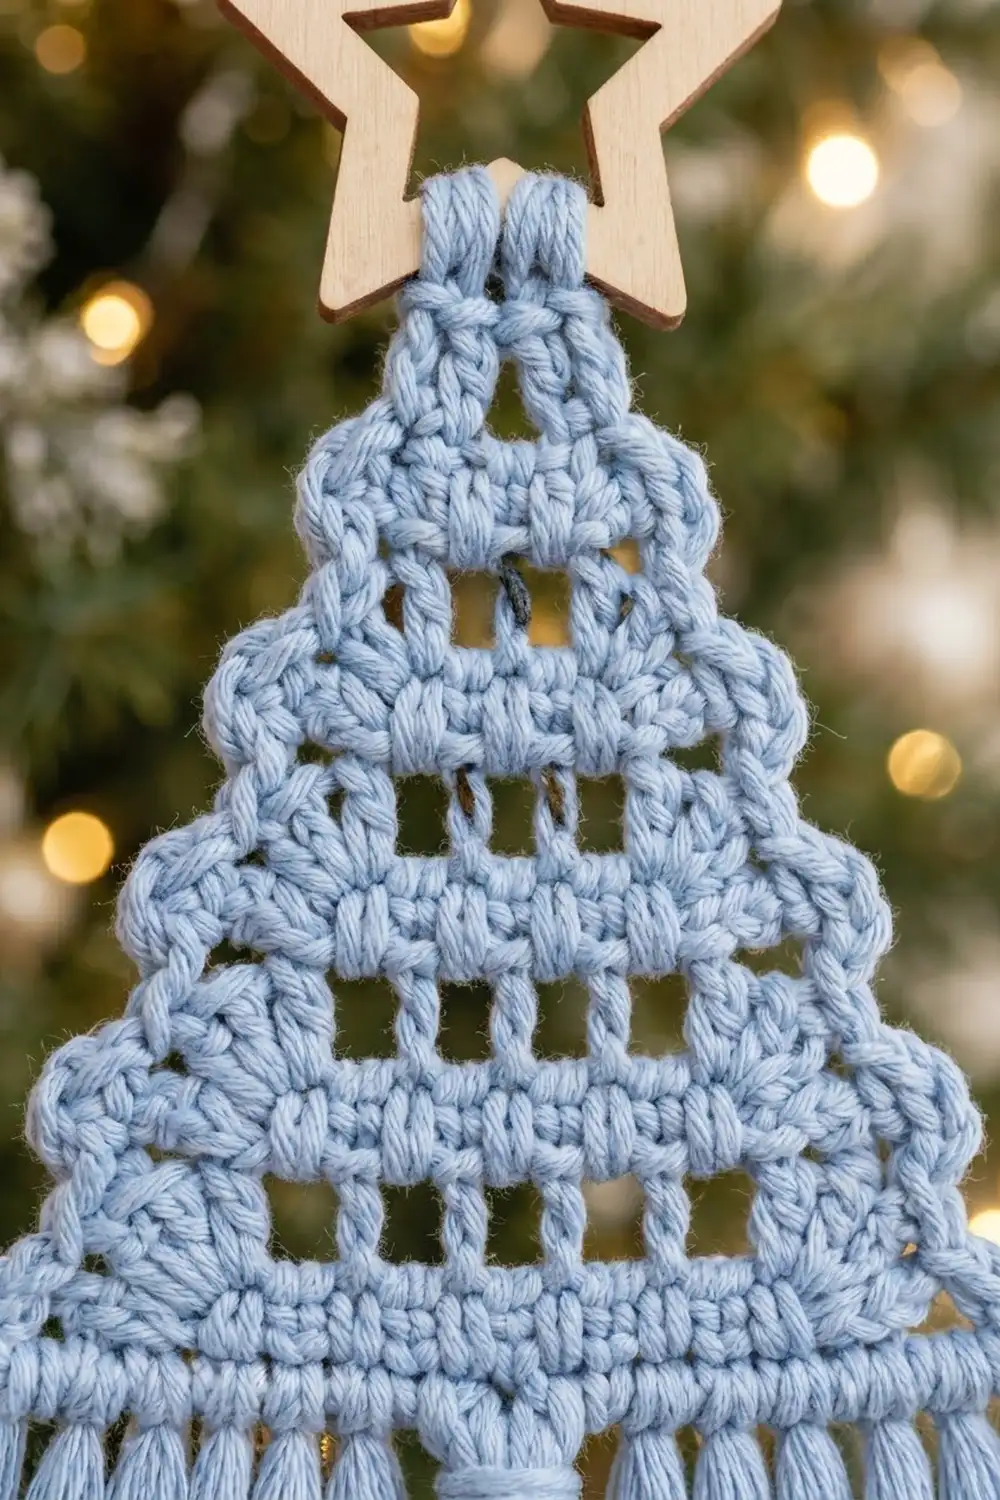
Tree Body
The tree is worked in turned rows from the top point down. On every row, you work 2 dc into the first stitch and 2 dc into the last stitch. Each row gains 2 stitches, which gives straight, even sides.
Row 1 (RS, solid): Ch 4. Work 2 dc in the 4th ch from the hook. The skipped ch count as a dc. Turn. (3 sts)
Row 2 (mesh): Ch 3 (counts as dc), dc in the same st, ch 1, sk next st, 2 dc in the last st (top of the turning ch). Turn. (5 sts: 4 dc + 1 ch-1 sp; 1 window)
Row 3 (solid): Ch 3, dc in the same st, dc in each st and each ch-1 sp across to the last st, 2 dc in the last st. Turn. (7 sts)
Row 4 (mesh): Ch 3, dc in the same st, ch 1, sk next st, dc in next st; repeat from * once more, ch 1, sk next st, 2 dc in the last st. Turn. (9 sts; 3 windows)
Row 5 (solid): Work as Row 3. (11 sts)
Checkpoint 1: measure now.
Row 6 (mesh): Ch 3, dc in the same st, ch 1, sk next st, dc in next st; repeat from * 3 more times (4 repeats total), ch 1, sk next st, 2 dc in the last st. Turn. (13 sts; 5 windows)
Row 7 (solid): Work as Row 3. (15 sts)
Row 8 (mesh): Ch 3, dc in the same st, ch 1, sk next st, dc in next st; repeat from * 5 more times (6 repeats total), ch 1, sk next st, 2 dc in the last st. Turn. (17 sts; 7 windows)
Row 9 (solid): Work as Row 3. (19 sts)
Row 10 (mesh): Ch 3, dc in the same st, ch 1, sk next st, dc in next st; repeat from * 7 more times (8 repeats total), ch 1, sk next st, 2 dc in the last st. Turn. (21 sts; 9 windows)
Row 11 (solid): Work as Row 3. Turn. (23 sts)
Checkpoint 2: measure now.
Mesh row logic: A mesh row worked over a row of k stitches has (k − 3) ÷ 2 repeats, plus one final ch-1 window. That gives (k − 1) ÷ 2 windows and k + 2 stitches. Check: Row 10 is worked over 19 sts, so it has 8 repeats, 9 windows, and 21 sts.
Base Band
These two rows have no increases. They make the firm, ridged band across the bottom of the tree.
Row 12: Ch 1 (does not count as a st), sc in each st across. Turn. (23 sc)
Row 13: Ch 1, sc in the back loop only of each st across. (23 sc) Do not fasten off.
Checkpoint 3: measure now.
Border
Border gauge: One dc row-end is about as tall as two sc. Work 2 sc into each dc row-end and 1 sc into each sc row-end. This keeps the sides flat, so they don’t ruffle or pull in.
Round 1 (RS): Turn so the RS faces you. Ch 1. Work 3 sc in the first st of Row 13 (bottom corner), sc in each of the next 21 sts, 3 sc in the last st (bottom corner). Rotate to work up the slanted side. Work 1 sc in each of the 2 sc row-ends, then 2 sc in each of the 11 dc row-ends (24 sc). Work 3 sc into the ch-4 foundation at the tip (top corner). Work down the other side: 2 sc in each of the 11 dc row-ends, then 1 sc in each of the 2 sc row-ends (24 sc). Sl st to the first sc. (78 sc)
Per-side counts for Round 1: The corner stitch is the center sc of each 3-sc group.
- Bottom side: 25 sts, corner to corner (1 corner + 1 + 21 + 1 + 1 corner)
- Each slanted side: 28 sts, corner to corner (1 corner + 1 + 24 + 1 + 1 corner)
- Total: 25 + 28 + 28 = 81. Subtract 3, because each corner is shared by two sides: 81 − 3 = 78 ✓
Round 2: Ch 1. Do not turn. Work rsc in each st around. Sl st to the first rsc. Fasten off. (78 rsc)
Why the math works: Round 1 places exactly 1 sc for each sc row-end and 2 sc for each dc row-end. The sides grow exactly as tall as the body, so they lie flat. The 3-sc groups add the extra length the corners need to turn. Round 2 works 1 rsc in each of the 78 sts, so the count stays the same and the edge gets its beaded texture. Each border round adds about 0.1 in (0.3 cm), so the total depth is 0.2 in (0.5 cm) on each side. The width becomes 5.1 + 0.4 = 5.5 in (14.0 cm). The height becomes 5.4 + 0.4 = 5.8 in (14.7 cm).
Checkpoint 4: measure now.
Fringe, Tassel, and Star
Fringe: Cut 36 strands, each 5 in (12.7 cm) long. Hold 3 strands together and fold them in half. Number the 25 bottom-edge sts of Round 1 from corner to corner (st 1 and st 25 are the corner stitches). Insert the hook from front to back under both loops of st 1, below the rsc edge. Pull the folded loop through, then pull the ends through the loop to make a lark’s-head knot. Repeat in sts 3, 5, 7, 9, and 11, and in sts 15, 17, 19, 21, 23, and 25. That makes 12 bundles: 6 on each side, with sts 12–14 left open for the tassel.
Tassel trunk: Wrap yarn 30 times around the 3.5 in (8.9 cm) card. Slide a 10 in (25.4 cm) tie strand under the wraps at the top edge. Thread both tie ends through st 13 (center bottom) and knot them securely at the back. Cut the wraps open along the bottom edge. Wrap a separate strand tightly about 0.5 in (1.3 cm) below the top, 8 to 10 times, to form the neck. Knot it, and hide the ends inside the tassel.
Trimming: Brush out the fringe and tassel strands if you like. Trim the fringe straight across to 2 in (5.1 cm) below the edge. Trim the tassel to 3 in (7.6 cm).
Star: Join yarn at the tip, in the center sc of the top 3-sc group. Ch 8, pass the chain up through the star’s center cutout, and sl st back into the same tip st. Fasten off. Cut an 8 in (20.3 cm) strand. Thread it through the hole at the star’s top point and knot the ends together to make the hanging loop.
Final Blocking
- Weave in all body ends before you block. Leave the fringe and tassel loose.
- Lightly mist the ornament until it is damp, not soaked.
- Lay it flat, RS up, on the blocking mat.
- Pin the three corners first. Make the bottom edge 5.5 in (14.0 cm) wide and the height 5.8 in (14.7 cm).
- Pin along each slanted side so the edges are perfectly straight.
- Use a pin tip to open each window into a neat square.
- Comb the fringe and tassel straight down. Mist them lightly.
- Let it dry completely, then unpin. Re-trim any strands that look uneven.
Final Quality-Control Checklist
- Row counts run 3, 5, 7, 9, 11, 13, 15, 17, 19, 21, 23, then 23 and 23 sc.
- Mesh rows show 1, 3, 5, 7, and 9 windows.
- The windows line up in neat vertical columns.
- Both slanted sides are straight and the same length.
- Border Round 1 has 78 sc: 25 on the bottom and 28 on each slanted side, counting corners.
- The rsc edge is even all the way around.
- There are 12 fringe bundles, 6 on each side, with an even gap for the tassel.
- The tassel is centered on st 13 and has a firm neck.
- The star hangs straight and doesn’t spin the tree sideways.
- The final size is 5.5 in (14.0 cm) x 5.8 in (14.7 cm).
Troubleshooting
The sides are wavy: You may have worked too many sc into the row-ends. Work exactly 2 sc per dc row-end and 1 sc per sc row-end.
The sides curl inward: The border is too tight. Go up one hook size for Round 1 only.
The windows are uneven or slanted: Check that you skip exactly one stitch under each ch-1. Also check that the stitch above each window goes into a dc, not into a ch-sp.
The stitch count is off: Make sure you work the last 2 dc into the top of the turning ch. Missing it loses 2 sts per row.
The tip has a gap: Pull the beginning tail to snug the ch-4 before you work the border.
The tree leans when hung: Check that the tip loop is centered. Block again if needed.
The fringe is frizzy: Mist it, comb it, let it dry, then trim.
Care
Hand wash in cool water with a mild soap, then press out the water in a towel. Reshape and dry flat. Don’t wet the wooden star.

Final Notes
Here is the measurement chain from start to finish:
- Gauge: 18 dc and 9 rows = 4 in (10.2 cm)
- Row 5: 11 sts, 2.4 in (6.1 cm) wide
- Row 11: 23 sts, 5.1 in (13.0 cm) wide
- Row 13: body measures 5.1 in (13.0 cm) x 5.4 in (13.7 cm)
- Border: 78 sts, finished size 5.5 in (14.0 cm) x 5.8 in (14.7 cm)
- Trims: 2 in (5.1 cm) fringe and a 3 in (7.6 cm) tassel
If you check each step against this chain, every tree you make will come out the same size, so a whole branch of them will match.
Happy crocheting!