

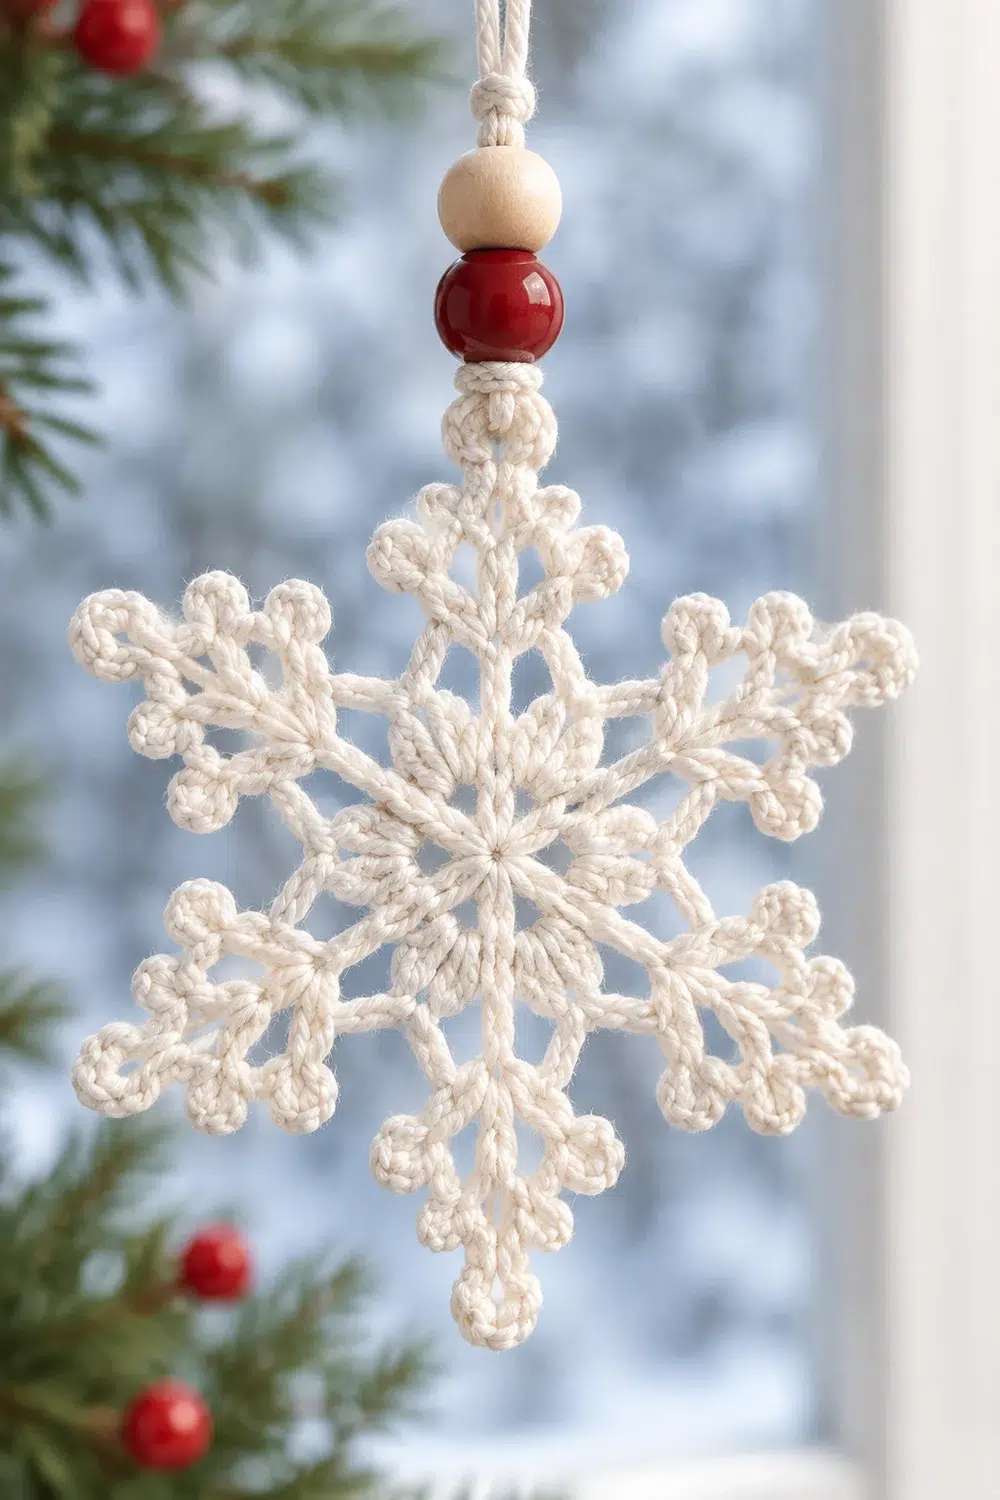
This lacy snowflake ornament has six pointed arms radiating from a solid hexagonal core. Each arm ends in a three-picot trefoil, with two small branches halfway along. It is worked in cream cotton thread and hangs from a cream cord threaded with a natural tan wooden bead and a red bead. The look is simple and calm, and it suits a frosty window.
The pattern uses US crochet terms throughout. The finished ornament measures 3.5 in (8.9 cm) from point to point after stiffening and blocking.
The snowflake is a single piece worked in the round. Rounds 1–3 build the hexagonal core. Round 4 adds a ring of chain loops. Round 5 is the outer edging round: it fills the loops with single crochet and builds the six arms and six small valley spikes as you go. Finish by stiffening, blocking flat, and adding the beaded hanging cord.
One ornament takes about an hour, so it is easy to make several to hang at different heights in a window.
Finished Size and Construction
- Finished size: 3.5 in (8.9 cm) point to point
- Skill level: Easy-intermediate (chain work and picots)
- Terminology: US crochet terms
- Yarn weight: Size 3 cotton crochet thread (#1 super fine)
- Hook: 2.25 mm (US B-1)
- Number of pieces: 1
- Layout: Single six-pointed motif, worked in the round
- Piece size: 3.5 in (8.9 cm) point to point
- Size before border (after Round 4): 2 in (5.1 cm) across
- Border depth (Round 5 arms): 0.75 in (1.9 cm) beyond Round 4 on each side
The math: 2 in + 0.75 in + 0.75 in = 3.5 in (5.1 cm + 1.9 cm + 1.9 cm = 8.9 cm).
Materials
Yarn advice: Use mercerized cotton thread. It holds a crisp shape after stiffening, shows the picots clearly, and does not fuzz. Avoid acrylic, which resists stiffening and can melt under a hot iron.
- Cream / off-white cotton thread, size 3: 4 g (about 11 m / 12 yd)
- Cream cotton cord or twine, 1–1.5 mm thick: 14 in (35.6 cm) for the hanger
Tools and notions:
- 2.25 mm (US B-1) crochet hook
- Fine tapestry needle
- Small sharp scissors
- 1 natural tan wooden bead, about 10 mm, with a 3–4 mm hole
- 1 red glass or wooden bead, about 10 mm, with a 3–4 mm hole
- Fabric stiffener (or a 1:1 white glue and water mix)
- Foam blocking board or corkboard, covered in plastic wrap
- Rustproof pins
- Ruler or tape measure
Quantities include a margin of about 25% for swatching, weaving in, and small mistakes.
Abbreviations (US Terms)
- ch – chain
- sl st – slip stitch
- sc – single crochet
- dc – double crochet
- sp – space
- st(s) – stitch(es)
- beg – beginning
Special stitches:
- Picot: Ch 3, sl st in 3rd ch from hook.
- Picot cluster (pcl): [Picot] 3 times. Then sl st in the chain stitch made just before the first picot. This pulls the three picots into a trefoil.
- Branch (br): Ch 4, sl st in 3rd ch from hook, ch 1, sl st in the same stitch the branch started from.
Gauge and Checkpoints
There is no separate swatch. The first snowflake is your test piece. Measure it flat and unstretched after each checkpoint round, before blocking. A tolerance of ±1/8 in (0.3 cm) is fine.
| After round | Measurement across |
|---|---|
| Round 1 | 0.6 in (1.5 cm) |
| Round 2 | 1 in (2.5 cm) |
| Round 3 | 1.6 in (4.1 cm), tip to opposite tip |
| Round 4 | 2 in (5.1 cm), tip loop to opposite tip loop |
| Round 5 (blocked) | 3.5 in (8.9 cm), trefoil to opposite trefoil |
If Round 2 is too big: Go down to a 2.0 mm hook, or tighten your chains.
If Round 2 is too small: Go up to a 2.5 mm hook.
Check again at Round 4. If you match there, the arms will land at 3.5 in (8.9 cm). The arm chains are a fixed length, and each one adds 0.75 in (1.9 cm).
Pattern: The Hexagonal Core
Round 1: Make a magic ring. Ch 3 (counts as dc), work 11 dc in the ring. Sl st to the top of beg ch-3. Pull the ring fully closed.
(12 dc)
Round 2: Ch 3 (counts as dc), dc in next dc, ch 3. Dc in next 2 dc, ch 3. Repeat from * 4 more times. Sl st to the top of beg ch-3.
(12 dc and 6 ch-3 sps, forming a hexagon)
Round 2 does not add new dc. It spaces the 12 dc into 6 pairs, with a chain corner between each pair.
Round 3: Sl st in next dc, then sl st into the next ch-3 sp. Ch 3 (counts as dc), work (2 dc, ch 2, 3 dc) in the same sp. Ch 1, skip next 2 dc, work (3 dc, ch 2, 3 dc) in next ch-3 sp. Repeat from * 4 more times. Ch 1, sl st to the top of beg ch-3.
(36 dc, 6 ch-2 tip sps, 6 ch-1 valley sps)
This is a growth round. The complete count is 6 shells × 6 dc = 36 dc. Each ch-2 tip marks where an arm will grow.
Checkpoint: 1.6 in (4.1 cm) from tip to opposite tip.
Pattern: The Loop Ring
Round 4: Sl st in next 2 dc, then sl st into the ch-2 tip sp. Ch 1, sc in the same sp. This is the first tip sc.
Ch 4, sc in next ch-1 sp (valley sc), ch 4, sc in next ch-2 sp (tip sc). Repeat from * 4 more times.
Ch 4, sc in next ch-1 sp, ch 4. Sl st to the first sc.
(12 sc: 6 tip sc and 6 valley sc; 12 ch-4 loops)
Checkpoint: 2 in (5.1 cm) across. This is your “size before border.”
Keep the ch-4 loops relaxed. If they are pulled tight, the core will cup.
Border: Round 5 (Edging, Arms, and Spikes)
Round 5 is the outer edging. It is a conversion round: it works into every existing sc and fills every loop. Arms are added at the tip sc, and spikes at the valley sc.
Border gauge: 4 sc per ch-4 loop, the same thread and hook as the core.
Arm instructions (worked from a tip sc):
- Ch 8. These chains are the spine.
- Work a pcl at the top. Finish with a sl st in the 8th ch of the spine, the last ch made before the picots.
- Sl st down the spine in the next 4 ch (spine chains 7, 6, 5, and 4).
- In spine chain 4, work a br twice. Lay one branch on each side.
- Sl st in the next 3 ch (spine chains 3, 2, and 1).
- Sl st in the same tip sc.
Work the slip stitches into the back bump of each chain. This keeps the spine round and firm.
Spike instructions (worked from a valley sc): Work 1 br, ending with the sl st in the same valley sc.
Round 5: You are joined into a tip sc. Ch 1, sc in the same sc, then work an Arm.
4 sc in next ch-4 loop, sc in valley sc, work a Spike. 4 sc in next ch-4 loop, sc in next tip sc, work an Arm. Repeat from * 4 more times.
4 sc in next ch-4 loop, sc in valley sc, work a Spike. 4 sc in last ch-4 loop. Sl st to the first sc. Fasten off, leaving a 6 in (15.2 cm) tail.
Counts per side (one-sixth of the snowflake, tip to tip):
- 1 tip sc + 4 sc + 1 valley sc + 4 sc = 10 sc
- 1 Arm
- 1 Spike
Total: 60 sc, 6 Arms, 6 Spikes.
Why the math works: Round 4 has 12 sc and 12 ch-4 loops. Round 5 places 1 sc in each existing sc (12) plus 4 sc in each loop (12 × 4 = 48), for 12 + 48 = 60 sc.
Sixty divides evenly by 6, so each side gets exactly 10 sc. Four sc fill a ch-4 loop without ruffling or pulling, so the edge lies flat.
The Arms and Spikes are chain structures that start and end in the same sc. They add no stitches to the sc count.
Checkpoint (before blocking): About 3.25–3.5 in (8.3–8.9 cm) point to point. Blocking opens the arms to the full 3.5 in (8.9 cm).
Weaving in: Weave the end tail and the magic-ring tail into the back of the sc and dc. Trim close.
Final Blocking
- Draw a 3.5 in (8.9 cm) circle on paper. Mark six points 60 degrees apart. Slip it under the plastic wrap on your board.
- Soak the snowflake in fabric stiffener. Squeeze out the excess and blot with a towel. No liquid should sit in the openwork.
- Lay the snowflake right side up over the template, with one arm at the top.
- Pin the center of each trefoil to a mark. Pin opposite arms in pairs (top/bottom, then the diagonals) so the shape stays even.
- Pin out each picot in the trefoils, and pin each branch at a slight angle away from its spine.
- Pin each Spike straight outward between the arms.
- Check that the core lies flat and is centered.
- Let it dry completely, at least 12 hours. Unpin it and check the size: 3.5 in (8.9 cm) point to point.
Adding the Hanger
- Fold the 14 in (35.6 cm) cord in half.
- Push the fold through the gap just below the top trefoil. Pass both ends through the fold to make a lark’s head knot. Snug it against the arm.
- Thread both ends through the tan wooden bead, then the red bead.
- Slide the two-bead cluster down to about 1 in (2.5 cm) above the snowflake’s top point. Tie an overhand knot just below the tan bead to hold it.
- Tie the cord ends together in an overhand knot at the top to make a hanging loop. Trim the ends.
Final Quality-Control Checklist
- Point to point is 3.5 in (8.9 cm) across all three arm pairs.
- All six arms are the same length.
- Each trefoil has three distinct picots.
- Each arm has two branches at its midpoint, one on each side.
- There are six Spikes, one centered between each pair of arms.
- The core lies flat with no cupping or ruffling.
- The snowflake is stiff and holds its shape when held by one point.
- All tails are woven in and invisible from the front.
- The beads sit about 1 in (2.5 cm) above the top point, with the cord hanging straight.
Troubleshooting
The core cups or curls: The Round 4 chains are too tight. Redo them more loosely, or go up a hook size for Round 4 only.
The edge ruffles: Check that you worked exactly 4 sc per loop. Five will cause waves.
One arm is shorter than the others: Recount the spine. Each one needs exactly 8 ch.
The trefoil looks floppy: The closing sl st went into the wrong chain. Work it into the spine’s 8th ch, just below the first picot.
The branches are hard to find: You worked the sl sts into the wrong spine chain. Count down exactly 4 sl sts before working the branches.
The snowflake goes limp after drying: Re-soak in a stronger stiffener, or apply a second coat, and re-pin.
The ornament hangs crooked: Re-center the lark’s head knot over the top trefoil.
Care
Dust gently with a soft brush or a hair dryer on the cool setting. If it gets wet, re-stiffen and re-block it on the template.

Final Notes
The measurement chain is short and reliable:
- Round 2 measures 1 in (2.5 cm).
- Round 3 measures 1.6 in (4.1 cm).
- Round 4 measures 2 in (5.1 cm).
- Round 5 adds a 0.75 in (1.9 cm) arm on each side, for a blocked 3.5 in (8.9 cm) snowflake.
If you hit the Round 4 checkpoint, the rest takes care of itself. Optional: make several ornaments and hang them at different heights in one window.
Happy crocheting!