

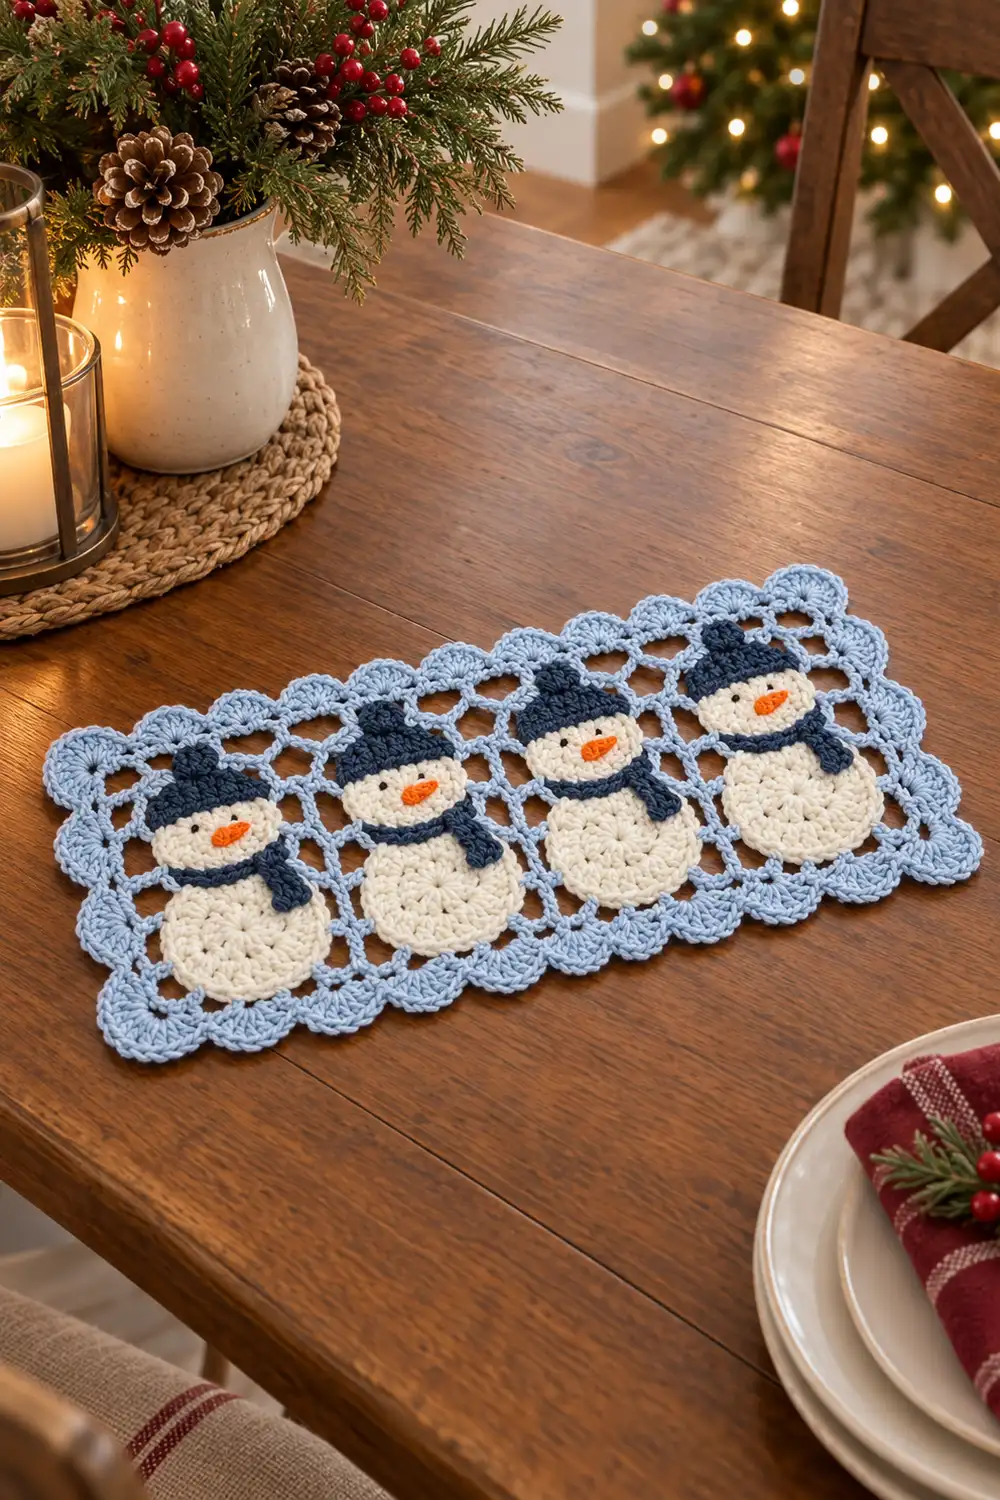
This cheerful holiday strip features four little snowmen standing in a row. Each one sits on a light blue open lattice panel, and the panels are joined into one long rectangle finished with a lacy shell-and-picot border.
The palette is soft and wintry. The snowballs are cream, the hats and scarves are navy, the carrot noses are orange, and the lattice and scalloped trim are light blue. Each snowman is built from two stacked popcorn-stitch snowballs and wears a rounded dome hat with a folded brim and a tiny pom-pom. A navy scarf wraps the neck.
The pattern uses US crochet terms. The finished strip measures 12 in x 5 in (30.5 cm x 12.7 cm). It works well as a small table runner, a mantel accent, or a wall hanging.
You will make four lattice blocks, sew a snowman appliqué onto each, join the four blocks side by side into a single strip, and then work a two-round shell border around the whole piece. Each stage has a measurement checkpoint, so you can catch problems early.
Finished Size and Construction
- Finished size: 12 in x 5 in (30.5 cm x 12.7 cm)
- Skill level: Easy-intermediate
- Terminology: US crochet terms
- Yarn weight: Worsted-weight cotton (#4)
- Hook: 4.0 mm (G-6)
- Number of pieces: 4 snowman motifs (each one lattice block plus small appliqué parts), joined into one strip
- Layout: 1 row of 4 motifs
- Single block size: 2.75 in x 4 in (7.0 cm x 10.2 cm)
- Size before border: 11 in x 4 in (27.9 cm x 10.2 cm)
- Border depth: 0.5 in (1.3 cm) on every side
Materials
Use a smooth, mercerized or combed worsted-weight cotton. Cotton gives crisp stitch definition, so the popcorns and scallops stay sharp. These amounts assume about 85 m per 50 g.
- Light blue (lattice and border): 35 g, about 60 m
- Cream (snowballs): 20 g, about 34 m
- Navy (hats, pom-poms, scarves, eyes): 10 g, about 17 m
- Orange (noses): 3 g, about 5 m
All quantities include a small safety margin.
Tools:
– 4.0 mm (G-6) crochet hook
– Tapestry needle
– Stitch markers
– Rust-proof pins
– Blocking mat or folded towel
– Spray bottle
– Scissors
– Ruler or tape measure
Abbreviations (US Terms)
- ch: chain
- sl st: slip stitch
- sc: single crochet
- dc: double crochet
- sc2tog: single crochet 2 together
- MR: magic ring
- BLO / FLO: back loop only / front loop only
- sp: space
- st(s): stitch(es)
- inc: 2 sc in the same st
Special stitches:
- Popcorn (pc): Work 4 dc in the indicated st or ring. Remove the hook from the loop. Insert the hook front to back into the first dc of the group, pick up the dropped loop, and pull it through.
- Beginning popcorn (beg pc): Ch 3 (counts as the first dc), then work 3 dc. Finish as for a popcorn, inserting the hook into the top of the ch-3.
- Picot: Ch 3, then sl st in the 3rd ch from the hook.
- Shell: (2 dc, picot, 2 dc) in the same st.
- Corner shell: (3 dc, picot, 3 dc) in the same corner sp.
Gauge and Checkpoints
Gauge: 4 sc = 1 in (2.5 cm). The lattice mesh measures 4 squares x 6 rows = 2.25 in x 3.5 in (5.7 cm x 8.9 cm).
Make one complete motif before you make the rest. Check these measurements as you go:
- Lattice mesh after Row 6: 2.25 in x 3.5 in (5.7 cm x 8.9 cm)
- Block after the edging round: 2.75 in x 4 in (7.0 cm x 10.2 cm)
- Head: 1.5 in (3.8 cm) across
- Body: 2 in (5.1 cm) across
- Hat, flattened: 1.5 in (3.8 cm) wide x 1 in (2.5 cm) tall
If your block is too big, go down to a 3.75 mm hook. If it is too small, go up to a 4.5 mm hook. Change your hook rather than your stitch counts, because the border math depends on the counts staying exactly as written.
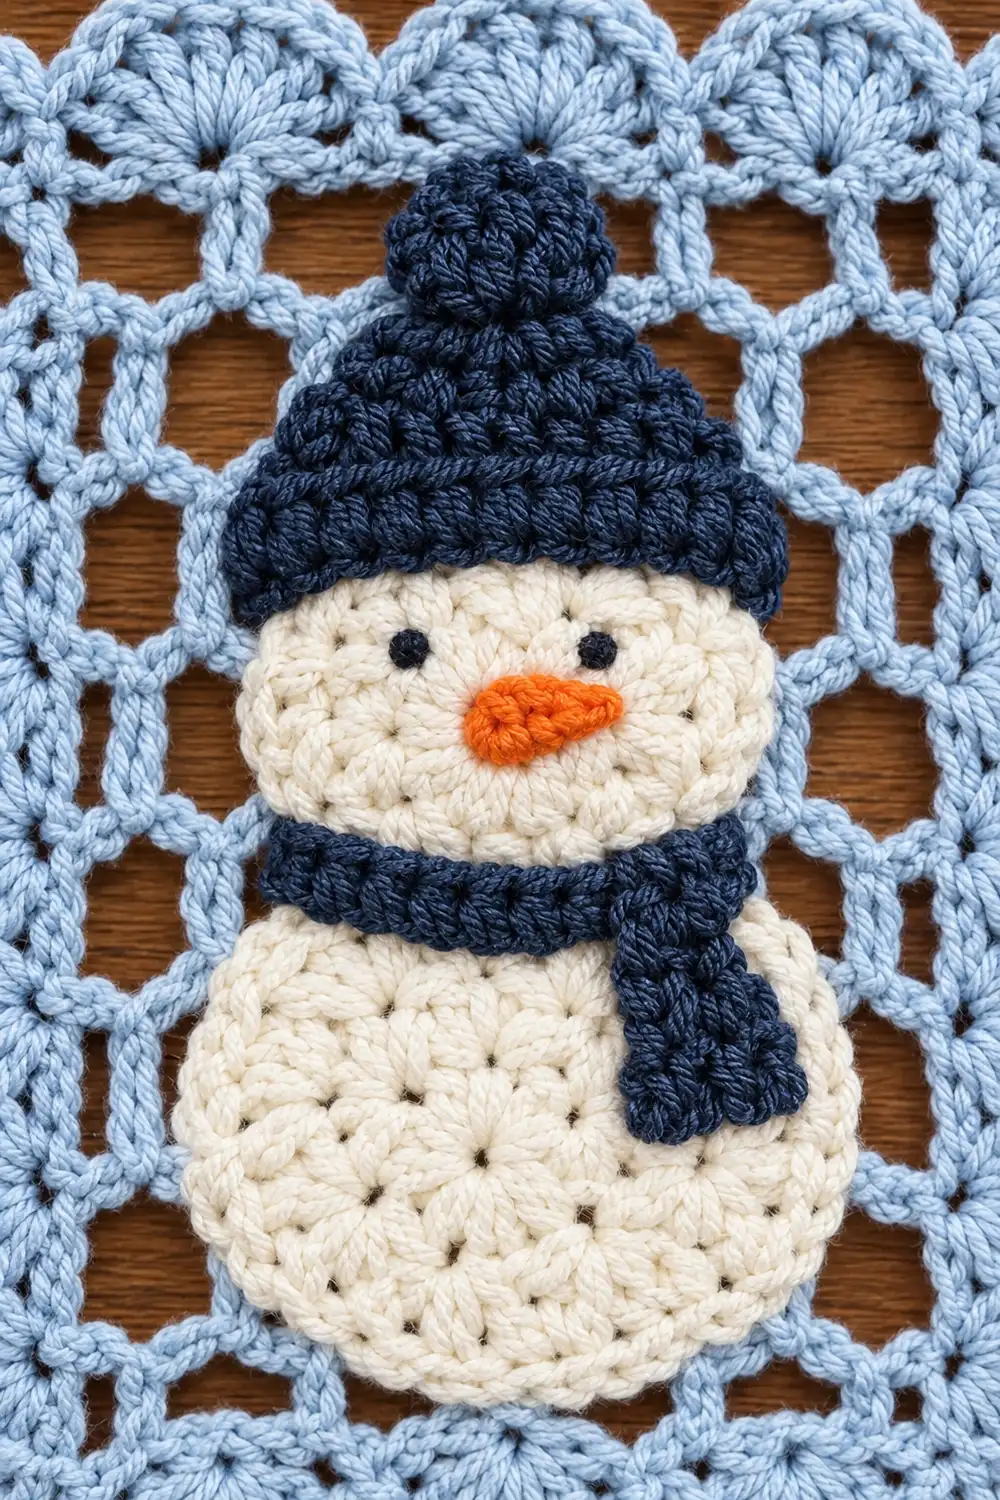
Lattice Block (Light Blue, Make 4)
Ch 12.
Row 1: Dc in the 6th ch from the hook. The skipped chs count as a dc and a ch-1 sp. Then work (ch 1, skip 1 ch, dc in next ch) 3 times. Turn.
Count: 5 dc and 4 ch-1 sps = 9 sts, forming 4 mesh squares.
Rows 2–6: Ch 4 (counts as dc and ch 1). Skip the first ch-1 sp, dc in the next dc. Work (ch 1, dc in next dc) 2 times. Ch 1, dc in the top of the turning chain. Turn.
Count per row: 9 sts.
Checkpoint: 2.25 in x 3.5 in (5.7 cm x 8.9 cm).
Edging round: Do not fasten off. Ch 1 and work around all four sides as follows. Count each dc and each ch-1 sp as one st.
- Top: 3 sc in the first st (corner), sc in the next 7 sts, 3 sc in the last st (corner).
- Side: 2 sc in each of the 6 row-ends.
- Bottom: Work across the 9 foundation sts: 3 sc in the first st (corner), sc in the next 7 sts, 3 sc in the last st (corner).
- Side: 2 sc in each of the 6 row-ends.
- Join with a sl st to the first sc. Fasten off.
This is a conversion round. Stitches worked one per existing st or space: 9 (top) + 9 (bottom) + 12 + 12 (row-ends) = 42. Extra stitches added: 2 at each of 4 corners = 8. Total: 50 sc.
Per-side counts, including both corner stitches:
– Top and bottom: 11 sc (corner, 1, 7, 1, corner)
– Each side: 16 sc (corner, 1, 12, 1, corner)
– Check: 11 + 11 + 16 + 16 − 4 shared corners = 50
Checkpoint: 2.75 in x 4 in (7.0 cm x 10.2 cm).
Snowman Head (Cream)
Rnd 1: In the MR, work beg pc, ch 1. Then work (pc, ch 1) 5 times. Join with a sl st to the top of the beg pc.
Count: 6 popcorns, 6 ch-1 sps.
Rnd 2: Ch 1. Work (sc in pc, 2 sc in ch-1 sp) 6 times. Join.
Count: 18 sc.
Fasten off and leave a 12 in (30.5 cm) tail. Checkpoint: 1.5 in (3.8 cm) across.
Snowman Body (Cream)
Rnd 1: In the MR, work beg pc, ch 1. Then work (pc, ch 1) 7 times. Join.
Count: 8 popcorns, 8 ch-1 sps.
Rnd 2: Ch 1. Work (sc in pc, 2 sc in ch-1 sp) 8 times. Join.
Count: 24 sc.
Fasten off and leave a 12 in (30.5 cm) tail. Checkpoint: 2 in (5.1 cm) across.
The puffy popcorn centers give each snowball a rounded, three-dimensional look.
Hat (Navy)
The hat is a rounded dome, worked amigurumi-style in continuous rounds. Mark the first st of each round.
- Rnd 1: 6 sc in the MR. (6 sc)
- Rnd 2: Inc in each st around. (12 sc)
- Rnd 3: Sc in BLO of each st around. (12 sc) This creates a textured ridge across the crown.
- Rnd 4: Sc in each st around. (12 sc)
- Rnd 5: Sc in FLO of each st around. (12 sc) The unused back loops become the fold line.
- Rnd 6: Sc in each st around. (12 sc)
Sl st to the next st and fasten off. Fold Rnds 5–6 upward and outward to form the cuff.
Checkpoint: flattened, the hat measures 1.5 in (3.8 cm) wide x 1 in (2.5 cm) tall. The dome shape comes from increasing in Rnds 1–2 and then working even, so the crown curves naturally instead of tapering to a point.
Pom-Pom (Navy)
- Rnd 1: 6 sc in the MR. (6 sc)
- Rnd 2: Sc2tog 3 times. (3 sc)
Fasten off. Tuck the yarn tails inside to fill the pom-pom and close it tightly. It measures about 0.4 in (1.0 cm).
Scarf (Navy)
- Band: Ch 8. Sc in the 2nd ch from the hook and in each ch across. (7 sc) The band is 1.75 in (4.4 cm) long.
- Tail: Ch 6. Sc in the 2nd ch from the hook and in each ch across. (5 sc) The tail is 1.25 in (3.2 cm) long.
Carrot Nose (Orange)
- Row 1: Ch 4. Sc in the 2nd ch from the hook and in the next 2 chs. Turn. (3 sc)
- Row 2: Ch 1, sc2tog, sc in the last st. Turn. (2 sc)
- Row 3: Ch 1, sc2tog. (1 sc)
Fasten off. The nose is a small triangle, about 0.75 in (1.9 cm) long.
Assemble Each Motif
- Pin the body to the lower part of the block. Leave about 0.25 in (0.6 cm) of lattice showing below it.
- Overlap the head onto the top of the body by 0.25 in (0.6 cm).
- Whipstitch both snowballs to the lattice, working through the outer loops of Rnd 2.
- Sew the hat over the top 0.75 in (1.9 cm) of the head, with the cuff facing forward. Sew the pom-pom to the crown.
- Sew the scarf band across the seam between the head and body. Attach the tail so it hangs from one end.
- Sew the nose to the center of the face, with the point angled to one side.
- Embroider two navy French knots for the eyes. Dark navy reads as black.
The snowman stands about 3.75 in (9.5 cm) tall from the bottom of the body to the top of the pom-pom.
Make All Pieces
Make 4 identical motifs. Each one uses:
- 1 light blue lattice block
- 1 cream head and 1 cream body
- 1 navy hat, 1 navy pom-pom, and 1 navy scarf (band and tail)
- 1 orange nose
Layout:
ROW 1: SNOWMAN SNOWMAN SNOWMAN SNOWMAN
Lay all four motifs facing the same direction, with the hats at the top.
Joining
Join the blocks with light blue using a flat whipstitch through the back loops only.
- Place two blocks side by side, right sides up, with their 16-st side edges touching.
- Whipstitch through the back loops of matching stitches. Go corner to corner, one stitch to one stitch, for all 16 sts.
- Repeat for the remaining two seams. You will have 3 seams total.
Tension: Snug each stitch just enough to close the gap. If you pull too tightly, the seam will pucker. If you work too loosely, the seam will gap. Lay the strip flat after each seam to check.
Because joining is stitch-to-stitch, no stitches are added or lost. The joined strip has these edge counts:
- Top and bottom: 4 blocks x 11 sts = 44 sts each. This includes the 2 outer corner sts. The 3 seams fall between existing block corner sts, and no extras are added.
- Each short side: 16 sts, including corners.
Checkpoint: 11 in x 4 in (27.9 cm x 10.2 cm).
Border (Light Blue)
Border gauge: The border uses the same gauge as the blocks, 4 sc = 1 in (2.5 cm). One shell repeat covers 4 sts, so each scallop is 1 in (2.5 cm) wide.
Rnd 1 (conversion round):
- Join the yarn in the 2nd st of the top edge, right after a corner.
- Sc in each st to the next outer corner st. Work (sc, ch 2) in that corner st.
- Continue the same way around all four sides.
- At the last corner, work sc, ch 1, then hdc in the first sc. The ch 1 and hdc together form the final corner space and place your hook ready for Rnd 2.
Each of the 116 edge sts is worked once. The total perimeter is 44 + 44 + 16 + 16 − 4 shared corners = 116. Count: 116 sc + 4 corner ch-2 sps. No extra sc are added.
Stitches between corner spaces:
– Top and bottom: 43 sc each (the 42 sts between the corners, plus the sc worked in the corner st just before its ch-2)
– Short sides: 15 sc each (the 14 sts between the corners, plus 1 corner sc)
– Check: 43 + 43 + 15 + 15 = 116
Rnd 2 (shells):
- Start in the current corner sp. Ch 3 (counts as dc), then work (2 dc, picot, 3 dc) in the same sp.
- Along the top: Skip 1, sc in next, then work (skip 1, shell in next, skip 1, sc in next) 10 times. Skip 1. This uses 1 + 1 + 40 + 1 = 43 sts.
- Work a corner shell in the next corner sp.
- Along the short side: Skip 1, sc in next, then work (skip 1, shell in next, skip 1, sc in next) 3 times. Skip 1. This uses 3 + 12 = 15 sts.
- Work a corner shell in the next corner sp.
- Repeat Steps 2–5 for the bottom and the second short side, omitting the final corner shell (it was made in Step 1).
- Join with a sl st to the top of the beginning ch-3. Fasten off.
Count:
– Top and bottom: 10 shells + 11 sc each
– Short sides: 3 shells + 4 sc each
– Plus 4 corner shells
– Total: 30 shells and 30 sc
Why the math works: The 4-st shell repeat needs (stitches between corners + 1) to divide evenly by 4.
- Top and bottom: 43 + 1 = 44 = 4 x 11
- Short sides: 15 + 1 = 16 = 4 x 4
These numbers are exactly the joined-strip edge counts. The (sc, ch 2) corner treatment is what keeps them aligned.
Checkpoint: 12 in x 5 in (30.5 cm x 12.7 cm).
Final Blocking
- Weave in all ends, working each one behind same-color stitches.
- Lightly mist the strip until it is damp, not soaked.
- Pin it to 12 in x 5 in (30.5 cm x 12.7 cm). Keep the edges straight with a ruler.
- Pin out each picot so the scallops open evenly.
- Gently open the lattice squares with your fingertips.
- Leave the snowballs and hat domes unpinned so they keep their puff.
- Let the strip dry completely before you remove the pins.
Final Quality-Control Checklist
- Each block measures 2.75 in x 4 in (7.0 cm x 10.2 cm)
- Each block edging has 50 sc: 11 on top and bottom, 16 on each side
- All 4 snowmen face the same way and sit evenly in their blocks
- The seams lie flat and are matched stitch-to-stitch
- Border Rnd 1 has 116 sc plus 4 corner spaces
- Border Rnd 2 has 30 shells, each with a crisp picot
- The finished strip measures 12 in x 5 in (30.5 cm x 12.7 cm)
Troubleshooting
- The block is wider than it is tall should allow: Your dc rows are short. Lengthen the yarn-overs slightly, or go up a hook size for the mesh only.
- The popcorns are not puffing: Make sure you insert the hook front to back so the popcorn pops forward.
- The hat is pointed: You may have skipped the even rounds. Rnds 3–6 must stay at 12 sc.
- The border ruffles: Your dc are too loose. Go down to a 3.75 mm hook for Rnd 2.
- The border cups inward: Your tension is too tight. Go up to a 4.5 mm hook for Rnd 2.
- A side ends with leftover stitches: Recount Rnd 1. The top and bottom must each have 43 sc between corner spaces, and the short sides must each have 15.
- The seams are bumpy: Rework them through the back loops only, with gentler tension.
Care
Hand wash in cool water with mild soap. Press out the water in a towel and dry flat, reshaping the scallops while the piece is damp.
Final Notes
The measurement chain is simple to follow:
- Lattice mesh: 2.25 in x 3.5 in (5.7 cm x 8.9 cm)
- Block with edging: 2.75 in x 4 in (7.0 cm x 10.2 cm)
- Four joined blocks: 11 in x 4 in (27.9 cm x 10.2 cm)
- Bordered strip: 12 in x 5 in (30.5 cm x 12.7 cm)
If every checkpoint matches, the border shells will land perfectly at every corner. Optional: for a longer strip, add blocks in pairs and recheck the border repeat math before starting.
Happy crocheting!