

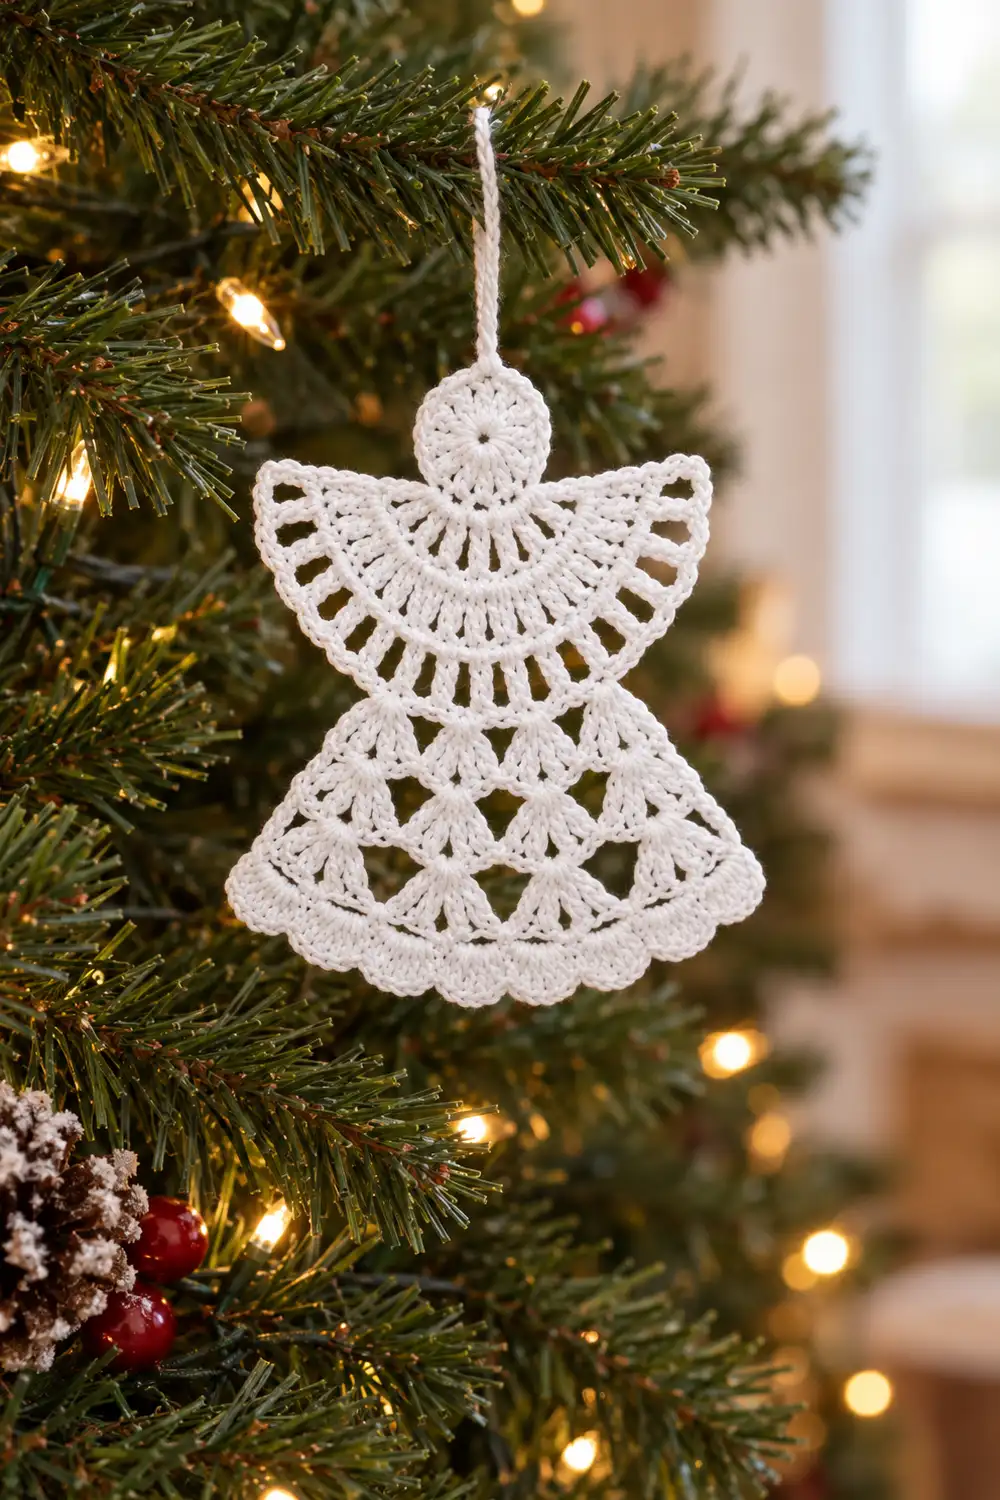
This little angel is pure white lace from halo to hem. A round head with a hanging loop sits above a semicircular wing fan with radiating spokes and a scalloped edge. Below the wings, three small fans form the upper body and arms, and a flared, tiered dress with densely packed shell scallops completes the silhouette.
The style is classic thread-crochet lace: open, airy and crisp after starching. It works on a tree, in a window, or as a gift-tag topper. The pattern uses US crochet terms throughout.
The finished angel measures 4.5 in (11.4 cm) tall, not counting the loop, and 3.75 in (9.5 cm) wide at the hem. The wingspan is about 3.25 in (8.3 cm).
The angel is one piece made of three stacked layers joined as you go. You crochet the head in rounds and add the loop. The wing fan is worked in turned rows off the lower half of the head. You then rejoin at the bottom center of the wings and work the three-fan middle layer downward, followed by the dress. A two-row hem border finishes the scallops. There is no sewing.
Finished Size and Construction
- Finished size: 4.5 in (11.4 cm) tall x 3.75 in (9.5 cm) wide at the hem
- Hanging loop: about 2 in (5.1 cm), extra to the height
- Skill level: Intermediate (comfort with thread and turned rows)
- Terminology: US crochet terms
- Yarn weight: Size 3 crochet thread (Lace, 0)
- Hook: 2.25 mm (US B-1)
- Number of pieces: 1 (three layers worked continuously)
- Layout, top to bottom: head with loop, wing fan, three-fan middle layer, dress
- Piece size: 4.5 in x 3.75 in (11.4 cm x 9.5 cm)
- Size before border: 4.1 in (10.4 cm) tall x 3.5 in (8.9 cm) wide at the hem
- Border depth: 0.4 in (1.0 cm)
Materials
Yarn: Use mercerized cotton crochet thread in size 3. Mercerized cotton holds starch well and gives crisp stitch definition. Avoid fuzzy or acrylic threads, because they blur the lace and resist blocking.
- White: 10 g (about 45 m / 49 yd)
The quantity includes a margin of roughly 50 percent over what one angel uses, to cover your gauge swatch and weaving in ends.
Tools:
- 2.25 mm (US B-1) hook, plus 2.0 mm and 2.5 mm for gauge adjustments
- Tapestry needle with an eye that fits the thread
- Scissors
- Fabric stiffener or liquid starch
- Foam blocking board and rustproof pins
- Ruler or tape measure
- Paper and pencil for a blocking template
Abbreviations (US Terms)
- ch: chain
- sl st: slip stitch
- sc: single crochet
- hdc: half double crochet
- dc: double crochet
- tr: treble crochet
- st(s): stitch(es)
- sp(s): space(s)
- tch: turning chain
- RS / WS: right side / wrong side
Special stitches:
- Shell: 5 dc in the same st.
- Fan: 7 dc in the same st.
- Large fan: 9 dc in the same st.
Gauge and Checkpoints
Base gauge: 9 dc = 1 in (2.5 cm). One dc row is about 0.3 in (0.8 cm) tall, and one sc row is about 1/8 in (0.3 cm) tall.
The head works as your test piece. Make it first and measure it before continuing.
Checkpoints:
- Head after Round 3: 1.25 in (3.2 cm) across.
- Wings after Row 3: about 3.25 in (8.3 cm) across the straight top edge. The fan reaches about 1.7 in (4.3 cm) below the head’s center.
- Middle layer after Row 4: 2.3 in (5.8 cm) wide.
- Dress after Row 3: 3.5 in (8.9 cm) wide. The total height is 4.1 in (10.4 cm).
- After border and blocking: 4.5 in (11.4 cm) tall x 3.75 in (9.5 cm) wide.
If your head is too big: Switch to a 2.0 mm hook and remake it.
If your head is too small: Switch to a 2.5 mm hook.
A difference of 1/8 in (0.3 cm) on the head grows to about 0.5 in (1.3 cm) on the whole angel, so fix gauge now.
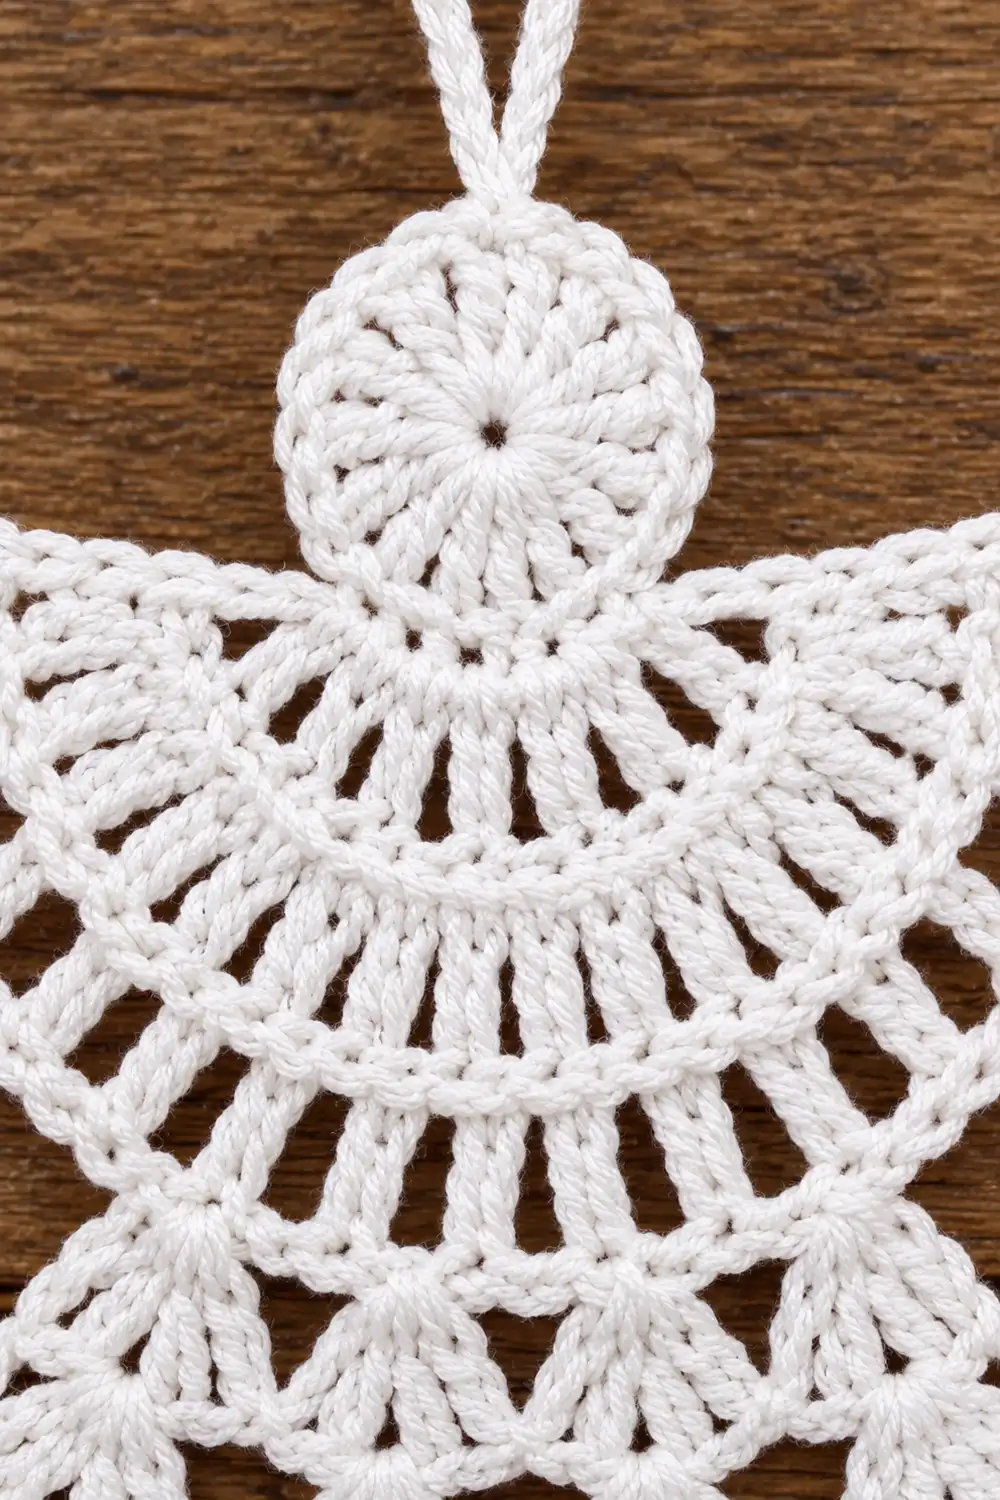
Head and Hanging Loop
Work in joined rounds with the RS facing. Do not turn.
Round 1: Make a magic ring. Ch 3 (counts as dc), then work 15 dc into the ring. Sl st to the top of ch-3. (16 dc)
Round 2: Ch 3 (counts as dc), then dc in the same st. Work 2 dc in each st around and sl st to the top of ch-3. (32 dc)
Round 3: Ch 1, then sc in each st around. Sl st to the first sc. (32 sc)
Pull the ring closed tightly and check Checkpoint 1. Turn the head so the join sits at 12 o’clock. This join is stitch 1.
Hanging loop: Ch 40, then sl st in the same st as the join. Work 50 sc around the chain loop, enough to cover it snugly. Sl st in the join st to close.
Move into position: Sl st in each of the next 8 sts. You are now in stitch 9, at 3 o’clock. Do not fasten off.
Wing Fan (Top Layer)
The wings are worked in turned rows across the lower half of the head. They run from stitch 9 to stitch 25, which is 17 sts.
Row 1 (RS): Ch 3 (counts as dc) in the same st. Work 2 dc in the next st, then dc in the next st. Repeat from * 8 times. You will end in stitch 25, at 9 o’clock. (25 dc)
This row is worked into 1 + 16 = 17 head sts. It adds 8 increases to curve the fan.
Row 2: Turn. Ch 5 (counts as tr + ch 1). Tr in the next dc, ch 1. Repeat from * 23 times, then tr in the top of the tch. (25 tr, 24 ch-1 sps)
These tall tr create the open, radiating spokes.
Row 3: Turn. Ch 1, then sc in the first tr. Skip the ch-1 sp and work a shell in the next tr. Skip the ch-1 sp and sc in the next tr. Repeat from * 12 times. The last sc goes in the 4th ch of the tch. (12 shells, 13 sc)
Each repeat uses 2 tr, so 1 + (12 x 2) = 25 tr. The scalloped outer edge is complete. Check Checkpoint 2, then fasten off.
Middle Layer (Upper Body and Arms)
Number the 13 sc of Wing Row 3 from either end. The center sc is sc 7, and it sits at the bottom of the fan, directly below the head.
Row 1 (RS): Join the thread in sc 6. Ch 1, then sc in the same st. Work 1 sc in each of the 5 dc of the next shell, 1 sc in sc 7, 1 sc in each of the 5 dc of the next shell, and 1 sc in sc 8. (13 sc)
Row 2 (upper-body fan): Turn. Ch 1 and sc in the first sc. Ch 4, skip 5 sc, and work a fan in the next sc (the 7th st). Ch 4, skip 5 sc, and sc in the last sc. (7 dc, 2 sc, 2 ch-4 sps)
The two ch-4 bars frame the first open window of the lacework.
Row 3 (arm fans): Turn. Ch 3 (counts as dc) in the first sc, then work 6 dc in the same st to make a 7-dc fan. Ch 3, skip the ch-4 sp and 3 dc, and sc in the 4th (center) dc of the fan. Ch 3, skip 3 dc and the ch-4 sp, and work a fan in the last sc. (14 dc, 1 sc, 2 ch-3 sps)
The three fans now form a triangle: the body fan on top and the two arm fans flaring out below. Open V-shaped spaces sit between them.
Row 4 (waist): Turn. Ch 1, then sc in each of the first 7 dc. Work 3 sc in the ch-3 sp, sc in the sc, and 3 sc in the next ch-3 sp. Sc in each of the next 6 dc and in the top of the tch. (21 sc)
This is a conversion row. You work 15 sc one per existing st (14 dc + 1 sc) and add 6 sc into the two spaces. Check Checkpoint 3. Do not fasten off.
Dress (Bottom Layer)
The dress continues in turned rows. Each tier sets its fans on the previous row’s sc, so the scallops stack like roof tiles.
Row 1: Turn. Ch 1 and sc in the first sc. Skip 1 sc, work a shell in the next sc, skip 1 sc, and sc in the next sc. Repeat from * 5 times. (5 shells, 6 sc)
Each repeat uses 4 sts, so 1 + (5 x 4) = 21 sc.
Row 2: Turn. Ch 3 (counts as dc), then work 3 dc in the same sc. Sc in the 3rd dc of the next shell, then work a fan in the next sc. Repeat from * 4 times. Sc in the 3rd dc of the last shell, then work 4 dc in the last sc. (36 dc, 5 sc)
The dc come from 4 + (4 x 7) + 4 = 36. This is a growth row, and that total is its own complete count.
Row 3: Turn. Ch 1 and sc in the first dc. Skip the next 3 dc and work a large fan in the next sc. Sc in the 4th dc of the next fan, then work a large fan in the next sc. Repeat from * 4 times. Skip 3 dc and sc in the top of the tch. (5 large fans = 45 dc, 6 sc)
This is a growth row, with 45 dc as its own complete count. Check Checkpoint 4. Do not fasten off.
Border
The border is two rows worked across the hem only. Together they add 0.4 in (1.0 cm) of depth.
Border gauge: The hem border is deliberately denser than the body. The body runs at about 9 sts per inch, while the border runs at about 16 sts per inch measured along the curved scallop edge. The extra stitches make each scallop round out and cup into the dense, shell-like hem.
Border Row 1 (scallops): Turn. Ch 1 and sc in the first sc. Then work this sequence across each large fan:
- hdc in the next dc
- dc in the next dc
- 2 dc in each of the next 5 dc
- dc in the next dc
- hdc in the next dc
- sc in the next sc
Repeat the sequence 5 times. (76 sts)
The count: You work 51 sts one per existing st (45 dc + 6 sc). You also add 25 sts, which is 5 extra in each of the 5 fans. That gives 51 + 25 = 76. Each scallop has 14 sts, and 6 sc separate them: (5 x 14) + 6 = 76.
Border Row 2 (edge finish): Turn. Ch 1, then sl st loosely in each st across. (76 sl sts) Fasten off.
Counts per side: Split the hem at the middle of the center scallop.
- Left half: 1 sc + 14 + 1 sc + 14 + 1 sc + 7 = 38 sts
- Right half: 38 sts, mirrored
Both halves add up to 76.
Why the math works: Each 9-dc fan spans about 0.7 in (1.8 cm) at its top. Adding 5 sts per fan stretches each scallop’s outer arc to about 0.85 in (2.2 cm). The arcs then sit side by side without rippling, and the hem widens from 3.5 in (8.9 cm) to 3.75 in (9.5 cm).
Final Blocking
- Weave in all ends along stitch posts. Leave the tails uncut for now.
- Draw a template on paper: a 4.5 in (11.4 cm) vertical center line, a 3.25 in (8.3 cm) wing line about 0.6 in (1.5 cm) below the top, and a 3.75 in (9.5 cm) hem line at the bottom. Cover it with plastic wrap and lay it on the foam board.
- Soak the angel in stiffener and squeeze out the excess. Blot it in a towel.
- Pin the head in a circle, centered on the line.
- Pin the wings’ straight edge along the wing line. Then pin the tip of each of the 12 wing shells so the spokes radiate evenly.
- Open the three middle fans and pull the V-spaces into clean triangles.
- Pin the hem at each of the 5 scallop peaks and the 6 sc valleys. Keep both halves symmetrical.
- Lay the hanging loop flat and straight.
- Let it dry completely, about 12–24 hours. Then unpin and trim the tails.
Final Quality-Control Checklist
- The angel is 4.5 in (11.4 cm) tall and 3.75 in (9.5 cm) wide at the hem.
- The head is round, 1.25 in (3.2 cm) across, with the magic ring fully closed.
- The loop sits at 12 o’clock, directly above the center sc of the wings.
- The wings have 12 shells and 25 even spokes.
- The middle layer has three distinct fans with open V-spaces.
- The dress has 5 large fans, and the hem has 5 scallops of 14 sts each.
- Both hem halves have 38 sts and match.
- No ends are visible, and the piece lies flat and stiff.
Troubleshooting
The wings ruffle. Your tr are too loose, or the ch-1 spaces are too long. Keep the chains snug, or drop to a 2.0 mm hook for Row 2.
The wings cup. Row 1 is tight. Redo it with a slightly looser tension.
The middle fans are off-center. You probably joined at the wrong sc. Count again from both ends so you start in sc 6.
Row 3 of the dress has the wrong count. Check that you skipped 3 dc at each edge and placed each large fan in a sc, never in a dc.
The hem flares or waves. Your increases may be uneven. Use exactly 5 increases per scallop and keep the sl st row loose.
The angel is too short. Your dc rows are short. Lengthen the yarn-over loop, or go up a hook size.
The thread splits. Use a hook with a rounded throat, and work from the center-pull end of the ball.
Care
Spot-clean the angel only, because soaking removes the starch. If it softens over time, re-starch it and re-pin it on the same template.
Final Notes
The whole angel follows one measurement chain:
- 9 dc = 1 in (2.5 cm).
- The head measures 1.25 in (3.2 cm).
- The wings span 3.25 in (8.3 cm).
- The waist is 2.3 in (5.8 cm) wide.
- The dress is 3.5 in (8.9 cm) wide and 4.1 in (10.4 cm) tall.
- The border brings it to 3.75 in x 4.5 in (9.5 cm x 11.4 cm).
Check each link before moving to the next one, and your angel will block into the same crisp, symmetrical shape every time.
Optional: For a smaller angel, the same pattern in size 10 thread with a 1.75 mm hook comes out at about 3.5 in (8.9 cm) tall.
Happy crocheting!