

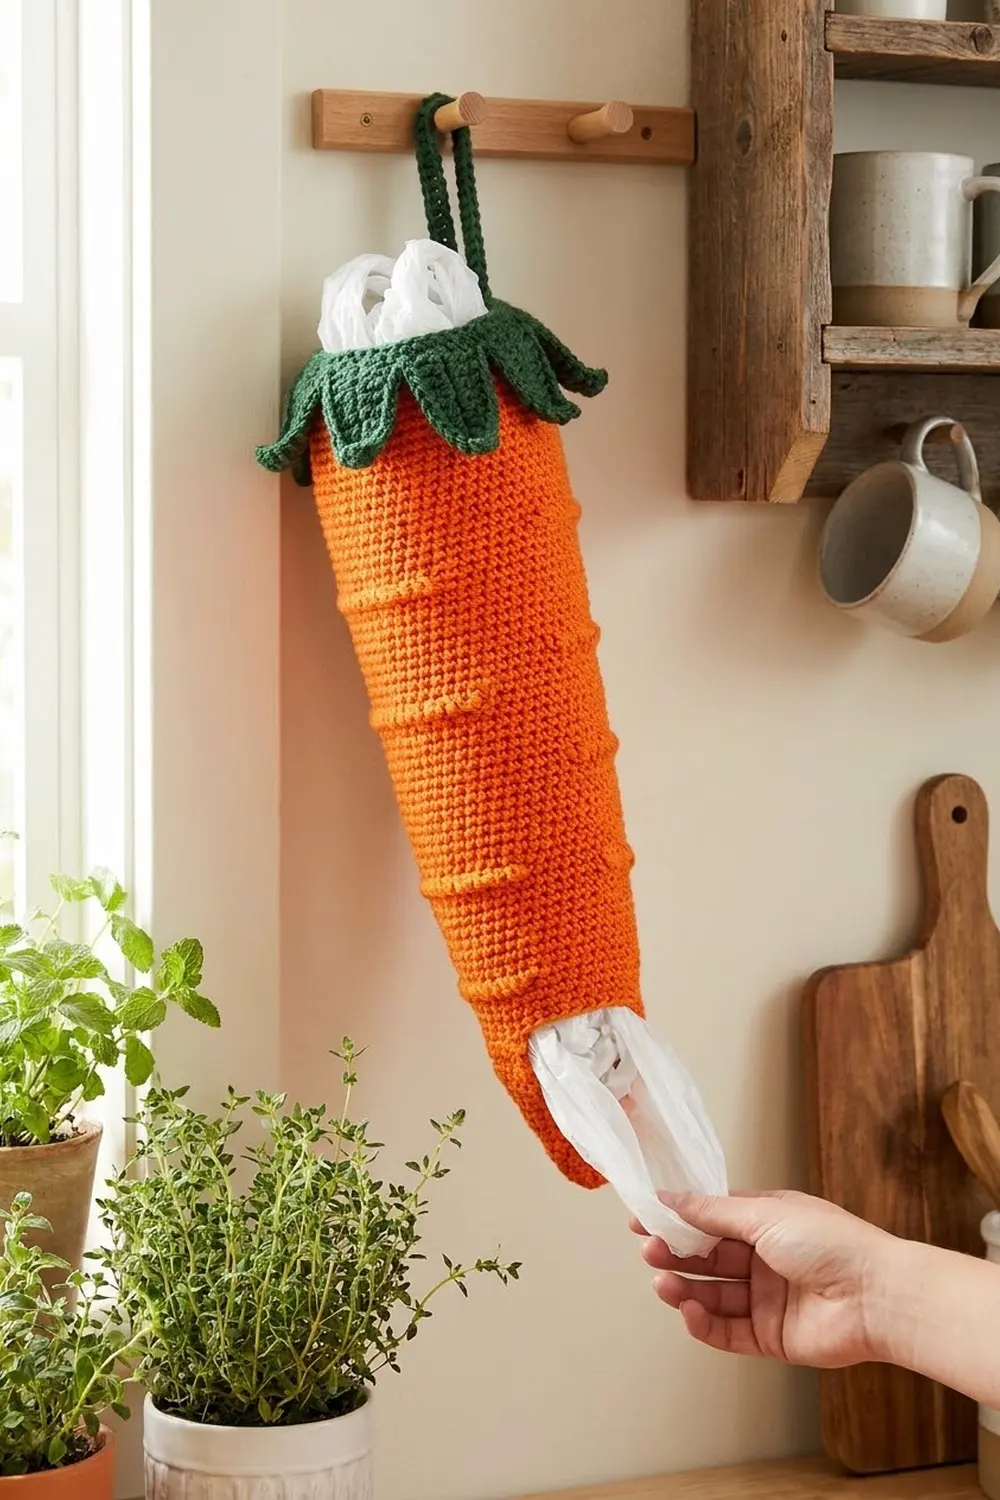
This cheerful carrot keeps plastic grocery bags tidy and makes them easy to grab. You push the bags in at the top, and they pull out one at a time from the open tip. It hangs from a peg or hook by a sturdy green strap, so it works well in a kitchen, pantry, or laundry room.
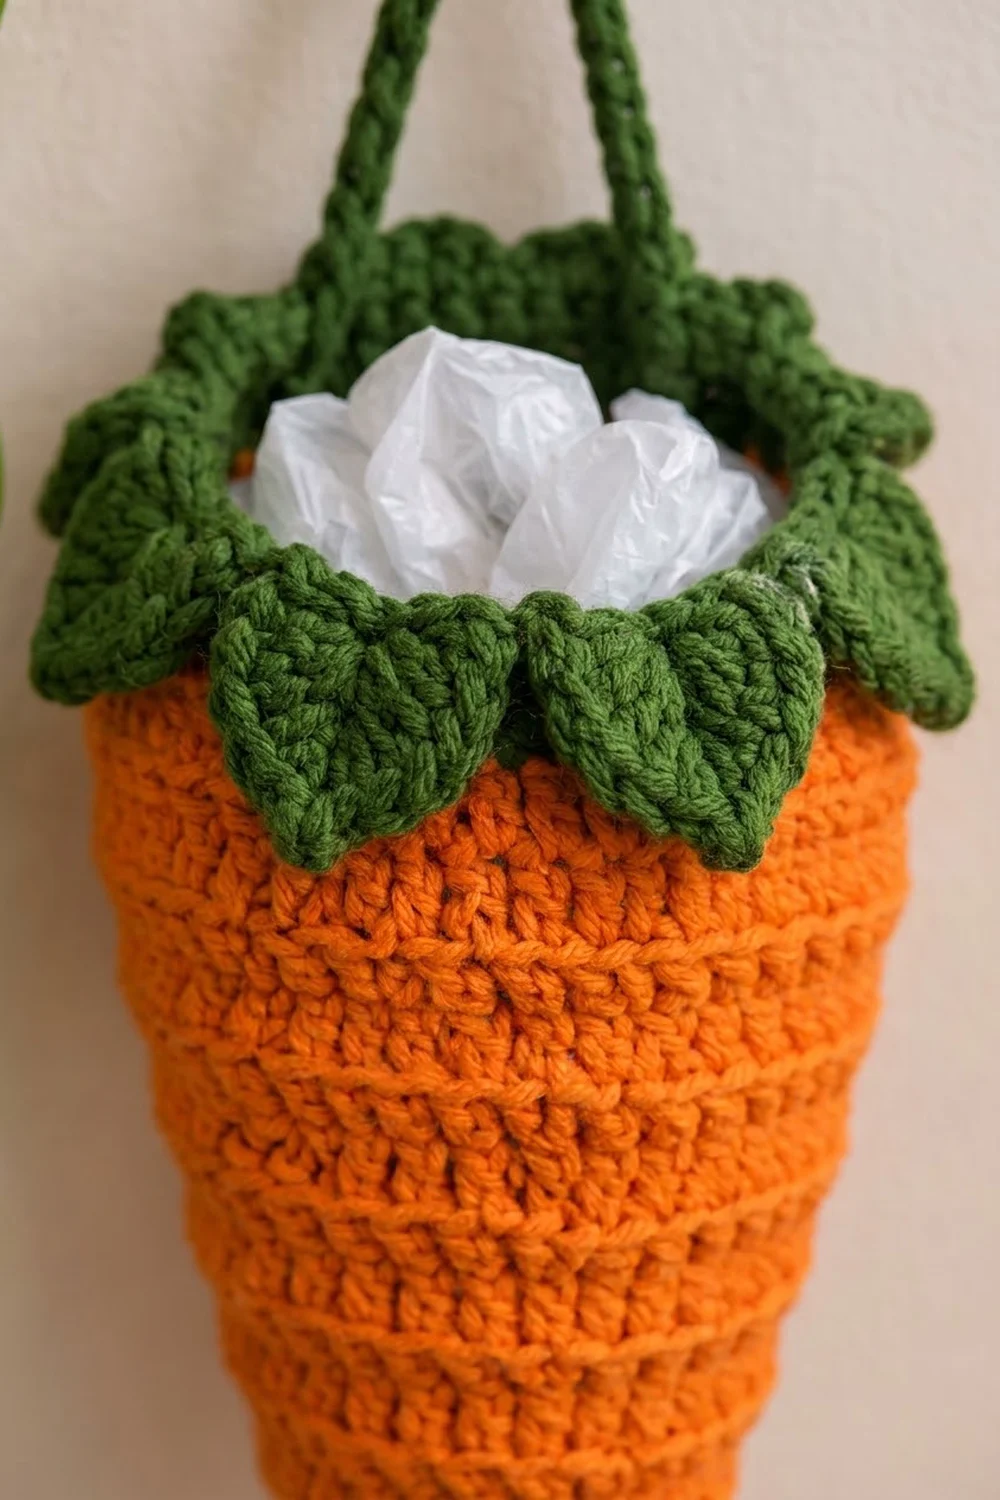
The body is bright orange with a raised ridge every fourth round, which looks like the natural lines on a real carrot. A dark green collar and a ring of 11 pointed leaves finish the top. You can also make a yellow carrot with a sage green top. Just swap the colors and keep the same counts.
This pattern uses US crochet terms. The finished holder measures about 16 in (40.6 cm) long from tip to leaf points and about 6 in (15.2 cm) across at the top. The open tip is about 1.8 in (4.6 cm) across. The strap adds a hanging loop about 7 in (17.8 cm) tall.
The holder is made as one piece. You start with a chain ring at the narrow tip and work double crochet rounds upward, adding 2 stitches per round. Then you work a green single crochet collar and a leaf round, and finish with a strap worked straight off the collar.
Finished Size and Construction
- Finished size: 16 in (40.6 cm) long; 6 in (15.2 cm) top diameter
- Skill level: Easy / advanced beginner
- Terminology: US
- Yarn weight: Worsted (#4), cotton or cotton blend
- Hook: 5.0 mm (H-8)
- Number of pieces: 1 (the strap is worked directly off the collar)
- Layout: One single cone, hung vertically
- Body (before rim): 14 in (35.6 cm) tall; 18.9 in (48.0 cm) top circumference
- Bottom opening: 5.7 in (14.5 cm) circumference
- Rim depth (collar + leaves): 2 in (5.1 cm)
- Strap: 4 sts wide, 16 in (40.6 cm) long before attaching
Materials
Choose a smooth worsted-weight cotton or cotton blend. Cotton holds the cone shape well and doesn’t stretch much under the weight of the bags. Acrylic also works, but the cone may sag a little more over time.
- Orange (body): 120 g / 205 m (224 yd)
- Dark green (collar, leaves, strap): 45 g / 77 m (84 yd)
- Yellow version: use the same amounts in pale yellow and sage green
Tools:
– 5.0 mm (H-8) crochet hook
– Stitch markers (at least 2)
– Tapestry needle
– Scissors
– Measuring tape
– Spray bottle and a rolled towel for blocking
All quantities include about a 15% margin for your gauge swatch and small tension differences.
Abbreviations (US Terms)
- ch: chain
- sl st: slip stitch
- sc: single crochet
- hdc: half double crochet
- dc: double crochet
- tr: treble crochet
- st(s): stitch(es)
- sk: skip
- BLO: back loop only
- FLO: front loop only
- BL: back loop
Special stitch: leaf shell. Work (hdc, dc, 2 tr, ch 3, sl st in 3rd ch from hook, 2 tr, dc, hdc) all in the same stitch. This makes one pointed leaf with a small picot at the tip.
Gauge and Checkpoints
Gauge: 14 dc and 8 rounds = 4 in (10.2 cm). For single crochet, 16 sc and 18 rows = 4 in (10.2 cm).
Before you start, work a small flat swatch of dc about 5 in (12.7 cm) wide. Treat the first 8 rounds of the cone as your real test piece and measure them carefully.
Checkpoints:
– After Round 1: the ring lies flat and measures 5.7 in (14.5 cm) around.
– After Round 8: 34 sts, about 9.7 in (24.6 cm) around and 4 in (10.2 cm) tall.
– After Round 16: 50 sts, about 14.3 in (36.3 cm) around and 8 in (20.3 cm) tall.
– After Round 24: 66 sts, about 18.9 in (48.0 cm) around and 12 in (30.5 cm) tall.
– After Round 28: still 66 sts and 14 in (35.6 cm) tall.
Too big? Go down half a hook size (4.5 mm). Too small? Go up half a size (5.5 mm). Keep the stitch counts the same and change only the hook, so the taper stays smooth.
Body (Orange)
Each round starts with ch 2. The ch 2 does not count as a stitch. Join every round with a sl st to the first dc. Place a marker in the first dc of each round.
Increase methods. “P” means the stitch count of the previous round.
- Method A: [2 dc in next st, dc in next (P/2 − 1) sts] twice.
- Method B: dc in next 3 sts, 2 dc in next st, dc in next (P/2 − 1) sts, 2 dc in next st, dc in last (P/2 − 4) sts.
Both methods work into P stitches and add exactly 2. Use Method A on even rounds and Method B on odd rounds. This moves the increases around so the cone stays round and doesn’t form points.
Ridge rounds. Work Rounds 4, 8, 12, 16, 20, 24, and 28 in BLO, including the increases. The unused front loops form the raised horizontal ridges.
Round 1: Ch 20 and join with a sl st to form a ring, taking care not to twist the chain. Ch 2, then dc in each ch around and join. (20 dc)
Round 2 (A): Ch 2, increase around, join. (22 dc)
Round 3 (B): (24 dc)
Round 4 (A, BLO): (26 dc)
Round 5 (B): (28 dc)
Round 6 (A): (30 dc)
Round 7 (B): (32 dc)
Round 8 (A, BLO): (34 dc) Check your measurements here.
Rounds 9–24: Keep alternating the methods. Work Rounds 12, 16, 20, and 24 in BLO. The count after each round is:
| Round | Count | Round | Count |
|---|---|---|---|
| 9 (B) | 36 | 17 (B) | 52 |
| 10 (A) | 38 | 18 (A) | 54 |
| 11 (B) | 40 | 19 (B) | 56 |
| 12 (A, BLO) | 42 | 20 (A, BLO) | 58 |
| 13 (B) | 44 | 21 (B) | 60 |
| 14 (A) | 46 | 22 (A) | 62 |
| 15 (B) | 48 | 23 (B) | 64 |
| 16 (A, BLO) | 50 | 24 (A, BLO) | 66 |
Each round’s total is its own complete count: 20 + 2 × (round number − 1). For example, Round 24 = 20 + 46 = 66.
Rounds 25–27: Ch 2, dc in each st around, join. (66 dc)
Round 28 (BLO): Ch 2, dc in BLO of each st around, join. (66 dc)
Fasten off the orange and weave in the end on the inside.
Rim: Collar and Leaves (Green)
This rim is the “border” of the piece. It turns the open top of the cone into a firm collar with leaves.
Rim gauge: 16 sc = 4 in (10.2 cm). The 66 sc are a little tighter than the 66 dc below them, so the collar pulls in gently to about 16.5 in (41.9 cm) around. That snug collar helps the leaves flare outward.
Round 29: Join green with a sl st in any st. Ch 1, then sc in each st around and join to the first sc. (66 sc: 66 worked 1-per-stitch + 0 added)
Round 30: Ch 1, sc in each st around, join. (66 sc) Place a marker in the first sc and call it st 1.
Round 31 (leaves, FLO): Work this round in the front loops only, so the back loops of Round 30 stay free for the strap.
Sl st in next st, sk 2 sts, leaf shell in next st, sk 2 sts. Repeat from * to * 10 more times, then sl st to the first sl st. (11 leaves)
Why the math works: Each repeat uses 6 stitches: 1 sl st + 2 skipped + 1 shell + 2 skipped. Since 11 × 6 = 66, the last repeat ends exactly where the first one began, with no gaps or extra stitches. Each shell has 8 stitches fanned into 1, which makes the leaf wider than its 6-stitch base. That extra width is why neighboring leaves overlap slightly and stand up.
The leaves measure about 1.5 in (3.8 cm) to the picot tip. Including the 0.5 in (1.3 cm) collar, the rim is 2 in (5.1 cm) deep.
Fasten off.
Hanging Strap (Green)
Row 1: Turn the holder so the inside faces you. Join green with a sl st in the BL of st 1 on Round 30. Ch 1, then sc in the same BL and in the BLs of the next 3 sts. (4 sc)
Rows 2–72: Ch 1, turn, sc in each st across. (4 sc each row)
At 4.5 rows per inch, 72 rows makes a strap 16 in (40.6 cm) long.
Attach: Count to sts 34–37 of Round 30, which are directly opposite sts 1–4 (66 ÷ 2 = 33 stitches apart). Make sure the strap isn’t twisted. Line up the 4 sc of Row 72 with the BLs of sts 34–37, then sl st through both layers across. (4 sl sts)
Fasten off, leaving a 6 in (15.2 cm) tail. Use the tail to sew down the strap edges for about 0.5 in (1.3 cm) on the inside so it stays firm. Do the same at the starting end.
Final Blocking
- Weave in all the remaining tails on the inside.
- Roll a towel into a cone and push it into the holder so the body is evenly firm.
- Lightly spray the whole piece with water until it is damp but not soaked.
- Smooth the ridges so they run level all the way around the carrot.
- Pinch each leaf into a point and turn it slightly outward.
- Lay the strap flat and straight.
- Let it dry completely with the towel inside, which takes about 24 hours.
- Remove the towel and check the measurements: 16 in (40.6 cm) long and 6 in (15.2 cm) across the top.
Final Quality-Control Checklist
- The body has 66 sts at Round 24 and stays at 66 through Round 28.
- There are 7 orange ridges, evenly spaced every 4 rounds.
- The increases are staggered and there are no corners or points along the sides.
- The bottom opening is about 1.8 in (4.6 cm) across, wide enough for a bag to pull through but not so wide that bags fall out.
- There are 11 leaves, evenly spaced, each with a picot tip.
- The strap is attached exactly opposite itself and is not twisted.
- All ends are woven in on the inside.
Troubleshooting
The cone looks lopsided or leans. Your increases are probably stacking. Make sure you alternate Methods A and B on every round.
The ridges are faint. Check that you worked the ridge rounds in BLO and not FLO.
The leaves are floppy. Go down to a 4.5 mm hook for Round 31 only, or block the leaves with a little starch.
The leaves are crowded or cupped. Count your skipped stitches. Each repeat must use exactly 6 stitches.
Bags fall out of the tip. Round 1 is too loose. Rework it with ch 18 and 18 dc, then add 2 sts per round as written. Remember this lowers every later count by 2, so repeat Rounds 25–27 once more at 64 sts.
The strap stretches. Use cotton yarn, or work the strap with a hook one size smaller.
Care
Hand wash in cool water, then reshape and lay flat or stuff with a towel to dry. Avoid the dryer, which can shrink cotton and soften the leaves.
Final Notes
The measurement chain works like this. A 20-stitch ring of 5.7 in (14.5 cm) grows by exactly 2 stitches a round to 66 stitches and 18.9 in (48.0 cm) at Round 24. The body then works even to 14 in (35.6 cm) tall. Next, 66 green single crochet stitches form the collar, 11 six-stitch leaf repeats use all 66 stitches, and a 16 in (40.6 cm) strap joins stitches 1–4 to the stitches opposite at 34–37. If your gauge matches at each checkpoint, the finished carrot will measure 16 in (40.6 cm) long and 6 in (15.2 cm) across.
Happy crocheting!