

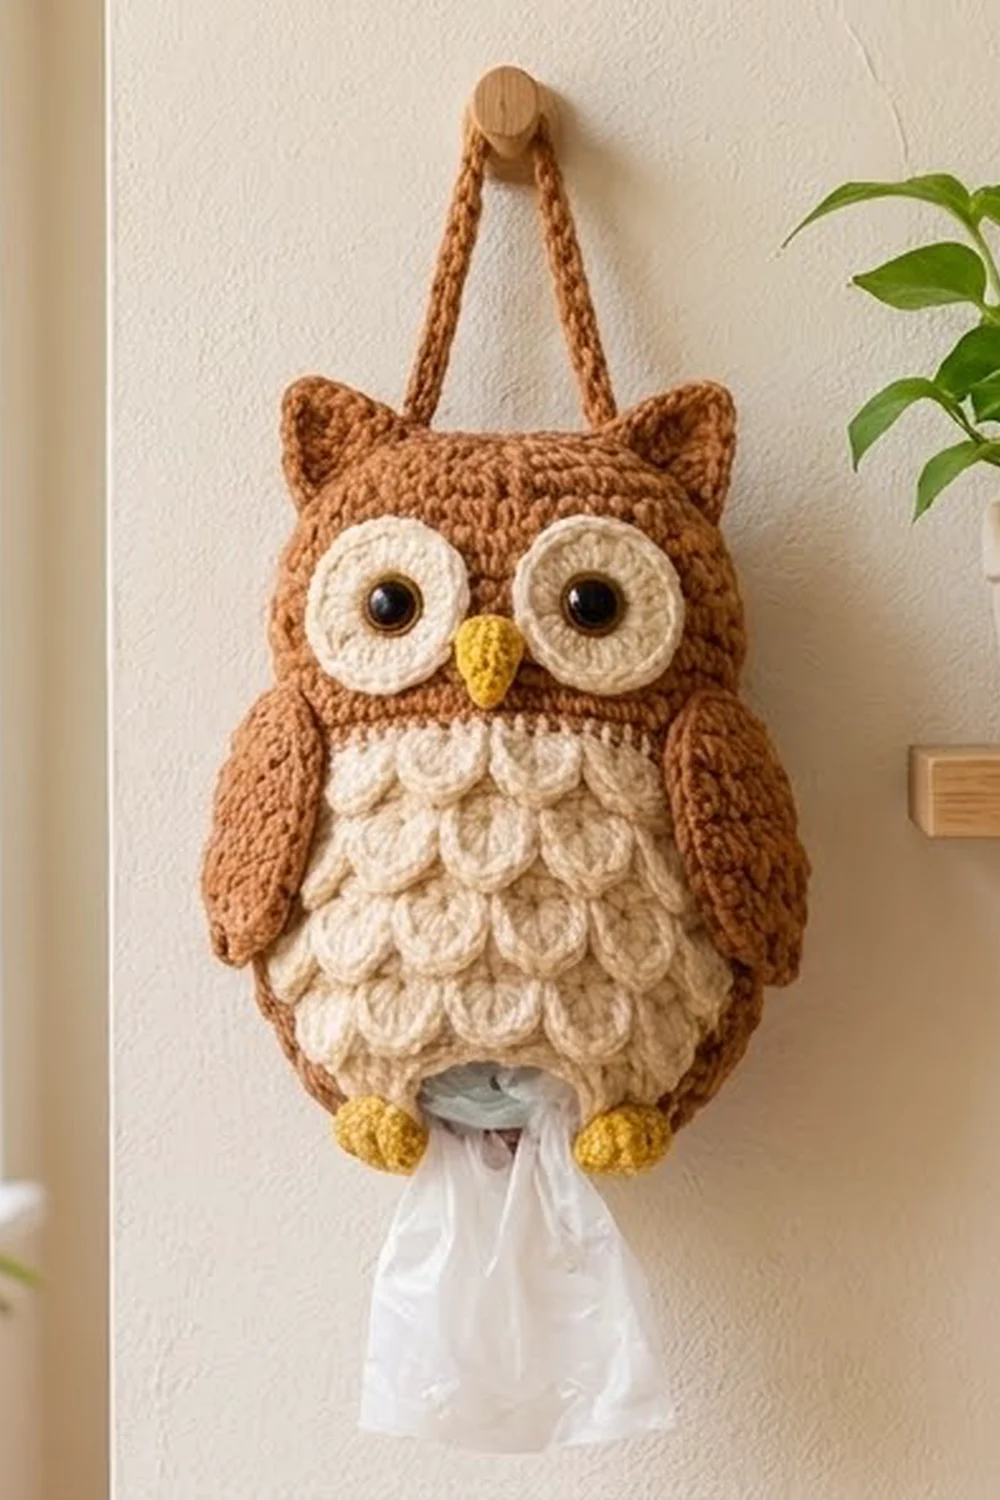
This owl hangs on a wall hook and keeps your plastic grocery bags out of sight. You stuff bags in through the open top and pull them out one at a time through a small opening at the bottom, right between the owl’s little yellow feet.
The body is warm caramel brown. The front has a cream belly panel of overlapping crocodile-stitch scales, all pointing down like soft feathers. Big cream eyes with dark safety eyes, a mustard yellow beak and mustard toes make up the face. Two textured brown wings, two pointed ear tufts and a hanging strap complete the look. A lilac version works just as well: swap the brown for purple.
This pattern uses US crochet terms. The finished owl is about 7.7 in (19.6 cm) wide across the flattened body and about 10 in (25.4 cm) across the wings. It is about 12.25 in (31.1 cm) tall including the ears. The strap adds a loop of about 5.5 in (14.0 cm) above the top.
Construction is simple. You work the body as a tube from the bottom up, starting from a small ring that becomes the opening for pulling bags out. The belly panel is worked flat in rows and sewn on. The eyes, beak, wings, feet, ears and strap are small separate parts that you sew to the body.
Finished Size and Construction
- Finished size: 7.7 in (19.6 cm) wide body, 10 in (25.4 cm) across wings, 12.25 in (31.1 cm) tall without strap
- Skill level: Intermediate (crocodile stitch, front post stitches)
- Terminology: US
- Yarn weight: Worsted (#4), cotton or cotton blend
- Hook: 5.0 mm (H-8)
- Number of pieces: One finished owl, assembled from 12 parts: body, belly panel, 2 eyes, beak, 2 wings, 2 feet, 2 ears, strap
- Layout: Belly centered on the front, eyes above it, wings on the sides, feet at the bottom edge, ears at the top corners, strap inside the back rim
- Body size before border: 10 in (25.4 cm) of side height above the base
- Border depth: one sc round at the top, about 0.25 in (0.6 cm), plus one sc round around the bottom opening
- Belly panel: 6 in wide x 7 in tall (15.2 x 17.8 cm)
Materials
Choose a smooth worsted cotton or cotton blend. Cotton holds its shape when the owl is full of bags and doesn’t stretch much.
- Brown (main color): about 100 g / 170 m
- Cream: about 60 g / 100 m
- Mustard yellow: about 15 g / 25 m
All quantities include a margin of roughly 20 to 25 percent, so you will have yarn left over.
Tools:
- 5.0 mm (H-8) crochet hook
- Two 15 mm safety eyes with washers
- Stitch markers
- Tapestry needle
- Scissors
- Pins
- Tape measure
- A piece of cardboard about 7.5 x 9 in (19.1 x 22.9 cm) for sewing and blocking
Abbreviations (US Terms)
- ch – chain
- sl st – slip stitch
- sc – single crochet
- hdc – half double crochet
- dc – double crochet
- FPdc – front post double crochet
- sc2tog / sc3tog – single crochet 2 or 3 together
- inc – 2 sc in the same stitch
- BLO – back loop only
- MR – magic ring
- st(s) – stitch(es)
- rnd – round
Special stitches
- V-st: (dc, ch 1, dc) in the same stitch.
- Scale: Turn the work so the V-st lies sideways. Work 5 dc down around the post of the first dc of the V-st, ch 1, then work 5 dc up around the post of the second dc. The scale hangs downward and covers the row below.
- 4-dc cl (cluster): (Yarn over, insert hook, pull up a loop, yarn over, pull through 2 loops) 4 times in the same place, then yarn over and pull through all 5 loops.
Gauge and Checkpoints
- Dc gauge: 14 sts and 8 rnds = 4 in (10.2 cm), which is 3.5 sts and 2 rnds per inch.
- Sc gauge: 14 sts and 16 rows = 4 in (10.2 cm).
Make one eye first as your test piece. It should measure 2.5 in (6.4 cm) across after Rnd 5. Then check the body at each checkpoint below:
- After body Rnd 1, the opening measures about 2.2 in (5.6 cm) across.
- After Rnd 4, the flat base measures about 4.9 in (12.4 cm) across.
- After Rnd 5, the flattened tube measures 7.7 in (19.6 cm) wide.
- After Rnd 14, the sides measure 5 in (12.7 cm) above the base fold.
- After Rnd 24, the sides measure 10 in (25.4 cm).
If your pieces are too big, go down one hook size. If they are too small, go up one size. Cotton doesn’t relax much when blocked, so fix the gauge with your hook instead of counting on blocking.

Body
Work in joined rounds with brown. The ch 2 at the start of dc rounds does not count as a stitch. Join each round with a sl st to the first dc.
Rnd 1: Ch 24, join with a sl st to form a ring without twisting. Ch 2, dc in each ch around. (24 dc)
Rnd 2: Ch 2, (dc in next st, 2 dc in next st) 12 times. (36 dc)
Rnd 3: Ch 2, (dc in next 2 sts, 2 dc in next st) 12 times. (48 dc)
Rnd 4: Ch 2, (dc in next 7 sts, 2 dc in next st) 6 times. (54 dc)
These four rounds form a flat ring. The center hole is the bag opening.
Rnd 5: Ch 2, dc in BLO of each st around. (54 dc)
The unused front loops make a fold line, and the work now turns upward to form the sides.
Rnds 6–24: Ch 2, dc in each st around. (54 dc in each round)
You now have 20 side rounds (Rnds 5–24), which equals 10 in (25.4 cm). Don’t fasten off; go straight on to the top border below.
Belly Panel
Work flat in rows with cream. You work the panel from the bottom up, so each new row of scales overlaps the one below.
Row 1 (base row, 4 V-sts): Ch 18. Sc in 2nd ch from hook, (sk 1 ch, V-st in next ch, sk 1 ch, sc in next ch) 4 times. (4 V-sts, 5 sc)
Row 2 (scale row, 4 scales): Ch 1, turn. Sc in first sc, (Scale over next V-st, sc in next sc) 4 times. (4 scales, 5 sc)
Row 3 (base row, 3 V-sts): Ch 1, turn. Sc in first sc, ch 1, sc in ch-1 sp at center of next scale, (ch 1, V-st in next sc, ch 1, sc in center of next scale) 3 times, ch 1, sc in last sc. (3 V-sts, 6 sc)
Row 4 (scale row, 3 scales): Ch 1, turn. Sc in first sc, sc in next sc, (Scale over next V-st, sc in next sc) 3 times, sc in last sc. (3 scales, 6 sc)
Row 5 (base row, 4 V-sts): Ch 1, turn. Sc in first sc, ch 1, (V-st in next sc, ch 1, sc in center of next scale, ch 1) 3 times, V-st in next sc, ch 1, sc in last sc. (4 V-sts, 5 sc)
Row 5 puts a V-st in each of the 4 inner sc of Row 4. This moves the next tier of scales half a scale sideways.
Row 6: Work as Row 2. (4 scales)
Rows 7–14: Repeat Rows 3–6 twice.
You now have 7 tiers of scales, with 4, 3, 4, 3, 4, 3 and 4 scales, for 25 scales in total. Fasten off, leaving a 30 in (76.2 cm) tail for sewing. The panel measures 6 x 7 in (15.2 x 17.8 cm).
Eyes (Make 2)
With cream:
Rnd 1: 6 sc in MR. (6 sc)
Rnd 2: Inc in each st. (12 sc)
Rnd 3: (Sc, inc) 6 times. (18 sc)
Rnd 4: (Sc in next 2, inc) 6 times. (24 sc)
Rnd 5: (Sc in next 3, inc) 6 times. (30 sc)
Rnd 6: Sl st loosely in BLO of each st around. (30 sl st)
The slip stitches form the raised rim around each eye. Fasten off with a long tail. Each eye measures 2.5 in (6.4 cm) across.
Beak
With mustard:
Rnd 1: 4 sc in MR. (4 sc)
Rnd 2: (Sc, inc) 2 times. (6 sc)
Rnd 3: (Sc in next 2, inc) 2 times. (8 sc)
Rnd 4: Sc in each st. (8 sc)
Fasten off with a long tail and flatten. The beak is 1 in (2.5 cm) long.
Wings (Make 2)
With brown. The ch 2 at the start does not count as a stitch.
Rnd 1: Ch 13. You’ll work into the 12 chains starting from the 2nd ch from hook. Sc in first ch, hdc in next ch, dc in next 9 ch, 6 dc in last ch. Rotate and work along the other side of the chain: dc in next 9 ch, hdc in next ch, 2 sc in the first ch. Join. (29 sts)
Rnd 2: Ch 2, FPdc around each of next 11 sts, 2 dc in each of next 6 sts, FPdc around each of next 10 sts, 2 sc in each of last 2 sts. Join. (37 sts)
Rnd 3: Ch 1, sc in each of next 11 sts, (2 sc in next st, sc in next st) 6 times, sc in each of next 10 sts, 2 sc in each of last 4 sts. Join. (47 sc)
The FPdc stitches make the raised, ridged texture. Fasten off with a long tail. Each wing measures about 5 x 3 in (12.7 x 7.6 cm).
Feet (Make 2)
With mustard: MR, (ch 3, 4-dc cl in ring, ch 3, sl st in ring) 3 times. Pull the ring tight. (3 toes)
Each foot is about 1.5 in (3.8 cm) wide.
Ears (Make 2)
With brown, worked in rows:
Row 1: Ch 8, sc in 2nd ch from hook and each ch across. (7 sc)
Row 2: Ch 1, turn, sc2tog, sc in next 3, sc2tog. (5 sc)
Row 3: Ch 1, turn, sc in each st. (5 sc)
Row 4: Ch 1, turn, sc2tog, sc, sc2tog. (3 sc)
Row 5: Ch 1, turn, sc in each st. (3 sc)
Row 6: Ch 1, turn, sc3tog. (1 st)
Each ear is a triangle 2 in (5.1 cm) wide and 1.5 in (3.8 cm) tall.
Strap
With brown:
Row 1: Ch 43, sc in 2nd ch from hook and each ch across. (42 sc)
Row 2: Ch 1, turn, sl st loosely in each st. (42 sl st)
The strap is 12 in (30.5 cm) long.
Border
The border uses the sc gauge of 3.5 sts per inch, so you work 1 sc for every dc.
Top rim (Rnd 25): Continuing from body Rnd 24, ch 1, sc in each st around. Join. (54 sc)
When the body is flattened, that is 27 sc on the front and 27 sc on the back. The tube has no corners, so you don’t add any stitches at the sides. Fasten off.
Opening rim: Turn the body upside down. Join brown in any foundation ch loop of Rnd 1. Ch 1, sc in each ch around. Join. (24 sc) Fasten off.
Why the math works: each border puts exactly 1 sc in each existing stitch or chain, so the circumference stays the same. That is 54 sts = 15.4 in (39.1 cm) at the top and 24 sts = 6.9 in (17.5 cm) at the opening. The rims neither flare nor pull in. The top rim adds 0.25 in (0.6 cm), which brings the sides to 10.25 in (26.0 cm).
Assembly
- Slide the cardboard inside the body so you don’t sew through both layers.
- Belly: The flattened front has 27 sts. Center the 6 in (15.2 cm) panel so about 3 brown sts show on each side. Put its bottom edge on Rnd 5 and its top edge on Rnd 18. Whipstitch all around.
- Eyes: Center the eyes over Rnds 19–23 with a 0.3 in (0.8 cm) gap between them. Their lower edges overlap the top scales slightly. Push each safety eye through Rnd 1 of an eye piece and through the body. Reach in through the open top and snap the washer on from inside. Sew the eye edges down.
- Beak: Sew it between the eyes, with the tip pointing down onto the top tier of scales.
- Wings: Sew one wing to each side, narrow end up at eye level, angled outward. Stitch only the upper two-thirds so the tip flares slightly.
- Feet: Sew them to the front at the base fold, one on each side of the opening, with the toes hanging down.
- Ears: Sew each ear base to the front top rim at the far corners, points up and slightly outward.
- Strap: Sew each end inside the back top rim, 1.5 in (3.8 cm) on either side of center, so the ends are 3 in (7.6 cm) apart. Overlap each end by 1 in (2.5 cm) and stitch it down firmly, because this joint carries all the weight.
Final Blocking
- Lightly mist the owl with water, or hold a steam iron just above it without touching.
- Slip the cardboard back inside.
- Pat the body out to 7.7 in (19.6 cm) wide.
- Smooth each scale downward with your fingers so they all point the same way.
- Flatten the wings and ears, and shape the ear points.
- Let the owl dry completely on the cardboard, then remove it.
Final Quality-Control Checklist
- Body is 54 sts around and 10.25 in (26.0 cm) tall at the sides.
- Opening is about 2.2 in (5.6 cm) across and lets a bag slide out easily.
- Belly has 7 tiers and 25 scales, all pointing down.
- Eyes are level and the washers are fully snapped on.
- Wings match each other in height and angle.
- Strap ends are sewn through several rounds, not just the rim.
- All ends are woven in at least 2 in (5.1 cm).
Troubleshooting
- Base ruffles: Your dc are too loose. Go down a hook size for Rnds 1–4.
- Base cups up before Rnd 5: You are working too tightly. Go up a hook size for those rounds.
- Scales lie flat instead of overlapping: Make sure you work around the posts of the V-st, not into its tops.
- Belly panel too wide: Work the scales more tightly, or use a smaller hook for the panel only.
- Bags jam in the opening: Stuff the bags in loosely, and pull the first one partway through so the rest follow.
- Strap stretches: Add a second row of sl st, or use a cotton with less give.
Care
Hand wash in cool water and lay flat to dry over the cardboard. Don’t tumble dry. Heat can loosen the safety eyes and felt any blended fibers.
Final Notes
Everything builds from the gauge. At 3.5 dc per inch, 24 sts make a 2.2 in (5.6 cm) opening and 54 sts make a body 7.7 in (19.6 cm) wide. Twenty dc rounds plus the sc rim give 10.25 in (26.0 cm) of side height. The 6 x 7 in (15.2 x 17.8 cm) belly sits centered on the front, the 2.5 in (6.4 cm) eyes sit above it, and the 5 in (12.7 cm) wings bring the width to 10 in (25.4 cm). Check each stage as you go, and your owl will come out the right size.
Happy crocheting!