

This wall-hanging toilet paper holder looks like a little gingerbread house. The house panel is worked in warm rust-brown single crochet and has a pointed roof. A cream scalloped strip sits along the roof like piped icing. A padded roll bar runs across the lower front, and each end of it sits in a round rust end cap.
The style is cozy and simple, made to hang from a wooden peg or knob in a bathroom. There are only two colors. Rust is used for the house, bar, caps and hanging cord, and cream is used for the roof trim.
The pattern uses US crochet terms. The finished panel is 7 in (17.8 cm) wide by 9.4 in (23.9 cm) tall, not counting the hanging loop. The bar fits a standard roll about 4.1 in (10.4 cm) wide.
Construction overview: work the panel flat in rows from the bottom up, decreasing at both ends to shape the roof. Add one rust edging round all the way around. Crochet the cream roof strip separately and sew it on. Make a single crochet tube over a wooden dowel for the bar, plus two small cups to hold its ends. Finally, sew on the cups and a chain hanging cord.
Finished Size and Construction
- Finished size: 7 in (17.8 cm) wide x 9.4 in (23.9 cm) tall, plus a 3 in (7.6 cm) hanging loop
- Skill level: Easy-Intermediate
- Terminology: US crochet terms
- Yarn weight: Worsted (#4), cotton or cotton blend
- Hook: US 7 (4.5 mm)
- Number of pieces: One holder made of 6 parts: 1 house panel, 1 roof strip, 1 roll bar, 2 end cups and 1 hanging cord
- Layout: One panel, with no motifs or tiles to join
- Panel size before edging: 6.5 in (16.5 cm) wide x 8.9 in (22.6 cm) tall
- Edging depth: 0.25 in (0.6 cm) on every side
- Roll bar: about 7 in (17.8 cm) long
Materials
Choose a smooth worsted cotton or cotton blend. Cotton keeps its shape while holding weight and handles bathroom humidity well. Acrylic also works, but the panel will be softer.
- Color A, Rust: 130 g, about 220 m (240 yd)
- Color B, Cream: 20 g, about 35 m (38 yd)
Both amounts include about 20 percent extra for swatching and differences in tension.
Tools:
- US 7 (4.5 mm) crochet hook
- Yarn needle
- 4 locking stitch markers
- Scissors
- Rustproof pins
- Wooden dowel, 1 in (2.5 cm) diameter, cut to 6.5 in (16.5 cm), with the ends sanded smooth
- Wall peg or round knob for hanging
Abbreviations (US Terms)
- ch – chain
- sl st – slip stitch
- sc – single crochet
- dc – double crochet
- sc2tog – single crochet 2 together
- sc3tog – single crochet 3 together
- MR – magic ring
- BLO – back loop only
- st(s) – stitch(es)
- RS – right side
Special stitch – Scallop: skip 1 st, 5 dc in next st, skip 1 st, sc in next st. Each scallop uses 4 stitches.
sc3tog: (insert hook in next st, yarn over, pull up a loop) 3 times, yarn over, pull through all 4 loops on hook. This removes 2 stitches.
Gauge and Checkpoints
Gauge: 16 sc x 18 rows = 4 in (10.2 cm) in rows of single crochet, worked firmly.
The panel doubles as your gauge swatch. Measure it after Row 6 before you go on.
- After Row 1: 26 sc measure 6.5 in (16.5 cm).
- After Row 27: the rectangle is 6 in (15.2 cm) tall.
- After Row 40: the panel is about 8.9 in (22.6 cm) tall.
- After the edging: 7 in (17.8 cm) x 9.4 in (23.9 cm).
- End cup, Round 4: a flat disc about 1.9 in (4.8 cm) across.
- Roll bar, flattened: about 1.75 in (4.4 cm) wide before you put the dowel in.
Panel too wide? Go down to a US 6 (4.0 mm) hook. Too narrow? Go up to a US 8 (5.0 mm) hook. If only your row gauge is off, add or remove rectangle rows until the rectangle is 6 in (15.2 cm) tall. Then work 1 sc per row-end along the sides in the edging.
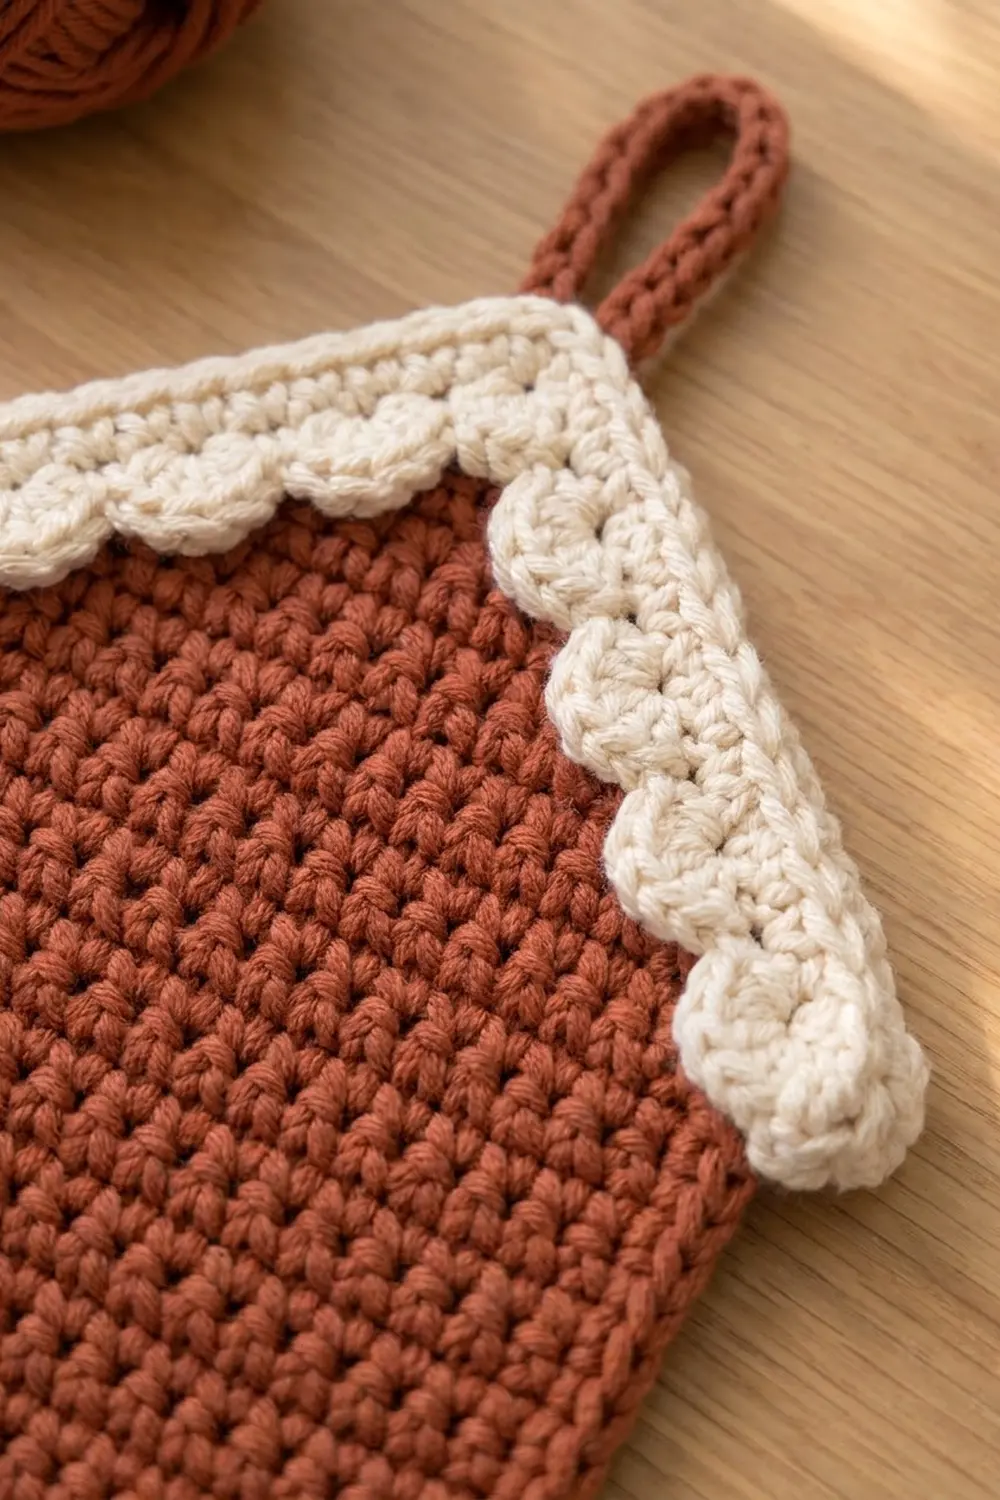
House Panel
With Color A, ch 27.
Row 1 (RS): Sc in 2nd ch from hook and in each ch across, turn. (26 sc)
Rows 2–27: Ch 1 (does not count as a stitch), sc in each st across, turn. (26 sc each row)
Checkpoint: 6.5 in (16.5 cm) wide x 6 in (15.2 cm) tall.
Roof decreases: each row removes 1 stitch at each end.
Row 28: Ch 1, sc2tog, sc in next 22 sts, sc2tog, turn. (24 sc)
Row 29: Ch 1, sc2tog, sc in next 20 sts, sc2tog, turn. (22 sc)
Rows 30–39: Ch 1, sc2tog, sc across to last 2 sts, sc2tog, turn.
Stitch counts: Row 30: 20, Row 31: 18, Row 32: 16, Row 33: 14, Row 34: 12, Row 35: 10, Row 36: 8, Row 37: 6, Row 38: 4, Row 39: 2.
Row 40: Ch 1, sc2tog. (1 st – the peak) Do not fasten off.
The roof takes 13 rows and is about 2.9 in (7.4 cm) tall. Both slanted edges should look straight, without visible steps.
Panel Edging
Edging gauge: 4 sc per inch along the bottom edge and 1 sc per row-end along the straight sides.
Edging Round: Ch 1, 3 sc in the peak st.
- Left roof edge (row-ends 39 to 28): sc in next 2 row-ends, 2 sc in next row-end, repeat 4 times. (16 sc)
- Left side (row-ends 27 to 1): sc in each row-end. (27 sc)
- Bottom (foundation chain): 3 sc in first ch, sc in next 24 ch, 3 sc in last ch. (30 sc)
- Right side: sc in each row-end. (27 sc)
- Right roof edge (row-ends 28 to 39): repeat the left roof edge sequence. (16 sc)
Sl st to first sc. Fasten off.
| Side | Stitches |
|---|---|
| Peak | 3 |
| Left roof | 16 |
| Left side | 27 |
| Bottom (includes both 3-sc corners) | 30 |
| Right side | 27 |
| Right roof | 16 |
| Total | 119 |
Why the math works: The bottom has 26 stitches. The 2 extra stitches at each corner give 3 + 24 + 3 = 30. The sides get 1 sc per row, so they lie flat. On the roof, each row moves in 0.25 in (0.6 cm) and up one row, so each slanted row-end is about 1/3 in long. Twelve row-ends make about 4 in (10.2 cm), and that length needs 16 sc at 4 sts per inch. That’s why every third row-end gets 2 sc. The wide angles where the sides meet the roof don’t need extra stitches.
Checkpoint: 7 in (17.8 cm) x 9.4 in (23.9 cm).
Roof Icing Strip
The strip has a straight outer edge and a scalloped inner edge. A decrease at the center bends it into an upside-down V.
With Color B, ch 44.
Row 1: Sc in 2nd ch from hook and in each ch across, turn. (43 sc) Mark the 22nd st as the center.
Row 2: Ch 1, sc in next 20 sts, sc3tog over the next 3 sts (the marked st is the middle one), sc in last 20 sts, turn. (41 sts) Move the marker to the sc3tog.
Row 3: Ch 1, sc in first st, work Scallop 10 times. (10 scallops: 11 sc + 50 dc = 61 sts)
The 5th scallop’s sc lands in the sc3tog, so the dip between two scallops sits right at the peak, with 5 scallops on each side. Fasten off and leave a 24 in (61.0 cm) tail.
Each arm is about 5.4 in (13.7 cm) long along the straight edge, and the strip is about 1 in (2.5 cm) deep.
End Cups (Make 2)
With Color A, work in continuous rounds and mark the first st of each round.
Rnd 1: MR, 6 sc in ring. (6 sc)
Rnd 2: 2 sc in each st around. (12 sc)
Rnd 3: Sc in next st, 2 sc in next st, repeat 6 times. (18 sc)
Rnd 4: Sc in next 2 sts, 2 sc in next st, repeat 6 times. (24 sc)
Checkpoint: a flat disc about 1.9 in (4.8 cm) across.
Rnd 5: Sc in BLO of each st around. (24 sc) Working in back loops only makes the ridge around the edge of the disc.
Rnd 6: Sc in next 2 sts, sc2tog, repeat 6 times. (18 sc)
Rnd 7: Sc in each st around. (18 sc)
Sl st to next st and fasten off, leaving an 18 in (45.7 cm) tail. The cup is about 0.7 in (1.8 cm) deep, and its narrower opening holds the end of the bar.
Roll Bar
With Color A:
Rnd 1: MR, 7 sc in ring. (7 sc)
Rnd 2: 2 sc in each st around. (14 sc)
Rnds 3–32: Sc in each st around. (14 sc each round)
Checkpoint: about 1.75 in (4.4 cm) wide when flattened. Push the dowel in. It should fit snugly.
Rnd 33: Sc2tog 7 times. (7 sts) Thread the tail through the front loops, pull it tight and weave it in.
The bar is about 7 in (17.8 cm) long and 1.3 in (3.3 cm) across. That slides easily through a roll core, which is about 1.6 in (4.1 cm) wide.
Hanging Cord
With Color A, ch 31. Sl st in the back bump of 2nd ch from hook and in each ch across. (30 sl sts) Fasten off, leaving a 10 in (25.4 cm) tail. The cord is about 6 in (15.2 cm) long.
Assembly
- Roof strip: With the panel RS up, line up the strip’s point with the peak and lay its straight edge over the roof edging. The scallops should hang down onto the rust panel, and each arm should extend about 3/4 in (1.9 cm) past the eave. Pin the strip, then whipstitch along the straight edge. Tack down the sc between each pair of scallops and leave the scallop tips loose.
- End cups: Mark rows 7–11 on both side edges. This puts the bar’s center about 2 in (5.1 cm) above the bottom edge. At each side, place a cup with its opening facing the center of the panel and its disc sticking out about 0.25 in (0.6 cm) past the edging. Sew the back of the cup wall (Rnds 5–7) to the panel front with about 8 small stitches.
- Bar: Press one end of the bar into the left cup. Flex the panel slightly and seat the other end in the right cup. To change the roll, pop the right end out and slide a new roll on.
- Hanging cord: Fold the cord in half. Sew both ends to the back of the panel just below the peak, overlapping them by 1 in (2.5 cm). This makes a 3 in (7.6 cm) loop.
Weave in all ends on the wrong side.
Final Blocking
- Take the bar out.
- Mist the panel and roof strip until damp.
- Pin the panel RS up to 7 in (17.8 cm) x 9.4 in (23.9 cm), with square bottom corners and a sharp peak.
- Shape each scallop with your fingers and pin each tip.
- Let it dry completely, then unpin it and put the bar back.
Final Quality-Control Checklist
- The panel measures 7 in (17.8 cm) x 9.4 in (23.9 cm).
- The edging has 119 sts and the sides lie flat.
- Both roof edges are straight and the same length.
- There are 5 scallops on each side, with a dip at the peak.
- Both eave overhangs are the same.
- The cups sit at the same height and face each other.
- The bar holds firmly but comes out easily.
- The loop is centered and the panel hangs straight.
- All ends are hidden.
Troubleshooting
Wavy roof edges: Work your sc2tog decreases more firmly.
Sides ruffle: Recount the edging. Each side should have 27 sc, one per row-end.
Roof strip won’t form a V: Check that the center decrease in Row 2 is a sc3tog, then block the strip to the roof angle.
Bar slips out of the cups: Rework Rnd 6 as sc in next st, sc2tog for 16 sts.
Bar won’t fit in the cups: Leave out Rnd 7, or make only 4 decreases in Rnd 6 for 20 sts.
Panel sags under the roll: Go down a hook size, or line the back with felt cut to 6.5 in (16.5 cm) x 8.9 in (22.6 cm).
Care
Take out the dowel, hand wash in cool water and lay flat to dry. Reshape the scallops and cups while the piece is still damp.
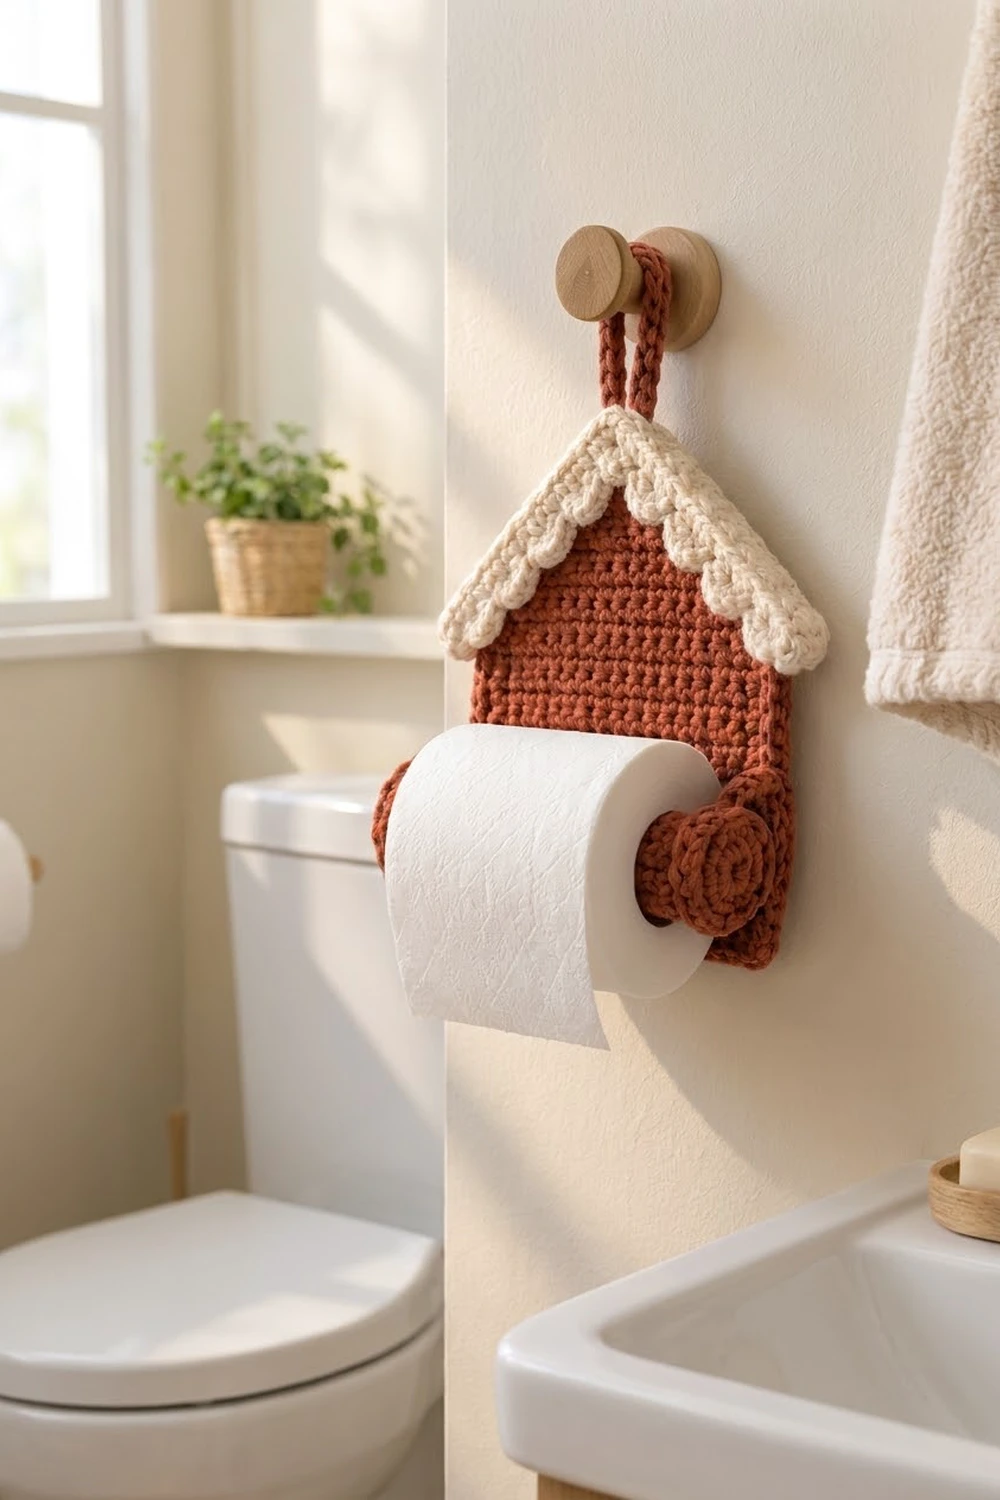
Final Notes
Each measurement builds on the one before. A gauge of 16 sc to 4 in (10.2 cm) gives a 6.5 in (16.5 cm) panel. Twenty-seven rows make a 6 in (15.2 cm) rectangle, and 13 roof rows bring the height to 8.9 in (22.6 cm). The 119-stitch edging finishes the panel at 7 in (17.8 cm) x 9.4 in (23.9 cm). The 43-stitch roof strip covers each roof edge with a small overhang, and the 18-stitch cups hold the 7 in (17.8 cm) bar. If your gauge matches at the first checkpoint, everything after it will fit.
Happy crocheting!