
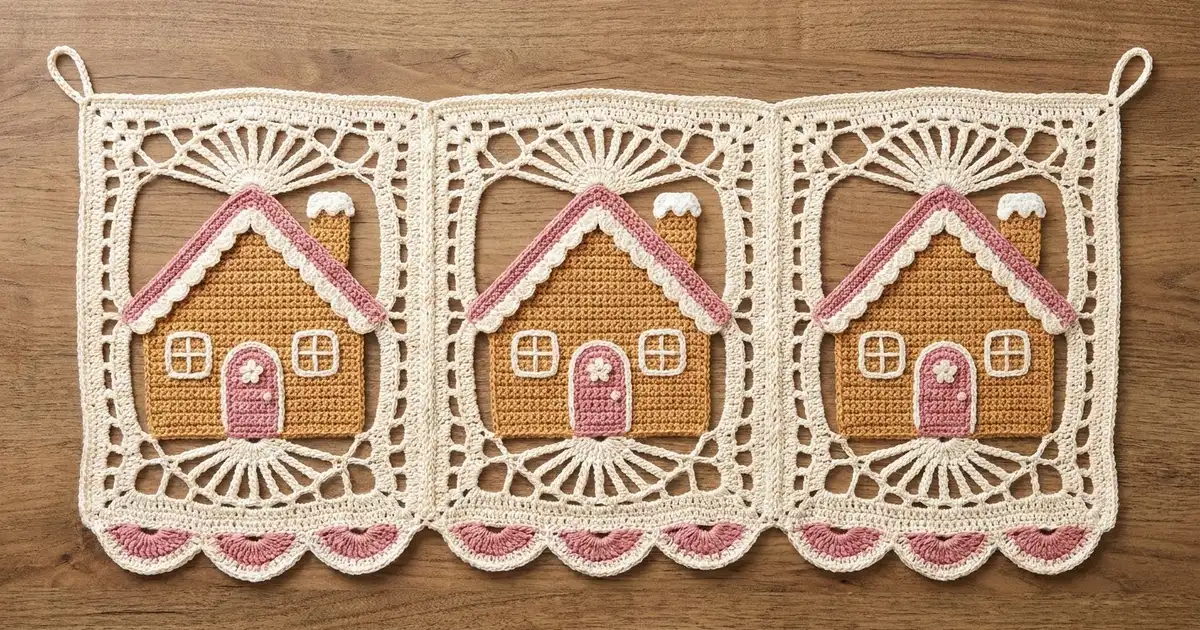
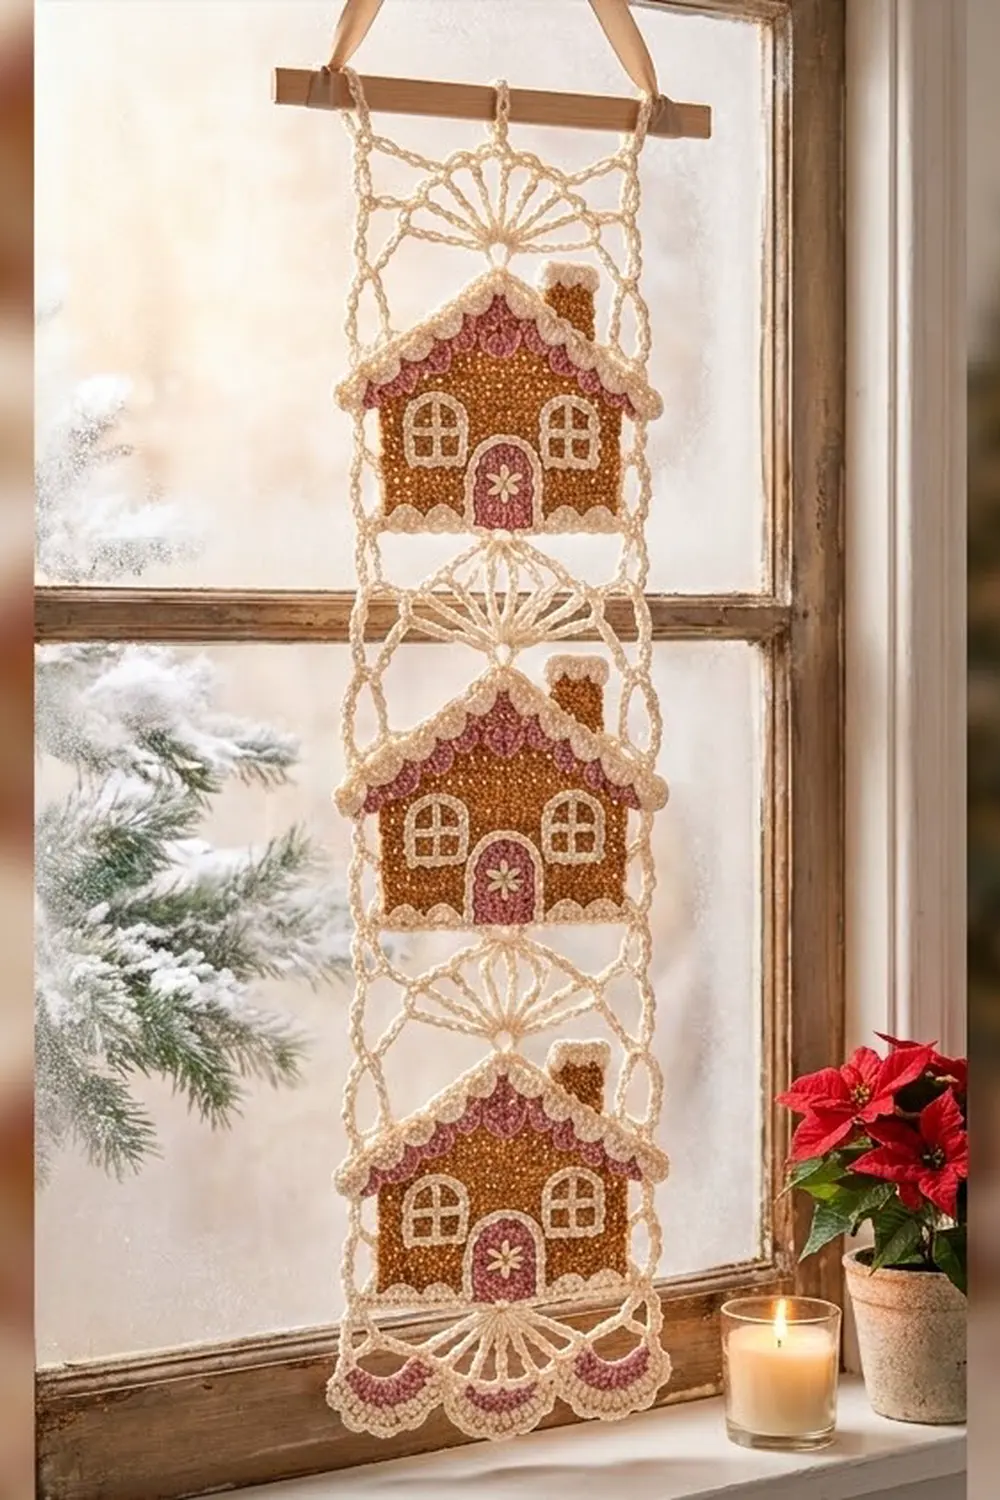
The Gingerbread Lane Lace Strip is a tall, narrow lace panel. It has three cozy gingerbread houses stacked in a single column, and each house sits inside an airy cream frame with a radiating fan above the roof and another below the door. The strip hangs from two chain loops and ends in a row of pink-and-cream scallops.
The colors are classic gingerbread: caramel tan for the house walls, dusty pink for the roof band, door, and inner scallops, and soft cream for the lace, icing, windows, and border. The style is part vintage filet lace, part bakery window.
This pattern uses US crochet terms. The finished strip measures 7 in × 24.75 in (17.8 × 62.9 cm), plus 1.25 in (3.2 cm) hanging loops, for an overall hanging length of 26 in (66.0 cm).
Construction: you crochet three cream lace frames in rows, worked outward from a center foundation chain. Then you make three tan house appliqués with pink and cream roof trim, a door, and a chimney, and sew one house onto each frame. Join the three motifs in a vertical column, then add a border with hanging loops at the top and shells at the bottom.
Finished Size and Construction
- Finished size: 7 in × 24.75 in (17.8 × 62.9 cm), plus 1.25 in (3.2 cm) loops
- Skill level: Intermediate
- Terminology: US
- Yarn weight: DK (#3), cotton or cotton blend
- Hook: 4.0 mm (G-6)
- Number of pieces: 3 motifs (each motif = 1 frame, 1 house, 1 door, 1 chimney)
- Layout: 1 motif wide × 3 motifs tall
- Motif size (after edging): 6 in × 7.75 in (15.2 × 19.7 cm)
- Size before border: 6 in × 23.25 in (15.2 × 59.1 cm)
- Border depth: 0.5 in (1.3 cm) on the sides and top; 1 in (2.5 cm) at the bottom, including the scallops
Materials
Use a smooth, mercerized or matte cotton DK yarn. Cotton holds the lace open and shows the fan spokes clearly. Avoid fuzzy yarns, because they blur the icing scallops.
- Cream: 75 g / 165 m (frames, icing, windows, border)
- Caramel tan: 35 g / 77 m (houses, chimneys)
- Dusty pink: 15 g / 33 m (roof bands, doors, bottom shells)
These quantities assume a yarn of about 220 m per 100 g and include a margin of roughly 15% for gauge swatches and weaving in ends.
Tools: 4.0 mm (G-6) hook, tapestry needle, 8 locking stitch markers, rustproof pins, blocking mat, spray bottle, scissors, and a measuring tape.
Abbreviations (US Terms)
- ch – chain
- sl st – slip stitch
- sc – single crochet
- hdc – half double crochet
- dc – double crochet
- sc2tog – single crochet 2 together
- sk – skip
- sp(s) – space(s)
- st(s) – stitch(es)
- tch – turning chain
- RS / WS – right side / wrong side
Fan: (dc, [ch 1, dc] 4 times) all in the same st. One Fan = 5 dc and 4 ch-1 sps.
Gauge and Checkpoints
- Gauge: 16 sc and 16 sc rows = 4 in (10.2 cm). The mesh is 4 rows = 2 in (5.1 cm).
- Width: 23 sts across the frame = 5.75 in (14.6 cm).
Make one complete motif before starting the others. Check it at these stages:
- After the top half of the frame: 5.75 in × 3.75 in (14.6 × 9.5 cm).
- Full frame body: 5.75 in × 7.5 in (14.6 × 19.1 cm).
- After the edging round: 6 in × 7.75 in (15.2 × 19.7 cm).
- House body before the roof: 4.5 in × 3 in (11.4 × 7.6 cm).
- House including roof: 5.25 in (13.3 cm) tall.
If your motif is too big, go down 0.5 mm in hook size. If it is too small, go up 0.5 mm. A house that is too wide will cover the side lace, so check the house size against the frame before making more.
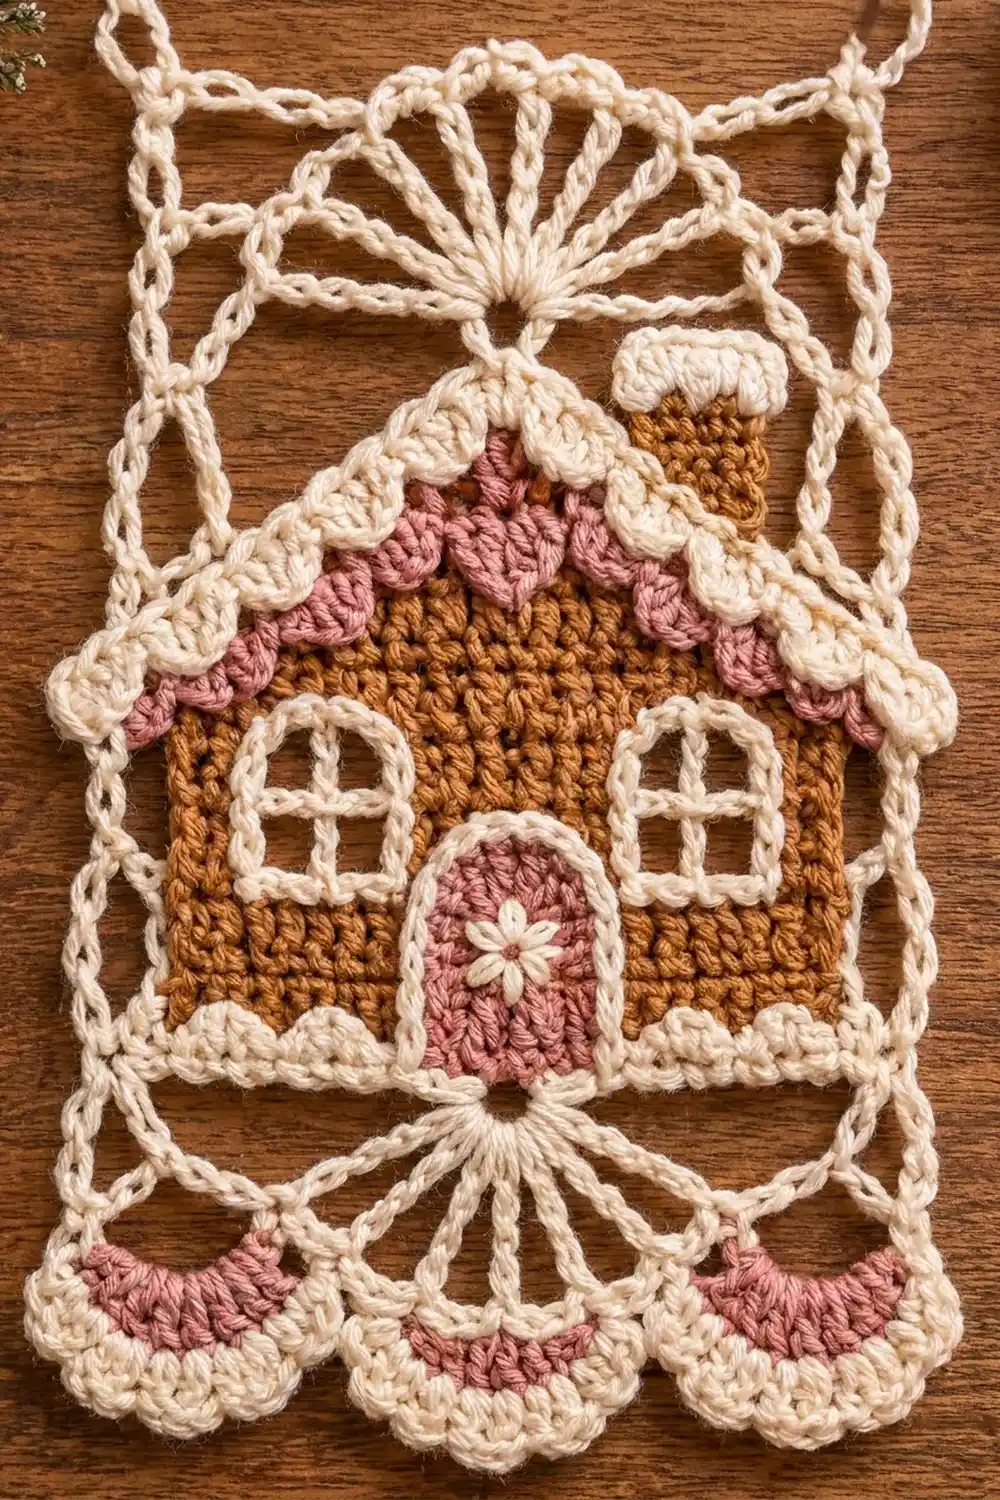
Lace Frame (make 3, cream)
The foundation chain runs across the middle of the frame. You work the top half upward from it, then turn the piece and work the bottom half into the other side of the chain. This way, both fans open outward.
Top Half
Foundation: Ch 24.
Row 1 (RS): Sc in the 2nd ch from the hook and in each ch across, turn. (23 sc)
Row 2: Ch 4 (counts as dc + ch 1), sk the next st, dc in the next st. *Ch 1, sk the next st, dc in the next st; rep from * across, turn. (12 dc, 11 ch-1 sps = 23 sts)
Rows 3–5: Ch 4 (counts as dc + ch 1), dc in the next dc. *Ch 1, dc in the next dc; rep from * across, working the last dc in the 3rd ch of the tch, turn. (23 sts)
Row 6: Ch 1, sc in each dc and each ch-1 sp across, ending with sc in the 3rd ch of the tch, turn. (23 sc)
Row 7 (Fan base): Ch 3 (counts as dc), ch 4, sk the next 4 sts, sc in the next st. Ch 5, sk the next 5 sts, work a Fan in the next st (this is the center, the 12th st). Ch 5, sk the next 5 sts, sc in the next st, ch 4, sk the next 4 sts, dc in the last st, turn.
Check: 1 + 4 + 1 + 5 + 1 + 5 + 1 + 4 + 1 = 23 sts used.
Row 8: Ch 3 (counts as dc), ch 4, sc in the next sc, ch 3, dc in the first dc of the Fan. *Ch 2, dc in the next Fan dc; rep from * 3 more times. Ch 3, sc in the next sc, ch 4, dc in the 3rd ch of the tch, turn. (5 Fan dc, 4 ch-2 sps)
Row 9: Ch 1, sc in the first dc, 3 sc in the ch-4 sp, sc in the sc, 2 sc in the ch-3 sp, sc in the next dc. *Sc in the ch-2 sp, sc in the next dc; rep from * 3 more times. 2 sc in the ch-3 sp, sc in the sc, 3 sc in the ch-4 sp, sc in the 3rd ch of the tch. Fasten off. (23 sc)
Bottom Half
Rotate the frame. With the RS facing, join cream in the first free loop of the foundation chain.
Row 1: Ch 1, sc in each of the 23 free loops, turn. (23 sc)
Rows 2–9: Work as for Rows 2–9 of the top half. Do not fasten off.
Edging Round
The frame has 18 rows: 6 sc rows and 12 dc-height rows. Each long side therefore takes 6 × 1 + 12 × 2 = 30 sc along the row ends.
Rnd 1: Ch 1, then work around all four sides:
– First short side: (sc, ch 2, sc) in the first st (corner), sc in the next 21 sts, (sc, ch 2, sc) in the last st (corner).
– First long side: 30 sc evenly along the row ends (1 sc per sc row end, 2 sc per dc row end).
– Second short side: (sc, ch 2, sc) in the corner st, sc in the next 21 sts, (sc, ch 2, sc) in the corner st.
– Second long side: 30 sc along the row ends.
Sl st to the first sc and fasten off.
Each short side has 23 sc and each long side has 32 sc, counting the corner sc. The corner sc are not counted twice. The round totals 110 sc and 4 ch-2 corner sps.
House Appliqué (make 3)
House Body and Roof (tan)
Foundation: Ch 19.
Row 1: Sc in the 2nd ch from the hook and across, turn. (18 sc)
Rows 2–12: Ch 1, sc across, turn. (18 sc)
Row 13: Ch 1, sc2tog, sc in the next 14 sts, sc2tog, turn. (16 sts)
Rows 14–19: Ch 1, sc2tog, sc across to the last 2 sts, sc2tog, turn. (14, 12, 10, 8, 6, 4 sts)
Row 20: Ch 1, sc2tog twice, turn. (2 sts)
Row 21: Ch 1, sc2tog. (1 st) Fasten off.
Decreasing 1 st at each edge on every row gives a 45-degree gable.
Pink Roof Band
With the RS facing, join pink at the end of Row 12 on the left edge (the left eave).
Row 1:
– Up the left slope: ch 1, sc in the row end of Row 12 and in each row end of Rows 13–20 (9 sc).
– At the peak: (sc, ch 2, sc) in the Row 21 st.
– Down the right slope: 9 sc, ending at the right eave.
Fasten off. Each slope has 10 sc, counting its peak sc, for a total of 20 sc and 1 ch-2 sp.
Cream Icing
With the RS facing, join cream in the first pink sc at the left eave.
Row 1:
– Left slope: ch 1, sc in the same st, then [sk 1, 5 dc in the next st, sc in the next st] 3 times. You finish on the peak sc.
– Peak: (hdc, ch 2, hdc) in the ch-2 sp.
– Right slope: sc in the next sc, then [sk 1, 5 dc in the next st, sc in the next st] 3 times.
Fasten off. Each slope uses 1 + 3 × 3 = 10 sts.
Windows (cream, surface slip stitch)
Mark two windows, each 4 sts wide × 4 rows tall: sts 3–6 and sts 13–16 on Rows 6–9.
Surface sl st around each rectangle. Then work one vertical line and one horizontal line through the center to form the cross panes. Each window measures 1 in (2.5 cm) square.
Door (pink)
Foundation: Ch 5.
Row 1: Sc in the 2nd ch from the hook and across, turn. (4 sc)
Rows 2–6: Ch 1, sc across, turn. (4 sc)
Row 7: Ch 1, sc2tog twice. (2 sts)
Cream edging: Join cream at the lower right corner. Work 7 sc up the row ends, 2 sc in each of the 2 top sts, then 7 sc down the other side. (18 sc) Leave the bottom edge unworked.
Flower: With cream, embroider 5 lazy-daisy petals at the center of the door.
The door measures 1 in × 1.75 in (2.5 × 4.4 cm).
Chimney (tan and cream)
Foundation: With tan, ch 4.
Row 1: Sc in the 2nd ch from the hook and across, turn. (3 sc)
Rows 2–4: Ch 1, sc across, turn. (3 sc)
Row 5 (cream): Ch 1, 2 sc in the first st, sc in the next st, 2 sc in the last st. (5 sc)
The chimney measures 0.75 in × 1.25 in (1.9 × 3.2 cm).
Assembly
- Sew the door over sts 8–11, with its bottom edge level with Row 1 of the house.
- Sew the lower 2 rows of the chimney behind the right roof slope so that the snow cap stands above the icing.
- Pin the house to the RS of the frame. Line up the house bottom with Row 6 of the frame’s bottom half, centered so that 0.625 in (1.6 cm) of mesh shows on each side. The icing peak should just touch the base of the top Fan.
- Whipstitch the walls in place with tan and the icing in place with cream.
Make All Pieces
- Cream: 3 frames, 3 icing rows, 6 windows, 3 door edgings, 3 snow caps
- Tan: 3 houses, 3 chimneys
- Pink: 3 roof bands, 3 doors
Layout grid (1 column):
[ Motif A ]  top
[ Motif B ]
[ Motif C ]  bottom
Joining
- Hold Motif A and Motif B with the RS together, matching the bottom edge of A to the top edge of B.
- With cream, sl st through both loops of both pieces:
- 1 sl st through both corner ch-2 sps together
- 23 sl sts, matching st to st
- 1 sl st through the other pair of corner sps
That is 25 sl sts in total. - Join Motif C to Motif B the same way.
Keep the slip stitches loose. If the seams pull, go up 0.5 mm in hook size. Once the seam corner sps are joined, they are used up, so the border does not work into them.
Checkpoint: The joined strip measures 6 in × 23.25 in (15.2 × 59.1 cm).
Border
Border gauge: Work 1 sc in each st. Never add or skip sts.
Starting counts: Each long side has 3 motifs × 32 sts = 96 sts. Each short side has 23 sts.
Rnd 1 (cream): With the RS facing, sc in each st around. Work (sc, ch 2, sc) in each of the 4 outer corner ch-2 sps. Sl st to join and fasten off.
– Long sides: 96 + 2 = 98 sc each
– Short sides: 23 + 2 = 25 sc each
– Total: 246 sc and 4 ch-2 sps
Checkpoint: 6.5 in × 23.75 in (16.5 × 60.3 cm).
Rnd 2 (cream, sides and top only): Join cream in the bottom-right corner sp.
– Right side: sc in each of the 98 sts.
– Top-right corner: (sc, ch 10, sc) in the corner sp. This is the first hanging loop.
– Top: sc in each of the 25 sts.
– Top-left corner: (sc, ch 10, sc) in the corner sp. This is the second hanging loop.
– Left side: sc in each of the 98 sts.
Sl st in the bottom-left corner sp and fasten off. (225 sc, 2 ch-10 loops)
Shell Row A (pink): With the RS facing, join pink in the first of the 25 bottom sts. Sc in the same st, then [sk 2, 7 dc in the next st, sk 2, sc in the next st] 4 times. Fasten off. (4 shells, 5 sc)
Shell Row B (cream): With the RS facing, join cream in the corner sp at the start of Row A. Sc in the corner sp, then sc in the first sc. *Sc in the first dc of the shell, 2 sc in each of the next 5 dc, sc in the last dc, sc in the next sc; rep from * 3 more times. Sc in the other corner sp. Fasten off. (55 sc)
Why the math works:
– The long sides use exactly 3 × 32 sts, with nothing added at the seams.
– The bottom count works because 25 = 1 + (6 × 4), so the 4 shells fit with an sc at each end.
– Shell Row B uses 2 + (4 × 13) + 1 = 55 sts.
Final Blocking
- Weave in all the ends behind the appliqués.
- Spray the strip until it is damp but not dripping.
- Pin it flat to 7 in × 24.75 in (17.8 × 62.9 cm).
- Pin each Fan spoke and each shell into a smooth curve.
- Pin the two hanging loops straight up, 1.25 in (3.2 cm) tall.
- Let it dry completely, about 24 hours.
Final Quality-Control Checklist
- [ ] Each motif measures 6 in × 7.75 in (15.2 × 19.7 cm).
- [ ] Every Fan has 5 spokes, centered on the 12th st.
- [ ] Each house is centered, with 0.625 in (1.6 cm) of mesh showing on each side.
- [ ] Each slope has 3 icing shells, with a pointed peak between them.
- [ ] The chimneys are on the right slope and all at the same height.
- [ ] The seams are flat and each has 25 sl sts.
- [ ] Each long side of the border has 98 sc in Rnd 1.
- [ ] There are 4 bottom shells and 2 equal hanging loops.
Troubleshooting
- The frame is narrower than the house: Your gauge is tight. Go up a hook size, or loosen the ch-1 sps.
- The Fan cups or ruffles: Make the chains in Row 8 slightly tighter, or block the Fan flatter.
- The roof is lopsided: Recount the sts after each decrease row (16, 14, 12, 10, 8, 6, 4, 2, 1).
- The seams pucker: Rework them with a larger hook, keeping the sl sts loose.
- The strip flares at the edges: Count the 30 row-end sc on each motif side again.
- The shells crowd together: Check that Rnd 1 gives exactly 25 sts on the bottom edge.
Care
Hand wash in cool water with mild soap. Press out the water in a towel, then reshape and dry flat. If needed, steam lightly with the iron held above the lace, without touching it.
Final Notes
The measurement chain runs like this:
1. Each frame is 5.75 in × 7.5 in (14.6 × 19.1 cm) before edging.
2. After the edging round, each motif is 6 in × 7.75 in (15.2 × 19.7 cm).
3. Three motifs joined make a strip of 6 in × 23.25 in (15.2 × 59.1 cm).
4. Border Rnd 1 brings it to 6.5 in × 23.75 in (16.5 × 60.3 cm).
5. The finished strip is 7 in × 24.75 in (17.8 × 62.9 cm), plus 1.25 in (3.2 cm) loops.
If every checkpoint matches, the border counts will fit exactly. Happy crocheting!