
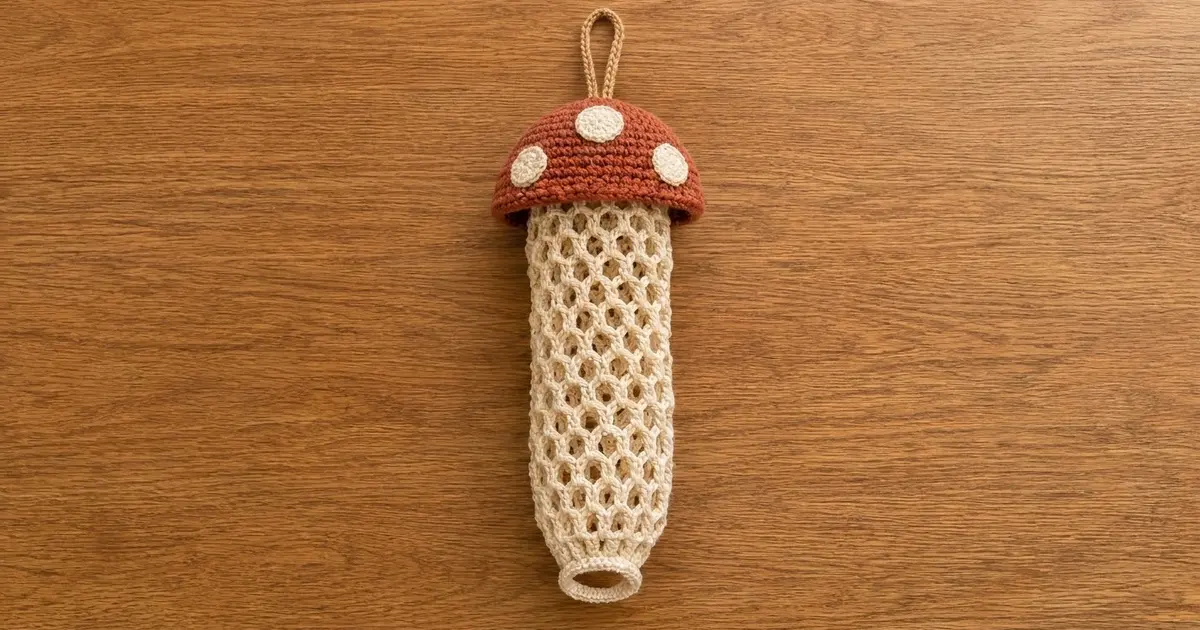
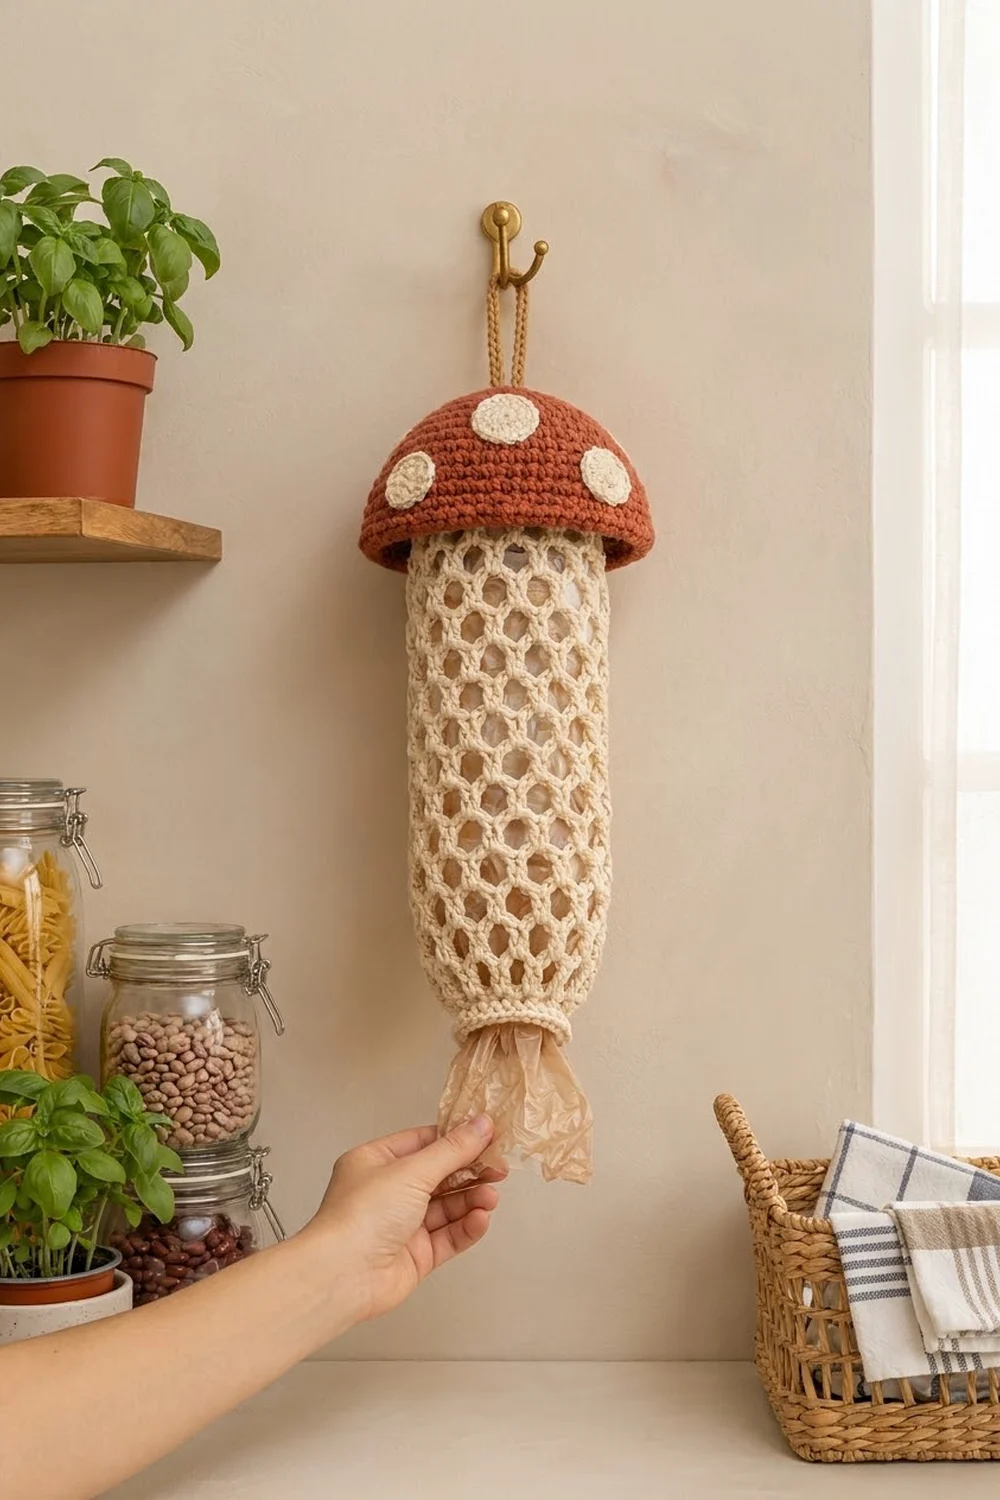
This toadstool bag holder brings a little woodland charm to the kitchen. A cream honeycomb mesh tube holds your spare plastic bags, a rust-red dome cap sits on top, and five cream spots finish the classic mushroom look. A tan cord loop lets it hang from any hook, and a cream ring at the bottom keeps the opening round so bags pull out one at a time.
The palette is warm and earthy: cream, rust and tan. The style is cottage-kitchen and practical. The mesh lets you see how full the holder is, and the solid cap hides the bunched bags at the top.
This pattern uses US crochet terms throughout. The finished holder measures about 17 in (43.2 cm) from the top of the cap to the bottom ring, or about 20.5 in (52.1 cm) including the hanging loop. The cap is 8.25 in (21.0 cm) wide laid flat.
Here is how it goes together. First you work the body top-down in joined rounds: a solid band, then a chain-loop mesh, then a gathered bottom cuff. Next you work the cap as a dome from the crown down. After that you make the dots, cover a plastic ring and make a slip-stitch cord. Finally you sew everything together, matching stitch to stitch.
Finished Size and Construction
- Finished size: about 17 in (43.2 cm) from cap top to bottom ring; 20.5 in (52.1 cm) with the loop
- Skill level: Easy / Advanced Beginner
- Terminology: US crochet terms
- Yarn weight: worsted weight (#4) cotton
- Hook: 5.0 mm (H-8)
- Number of pieces: 10 (1 body, 1 cap, 3 large dots, 2 small dots, 1 covered ring, 1 cord, plus the plastic ring inside the covered ring)
- Layout: cap over the body top, dots on the cap, ring inside the bottom edge, cord at the crown
- Body size: 6 in (15.2 cm) wide flat × 15.75 in (40.0 cm) long
- Body length before the bottom cuff: 14.5 in (36.8 cm)
- Bottom cuff depth: 1.25 in (3.2 cm)
- Cap size: 8.25 in (21.0 cm) wide flat × 3.25 in (8.3 cm) tall
Materials
Use a smooth, sturdy worsted-weight cotton or cotton blend. Cotton holds its shape when the holder is full and won’t stretch out as much as acrylic. The amounts below assume about 190 m per 100 g.
- Cream (body, dots, ring cover): 100 g / 190 m
- Rust (cap): 30 g / 57 m
- Tan (hanging cord): 10 g / 19 m
Tools:
– 5.0 mm (H-8) crochet hook
– one plastic or wooden ring, 2.25 in (5.7 cm) outer diameter
– tapestry needle
– stitch markers
– scissors
– measuring tape
– rust-proof pins for blocking
All quantities include a safety margin of about 30%.
Abbreviations (US Terms)
- ch – chain
- sc – single crochet
- dc – double crochet
- sl st – slip stitch
- inc – 2 sc in the same stitch
- st(s) – stitch(es)
- sp – space
- sk – skip
- MR – magic ring
- rnd – round
Special stitch: back-bump slip-stitch cord. Make a chain. Working back along it, slip stitch into the bump on the back of each chain. This gives a firm, braided-looking cord that doesn’t stretch.
Gauge and Checkpoints
Single-crochet gauge: 16 sc and 16 rnds = 4 in (10.2 cm). That is 4 sts and 4 rnds per 1 in (2.5 cm).
Mesh gauge: 4 mesh rnds = 3 in (7.6 cm), so each mesh rnd is 0.75 in (1.9 cm) tall.
Work the cap first, since it is the smallest solid piece, and use it as your gauge test.
- Cap after Rnd 7: the flat disc measures 3.5 in (8.9 cm) across.
- Cap after Rnd 13: the opening circumference is 15 in (38.1 cm).
- Body after Rnd 4: the band is 6 in (15.2 cm) wide flat and 1 in (2.5 cm) tall.
- Body after Rnd 12: it is 7 in (17.8 cm) long.
- Body after Rnd 22: it is 14.5 in (36.8 cm) long.
If your pieces come out too big, go down one hook size. If they come out too small, go up one size.
Most of the fit depends on the body’s top band (48 sts, 12 in / 30.5 cm around) matching cap Rnd 9 (48 sts). As long as your sc gauge is right, those two edges will line up.
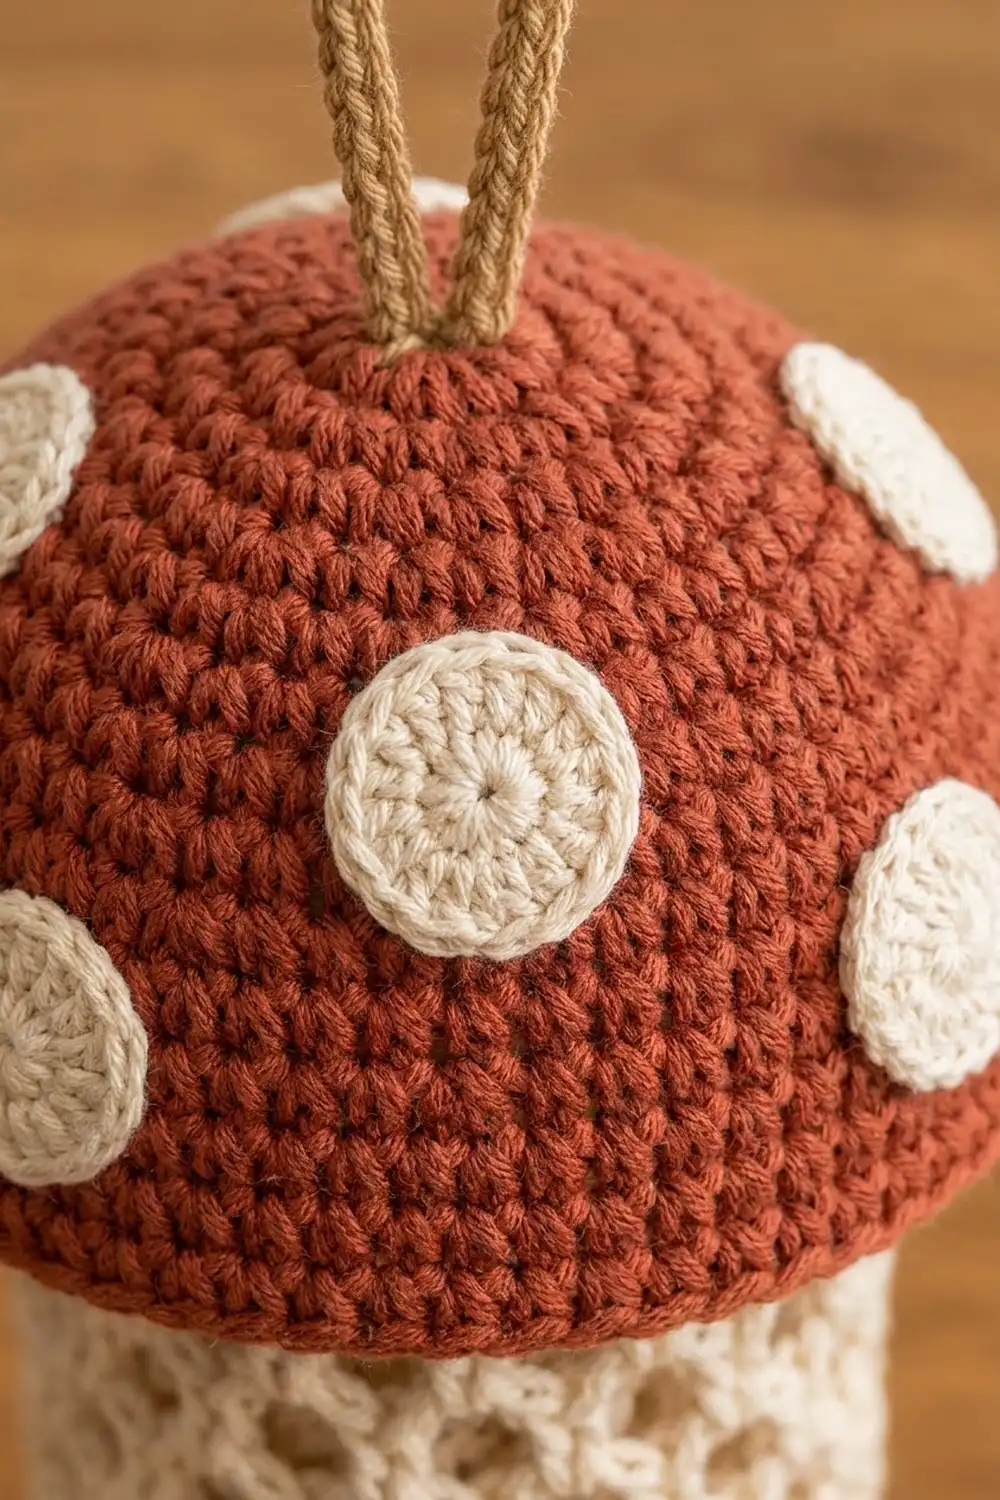
Cap (Rust)
Work in continuous spiral rounds. Mark the first st of each rnd with a stitch marker.
- Rnd 1: 6 sc in MR. (6)
- Rnd 2: inc in each st. (12)
- Rnd 3: (sc, inc) 6 times. (18)
- Rnd 4: (2 sc, inc) 6 times. (24)
- Rnd 5: (3 sc, inc) 6 times. (30)
- Rnd 6: (4 sc, inc) 6 times. (36)
- Rnd 7: (5 sc, inc) 6 times. (42)
Checkpoint: the disc measures 3.5 in (8.9 cm) across.
- Rnd 8: sc in each st. (42)
- Rnd 9: (6 sc, inc) 6 times. (48) Place a contrasting marker in this rnd. The body attaches here later.
- Rnd 10: sc in each st. (48)
- Rnd 11: (7 sc, inc) 6 times. (54)
- Rnd 12: sc in each st. (54)
- Rnd 13: (8 sc, inc) 6 times. (60)
Because Rnds 8–13 alternate increase and plain rounds, the piece curves down into a dome instead of lying flat.
- Rnds 14–16: sc in each st. (60)
- Rnd 17 (brim flare): (9 sc, inc) 6 times. (66)
- Rnd 18: sc in each st, then sl st to the next st. (66) Fasten off and weave in the end.
The final 6 increases make the slight outward flare at the rim. The rim is 66 sts, or 16.5 in (41.9 cm) around, which is 8.25 in (21.0 cm) wide laid flat. The cap stands about 3.25 in (8.3 cm) tall.
Body (Cream)
Work in joined rounds from the top down.
Top band
– Foundation: ch 48. Join with a sl st to the first ch, taking care not to twist the chain.
– Rnd 1: ch 1, sc in each ch, sl st to the first sc. (48)
– Rnds 2–4: ch 1, sc in each st, sl st to the first sc. (48)
Checkpoint: the band is 6 in (15.2 cm) wide flat and 1 in (2.5 cm) tall.
Mesh
– Rnd 5 (set-up): ch 1, sc in the first st, ch 5, sk 3 sts, sc in the next st 11 times. Then ch 2 and dc in the first sc. (12 ch-5 sps)
The ch 2 + dc counts as the 12th loop, and it places your hook at the middle of that loop. Each loop spans 4 band sts: 12 × 4 = 48.
- Rnds 6–22: ch 1, sc in the sp made by the joining dc, ch 5, sc in the next ch-5 sp 11 times, ch 2, dc in the first sc. (12 ch-5 sps each rnd)
Each sc sits at the middle of the loop below it, which staggers the openings into the honeycomb pattern. In total there are 18 mesh rnds, which add 13.5 in (34.3 cm).
Checkpoint: the body measures 14.5 in (36.8 cm) long, which is 1 in + 13.5 in.
Make All Pieces
Cream:
– Body: 1 (above)
– Large dot, make 3: 6 sc in MR. Rnd 2: inc in each st (12). Rnd 3: (sc, inc) 6 times (18). Sl st to join and fasten off with a 10 in (25.4 cm) tail. Each large dot is 1.5 in (3.8 cm) across.
– Small dot, make 2: 6 sc in MR. Rnd 2: inc in each st (12). Sl st to join and fasten off with a tail. Each small dot is 1 in (2.5 cm) across.
– Ring cover, make 1: attach the yarn to the 2.25 in (5.7 cm) ring and work 36 sc around it, packing the sts evenly. Sl st to the first sc and fasten off. The covered ring is about 2.75 in (7.0 cm) across on the outside.
Rust:
– Cap: 1 (above)
Tan:
– Cord, make 1: ch 45. Starting in the 2nd ch from the hook, sl st in the back bump of each ch. (44 sl st) The cord is about 9 in (22.9 cm) long. Leave both tails long.
Assembly layout (front view, top to bottom):
        [ tan loop ]
     ( L )            <- large dot, crown front
  ( L ) RUST CAP ( L ) <- large dots, sides
   |  cream mesh  |    (2 small dots on cap back)
   |    body      |
   |              |
    \ cuff + ring /
Joining
Do the steps in this order, while the inside of the cap is still easy to reach.
- Cord. Fold the cord in half. Push both ends down through the MR hole at the crown from the outside, leaving a loop about 3.5 in (8.9 cm) tall. Knot the ends on the inside and sew them flat across Rnds 1–3.
- Dots. Pin one large dot at the front of the crown, over Rnds 5–8. Pin the other two large dots on the front sides, over Rnds 12–15. Pin both small dots on the back. Whipstitch around each dot’s outer loops with its own tail.
- Body to cap. Push the top band up inside the cap until its top edge reaches the marked Rnd 9 on the inside. Match st for st: 48 band sts to 48 Rnd 9 sts, a 1:1 ratio with nothing added or skipped.
Whipstitch only the back 24 sts with cream. Leave the front 24 sts free so you can lift the front of the cap to refill the holder from the top.
Keep the whipstitch snug but not tight. The seam should be about as wide as the fabric around it, with no puckering.
Size checkpoint: hang the holder from its loop. The cap rim should cover the top band and the first mesh rnd, and it should measure 14.5 in (36.8 cm) from the cap top to the bottom of Rnd 22. If it measures more than about 0.5 in (1.3 cm) longer, your mesh rnds are loose. Block the holder shorter (see below) before you add the cuff ring.
Border: Bottom Dispensing Cuff
The cuff is the border of the body. It narrows the mesh into a smaller opening and attaches it to the covered ring.
Border gauge: 16 sc = 4 in (10.2 cm). The cuff’s 36 sts are 9 in (22.9 cm) around, which is 4.5 in (11.4 cm) wide flat. Laid flat, each side has 18 sts, and that count includes the 1 st at each fold.
- Rnd 23 (conversion): ch 1, 3 sc in the joining-dc sp, then 3 sc in each of the 11 remaining ch-5 sps. Sl st to the first sc. 12 sps × 3 sc = 36 sts (18 per flat side).
This rnd works into spaces, not stitches, so there are no existing sts to carry over. It also gathers the 12 in (30.5 cm) mesh down to 9 in (22.9 cm). It adds 0.25 in (0.6 cm).
- Rnd 24 (openwork): ch 4 (counts as dc + ch 1), sk the next st, dc in the next st, ch 1, sk the next st 17 times. Sl st to the 3rd ch of the beg ch-4. That gives 18 dc + 18 ch-1 sps = 36 sts (18 per side). It adds 0.5 in (1.3 cm).
- Rnd 25: ch 1, sc in each dc and each ch-1 sp, sl st to the first sc. 36 worked 1 per existing st + 0 extra = 36 sts.
- Rnd 26: ch 1, sc in each st, sl st to the first sc. 36 sts (18 per side). Fasten off, leaving a 24 in (61.0 cm) tail.
Rnds 25–26 add 0.5 in (1.3 cm), so the cuff is 1.25 in (3.2 cm) deep. The finished body is 14.5 + 1.25 = 15.75 in (40.0 cm) long.
Attach the ring. Set the covered ring just inside Rnd 26. Whipstitch each Rnd 26 st to one ring sc, 36 to 36.
Why the math works:
– 12 loops × 3 sc = 36.
– 36 is even, so the dc/ch-1 rnd divides evenly into 18 pairs.
– 36 is exactly the number of sc on the ring, so the join is a clean 1:1 with no easing.
Final Blocking
- Wet the whole holder in cool water and gently press out the excess. Don’t wring it.
- Roll it in a towel to remove more water.
- Fill the body loosely with a rolled towel about 4 in (10.2 cm) thick so it holds a tube shape.
- Lay it flat. Pin the body straight to 6 in (15.2 cm) wide and 15.75 in (40.0 cm) long.
- Shape the cap over a small bowl or a ball about 5 in (12.7 cm) across, and press the rim flare outward evenly.
- Pin each dot flat against the cap curve.
- Let it dry completely, usually 24–36 hours for cotton, then remove the towel roll.
Final Quality-Control Checklist
- Cap: 66 sts at the rim; 8.25 in (21.0 cm) flat; 3.25 in (8.3 cm) tall
- Body band: 48 sts; mesh: 12 loops in every rnd from Rnd 5 to Rnd 22
- Cuff: 36 sts in each of Rnds 23–26
- Ring: 36 sc, joined 1:1 to Rnd 26
- Back 24 band sts sewn to cap Rnd 9; front 24 left free
- 3 large dots and 2 small dots sewn flat, with no curling edges
- Cord anchored firmly on the inside of the crown
- All ends woven in at least 2 in (5.1 cm)
- Overall length about 17 in (43.2 cm), or 20.5 in (52.1 cm) with the loop
Troubleshooting
- The cap is flat instead of domed. You probably increased in Rnds 8, 10 or 12. Those rnds must be plain sc.
- The cap rim ripples. Your tension is loose. Rework Rnd 17 as (10 sc, inc) 6 times for 66 sts… or keep 60 sts with plain sc instead; the second option is simpler: work Rnd 17 as plain sc (60) and accept a straighter rim.
- The mesh twists in a spiral. Make sure each rnd starts in the joining-dc sp. Count 12 loops at the end of every rnd.
- The body is too long. Leave out mesh rnds; each one removes 0.75 in (1.9 cm).
- The cuff flares. Make sure you worked exactly 3 sc per loop in Rnd 23, not 4.
- The ring sts look crowded. Push them around the ring until they are evenly spaced before you sew the ring to the body.
- Bags fall out of the bottom. Make the cuff tighter by working Rnd 26 with a 4.5 mm hook.
Care
Hand wash in cool water, reshape while damp and dry flat. Don’t put it in the dryer, because heat can shrink the cotton and distort the cap.
Final Notes
The sizes in this pattern build on each other, so if each checkpoint matches, the pieces will fit together:
- 16 sc = 4 in (10.2 cm), which gives a 48-st band that is 12 in (30.5 cm) around.
- The band matches cap Rnd 9, also 48 sts.
- 12 mesh loops become 36 cuff sts.
- 36 cuff sts match the 36 sc on the ring.
If each checkpoint matches, the finished toadstool hangs straight and pulls bags out neatly from the bottom.
Happy crocheting!