

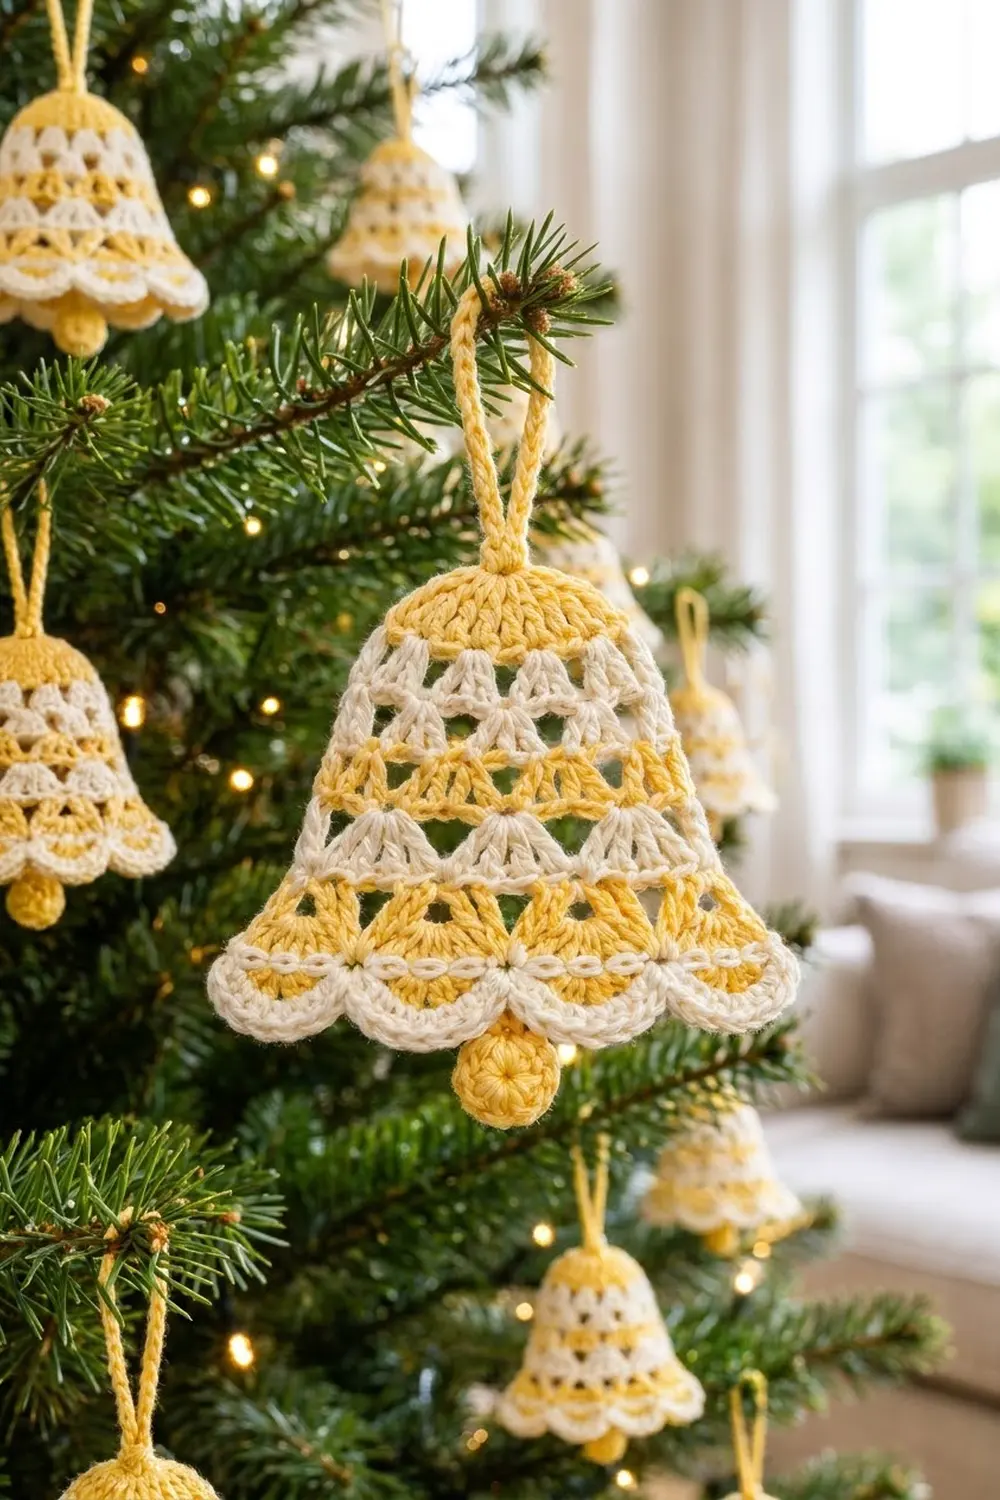
The Golden Chime Bell is a flat, lacy Christmas bell worked in two soft colors: butter yellow and warm cream. A solid yellow crown sits at the top. Below it, cream shell rows and yellow V-stitch rows alternate down the bell, so open triangles show through the body. A cream scalloped edge wraps around small yellow inner scallops, a round yellow clapper hangs from the center of the hem, and a yellow loop at the top is ready for the tree.
The look is classic and a little vintage, like a lace doily cut into a bell. Hang several together and they read as a set, but the pattern below is for one ornament, made in one flat piece with two small add-ons.
This pattern uses US crochet terms. The finished bell measures about 5 in (12.7 cm) wide at the scalloped hem and 4 in (10.2 cm) tall from the crown to the scallop tips. The clapper adds about 0.5 in (1.3 cm) below the hem, and the hanging loop adds 2 in (5.1 cm) above the crown.
You work the body flat in rows from the top down. Two yellow rows form the crown. Then six lace rows alternate cream and yellow and widen the bell a little at each edge. Three edging rows finish the hem. The clapper and the hanging loop are made separately and attached last.
Finished Size and Construction
- Finished size: 5 in (12.7 cm) wide x 4 in (10.2 cm) tall, plus a 0.5 in (1.3 cm) clapper drop and a 2 in (5.1 cm) loop
- Skill level: Easy / advanced beginner
- Terminology: US
- Yarn weight: Sport (#2) mercerized cotton
- Hook: 3.0 mm
- Number of pieces: 1 bell body, plus 1 clapper and 1 hanging loop attached to it
- Layout: Single flat ornament, no joining of motifs
- Body size before edging (after Row 8): 4.25 in (10.8 cm) wide x 3.2 in (8.1 cm) tall
- Edging depth (Rows 9–11): 0.8 in (2.0 cm)
Materials
Pick a smooth, mercerized sport-weight cotton. It gives clear stitch definition, holds the scallops crisp, and doesn’t fuzz on the tree. Cotton-blend sport yarn also works, but test the gauge first because it may block larger.
- Color A, butter yellow: 5 g, about 15 m (16.4 yd), for the crown, V-stitch rows, inner scallops, clapper and loop
- Color B, cream: 4 g, about 12 m (13.1 yd), for the shell rows, sc trim row and outer scallops
These quantities include a margin for swatching and weaving in ends. A single 50 g ball of each color makes many bells.
Tools
- 3.0 mm crochet hook
- Tapestry needle
- Scissors
- Rustproof pins and a foam blocking mat
- Spray bottle
- Optional: spray starch or fabric stiffener
Abbreviations (US Terms)
- ch – chain
- sl st – slip stitch
- sc – single crochet
- dc – double crochet
- st(s) – stitch(es)
- sp – space
- sk – skip
- rep – repeat
- RS / WS – right side / wrong side
Special stitches
- V-st (V-stitch): (dc, ch 1, dc) in the same stitch or space.
- Shell: 3 dc in the same stitch or space.
- Join: Make a slip knot on your hook, sl st in the stitch named, then work as written.
A beginning ch 3 always counts as 1 dc.
Gauge and Checkpoints
Gauge: 24 dc and 10 rows = 4 in (10.2 cm) in plain dc. Along the hem, the sc trim row works out at about 7 sc per 1 in (2.5 cm).
The bell is small, so the bell itself is your gauge swatch. Make one, measure it at each checkpoint, and adjust before you make a batch.
| After | Width | Height |
|---|---|---|
| Row 2 (crown) | 2.25 in (5.7 cm) | 0.8 in (2.0 cm) |
| Row 4 | 3 in (7.6 cm) | 1.6 in (4.1 cm) |
| Row 8 (body) | 4.25 in (10.8 cm) | 3.2 in (8.1 cm) |
| Row 9 (trim) | 4.5 in (11.4 cm) | 3.4 in (8.6 cm) |
| Row 11 (edging) | 5 in (12.7 cm) | 4 in (10.2 cm) |
Too big? Go down to a 2.75 mm hook, or keep your chains snug. Loose ch-1 spaces are the most common cause of a wide bell.
Too small? Go up to a 3.25 mm hook. If only the height is short, pull up the dc loops a little taller.
A difference of up to 0.25 in (0.6 cm) is fine for an ornament. Just keep the same hook for the whole set so the bells match.
Pattern: Bell Body
Each lace row uses one color, so you cut the yarn at the end of every row from Row 2 onward. Then join the next color at the edge where you finished. Leave 4 in (10.2 cm) tails. Weave them into the row ends as you go so the sides stay neat.
Crown
Row 1 (A): Ch 9. Dc in 4th ch from hook and in each ch across. Turn. (7 sts: the skipped ch 3 counts as the first dc.)
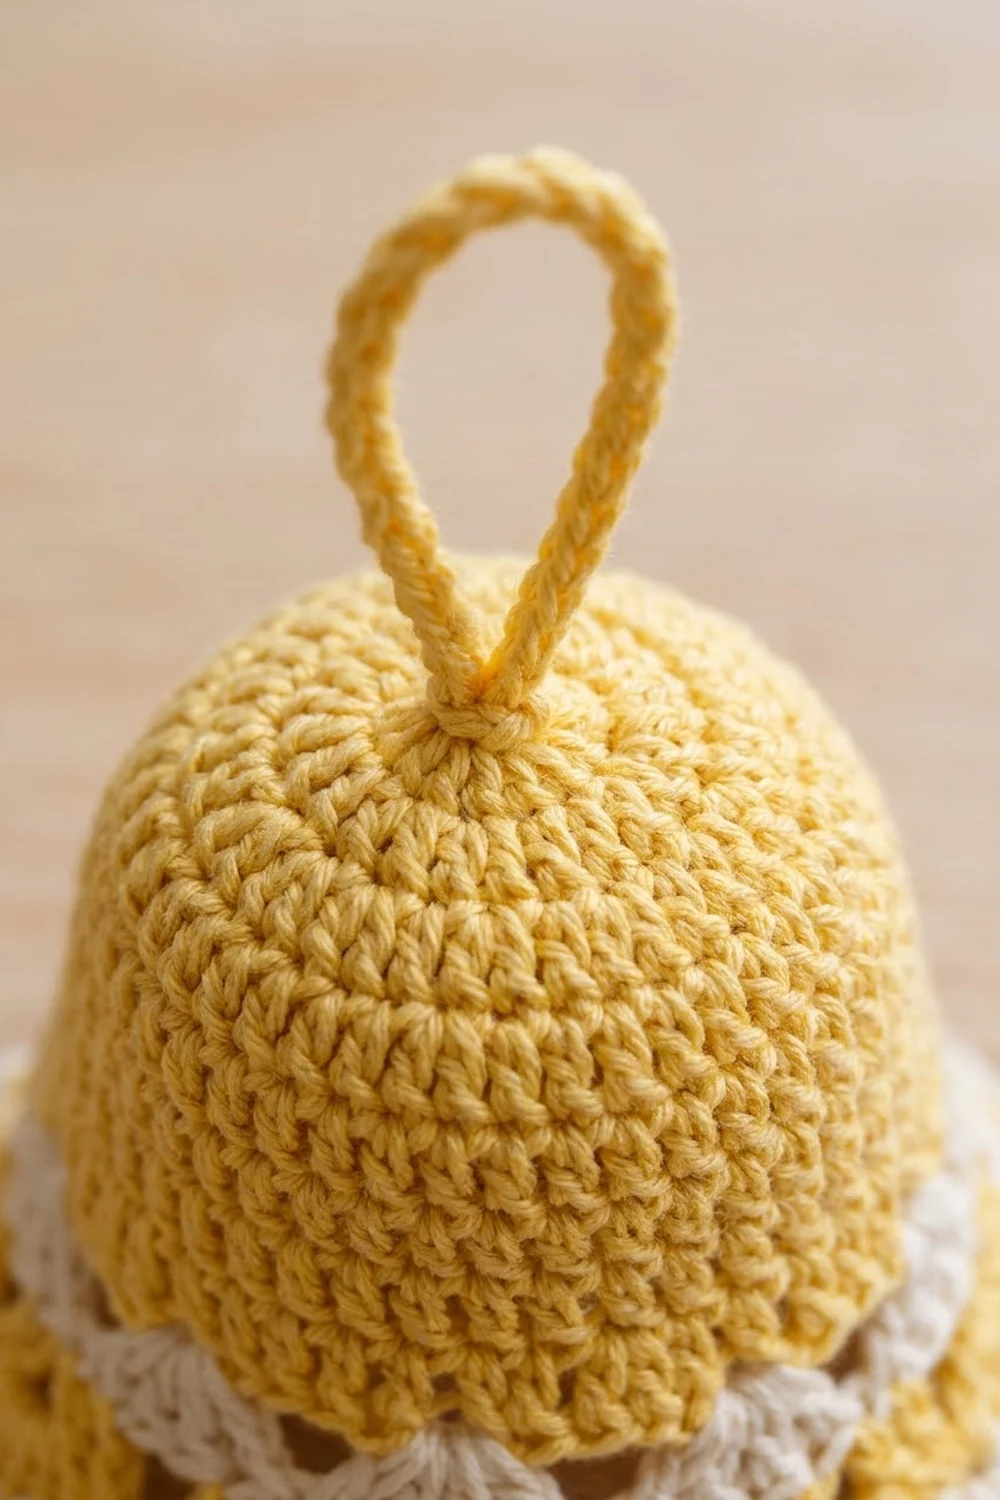
Row 2 (A): Ch 3, dc in first st, 2 dc in each of next 2 sts, dc in center st, 2 dc in each of last 3 sts. (13 dc.) Fasten off A.
The increases sit evenly on both sides of the center stitch, so the crown flares into a smooth dome.
Checkpoint: 2.25 in (5.7 cm) wide x 0.8 in (2.0 cm) tall.
Lace Rows
Row 3 (B, shell row): Join B in last st of Row 2. Ch 3, dc in same st, ch 1, sk 2 sts, shell in next st; rep from * 2 more times, ch 1, sk 2 sts, 2 dc in last st. (13 dc: 3 shells and 2 half-shells of 2 dc each; 4 ch-1 sps.) Fasten off.
Check: 1 st + 3 x (2 skipped + 1 shell st) + 2 skipped + 1 st = 13 sts used.
Row 4 (A, V row): Join A in last st of Row 3. Ch 3, dc in same st, sk next dc, V-st in next ch-1 sp, sk next dc, dc in center dc of next shell; rep from * 2 more times, sk next dc, V-st in last ch-1 sp, sk next dc, 2 dc in top of beginning ch-3. (15 dc: 2 edge dc at each end, 4 V-sts, 3 center dc; 4 ch-1 sps inside the V-sts.) Fasten off.
Checkpoint: 3 in (7.6 cm) wide x 1.6 in (4.1 cm) tall.
Row 5 (B, shell row): Join B in last st of Row 4. Ch 3, dc in same st, ch 1, shell in ch-1 sp of next V-st, ch 1; rep from * 3 more times, 2 dc in top of beginning ch-3. (16 dc: 4 shells and 2 half-shells; 5 ch-1 sps.) Fasten off.
Each ch 1 between shells skips the second dc of a V, the center dc and the first dc of the next V. This makes the open triangles.
Row 6 (A, V row): Join A in last st of Row 5. Ch 3, dc in same st, V-st in next ch-1 sp, dc in center dc of next shell; rep from * 3 more times, V-st in last ch-1 sp, 2 dc in top of beginning ch-3. (18 dc: 4 edge dc, 5 V-sts, 4 center dc; 5 ch-1 sps.) Fasten off.
Row 7 (B, shell row): Join B in last st of Row 6. Ch 3, dc in same st, ch 1, shell in ch-1 sp of next V-st, ch 1; rep from * 4 more times, 2 dc in top of beginning ch-3. (19 dc: 5 shells and 2 half-shells; 6 ch-1 sps.) Fasten off.
Row 8 (A, V row): Join A in last st of Row 7. Ch 3, dc in same st, V-st in next ch-1 sp, dc in center dc of next shell; rep from * 4 more times, V-st in last ch-1 sp, 2 dc in top of beginning ch-3. (21 dc: 4 edge dc, 6 V-sts, 5 center dc; 6 ch-1 sps.) Fasten off.
The pattern repeats in pairs. A shell row with n shells is followed by a V row with n + 1 V-sts, and the next shell row has 1 more shell. The 2-dc edge pairs widen the bell by one stitch at each side on every lace row.
Checkpoint: 4.25 in (10.8 cm) wide x 3.2 in (8.1 cm) tall. This is your size before the edging.
Edging (Hem Border)
The edging goes across the bottom of Row 8 only. The sides of the bell are row ends and stay unbordered, as in the finished piece.
Border gauge: About 7 sc = 1 in (2.5 cm) along Row 9.
Row 9 (B, trim row): Join B in last st of Row 8. Ch 1, 2 sc in each of first 2 dc, sc in each dc and each ch-1 sp across to last 2 sts, 2 sc in each of last 2 sts. (31 sc.) Fasten off.
This is a conversion row. Working 1 sc in each of the 21 dc and each of the 6 ch-1 sps gives 27 sc. The 4 extra sc at the edge pairs bring it to 31 sc (27 + 4). This makes a flat cream line across the hem.
Checkpoint: 4.5 in (11.4 cm) wide x 3.4 in (8.6 cm) tall.
Row 10 (A, inner scallops): Join A in last sc of Row 9. Ch 1, sc in same st, sk 2 sc, 5 dc in next sc, sk 2 sc, sc in next sc; rep from * 4 more times. (5 scallops: 25 dc + 6 sc = 31 sts.) Fasten off.
Why the math works: Each repeat uses 6 sc (2 skipped, 1 scallop, 2 skipped, 1 sc). 1 starting sc + 5 x 6 = 31, which uses all of Row 9 exactly. The middle scallop (the 3rd of 5) sits exactly at the center of the bell, ready for the clapper.
Row 11 (B, outer scallops): Join B in last sc of Row 10. Ch 1, sc in same st, dc in first dc of scallop, 2 dc in each of next 3 dc, dc in last dc of scallop, sc in next sc; rep from * 4 more times. Fasten off. (46 sts: 40 dc + 6 sc.)
This is a trim row. Working 1 st in each of the 31 sts gives 31. Each scallop gets 3 extra dc, so 5 x 3 = 15 extra, and 31 + 15 = 46. Each cream scallop has 8 dc and wraps around a 5-dc yellow scallop, so a band of yellow shows inside every cream curve.
Checkpoint: 5 in (12.7 cm) wide x 4 in (10.2 cm) tall. The edging is 0.8 in (2.0 cm) deep: 4 in total minus 3.2 in body.
Clapper
Rnd 1 (A): Make a magic ring. Ch 1, 8 sc in ring. Pull the ring closed and sl st to first sc. (8 sc.)
Rnd 2 (A): Ch 1, 2 sc in each st around. Sl st to first sc. (16 sc.) Fasten off, leaving a 6 in (15.2 cm) tail.
Checkpoint: 0.75 in (1.9 cm) across.
Attach: With the bell WS facing you, place the clapper behind the center (3rd) scallop. Its top 0.25 in (0.6 cm) should overlap the back of the scallop, and 0.5 in (1.3 cm) should hang below the scallop tip. Whipstitch it to the back of the scallop with the tail, catching only the back loops so nothing shows on the front.
Hanging Loop
Find the center of Row 1 on the top edge: the free loop of the foundation chain under the 4th (center) st.
Loop (A): Join A in that foundation loop. Ch 24, sl st in the same foundation loop to make a ring. Work 1 sc in each ch around the loop. (24 sc.) Sl st in the foundation loop again and fasten off.
The sc worked over the chain make a firm, round cord, so the loop doesn’t twist flat. The finished loop is about 2 in (5.1 cm) long.
Weave in all remaining ends on the WS.
Final Blocking
- Wet the bell or spray it until it’s damp all the way through.
- Gently squeeze out the extra water in a towel. Don’t wring it.
- Lay it RS up on the blocking mat.
- Pin the hem to 5 in (12.7 cm) wide, with one pin at the tip of each cream scallop and one at each sc valley.
- Pin the center top of the crown so the bell measures 4 in (10.2 cm) tall.
- Shape the crown into a smooth dome by easing the two top corners down and rounding them with your fingers.
- Pin the sides in a straight, gently flared line from the crown to the outer scallops.
- Use a pin tip to open each triangle in the lace rows so they are all the same size.
- Pin the loop straight up and smooth the clapper flat.
- Optional: spray with starch for a crisper ornament.
- Let it dry completely before unpinning.
Final Quality-Control Checklist
- Crown is solid yellow, 13 dc wide, with increases centered.
- Rows alternate correctly: B, A, B, A, B, A for Rows 3–8.
- Stitch counts match: 13, 15, 16, 18, 19, 21 dc for Rows 3–8.
- Row 9 has 31 sc and lies flat.
- 5 yellow inner scallops, each wrapped by an 8-dc cream scallop.
- Clapper sits centered under the 3rd scallop, and the stitching doesn’t show from the front.
- Loop is centered on the crown and firmly anchored.
- Bell blocks to 5 in (12.7 cm) wide x 4 in (10.2 cm) tall.
- All ends are woven in and trimmed.
Troubleshooting
The bell leans to one side. Check that both edges get 2 dc on every lace row. A missed edge dc pulls one side in.
The triangles look closed. Your ch-1 spaces are too tight. Make each chain the same height as a loop on your hook.
The hem ruffles. Row 9 is too loose, or you added extra sc. Recount for 31, or go down 0.5 mm for Rows 9–11 only.
The hem cups upward. Row 11 is too tight. Work the 2-dc increases loosely, or go up 0.5 mm for that row.
Row 10 doesn’t end on a sc. Row 9 is off count. Fix it to 31 sc before you continue.
The crown looks pointed. Block it rounder, and check that Row 2 has exactly 13 dc.
Color tails show on the front. Weave the tails up and down through the row ends on the WS, not across the lace.
Care
Hand wash in cool water with mild soap, roll in a towel, and dry flat, re-pinning to shape if needed. Between holiday seasons, store it flat or hanging where it won’t get crushed.
Final Notes
Here’s the measurement chain for the bell. The crown measures 2.25 in (5.7 cm) after Row 2. The lace rows widen it to 4.25 in x 3.2 in (10.8 cm x 8.1 cm) after Row 8. The 31-sc trim row brings it to 4.5 in (11.4 cm). The scalloped edging finishes it at 5 in (12.7 cm) wide x 4 in (10.2 cm) tall. Then the 0.75 in (1.9 cm) clapper and the 2 in (5.1 cm) loop finish the ornament. If your bell hits each checkpoint, every bell after it will match.
Happy crocheting!