

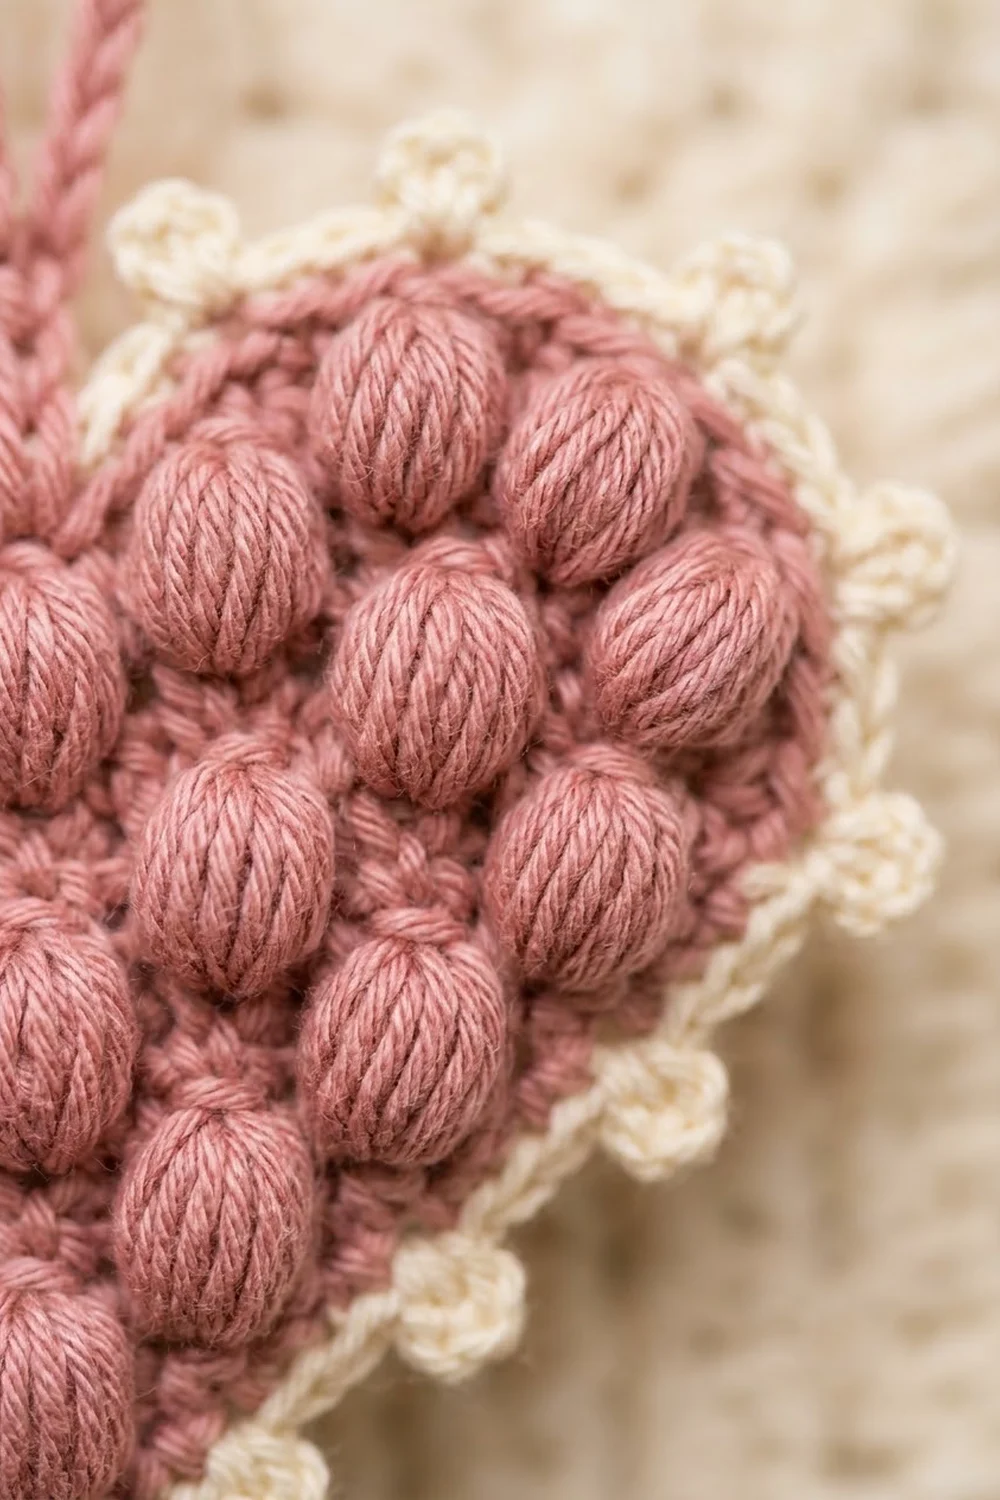
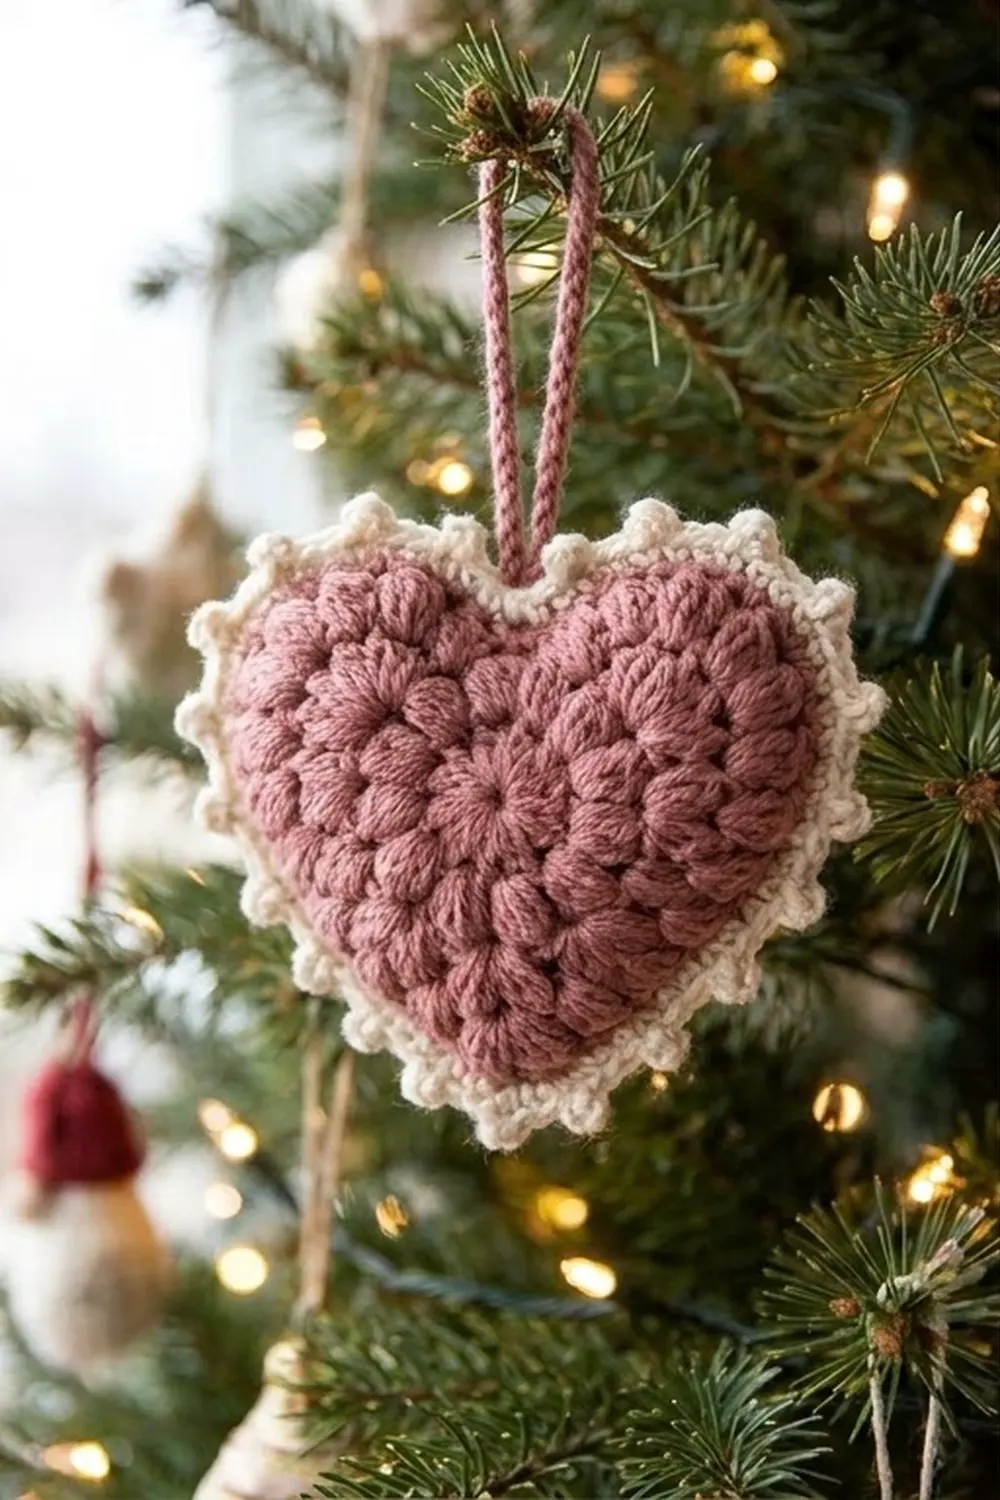
This little heart is all texture. Rows of round, squishy puff stitches in dusty rose fill the body, and a crisp cream border with tiny picot bumps frames the outline. A rose hanging loop rises from the dip between the lobes, so the heart is ready for a tree branch, a gift tag or a doorknob.
The style is soft and vintage: two quiet colors and one bold texture. It works for Christmas, Valentine’s Day or any time you want a fast handmade gift.
The pattern uses US crochet terms. The finished heart measures 3.5 in (8.9 cm) wide and 3.25 in (8.3 cm) tall, plus a hanging loop that rises about 1.5 in (3.8 cm).
You work the heart body in turned rows from the bottom point up, adding one puff per row. Row 7 splits into two lobes and Row 8 rounds off their tops. Then you add a two-round cream border and finish with the hanging loop.
Finished Size and Construction
- Finished size: 3.5 in (8.9 cm) wide x 3.25 in (8.3 cm) tall, loop not included
- Skill level: Easy to intermediate (puff stitches and simple shaping)
- Terminology: US crochet terms
- Yarn weight: DK (weight 3) cotton or cotton blend
- Hook: 3.5 mm (E-4)
- Number of pieces: 1
- Layout: single heart, worked flat
- Piece size before border: 2.75 in (7.0 cm) wide x 2.5 in (6.4 cm) tall
- Border depth: 0.375 in (1.0 cm) on every edge
- Hanging loop: about 1.5 in (3.8 cm) high
Materials
Choose a smooth DK cotton or cotton blend. Cotton shows puff stitches clearly and holds its shape on a tree. Fuzzy or very splitty yarns hide the puffs and make the chain spaces hard to find.
- Color A, dusty rose: 10 g, about 23 m (body and hanging loop)
- Color B, cream: 4 g, about 9 m (border)
Tools:
- 3.5 mm (E-4) crochet hook
- Tapestry needle
- Scissors
- Stitch marker
- Ruler or tape measure
- Pins and a blocking mat or folded towel
- Spray bottle with water
These quantities include a margin of about 20% for testing gauge and weaving in ends. One ball of each color will make many hearts.
Abbreviations (US Terms)
- ch – chain
- sl st – slip stitch
- sc – single crochet
- hdc – half double crochet
- sp – space
- st(s) – stitch(es)
- tch – turning chain
- RS / WS – right side / wrong side
Puff stitch (puff): (Yo, insert hook in the indicated st or sp, yo, pull up a loop to the height of an hdc) 4 times, yo and pull through all 9 loops on hook, ch 1 to lock. The locking ch is part of the puff. Never count it as a separate st and never work into it.
Picot: Ch 3, sl st in 3rd ch from hook.
Puffs look nearly the same on both faces, so puffs made on WS rows still sit nicely on the RS.
Gauge and Checkpoints
Gauge: 5 puffs with their ch-1 sps = 2 in (5.1 cm) wide; 4 puff rows = 1.25 in (3.2 cm) tall.
Because this is one small piece, the heart itself is your test. Make the body first and check it before you start the border.
Checkpoints:
- After Row 3: about 1.5 in (3.8 cm) wide and about 1 in (2.5 cm) tall.
- After Row 6: about 2.75 in (7.0 cm) wide and 1.875 in (4.8 cm) tall.
- After Row 8: 2.75 in (7.0 cm) wide and 2.5 in (6.4 cm) tall.
- After Border Round 2: 3.5 in (8.9 cm) wide and 3.25 in (8.3 cm) tall.
If the heart is too big, go down to a 3.25 mm (D-3) hook or pull up shorter puff loops. If it is too small, go up to a 3.75 mm (F-5) hook. Keep the puff loops the same height every time, because uneven loops change the width more than the hook size does.
Heart Body
With Color A, ch 2.
Row 1 (RS): In 2nd ch from hook work (hdc, ch 1, puff, ch 1, hdc). (1 puff, 2 hdc, 2 ch-1 sps)
This chain becomes the bottom point. Place a marker in it so you can find it later.
Row 2 (WS): Ch 3 (counts as hdc and ch 1 throughout), turn, (puff in next ch-1 sp, ch 1) 2 times, hdc in last hdc. (2 puffs, 2 hdc, 3 ch-1 sps)
Row 3: Ch 3, turn, (puff in next ch-1 sp, ch 1) 3 times, hdc in 2nd ch of tch. (3 puffs, 2 hdc, 4 ch-1 sps)
Row 4: Ch 3, turn, (puff in next ch-1 sp, ch 1) 4 times, hdc in 2nd ch of tch. (4 puffs, 2 hdc, 5 ch-1 sps)
Row 5: Ch 3, turn, (puff in next ch-1 sp, ch 1) 5 times, hdc in 2nd ch of tch. (5 puffs, 2 hdc, 6 ch-1 sps)
Row 6: Ch 3, turn, (puff in next ch-1 sp, ch 1) 6 times, hdc in 2nd ch of tch. (6 puffs, 2 hdc, 7 ch-1 sps)
Every row has one more ch-1 sp than it has puffs, and the next row puts one puff in every ch-1 sp. That adds exactly one puff per row. It also staggers the puffs like brickwork, which gives the heart its sloped sides.
Row 7 (lobe split): Ch 3, turn, (puff in next ch-1 sp, ch 1) 3 times, sl st in next ch-1 sp (the 4th, center sp), ch 1, (puff in next ch-1 sp, ch 1) 3 times, hdc in 2nd ch of tch. (6 puffs, 2 hdc, 1 sl st, 8 ch-1 sps)
The sl st replaces the center puff and pulls the middle down into the dip between the lobes. Each lobe now has 3 puffs and 4 ch-1 sps.
Row 8 (lobe tops): Ch 1, turn, sc in first hdc, sc in next ch-1 sp, puff in next ch-1 sp, ch 1, puff in next ch-1 sp, sc in next ch-1 sp, sl st in center sl st, sc in next ch-1 sp, puff in next ch-1 sp, ch 1, puff in next ch-1 sp, sc in next ch-1 sp (the sp formed by the tch), sc in 2nd ch of tch. (4 puffs, 6 sc, 1 sl st, 2 ch-1 sps)
Each lobe top now has 2 puffs sitting over 3, which rounds it off. Fasten off and weave in ends.
Total puffs in the body: 1 + 2 + 3 + 4 + 5 + 6 + 6 + 4 = 31.
Check the body now. It should be 2.75 in (7.0 cm) wide across the lobes and 2.5 in (6.4 cm) tall from the point to the top of the lobes.
Border
Border gauge: 8 sc = 1.25 in (3.2 cm) along a straight edge. Round 1 adds about 0.125 in (0.3 cm) and the picots in Round 2 add about 0.25 in (0.6 cm). Together they give a border depth of 0.375 in (1.0 cm).
The heart edge has five sections: the center dip, two lobe tops (worked along the sts of Row 8), two sloped sides (worked into the row ends) and the bottom point.
Round 1 (RS): With RS facing, join Color B with a sc in the center sl st of Row 8 (1 sc at center).
- First lobe top: sc in next sc, 2 sc in next puff, sc in next ch-1 sp, 2 sc in next puff, sc in next sc, sc in end sc of the row. (8 sc)
- First side: 1 sc in the row end of Row 8, then 2 sc in the row end of each of Rows 7 to 1. (15 sc)
- Point: 3 sc in the marked base ch. (3 sc)
- Second side: 2 sc in the row end of each of Rows 1 to 7, then 1 sc in the row end of Row 8. (15 sc)
- Second lobe top: sc in end sc of the row, sc in next sc, 2 sc in next puff, sc in next ch-1 sp, 2 sc in next puff, sc in next sc. (8 sc)
Join with sl st to first sc. (50 sc)
Count check: 1 + 8 + 15 + 3 + 15 + 8 = 50 sc.
Why the math works: each hdc-height row end is about 0.3125 in (0.8 cm) tall, and at border gauge, 2 sc measure the same 0.3125 in (0.8 cm). The edge stays flat without ruffling or pulling in. The Row 8 ends are only sc height, so they take 1 sc each. The lobe tops curve outward, and the 2-sc increases in the puffs give the curve the extra length it needs. The 3 sc at the point turn the sharp corner, and the single sc at the dip keeps it from bunching.
Round 2 (picot round): Ch 1, sl st in same st as join. This is the center st, and it gets no picot so the dip stays clean.
- First lobe top: (sc in next 2 sts, picot) 3 times, sc in next 2 sts. (8 sc, 3 picots)
- First side: sc in next 3 sts, picot, (sc in next 4 sts, picot) 2 times, sc in next 4 sts. (15 sc, 3 picots)
- Point: sc in next st, sc in center point st, picot, sc in next st. (3 sc, 1 picot)
- Second side: (sc in next 4 sts, picot) 3 times, sc in next 3 sts. (15 sc, 3 picots)
- Second lobe top: (sc in next 2 sts, picot) 3 times, sc in next 2 sts. (8 sc, 3 picots)
Join with sl st to first sl st. (1 sl st, 49 sc, 13 picots)
Count check: 1 + 8 + 15 + 3 + 15 + 8 = 50 sts worked 1 into each Round 1 st, plus 13 picots added on top. Each picot sits on the st before it and adds no width along the edge. The outline stays the same length and only gains the bumps. Fasten off and weave in ends.
Hanging Loop
With RS facing, join Color A with a sl st in the center sl st of Round 2. Ch 18, then sl st in the same center st to close the loop. Turn the loop, sl st in the back bump of each of the 18 ch, then sl st in the center st again. Fasten off. Weave in the ends by threading the tails through the border so they don’t show.
The second pass of sl sts thickens the chain into a firm cord that holds its shape. The loop rises about 1.5 in (3.8 cm) above the dip.
Final Blocking
- Weave in all ends before blocking. Split the yarn plies on the WS so the ends stay hidden.
- Lay the heart RS up on a blocking mat or folded towel.
- Pin the bottom point first, then the outer edge of each lobe, so the heart measures 3.5 in (8.9 cm) wide and 3.25 in (8.3 cm) tall.
- Pin the center dip down gently so it stays defined.
- Pinch each picot into a round bump with your fingers. Do not pin through the picots.
- Mist with water until the heart is damp but not soaked. Do not press the puffs flat.
- Let it dry completely, for at least 4 hours.
- Unpin the heart and hang it by its loop for a few minutes to check that it hangs straight.
Final Quality-Control Checklist
- The body has 31 puffs, with rows of 1, 2, 3, 4, 5, 6, 6 and 4.
- The body measures 2.75 in (7.0 cm) x 2.5 in (6.4 cm) before the border.
- Round 1 has exactly 50 sc, including 15 on each side.
- Round 2 has 13 picots: 3 on each lobe, 3 on each side and 1 at the point.
- There is no picot at the center dip.
- The finished heart measures 3.5 in (8.9 cm) x 3.25 in (8.3 cm).
- The two halves of the heart are mirror images.
- The hanging loop is centered and about 1.5 in (3.8 cm) high.
- All ends are woven in and can’t be seen from the RS.
Troubleshooting
Puffs look thin or flat. Pull every loop up to full hdc height before closing the puff, and don’t skip the locking ch.
Sides ruffle. You may have worked 3 sc into some row ends. Recount to 15 sc per side, or go down a hook size for the border.
Sides pull in or cup. You worked fewer than 2 sc into some row ends. Rework the side with 2 sc in each of Rows 1 to 7.
Lobes look square. Make sure Round 1 puts 2 sc into each lobe puff.
No clear dip between lobes. Check that Row 7 has a sl st, not a puff, in the center sp, and that Round 2 starts with a sl st there.
Heart leans when hung. The loop is off center. Remove it and rejoin exactly at the center sl st.
Picots point sideways. Close each picot with a sl st in the 3rd ch from hook, then shape it with your fingers while blocking.
Care
Hand wash in cool water with mild soap, press the water out in a towel and dry flat. Reshape the picots and the point while the heart is damp.
Final Notes
The measurement chain is short and easy to check. A gauge of 5 puffs to 2 in (5.1 cm) and 4 rows to 1.25 in (3.2 cm) gives a body of 2.75 in (7.0 cm) x 2.5 in (6.4 cm). Round 1 frames it with 50 sc: 1 at the dip, 8 on each lobe, 15 on each side and 3 at the point. Round 2 keeps those 50 sts and adds 13 picots. That brings the border to 0.375 in (1.0 cm) and the finished heart to 3.5 in (8.9 cm) x 3.25 in (8.3 cm). The rose loop adds 1.5 in (3.8 cm) on top.
Make one heart and check it against these numbers. After that, each new heart should take well under an hour.
Happy crocheting!