
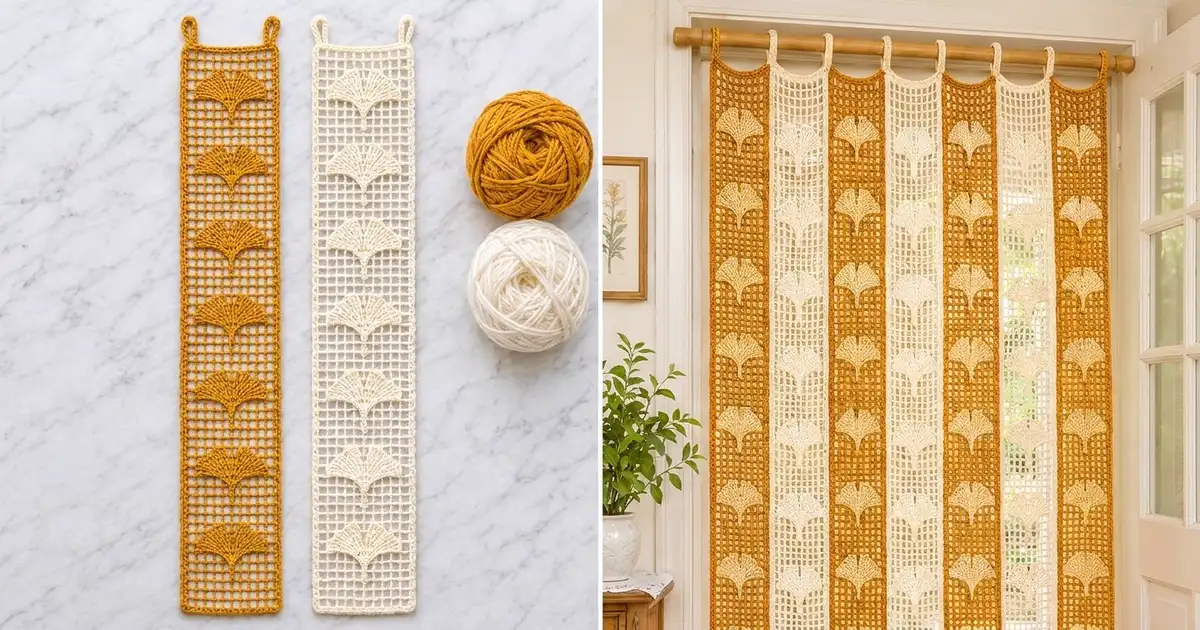
The Golden Ginkgo Strip Panel is a long, narrow filet mesh strip with seven raised ginkgo leaves stacked down its center. Each leaf is a small fan with a notched top edge and a slim stem. It is sewn onto the open grid so it sits slightly above the mesh. Two small hanging loops at the top let the strip slide onto a curtain rod or hook.
The sample is worked in warm mustard yellow with leaves in the same color, and a second strip is shown in creamy off-white. The look is clean and graphic: open squares, crisp edges and a soft botanical motif. The pattern uses US crochet terms throughout.
The finished strip measures 8.75 in (22.2 cm) wide by 45.5 in (115.6 cm) long including the border. The hanging loops rise about 1.5 in (3.8 cm) above the top edge.
Construction is simple. You work one rectangular filet mesh strip in rows, add one round of single crochet border, then work two hanging loops on the top edge. You crochet seven ginkgo leaves separately as small fans and stitch them onto the mesh at even intervals.
Finished Size and Construction
- Finished size: 8.75 in x 45.5 in (22.2 cm x 115.6 cm), plus 1.5 in (3.8 cm) loops
- Skill level: Easy to intermediate
- Terminology: US crochet terms
- Yarn weight: Worsted (#4), cotton or cotton blend
- Hook: 5.0 mm (H-8)
- Number of pieces: 1 mesh strip plus 7 leaf appliqués, sewn into one finished strip
- Layout: Single vertical strip, with the leaves centered and stacked and the stems pointing down
- Mesh size before border: 11 squares wide x 60 rows, 8.25 in x 45 in (21.0 cm x 114.3 cm)
- Leaf size: 4.5 in (11.4 cm) wide x 2.25 in (5.7 cm) tall, plus a 1.5 in (3.8 cm) stem
- Border depth: 0.25 in (0.6 cm) on each side
Materials
Choose a smooth worsted-weight cotton or cotton blend. Cotton keeps the mesh squares open and square, and it hangs straight without stretching much. Avoid fuzzy yarns, which blur the grid.
- Colorway A, Mustard: 160 g (290 m) for one strip, including the leaves
- Colorway B, Cream: 160 g (290 m) for one strip, including the leaves
Make the strip in either color. The mesh uses about 115 g, the seven leaves about 28 g, and the border and loops about 10 g. These quantities include a margin of roughly 5 percent for swatching and weaving in ends.
Tools:
- 5.0 mm (H-8) crochet hook
- Tapestry needle
- Stitch markers (at least 8)
- Rust-proof pins
- Measuring tape
- Scissors
- Blocking mats or a padded surface
Abbreviations (US Terms)
- ch chain
- sl st slip stitch
- sc single crochet
- hdc half double crochet
- dc double crochet
- sk skip
- st(s) stitch(es)
- sp space
- RS right side
Special stitch, mesh square: One dc post, ch 2 and the next dc post together form one open square. A row of 11 squares has 12 dc posts and 11 ch-2 spaces, for a total of 34 stitches (12 + 22).
Gauge and Checkpoints
Mesh gauge: 4 squares and 4 rows = 3 in (7.6 cm) square after light blocking. One square is 0.75 in (1.9 cm) wide and tall.
Border gauge: 4 sc = 1 in (2.5 cm).
Test first: work Rows 1 to 4 of the strip, then measure before you continue. The checkpoints are:
- After Row 4: 8.25 in (21.0 cm) wide x 3 in (7.6 cm) tall
- After Row 20: 15 in (38.1 cm) tall
- After Row 40: 30 in (76.2 cm) tall
- After Row 60: 45 in (114.3 cm) tall
- One leaf after Row 3: about 3.5 in (8.9 cm) wide
- One finished leaf: 4.5 in (11.4 cm) wide x 2.25 in (5.7 cm) tall
If your strip is too wide, go down half a hook size. If it is too narrow, go up half a hook size. If the width is right but the rows are too short, pull your dc stitches up a little taller. If the rows are too tall, keep the dc more compact. Don’t change the stitch counts, because the border math depends on them.
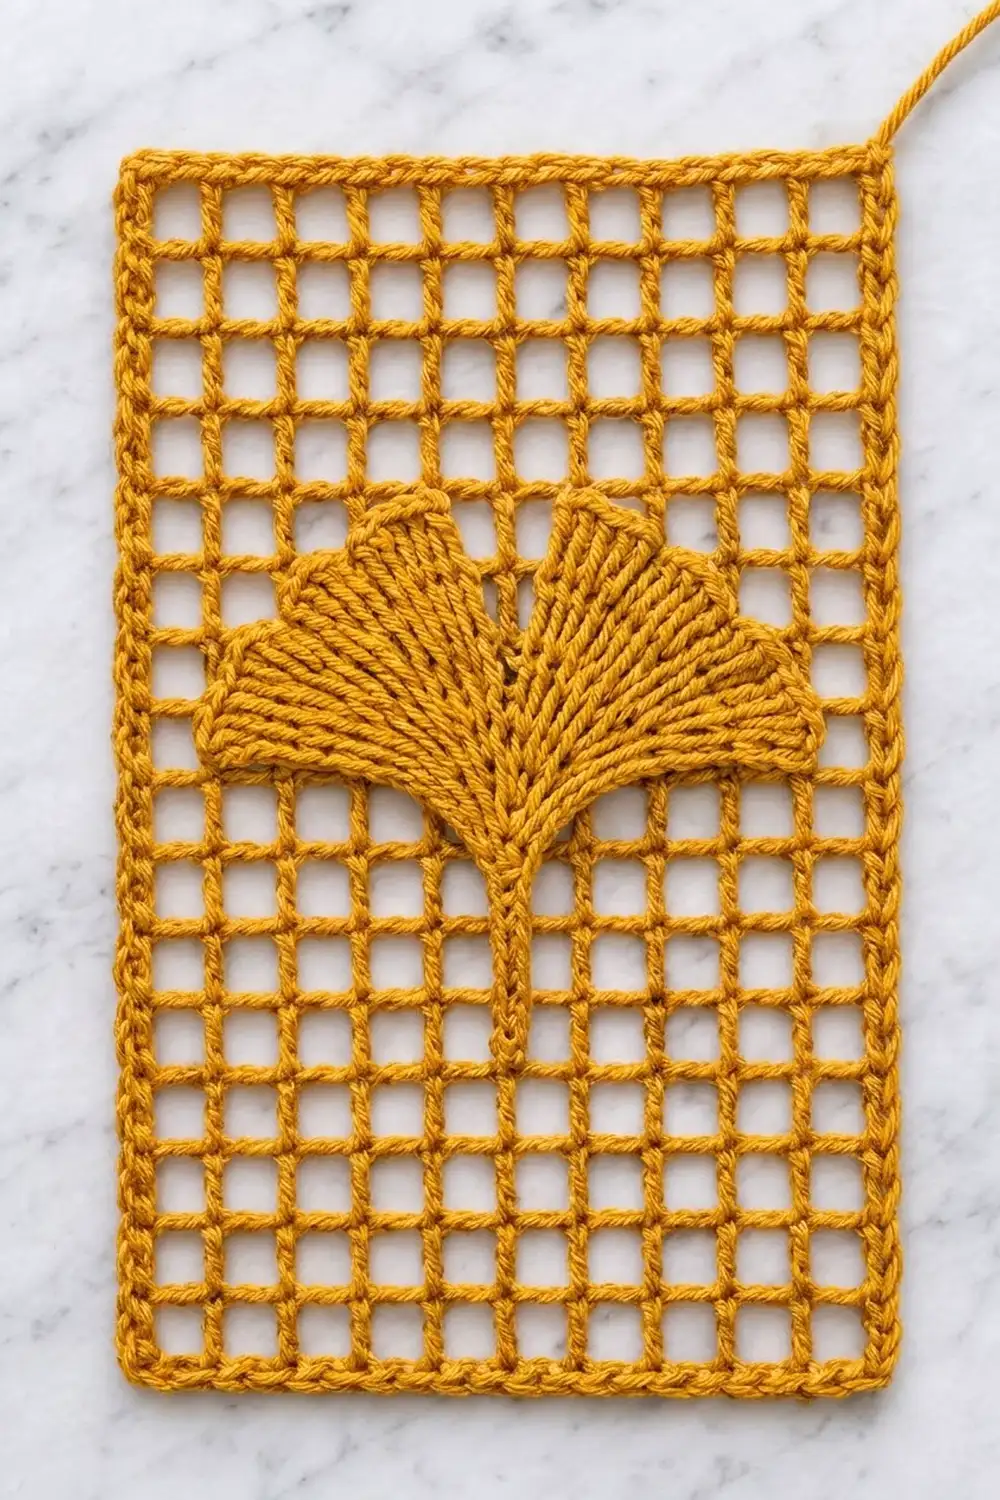
Mesh Strip
Work in Colorway A or B.
Foundation: Ch 38.
Row 1 (RS): Dc in 8th ch from hook (the 7 skipped chs count as a dc post, ch 2 and 2 skipped base chs), ch 2, sk 2 ch, dc in next ch; repeat from * 9 more times. Turn. (11 squares: 12 dc posts and 11 ch-2 sps, 34 sts.)*
Row 2: Ch 5 (counts as dc and ch 2), sk first ch-2 sp, dc in next dc, ch 2, dc in next dc; repeat from * 8 more times, ch 2, dc in 3rd ch of turning ch. Turn. (11 squares, 34 sts.)*
Rows 3 to 60: Repeat Row 2. Every row keeps 11 squares and 34 sts. Fasten off after Row 60 and weave in the starting tail.
Measure at Rows 4, 20, 40 and 60 as listed above. Keep the turning chains snug so the side edges stay straight. Loose turning chains make the strip flare.
Place a stitch marker at the start of Rows 4, 12, 20, 28, 36, 44 and 52. Each leaf stem starts at one of these marked rows.
Ginkgo Leaf Appliqué (Make 7)
Work in the same color as the strip. Each leaf is a fan worked in rows from the stem point outward. The last row is a wavy edge that dips into a center notch, giving the classic split ginkgo shape.
Row 1: Ch 4, 6 dc in 4th ch from hook. Turn. (7 dc, counting the skipped chs as 1 dc.)
Row 2: Ch 3 (counts as dc), dc in same st, 2 dc in each st across. Turn. (14 dc.)
Row 3: Ch 3 (counts as dc), dc in same st, dc in next st, 2 dc in next st; repeat from * 5 more times, dc in last st. Turn. (21 dc.)*
The dc posts radiate out from the base and form the fine ridged lines that make the leaf look veined.
Row 4 (notched scallop trim): Ch 1, sc in first st, 2 hdc in next st, sc in next st; repeat from * 3 more times, hdc in next st, sl st in center st (11th st), hdc in next st, sc in next st, 2 hdc in next st; repeat from * 3 more times, sc in last st. (21 sts worked 1 per stitch + 8 extra = 29 sts.)
The sl st pulls the center down into a notch, and the hdc pairs make a gently wavy outer edge on each lobe. Fasten off, leaving a 12 in (30.5 cm) tail for sewing.
Stem: Join yarn at the base point of Row 1. Ch 7, sl st in 2nd ch from hook and in each of the next 5 ch, sl st into the base point. (6 sl sts.) Fasten off and weave in the stem tail.
The stem measures about 1.5 in (3.8 cm). Pin the first leaf flat and check it against 4.5 in (11.4 cm) wide x 2.25 in (5.7 cm) tall before you make the rest.
Attaching the Leaves
Lay the mesh strip RS up with Row 60 at the top. Each leaf uses an 8-row repeat that is 6 in (15.2 cm) tall:
- The stem runs over 2 rows (Rows 4 to 5 for the first leaf).
- The leaf body covers the next 3 rows (Rows 6 to 8).
- The next 3 rows (Rows 9 to 11) stay open.
The stem bases sit at Rows 4, 12, 20, 28, 36, 44 and 52. The top leaf ends at Row 56. That leaves 4 open rows (3 in, 7.6 cm) above it and 3 open rows (2.25 in, 5.7 cm) below the bottom stem.
Center every leaf on the middle of square 6, the center square of 11. Each leaf is 6 squares wide, so it reaches from the middle of square 3 to the middle of square 9. That leaves 2.5 squares, about 1.9 in (4.8 cm), of open mesh on each side.
Pin each leaf in place with the stem pointing down. Use the tail to whipstitch around the outer edge of Row 4 and along the straight bottom edges of the fan, catching only the mesh bars underneath. Tack the stem tip to the dc post below it with two small stitches. Keep the stitches loose enough that the mesh doesn’t pucker but firm enough that the leaf lies flat.
Border
Border gauge: 4 sc = 1 in (2.5 cm). Each dc row end is 0.75 in (1.9 cm) tall, so it takes 3 sc. Across the top and bottom, each mesh square is 0.75 in (1.9 cm) wide and also takes 3 sc (2 in the ch-2 sp and 1 in the dc).
Round 1 (conversion round): With RS facing, join yarn in the last dc of Row 60 (top right corner). Ch 1, 3 sc in same st (corner).
- Top edge: Work 2 sc in each ch-2 sp and 1 sc in each dc up to the last dc. Work 3 sc in the last dc (corner).
- First long side: Work 3 sc in each row end.
- Bottom edge: Work 3 sc in the first foundation st (corner). Then work 2 sc in each ch-2 sp and 1 sc at the base of each dc, with 3 sc in the last base st (corner).
- Second long side: Work 3 sc in each row end. Sl st to first sc.
Count for Round 1: 428 sts worked 1 per existing stitch + 8 extra corner sts = 436 sc.
Count per side, from corner-center sc to corner-center sc inclusive:
- Top: 36 sc
- Bottom: 36 sc
- Each long side: 184 sc
Check: 36 + 36 + 184 + 184 = 440. Subtract the 4 corner-center sc that were counted twice, and you get 436.
Why the math works: Each short edge has 34 sts (12 dc + 22 ch). At 4 sc per inch, 34 sc equals 8.5 in (21.6 cm). That is close enough to 8.25 in (21.0 cm) for blocking to even it out without ruffling. Each long side has 60 row ends x 3 sc = 180 sc, which equals exactly 45 in (114.3 cm) at 4 sc per inch. The border adds 0.25 in (0.6 cm) all around, so the strip measures 8.75 in x 45.5 in (22.2 cm x 115.6 cm).
Round 2 (hanging loops): Number the 36 top-edge sc from left to right. The top left corner-center sc is sc 1, and the top right corner-center sc is sc 36.
- Left loop: Join yarn in sc 3. Ch 12, sk sc 4 to 6, sl st in sc 7. Turn, work 18 sc into the ch-12 loop, sl st in sc 3. Fasten off.
- Right loop: Join yarn in sc 30. Ch 12, sk sc 31 to 33, sl st in sc 34. Turn, work 18 sc into the ch-12 loop, sl st in sc 30. Fasten off.
Positions 3 and 34 mirror each other, as do 7 and 30, so the loops sit symmetrically. Each loop rises about 1.5 in (3.8 cm), which makes the total hanging length about 47 in (119.4 cm).
Final Blocking
- Weave in all remaining tails along the mesh bars, not through the open squares.
- Soak the strip in cool water for 10 minutes, then press the water out in a towel. Don’t wring it.
- Lay it flat on mats RS up and pin the corners to 8.75 in x 45.5 in (22.2 cm x 115.6 cm).
- Pin the long edges every 3 in (7.6 cm), keeping them straight.
- Lay a long ruler or a string down the center to check that every mesh column is vertical.
- Smooth each leaf with your fingers so the fan opens flat and the notch is clear.
- Let the strip dry completely before you unpin it, usually about 24 hours.
Final Quality-Control Checklist
- Every row has 11 squares and 34 sts.
- Before the border, the strip measures 8.25 in x 45 in (21.0 cm x 114.3 cm).
- There are seven leaves, each with 29 sts in Row 4 and a clear center notch.
- The leaves are centered on square 6, with stems pointing down, 8 rows apart.
- Border Round 1 totals 436 sc, with 3 sc in each corner.
- Both loops are the same size and placed symmetrically.
- The finished size is 8.75 in x 45.5 in (22.2 cm x 115.6 cm).
- The mesh doesn’t pucker around the sewn leaves.
Troubleshooting
Mesh squares look like rectangles. Your dc height and ch-2 width don’t match. Tighten or loosen the chains, or change how tall you pull up the dc.
Side edges wave. The turning chains are too loose. Work the ch-5 turning chains more tightly so they match the height of your dc posts.
A leaf cups instead of lying flat. The Row 3 increases are too tight. Go up half a hook size for the leaves only.
A leaf ruffles. Use the same hook as for the strip, or replace a few of the 2-hdc groups in Row 4 with 1 sc each.
The border ruffles on the long sides. Your rows are probably shorter than 0.75 in (1.9 cm), so check your row gauge.
The mesh puckers under a leaf. Remove the sewing and restitch with looser whipstitches.
Care
Hand wash in cool water with mild soap, dry flat, and reblock lightly if needed. Don’t hang the strip while it’s wet, or the mesh may stretch.
Final Notes
Every measurement follows from one 0.75 in (1.9 cm) mesh square:
- 11 squares make the 8.25 in (21.0 cm) width, and 60 rows make the 45 in (114.3 cm) length.
- The seven leaves, each 4.5 in x 2.25 in (11.4 cm x 5.7 cm), sit in 8-row repeats of 6 in (15.2 cm).
- One round of sc border at 4 sc per inch adds 0.25 in (0.6 cm) all around, for a finished strip of 8.75 in x 45.5 in (22.2 cm x 115.6 cm).
- Two loops add 1.5 in (3.8 cm) at the top for hanging on a rod.
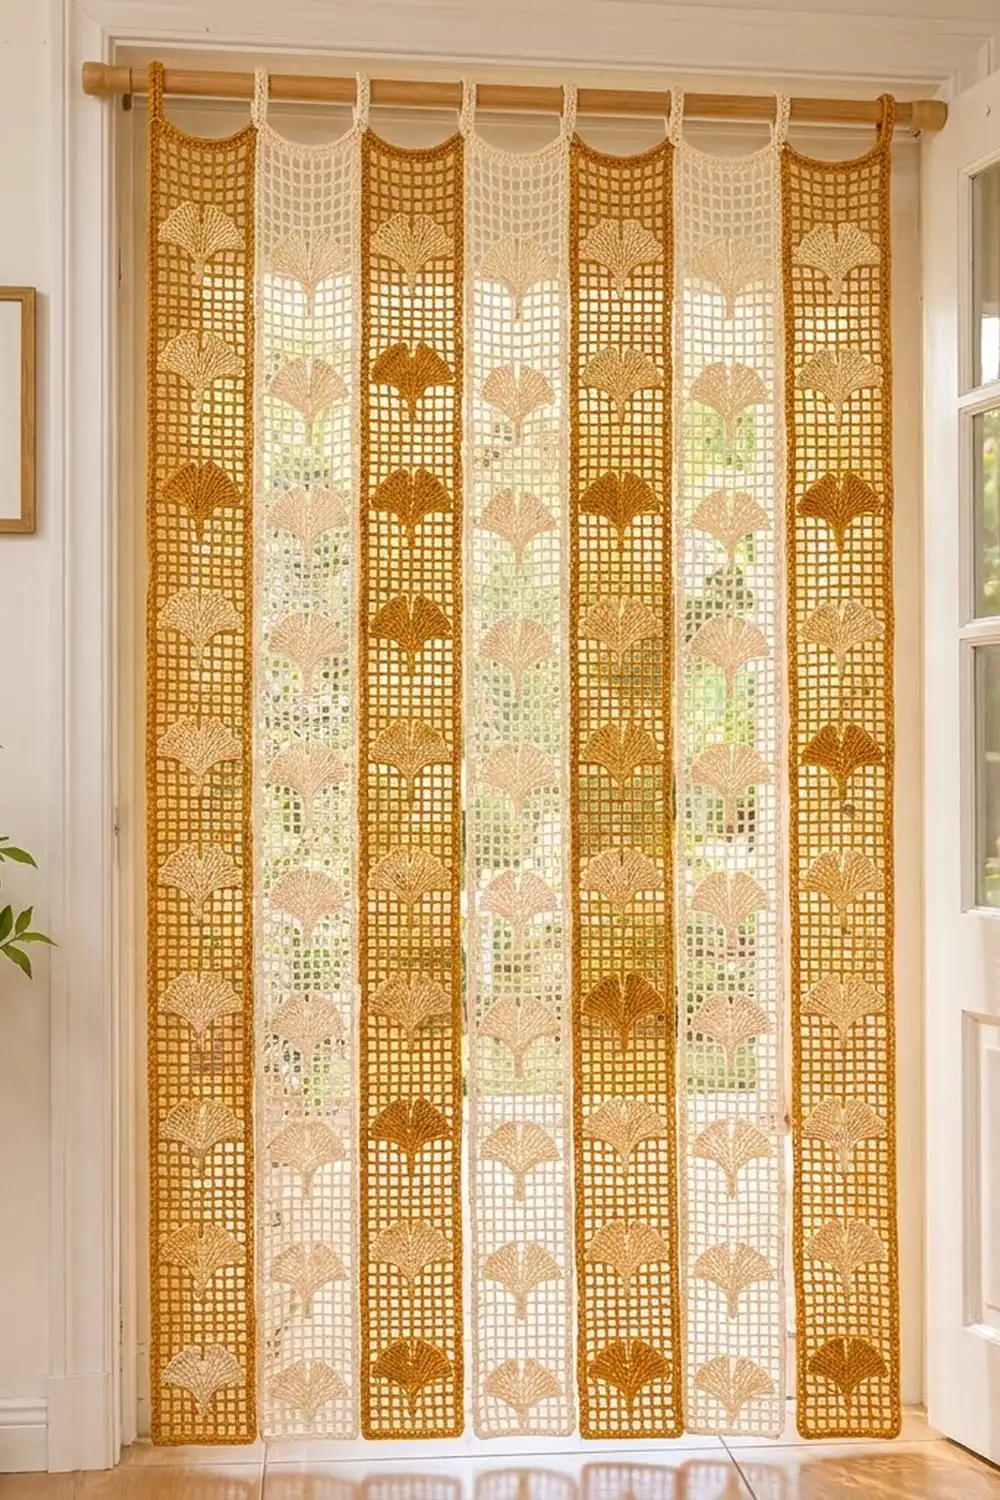
Strips like this can also hang side by side, unjoined, as a doorway curtain.
Happy crocheting!