

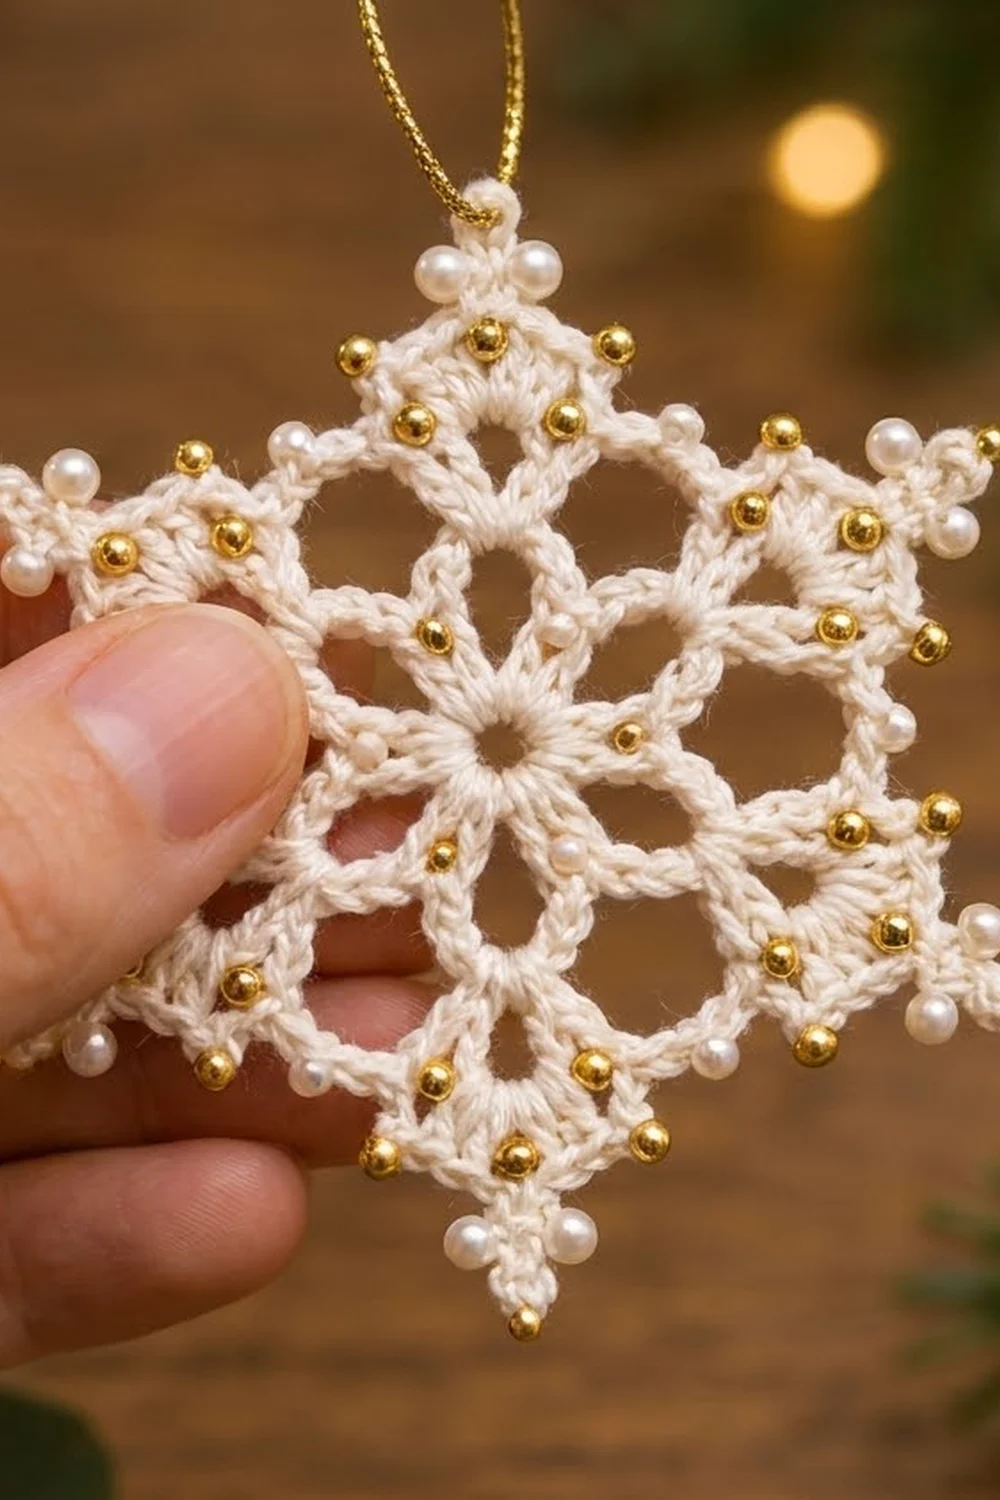
This six-pointed snowflake is lacy and light, but it still feels special. It starts as a soft six-petal flower worked in cream cotton thread. Two rings of open chain arches go around the flower, and the motif finishes with six crisp triangular points. Gold beads and pearls are sewn on at the end, so they catch the light on the tree.
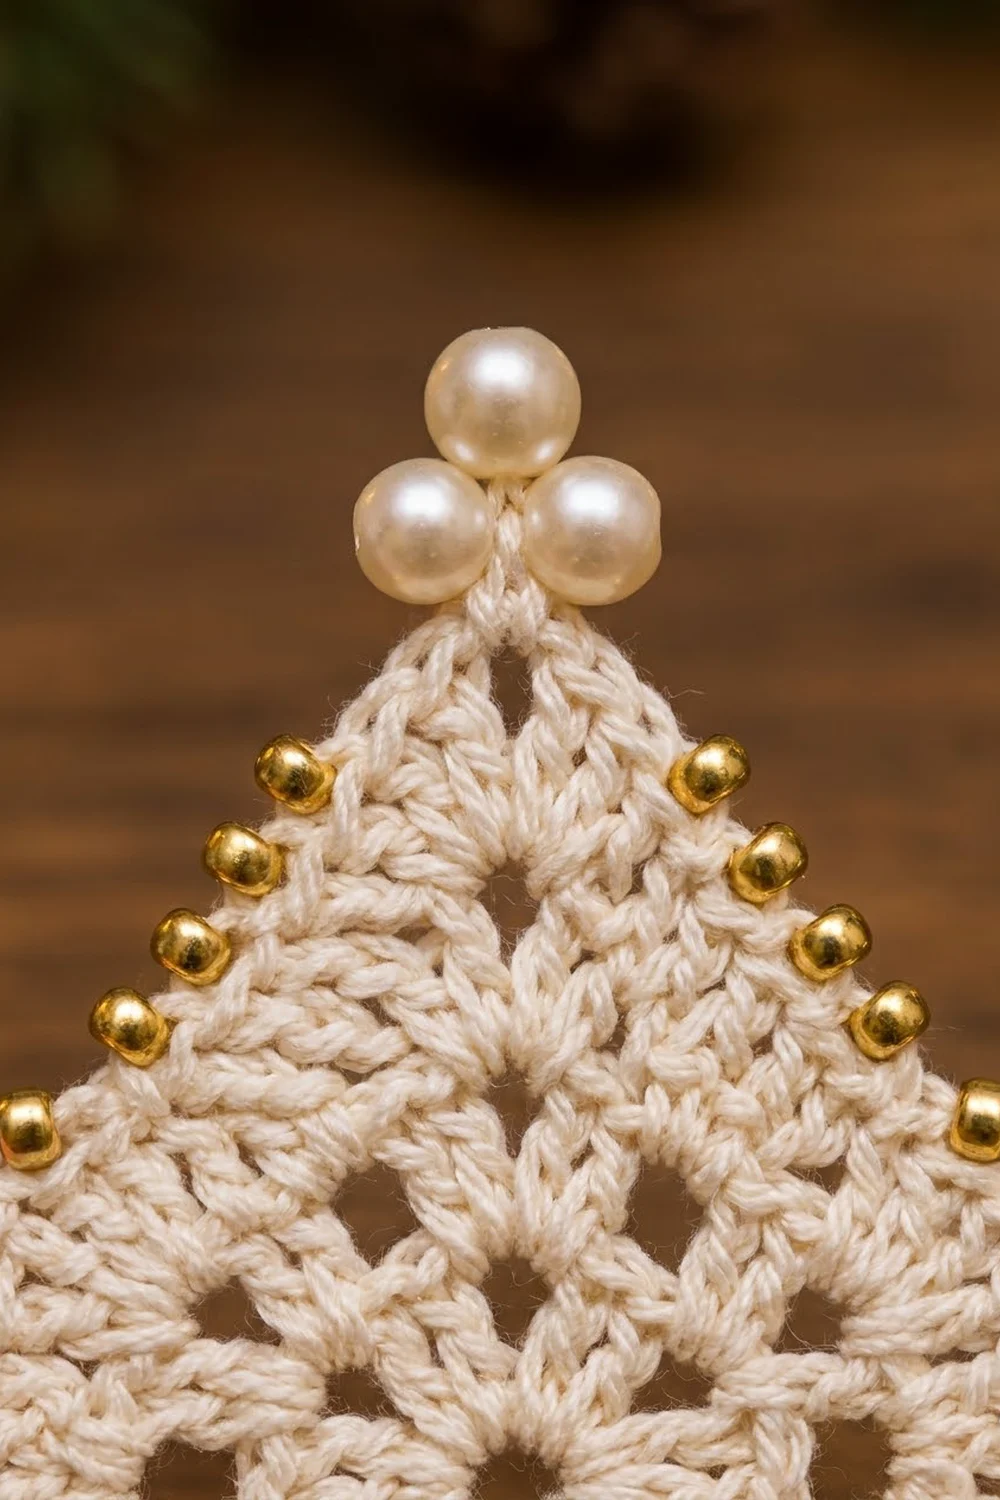
The palette stays simple: warm cream or ivory thread, small gold metallic beads, and creamy white pearls. Each point ends in a little trefoil of three pearls, and a gold cord loop at the top makes it ready to hang. The look is classic Victorian lace with a little modern shine.
This pattern uses US crochet terms. The finished snowflake measures 4 in (10.2 cm) from point to point before beading, and about 4.5 in (11.4 cm) once the pearl trefoils are added.
Construction is easy to follow. You work seven joined rounds from a magic ring without turning: a dc center, chain-loop petals, a petal edging, two arch rounds, a pointed round, and a tip-loop edging round. After that you block and stiffen the piece, then sew on the beads and attach the hanging loop.
Finished Size and Construction
- Finished size: 4 in (10.2 cm) point to point; about 4.5 in (11.4 cm) with pearl trefoils
- Skill level: Intermediate (simple stitches, careful counting, some bead sewing)
- Terminology: US crochet terms
- Yarn weight: Size 3 cotton crochet thread (Lace / 0)
- Hook: 2.0 mm steel hook
- Number of pieces: 1 single motif
- Layout: One stand-alone snowflake, no joining
- Piece size before border: 3.75 in (9.5 cm) point to point after Round 6
- Border depth: about 0.125 in (0.3 cm) on the sides, plus the ch-4 tip loops
Materials
Choose a mercerized cotton thread in size 3. Mercerized cotton holds starch well, keeps sharp points, and won’t fuzz around the beads. Pick a warm cream or ivory instead of bright white so the gold beads look rich instead of brassy.
- Cream cotton thread, size 3: 8 g / 35 m (38 yd)
- Gold metallic cord or thread (hanging loop): 1 g / 0.3 m (0.3 yd)
- Gold round beads, 3 mm: 36
- White or cream pearl beads, 5 mm: 18 (tip trefoils)
- White or cream pearl beads, 4 mm: 6 (side dips)
Tools:
- 2.0 mm steel crochet hook
- Beading needle and strong cream sewing thread (or polyester beading thread)
- Tapestry needle
- Scissors
- Blocking board or foam and rust-proof pins
- Fabric stiffener, or starch made from white glue and water
- Ruler or tape measure
All thread amounts include a margin of about 25% for your gauge swatch and tails.
Abbreviations (US Terms)
- ch – chain
- sl st – slip stitch
- sc – single crochet
- hdc – half double crochet
- dc – double crochet
- tr – treble crochet (yarn over twice)
- sp – space
- st(s) – stitch(es)
- sk – skip
- rep – repeat
Special stitch – Tip loop: In this pattern a “tip loop” is the ch-4 at the end of each point. Round 6 creates it, and Round 7 puts (2 sc, ch 4, 2 sc) into it. The pearl trefoil gets sewn into this final ch-4 loop.
Stitch labels: In Round 5 the sc worked above a petal tip is called T (tip stitch), and the sc worked into the middle of an arch is called S (side stitch). These labels make Rounds 6 and 7 easy to follow.
Gauge and Checkpoints
Gauge isn’t critical for an ornament, but it decides the final size and how sharp the points look. Make a test snowflake through Round 3 before you commit to a batch.
Checkpoints (measured flat, unblocked, gently pressed):
- After Round 1: 0.75 in (1.9 cm) across
- After Round 3 (flower): 2 in (5.1 cm) from petal tip to opposite petal tip
- After Round 4: 2.4 in (6.1 cm) across
- After Round 5: 3 in (7.6 cm) across
- After Round 6: 3.75 in (9.5 cm) point to point
- After Round 7: 4 in (10.2 cm) point to point
A tolerance of ±0.25 in (0.6 cm) at any checkpoint is fine.
If your piece is too big: go down to a 1.75 mm hook, or keep your chains tighter. Long, loose chains are the most common reason a snowflake grows.
If your piece is too small or cups: go up to a 2.25 mm hook. If the flower cups after Round 3, your ch-10 loops are probably too tight, so loosen up only on the chains.
Pattern
Round 1 – Center
Make a magic ring.
Ch 3 (counts as dc), work 17 dc into the ring. Pull the ring closed, leaving a small hole about 0.125 in (0.3 cm) wide. Sl st to the top of the beginning ch-3.
Stitch count: 18 dc.
Round 2 – Petal Loops
Ch 1, sc in the same st as the join. Ch 10, sk 2 dc, sc in next dc. Rep from * 4 more times. Ch 10, sk the last 2 dc, sl st to the first sc.
Stitch count: 6 sc and 6 ch-10 loops. You use all 18 dc: 6 repeats × (1 sc + 2 skipped) = 18.
Round 3 – Petal Edging
Sl st into the first ch-10 loop.
In the ch-10 loop work (2 sc, 2 hdc, 3 dc, ch 2, 3 dc, 2 hdc, 2 sc). Sl st in the next sc from Round 2. Rep from * around 6 times. The last sl st goes into the first sc of Round 2.
Stitch count: 84 sts (14 per petal) and 6 ch-2 tips. The 6 sl sts between petals are not counted.
The graded heights (sc to hdc to dc and back down) give each petal a rounded, teardrop shape, and the ch-2 makes a small pointed tip. These 6 petals form the inner flower, and each petal points toward one future snowflake point.
Round 4 – Inner Arches
Sl st in each of the next 2 sc, 2 hdc, and 3 dc, then sl st into the ch-2 tip.
Ch 1, sc in the same ch-2 sp. Ch 9, sc in the next ch-2 tip. Rep from * 4 more times. Ch 9, sl st to the first sc.
Stitch count: 6 sc and 6 ch-9 arches.
Each arch spans from one petal tip to the next. The space between the arch and the two petal sides becomes the first ring of six rounded openings.
Round 5 – Outer Arches
Ch 1, sc in the same sc as the join (this is your first T).
Ch 5, sc around the center of the next ch-9 arch (S), ch 5, sc in the next sc (T). Rep from * around 6 times, but on the last repeat skip the final sc and sl st to the first sc instead.
Stitch count: 12 sc (6 T and 6 S) and 12 ch-5 loops.
This round makes the second ring of openings, with twelve small loops sitting outside the first six.
Round 6 – Points
Sl st in each of the next 5 ch and in the next S sc. Ch 1, sc in the same S.
(Hdc, 2 dc, 2 tr) in the next ch-5 sp. (Tr, ch 4, tr) in the next T. (2 tr, 2 dc, hdc) in the next ch-5 sp. Sc in the next S. Rep from * around 6 times. Leave out the last sc on the final repeat and sl st to the first sc.
Stitch count: 78 sts (13 per point) and 6 ch-4 tips.
Per point that’s 1 sc + 5 + 2 + 5 = 13. The stitches build from sc at the dip up to tr at the tip and come back down, which makes the solid triangular point. Measure now: 3.75 in (9.5 cm) point to point.
Round 7 – Tip-Loop Edging
See the Border section below.
Border
The border is Round 7, a single edging round that firms up the edges of the points and gives each tip a hanging loop.
Border gauge: about 12 sc = 1 in (2.5 cm) along the slope of a point, which adds roughly 0.125 in (0.3 cm) on each side.
Round 7: Ch 1. Sc in each of the next 6 sts (hdc, 2 dc, 3 tr). In the ch-4 tip work (2 sc, ch 4, 2 sc). Sc in each of the next 6 sts (3 tr, 2 dc, hdc). Sl st in the next S sc. Rep from * around 6 times. The final sl st goes into the first sc of Round 6. Fasten off, leaving a 6 in (15.2 cm) tail.
Stitch count: 78 stitches worked 1-per-existing-stitch (72 sc + 6 sl st) + 24 sc added in the tip spaces (4 per tip) = 96 sc, 6 sl st, and 6 ch-4 tip loops.
Per point: 6 sc up one slope, 2 sc + ch-4 + 2 sc at the tip, 6 sc down the other slope, and 1 sl st in the dip. That’s 16 sc and 1 sl st.
Why the math works: Each point in Round 6 has exactly 13 stitches: 6 on one slope, 6 on the other, and the S sc at the dip. Round 7 covers all 13 one-for-one, with the dip stitch worked as a sl st so it sits low and keeps the valley sharp. The extra 4 sc per tip are worked into the ch-4 space, not into stitches, so they don’t change any slope count. 6 points × 13 = 78, and 78 + 24 = 102 stitches in total. The edging adds only about 0.125 in (0.3 cm) all around, taking the snowflake from 3.75 in (9.5 cm) to 4 in (10.2 cm).
Final Blocking
- Weave in all tails, but don’t trim them yet.
- Soak the snowflake in fabric stiffener, or in a mix of 1 part white glue to 1 part water. Squeeze out the extra gently, without wringing.
- Lay it right side up on the blocking board.
- Pin the center hole open with one pin.
- Pin all six ch-4 tip loops so they measure 4 in (10.2 cm) from opposite tip to opposite tip. Check all three axes.
- Pin each S dip toward the center so the valleys look crisp.
- Pin open each petal tip and each arch so all 18 openings are round and even.
- Let it dry completely, usually 12 to 24 hours.
- Unpin, trim the tails close, and press any arches back into shape by hand.
Beading and Hanging Loop
Sew beads on only after blocking, because stiffener can cloud pearls. Use doubled cream sewing thread and a beading needle, and run the thread through the backs of stitches between beads.
- Tip trefoils: Sew three 5 mm pearls into each ch-4 tip loop: one at the top and one on each side. That’s 18 pearls in total.
- Gold along the points: On each point, sew one 3 mm gold bead on each side at the base of the tip, and one on each slope at the dc stitches. That’s 4 per point, 24 in total.
- Gold on the inner rings: Sew one gold bead on each Round 4 sc (6) and one on each Round 5 S sc (6). That’s 12 in total.
- Side dips: Sew one 4 mm pearl at each Round 7 sl st dip (6).
Hanging loop: Cut 7 in (17.8 cm) of gold cord. Thread it through the top tip loop under the center pearl, knot the ends together, and trim. The finished loop should be about 3 in (7.6 cm) long.
Final Quality-Control Checklist
- 18 dc in Round 1, with a small, closed center
- 6 even petals, each with 14 sts and a ch-2 tip
- 6 ch-9 arches and 12 ch-5 loops, all the same length
- 78 sts in Round 6, 13 per point
- 96 sc, 6 sl st, and 6 ch-4 tip loops in Round 7
- 4 in (10.2 cm) point to point on all three axes
- Points lie flat and sharp, with no ruffling or cupping
- 36 gold beads, 18 tip pearls, and 6 dip pearls, all secure
- Gold hanging loop at the top, centered over one point
Troubleshooting
The flower cups or won’t lie flat. Your Round 2 chains are too tight. Rework them more loosely, or add one chain to each loop (ch 11).
The petals ruffle. Your chains are too loose for 14 sts. Try ch 9 instead of ch 10.
The points look rounded instead of sharp. Make sure you worked (tr, ch 4, tr) into T, not (dc, ch 4, dc). Block with firm pins at each tip.
The arches sag after blocking. The stiffener was too weak. Re-soak in a stronger mix and pin each arch open.
Round 7 count is off. Count each point separately: 6, tip, 6, sl st. A missing stitch usually means the first hdc of a slope got skipped.
The beads tilt or flop. Go through each bead twice and anchor the thread with a small knot behind a solid stitch.
Care
Dust gently with a soft brush and store flat in tissue paper. If needed, spot clean with a damp cloth. Don’t submerge it, because that will soften the starch.
Final Notes
Here is the full measurement chain: 18 dc make a 0.75 in (1.9 cm) center. Six 14-stitch petals grow it to 2 in (5.1 cm). The inner and outer arches take it to 2.4 in (6.1 cm), then 3 in (7.6 cm). Thirteen-stitch points reach 3.75 in (9.5 cm), and the 102-stitch tip-loop edging finishes at 4 in (10.2 cm). The pearl trefoils bring it to about 4.5 in (11.4 cm).
If your test snowflake hits these checkpoints, every ornament after it will match. Make one for a gift tag, or keep going and fill a whole tree with them.
Happy crocheting!