

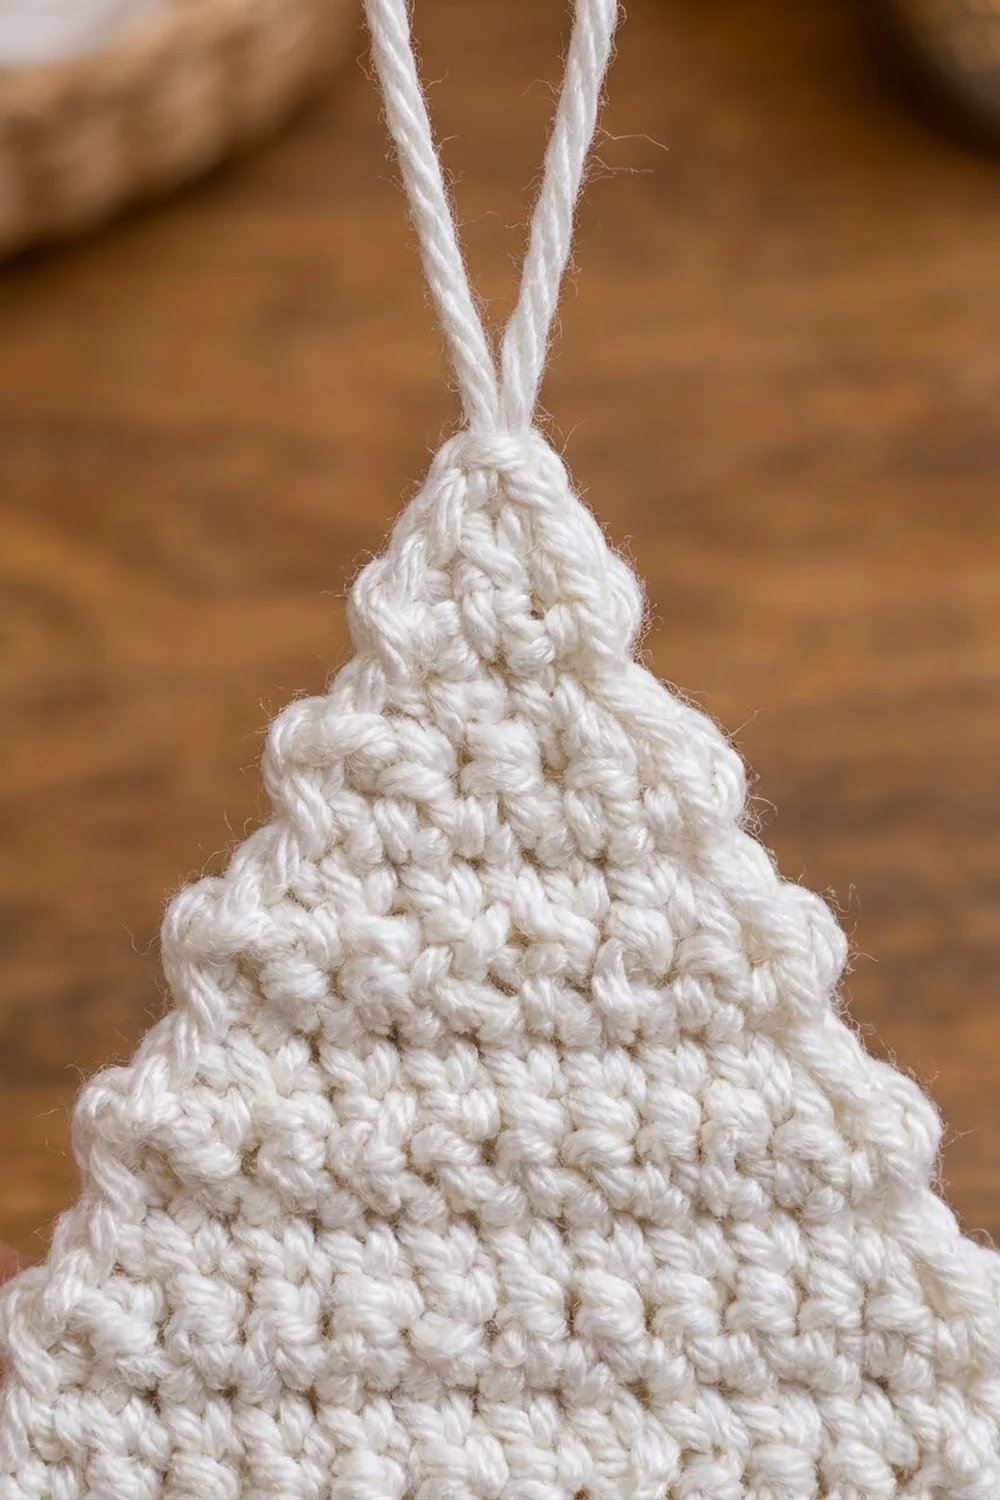
The Snowy Pine is a small, flat Christmas tree ornament with a clean, modern look. The tree is a solid triangle of creamy off-white single crochet, with a short light gray trunk centered underneath. A plain yarn loop at the top lets you hang it on a branch, a gift tag, or a window hook.
The style is minimal and Scandinavian-inspired. The neutral colors go well with natural wood, red baubles, and warm lights. The dense single crochet fabric makes it firm enough to hang flat without stiffening.
This pattern uses US crochet terms. The finished ornament measures 3 in (7.6 cm) wide and 3.5 in (8.9 cm) tall including the trunk, not counting the loop.
Construction is simple. You work the triangle from the bottom up in rows, decreasing at both ends of every other row until one stitch remains. Then you work one round of single crochet border all the way around. The trunk is crocheted straight onto the bottom border in gray, and last you add the hanging loop.
Finished Size and Construction
- Finished size: 3 in (7.6 cm) wide × 3.5 in (8.9 cm) tall, not including the loop
- Tree triangle (bordered): 3 in (7.6 cm) wide × 2.75 in (7.0 cm) tall
- Trunk: 0.6 in (1.5 cm) wide × 0.75 in (1.9 cm) tall
- Hanging loop: about 2 in (5.1 cm) tall
- Skill level: Easy / advanced beginner
- Terminology: US
- Yarn weight: DK / light (#3), cotton or cotton blend
- Hook: 3.0 mm (US C/2 or D/3)
- Number of pieces: 1 (the trunk is worked directly onto the tree)
- Layout: Single motif, no assembly
- Size before border: 2.6 in (6.6 cm) wide × 2.4 in (6.1 cm) tall
- Border depth: 1 round of sc, about 0.2 in (0.5 cm)
Materials
Yarn: Use a smooth DK-weight cotton or cotton blend. Mercerized or combed cotton gives the crisp stitch definition shown here and holds its triangle shape well. Wool and acrylic also work, but they make a softer, slightly fuzzier ornament.
- Off-white (tree body, border, loop): 8 g, about 18 m
- Light gray (trunk): 2 g, about 4 m
These quantities make one ornament and include a margin for the gauge swatch and weaving in ends. A single 50 g ball of off-white makes about six ornaments.
Tools:
- 3.0 mm crochet hook
- Tapestry needle
- Scissors
- Stitch marker (optional, for the top stitch)
- Rustproof pins and a foam blocking mat
- Spray bottle or steam iron
Abbreviations (US Terms)
- ch – chain
- sc – single crochet
- sl st – slip stitch
- st(s) – stitch(es)
- sc2tog – single crochet 2 together
- sc3tog – single crochet 3 together
- RS – right side
- rep – repeat
Special stitches:
- sc2tog: Insert the hook in the next st, yarn over, and pull up a loop. Insert the hook in the following st, yarn over, and pull up a loop (3 loops on hook). Yarn over and pull through all 3 loops. This uses 2 sts and makes 1.
- sc3tog: Pull up a loop in each of the next 3 sts (4 loops on hook), yarn over, and pull through all 4 loops. This uses 3 sts and makes 1.
The ch 1 at the start of each row is a turning chain and does not count as a stitch.
Gauge and Checkpoints
Gauge: 20 sc and 22 rows = 4 in (10.2 cm) in sc worked in rows with a 3.0 mm hook. That works out to 5 sts and 5.5 rows per inch.
The ornament is small, so the quickest gauge test is to make one tree body (Rows 1–13) and measure it before you add the border. Use these checkpoints:
- After Row 1 (13 sts): 2.6 in (6.6 cm) wide
- After Row 6 (9 sts): about 1.1 in (2.8 cm) tall from the foundation edge
- After Row 13 (1 st): 2.4 in (6.1 cm) tall, 2.6 in (6.6 cm) wide at the base
- After the border: 3 in (7.6 cm) wide × 2.75 in (7.0 cm) tall
- After the trunk: 3.5 in (8.9 cm) total height
If your piece is too big: Go down 0.25–0.5 mm in hook size. A loose ornament also tends to curl and lose its sharp point.
If your piece is too small: Go up 0.25–0.5 mm in hook size. Keep the fabric firm, though. You should not be able to see light through the stitches.
Small differences of 0.1 in (0.3 cm) are fine and will block out. Measure on a flat surface without stretching.
Tree Body
Use off-white yarn and the 3.0 mm hook. You work the tree from the base up to the top point. Odd-numbered rows are RS rows.
Foundation: Ch 14.
Row 1 (RS): Sc in 2nd ch from hook and in each ch across. (13 sts)
Row 2: Ch 1, turn. Sc in each st across. (13 sts)
Row 3: Ch 1, turn. Sc2tog, sc in each st across to last 2 sts, sc2tog. (11 sts)
Row 4: Ch 1, turn. Sc in each st across. (11 sts)
Row 5: Ch 1, turn. Sc2tog, sc in next 5 sts, sc2tog. (9 sts)
Row 6: Ch 1, turn. Sc in each st across. (9 sts)
Row 7: Ch 1, turn. Sc2tog, sc in next 3 sts, sc2tog. (7 sts)
Row 8: Ch 1, turn. Sc in each st across. (7 sts)
Row 9: Ch 1, turn. Sc2tog, sc in next st, sc2tog. (5 sts)
Row 10: Ch 1, turn. Sc in each st across. (5 sts)
Row 11: Ch 1, turn. Sc2tog, sc in next st, sc2tog. (3 sts)
Row 12: Ch 1, turn. Sc in each st across. (3 sts)
Row 13 (RS): Ch 1, turn. Sc3tog. (1 st)
Do not fasten off. If you like, place a marker in this top stitch.
Stitch count summary: 13, 13, 11, 11, 9, 9, 7, 7, 5, 5, 3, 3, 1. Each decrease row loses exactly 2 sts, one at each edge, so the triangle stays symmetrical. Because you decrease only on every other row, the sides slope evenly and form small steps. Those steps make the softly beaded edge you see on the finished tree.
Checkpoint: The body should measure 2.6 in (6.6 cm) across the foundation edge and 2.4 in (6.1 cm) from base to point (13 rows ÷ 5.5 rows per inch).
Border
The border is one round of sc in off-white. It tidies the stepped edges, squares off the base, and adds about 0.2 in (0.5 cm) all around.
Border gauge: Same as the body, 5 sc per inch. On the slanted sides you work 1 sc per row end. The decreases already pull those edges in a little, so 1 sc per row lies flat without ruffling.
Where the stitches go:
- Top corner: the single st of Row 13
- Each slanted side: the row ends of Rows 12 down to 2 (11 row ends)
- Bottom corners: the first and last foundation chains, at the ends of Row 1
- Base: the free loops of the foundation chain between the corners (chains 2–12, which is 11 chains)
Border Round (RS): Without turning, ch 1. Work 3 sc in the top st (Row 13). Rotate to work down the left side: work 1 sc in the end of each row from Row 12 to Row 2 (11 sc). Work 3 sc in the first foundation ch (the bottom-left corner). Working in the free loops of the foundation chain, sc in each of the next 11 ch (11 sc). Work 3 sc in the last foundation ch (the bottom-right corner). Working up the right side, work 1 sc in the end of each row from Row 2 to Row 12 (11 sc). Sl st to the first sc of the round. (42 sts)
Fasten off, leaving a 6 in (15.2 cm) tail.
Counts per side:
- Each corner group is 3 sc: 1 flank st, 1 center (corner) st, and 1 flank st.
- Each side between two corner centers has 13 sts: 1 flank + 11 edge sts + 1 flank.
- Total: 3 sides × 13 sts + 3 corner center sts = 39 + 3 = 42 sts.
Why the math works: You have 11 working spaces on each side (11 row ends or 11 foundation chains), plus 3 corners with 3 sc each. That gives 33 + 9 = 42. The 3-sc corners turn each point smoothly without cupping. Because all three edges have the same count, the stitches sit evenly and the outline stays a clean triangle.
Checkpoint: The bordered triangle measures 3 in (7.6 cm) across the base and 2.75 in (7.0 cm) from base to the tip.
Trunk
The trunk is worked straight into the bottom edge of the border in light gray. It is centered over the middle 3 of the 11 base edge stitches, which leaves 4 base stitches free on each side.
Hold the tree with the RS facing you and the base at the top. Skip the bottom-right corner group, then count across the 11 base edge stitches.
Row 1 (RS): Join gray with a sl st in the 5th base edge st. Ch 1. Sc in the same st and in the next 2 sts. (3 sts)
Row 2: Ch 1, turn. Sc in each st across. (3 sts)
Row 3: Ch 1, turn. Sc in each st across. (3 sts)
Row 4: Ch 1, turn. Sc in each st across. (3 sts)
Fasten off and leave a 6 in (15.2 cm) tail.
Checkpoint: 4 base sts + 3 trunk sts + 4 base sts = 11, so the trunk is perfectly centered. It measures 0.6 in (1.5 cm) wide (3 sts ÷ 5) and about 0.75 in (1.9 cm) tall (4 rows ÷ 5.5). The total ornament height is now 3.5 in (8.9 cm).
Optional tidy edge: If the trunk’s side edges look uneven, use the gray tail to whipstitch loosely down one side. Keep the stitches small so they don’t show.
Hanging Loop
- Cut a 10 in (25.4 cm) length of off-white yarn.
- Thread it on a tapestry needle and pass it from front to back through the center st of the top corner group.
- Even up the ends, then tie them together in a firm double knot about 2 in (5.1 cm) above the top point.
- Trim the ends to about 0.25 in (0.6 cm), or tuck the knot down so it sits at the back of the tree.
If you’d rather have a crocheted loop, join off-white in the top center st, ch 20, and sl st back into the same st. This makes a loop of about the same height.
Weave in all remaining ends on the wrong side. Run each tail through the backs of stitches of its own color, so no gray shows through the white.
Final Blocking
Cotton blocks well and keeps a crisp shape.
- Lay the ornament RS up on a foam mat.
- Pin the bottom-left and bottom-right corners 3 in (7.6 cm) apart.
- Pin the top point 2.75 in (7.0 cm) above the center of the base.
- Ease the slanted sides into straight lines. Add one pin halfway along each side if needed.
- Square the trunk to 0.6 in (1.5 cm) × 0.75 in (1.9 cm) and pin its two lower corners.
- Mist with water until damp, or hover a steam iron about 1 in (2.5 cm) above the piece. Do not press down.
- Let it dry completely, about 2–4 hours, before you unpin it.
- Check the measurements again once it’s dry.
Final Quality-Control Checklist
- Tree body rows follow 13, 13, 11, 11, 9, 9, 7, 7, 5, 5, 3, 3, 1.
- Border round has 42 sts, with 11 edge sts on each side and 3 sc in each corner.
- The bordered triangle measures 3 in (7.6 cm) × 2.75 in (7.0 cm).
- The trunk is centered, with 4 free base sts on each side.
- The trunk is 3 sts wide and 4 rows tall.
- The total height is 3.5 in (8.9 cm) without the loop.
- The loop is centered at the top point and knotted securely.
- All ends are woven in and invisible from the RS.
- The ornament hangs straight without tilting.
Troubleshooting
The sides ruffle or wave: You worked more than 1 sc per row end in the border. Rework it with exactly 11 sc per side.
The sides pucker or pull in: Your border tension is too tight, or you skipped a row end. Recount the stitches and loosen up slightly.
The point is blunt or rounded: Make sure Row 13 is a true sc3tog. Use all 3 sc in the top corner group, and pin the point firmly when blocking.
The trunk is off-center: Recount the base edge sts. Start at the first st after the corner group, not inside it.
The ornament leans when hanging: Move the loop to the exact center st of the top corner group.
Gray shows through the white: Re-weave the gray tails within the trunk stitches only.
The bottom edge curls: Block again with extra pins along the base, and let it dry fully.
Care
Hand wash in cool water with mild soap, press out the water in a towel, and lay flat to dry, pinning back to shape if needed. Store flat or hanging, away from direct sunlight, so the off-white stays bright.

Final Notes
The whole ornament follows one measurement chain:
- 13 foundation sts at 5 sts per inch give a 2.6 in (6.6 cm) base.
- 13 rows at 5.5 rows per inch give a height of 2.4 in (6.1 cm).
- The 42-st border brings the triangle to 3 in (7.6 cm) × 2.75 in (7.0 cm).
- The 3-st, 4-row trunk adds 0.75 in (1.9 cm), for a finished height of 3.5 in (8.9 cm).
If you match the gauge at the first checkpoint, every later measurement falls into place. Make one, check it against the numbers, then make a whole batch for your tree or gift wrapping.
Happy crocheting!