

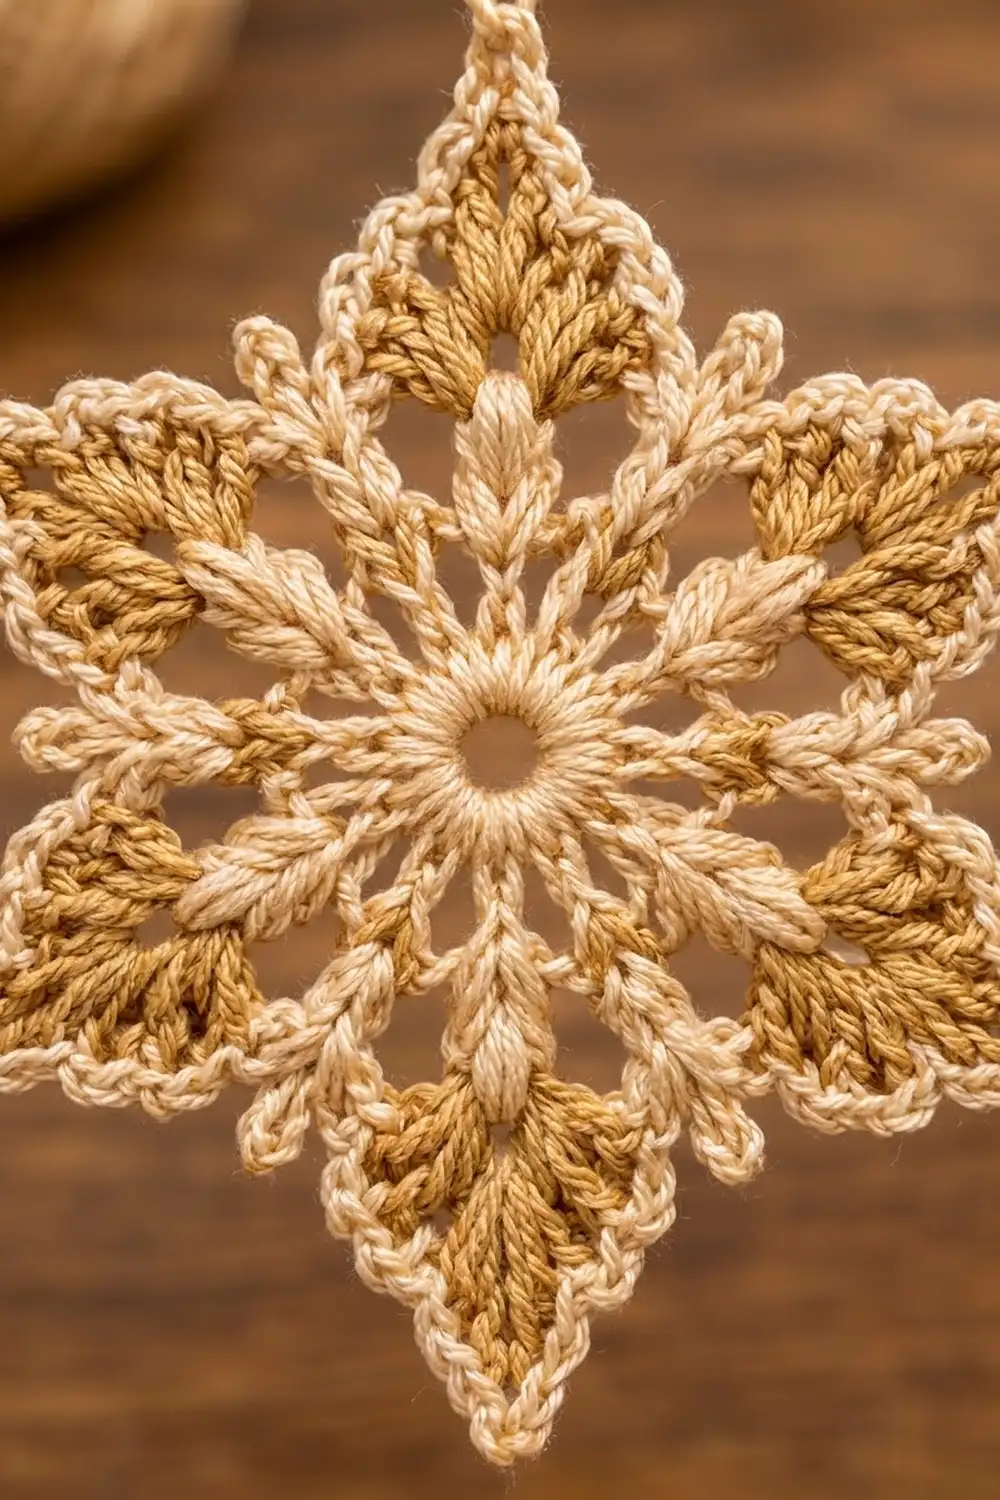
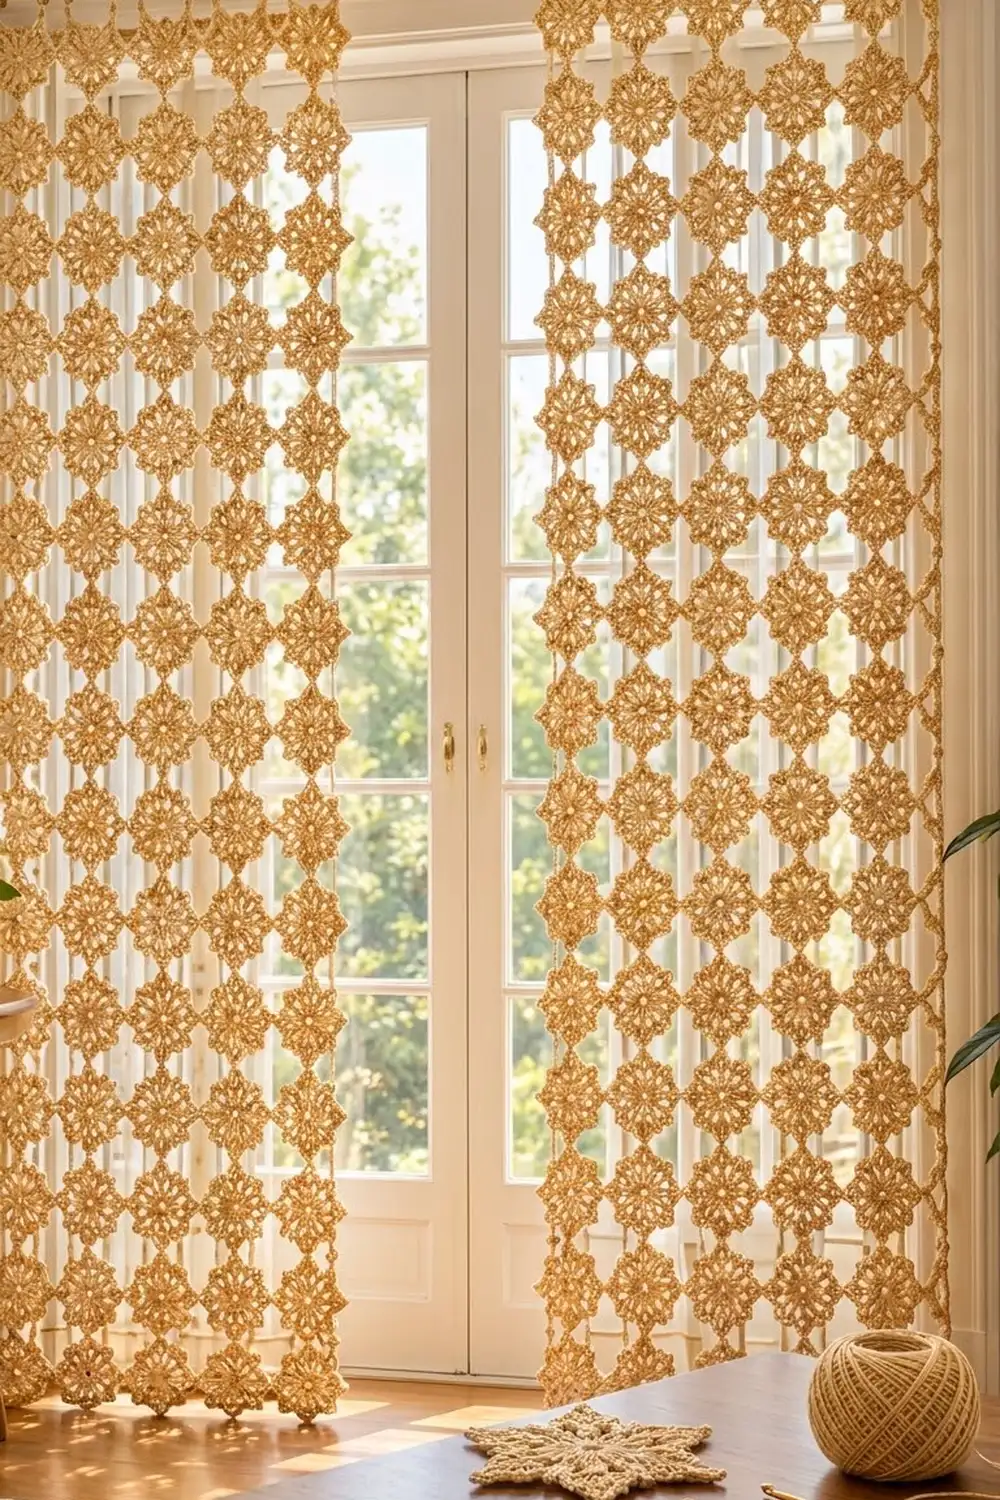
This curtain panel is a light, airy screen of six-pointed stars. Each star has a cream center ring and lacy spokes, golden-tan leaf texture inside every point, and a clean cream outline that ends in a small tip loop. The stars join tip to tip in offset columns, so the open spaces between them form little diamonds and triangles that let the daylight through.
The colors are a soft cream and a warm golden tan. Together they read like sunlight on lace: classic, slightly vintage, and calm. The pattern uses US crochet terms throughout.
One finished panel is about 30.3 in (77.0 cm) wide and 85 in (215.9 cm) long, measured from the top of the hanging tabs to the lowest star point. Make two panels for a pair like the one in the photo.
You crochet one motif at a time. Rounds 1–3 and Round 6 use cream, and Rounds 4–5 use tan. From the second motif on, you join each new star to its neighbors on the last round. After all 112 motifs are joined, you add a heading band and tabs across the top. The sides and bottom keep their star points as a natural lace edge.
Finished Size and Construction
- Finished panel size: 30.3 in × 85 in (77.0 cm × 215.9 cm)
- Skill level: Intermediate
- Terminology: US crochet terms
- Yarn weight: Sport (#2), mercerized cotton
- Hook: 3.5 mm (E-4)
- Number of pieces: 112 star motifs per panel (224 for a pair)
- Layout: 7 columns × 16 motifs, alternating columns offset by half a motif
- Piece size: 5 in (12.7 cm) from top tip to bottom tip; 4.33 in (11.0 cm) across the side points
- Size before border: 30.3 in × 82.5 in (77.0 cm × 209.6 cm)
- Border depth: top edge only; 1 in (2.5 cm) heading band plus 1.5 in (3.8 cm) loop tabs
Materials
Use a smooth mercerized cotton or cotton blend. It shows the stitch definition clearly, blocks to sharp points, and holds up in sunlight. Avoid fuzzy or very stretchy yarns, because a hanging panel this long will drop.
These amounts are for one panel, using yarn sold as 50 g = 150 m (164 yd):
- Color A (Cream): 7 balls, 350 g, 1050 m (1148 yd)
- Color B (Golden Tan): 5 balls, 250 g, 750 m (820 yd)
For a pair of panels, double these amounts. All quantities include a margin of about 15% for gauge differences and weaving in ends.
Tools:
- 3.5 mm (E-4) crochet hook
- Tapestry needle
- Stitch markers
- Rust-proof pins, blocking mats or a clean sheet over carpet
- Spray bottle
- Measuring tape
Abbreviations (US Terms)
- ch – chain
- sl st – slip stitch
- sc – single crochet
- hdc – half double crochet
- dc – double crochet
- tr – treble crochet
- sp(s) – space(s)
- st(s) – stitch(es)
- RS / WS – right side / wrong side
Special stitches:
- Shell: (2 dc, ch 3, 2 dc) all in the same space.
- Point: (3 dc, ch 3, 3 dc) all in the same space.
- Join tip: on Round 6, work (2 sc, ch 1, sl st in the neighbor’s tip ch-3 sp, ch 1, 2 sc) in place of (2 sc, ch 3, 2 sc). It sits in the same spot as a normal tip.
Gauge and Checkpoints
Make one full motif and block it before starting the panel. The panel’s width and length depend entirely on the motif size.
Checkpoints, measured with the motif blocked:
- After Round 1: 1.25 in (3.2 cm) across
- After Round 3: 2.75 in (7.0 cm) across, measured shell tip to shell tip
- After Round 5: 4.5 in (11.4 cm), measured tip to opposite tip
- After Round 6: 5 in (12.7 cm), top tip to bottom tip
Heading gauge: 20 sc and 24 rows = 4 in (10.2 cm). Work your chains so that 5 ch = 1 in (2.5 cm).
If your motif is too big, go down to a 3.25 mm hook. If it is too small, go up to a 3.75 mm hook. A difference of 0.25 in (0.6 cm) per motif becomes 4 in (10.2 cm) over 16 motifs, so match the gauge closely.
Star Motif
You’ll make 112 of these. The first motif is worked in full; every motif after it joins on Round 6 (see Joining).
Round 1 (Color A): Ch 5, sl st in the first ch to form a ring. Ch 3 (counts as dc), work 17 dc in the ring, then sl st in the top of the ch-3 to join. (18 dc)
Round 2 (Color A): Ch 4 (counts as tr), tr in the next 2 dc, ch 3. Tr in the next 3 dc, ch 3. Repeat from * 4 more times, then join to the top of the ch-4. (18 tr in 6 groups of 3; 6 ch-3 sps)
Round 3 (Color A): Sl st in the next tr, which is the center of the group. Ch 1, sc in the same tr, ch 3, work a Shell in the next ch-3 sp, ch 3. Sc in the center tr of the next group, ch 3, Shell in the next ch-3 sp, ch 3. Repeat from * 4 more times, then join to the first sc. Fasten off.
(6 sc, 6 Shells = 24 dc and 6 shell ch-3 sps, 12 ch-3 arcs)
These sc-and-arc spokes make the open cream lace around the center ring.
Round 4 (Color B): Join B with a sc in any Round 3 sc. Ch 2, skip the ch-3 arc, work a Point in the next shell ch-3 sp, ch 2, skip the arc, sc in the next sc. Repeat from * around, leaving out the final sc, then sl st in the first sc to join.
(36 dc, 6 sc, 6 tip ch-3 sps, 12 ch-2 sps)
Round 5 (Color B): Do not turn. Sc in the next ch-2 sp, hdc in the next dc, dc in the next dc, tr in the next dc, then (tr, ch 3, tr) in the tip ch-3 sp. Tr in the next dc, dc in the next dc, hdc in the next dc, sc in the next ch-2 sp, sl st in the next sc. Repeat from * around. The last sl st goes into the joining sc of Round 4. Fasten off.
(Per arm: 10 sts and 1 tip sp, with 1 sl st in each valley. Round total: 60 sts, 6 sl sts, 6 tip ch-3 sps)
The stitches get taller toward each tip, which pulls the arm into a sharp diamond. The tan rows sitting over the Round 4 dc create the leaf ridges.
Round 6 (Color A, edging): Join A with a sc in any valley sl st. Sc in the next 5 sts (sc, hdc, dc, tr, tr), then (2 sc, ch 3, 2 sc) in the tip sp. Sc in the next 5 sts (tr, tr, dc, hdc, sc), then sc in the next valley sl st. Repeat from * around, leaving out the final sc, then join to the first sc. Fasten off and weave in the ends.
(Per arm: 15 sc and 1 tip ch-3. Round total: 90 sc and 6 tip ch-3 sps)
Check: 6 arms × 15 sc = 90 sc. The motif should measure 5 in (12.7 cm) from tip to opposite tip.
Make All Pieces
Per panel: 112 motifs, each using both colors (A for Rounds 1–3 and 6, B for Rounds 4–5).
To work efficiently, make Rounds 1–5 on all the motifs in batches. Then work Round 6 with joins one motif at a time.
Layout: There are 7 columns. Columns 1, 3, 5 and 7 are “high” columns (H). Columns 2, 4 and 6 are “low” columns (L), set 2.5 in (6.4 cm) lower. Each motif sits with one point straight up.
Col:  1    2    3    4    5    6    7
      H1        H1        H1        H1
           L1        L1        L1
      H2        H2        H2        H2
           L2        L2        L2
      ...  ...  ...  ...  ...  ...  ...
      H16       H16       H16       H16
           L16       L16       L16
Each column holds 16 motifs, so the panel has 7 × 16 = 112 motifs. Column centers are 4.33 in (11.0 cm) apart. A high column is 16 × 5 in = 80 in (203.2 cm) long. The low columns hang 2.5 in (6.4 cm) further down, which makes the panel 82.5 in (209.6 cm) long before the border.
Joining
Method: join-as-you-go on Round 6 at the tips only. Each star point meets exactly one neighbor point, so every join is one tip to one tip.
Order:
- Work all of Column 1. Each new motif joins its top tip to the bottom tip of the motif above.
- Work Column 2. Low motif Lk joins at three tips:
- its top tip to Lk–1 (when there is one)
- its upper-left tip to the lower-right tip of Hk in Column 1
- its lower-left tip to the upper-right tip of Hk+1 in Column 1 (when there is one)
- Continue column by column. Each new motif joins to the column on its left using the same two diagonal tips, plus its top tip to the motif above.
Stitch logic: Work Round 6 as written until you reach a tip that touches a finished neighbor. Work a Join tip there, then carry on. The join chain (ch 1, sl st, ch 1) is the same length as a ch-3, so the motif keeps its stitch count of 90 sc. Turn the new motif before you start Round 6 so that the tips you need sit where you will reach them.
Join count per panel:
- vertical joins: 15 per column × 7 = 105
- diagonal joins: 31 per column pair × 6 = 186
- total: 291 joins
Tension: Work the sl st firmly, but keep both ch 1s at your normal chain size. Joins that are too tight pull the tips together and make the openings pucker.
Size checkpoint: After Columns 1–3 are joined, lay them flat. The width from the outer side points of Column 1 to those of Column 3 should be 3 × 4.33 in = 13 in (33.0 cm).
Border: Top Heading Band and Tabs
Border gauge: 20 sc = 4 in (10.2 cm) and 5 ch = 1 in (2.5 cm).
The border is worked only across the top edge. It bridges between the top tips of the high columns and drops a short anchor chain down to each low column.
Row 1 (Color A, RS): Join A with a sc in the top tip ch-3 sp of H1, Column 1, then work 2 more sc in the same sp.
Ch 32. Sl st in the top tip ch-3 sp of L1 in the next column, which sits directly below. Sl st in the back bump of each of the next 12 ch, going back up the chain to finish in the 20th ch. Ch 20. Work 3 sc in the top tip ch-3 sp of H1 in the next high column.
Repeat from * 2 more times.
Each bridge counts as 40 ch: 20 before the drop and 20 after. The 12 drop chains are covered with sl sts and are not counted.
Row 1 count: (4 high tips × 3 sc) + (3 bridges × 40 ch) = 12 + 120 = 132 sts
Row 2: Ch 1, turn. Sc in each st across, working into the back bump of each chain. (132 sc)
Rows 3–6: Ch 1, turn, sc in each st across. (132 sc) The band is now 6 rows = 1 in (2.5 cm) deep.
Tabs (Row 7 onward): Ch 1, turn, sc in the first 6 sts. Work 17 more rows of 6 sc on these stitches, for 18 rows = 3 in (7.6 cm), then fasten off with a long tail.
Skip the next 8 sts, join A in the next st, and work a 6-st tab the same way. Repeat from * until you have 10 tabs.
(Check: 10 tabs × 6 + 9 gaps × 8 = 60 + 72 = 132)
Fold each tab to the WS and whipstitch its last row to the WS of Row 2. This makes a 1.5 in (3.8 cm) loop that fits a rod up to 1 in (2.5 cm) thick.
Why the math works: The high-column top tips are 2 × 4.33 = 8.66 in (22.0 cm) apart. A 3-sc tip takes up about 0.6 in (1.5 cm), which leaves 8.06 in (20.5 cm) for the bridge, and 40 ch at 5 ch per inch covers 8 in (20.3 cm). The drop chain covers the 2.5 in (6.4 cm) drop to each low tip: the 12 chains give 2.4 in (6.1 cm), and the tip sp adds the rest.
Across the full band, 132 sts ÷ 5 = 26.4 in (67.1 cm). That matches the 26 in (66.0 cm) span between the outer high tips plus one tip’s width. The outer side points extend past the band on both sides as part of the lace edge.
Final Blocking
- Soak the panel in cool water with a little wool wash for 15 minutes.
- Press out the water without wringing. Roll the panel in towels to remove more water.
- Lay it flat on mats or a sheet. If space is tight, work in sections of 3–4 rows of motifs at a time.
- Pin the heading band straight first, at 26.4 in (67.1 cm).
- Pin each column down from there. Place a pin at every tip so that each motif measures 5 in (12.7 cm) tip to tip.
- Check that the column centers are 4.33 in (11.0 cm) apart all the way down.
- Let the panel dry completely before unpinning it. Then fold the tabs and sew them down if you haven’t already.
Final Quality-Control Checklist
- [ ] Every motif has 90 sc on Round 6 and six crisp tips
- [ ] The tan fill does not show through the cream edging
- [ ] All 291 joins are in place, with no loose or skipped tips
- [ ] The columns hang straight, with no leaning or spiraling
- [ ] The heading has 132 sts and is flat, not puckered
- [ ] The 10 tabs are evenly spaced and securely stitched
- [ ] All ends are woven in along the stitch posts, not across the open spaces
- [ ] The panel measures 30.3 in × 85 in (77.0 cm × 215.9 cm)
Troubleshooting
- Motif cups: Rounds 2 and 5 are too tight. Go up a hook size or loosen the tr stitches.
- Motif ruffles: The ch-3 arcs are too loose. Chain more snugly, or use ch 2 arcs on Round 3.
- Points look rounded: Pull the Round 6 tip ch-3 firmly and pin the tips sharply when blocking.
- Columns lean: A diagonal join landed on the wrong tip. Count the tips again from the top point.
- Heading puckers: The bridge chains are too tight. Rework them with a hook one size larger.
- Low columns sag below the band: Shorten the drop chain to 11 ch.
- Panel grows longer after hanging: This is normal for cotton. Block it again and dry it flat.
Care
Hand wash cool and dry flat, pinning the tips if needed. Keep it out of the dryer, and dust or shake it out gently between washes.
Final Notes
The sizes depend on each other in a simple chain:
- one motif: 5 in (12.7 cm) tall and 4.33 in (11.0 cm) wide
- 16 motifs: an 80 in (203.2 cm) column
- the offset low columns bring the length to 82.5 in (209.6 cm)
- 7 columns make the panel 30.3 in (77.0 cm) wide
- a 132-stitch heading and 10 tabs bring the full length to 85 in (215.9 cm)
Get the first motif right and everything after it falls into place.
Happy crocheting!