

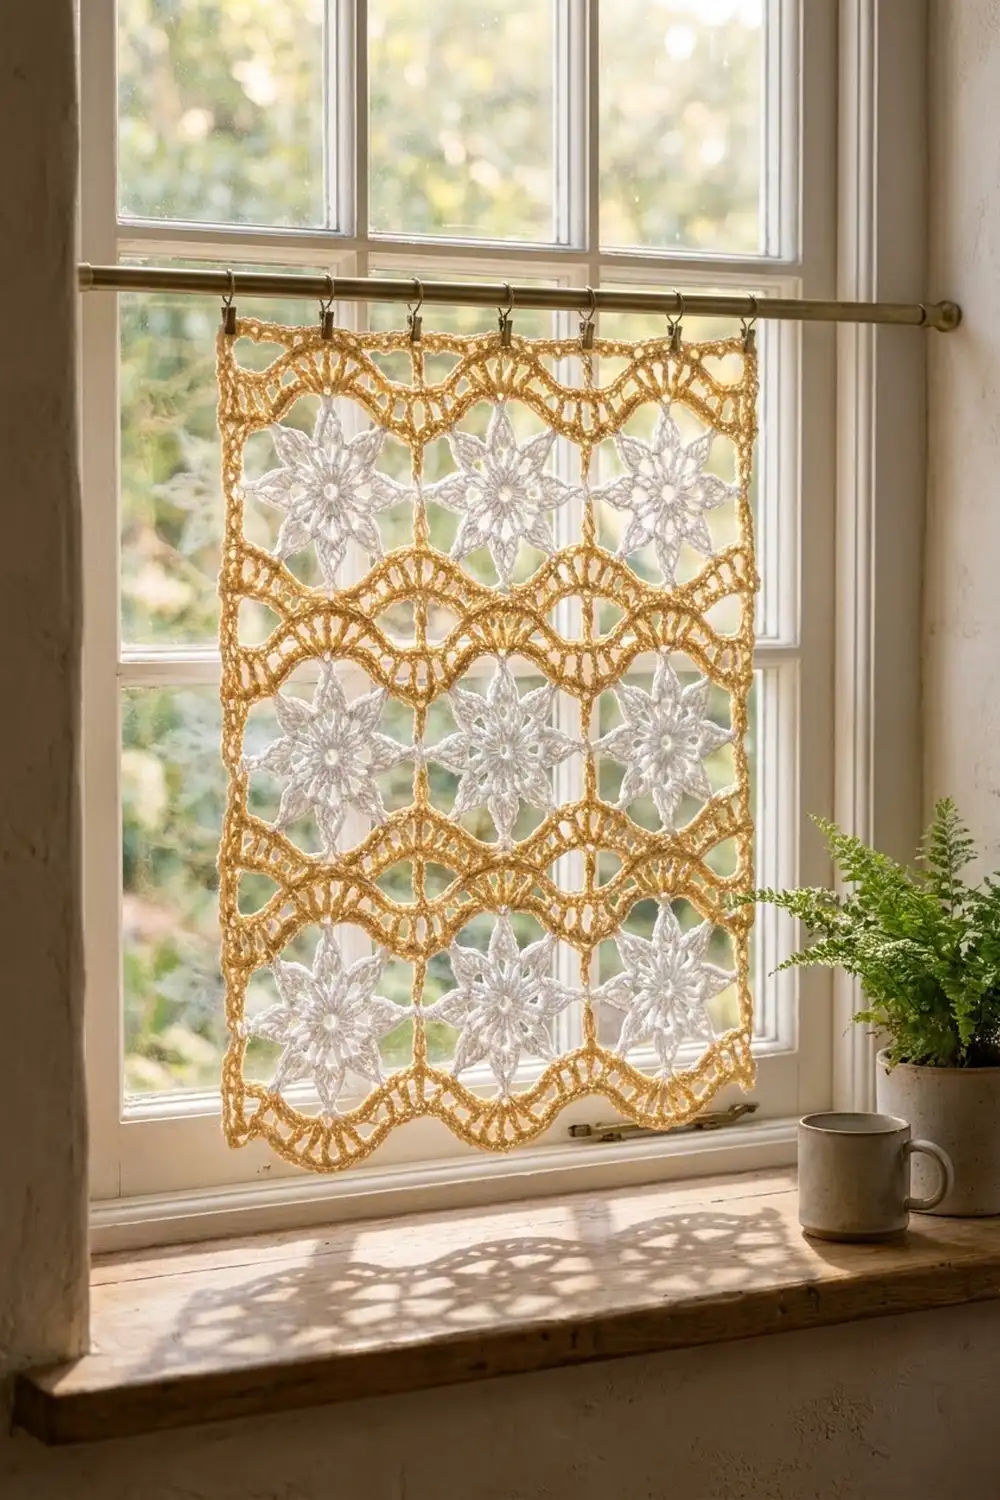
The Golden Starlight Lace Panel sets nine crisp white eight-pointed stars inside soft, rippling bands of golden lace. The gold waves rise over the center of every star and dip between them, so the panel looks like light moving across a frosted window.
The palette is just two colors: a warm honey gold for the lace body and a clean white for the stars. The look is festive without being loud. It works as a table centerpiece, a door or wall hanging, or a framed winter piece.
This pattern uses US crochet terms. The finished panel measures 13.2 in x 16.5 in (33.5 cm x 41.9 cm) including the border.
First you crochet a gold ripple band in rows. Then you make three white stars that join to that band in their final round. A gold bridge row catches the star tips, and the next ripple band grows from it. This repeats until three rows of stars are in place. Two rounds of single crochet finish the edges.
Finished Size and Construction
- Finished size: 13.2 in x 16.5 in (33.5 cm x 41.9 cm)
- Skill level: Intermediate
- Terminology: US crochet terms
- Yarn weight: DK (#3) cotton
- Hook: 3.5 mm (E-4)
- Number of pieces: 9 white star motifs, joined as you go into 1 gold lace body
- Layout: 3 stars across x 3 stars down, separated by 4 gold ripple bands
- Star size: 3.5 in (8.9 cm) from tip to tip
- Size before border: 12.2 in x 15.5 in (31.0 cm x 39.4 cm)
- Border depth: 0.5 in (1.3 cm) on every side
Materials
Choose a smooth mercerized or soft-twist cotton in DK weight. Cotton keeps the star points sharp and the waves crisp. Fuzzy yarns blur the lace.
- Color A, Honey Gold: 50 g, about 120 m
- Color B, White: 25 g, about 60 m
Both amounts include a margin of about 20 percent for your gauge swatch and small differences in tension.
Tools:
- 3.5 mm (E-4) crochet hook
- Tapestry needle
- Locking stitch markers
- Scissors and a measuring tape
- Blocking mat, rustproof pins, and a spray bottle
Abbreviations (US Terms)
- ch: chain
- sl st: slip stitch
- sc: single crochet
- hdc: half double crochet
- dc: double crochet
- tr: treble crochet
- sc2tog / dc2tog: single / double crochet 2 together
- sp: space
- st(s): stitch(es)
- RS / WS: right side / wrong side
Point Base (PB): Work back along 6 chains: sl st in next ch, sc in next ch, hdc in next ch, dc in each of next 2 ch, tr in next ch. A PB always equals 6 sts.
Free Point: Ch 7, sl st in 2nd ch from hook (the skipped ch is the tip), then work sc, hdc, 2 dc, and tr in the remaining 5 ch. This is a 6-st PB with a free tip.
Joined Point: Ch 6, sl st in the target st (this takes the place of the tip ch), then work a PB back along the 6 ch.
Leg Point: Ch 11, sl st in the target st, sl st in each of the next 5 ch (this is the leg), then work a PB in the remaining 6 ch.
Post Point: Ch 8, sl st in the tip of the neighboring star’s P7. Ch 10, sl st in the target valley sp, then sl st in each of the 10 post ch. Sl st in each of the next 2 ch (this is the bridge), then work a PB in the remaining 6 ch.
Gauge and Checkpoints
Gauge: 20 dc and 10 rows = 4 in (10.2 cm) in plain dc rows with Color A.
Make and measure one test star with Free Points before you start the panel:
- After Round 1: 1 in (2.5 cm) across
- After Round 2: 1.5 in (3.8 cm) across
- After Round 3: 3.5 in (8.9 cm) from tip to opposite tip
Check the panel as it grows:
- After Row 1: 12.2 in (31.0 cm) wide
- After Row 4: about 1.25 in (3.2 cm) tall, measured straight up through a peak
- Before the border: 12.2 in x 15.5 in (31.0 cm x 39.4 cm), with the height measured up through a star column
If the star or swatch is too big, use a hook 0.25 mm smaller. If it is too small, use a hook 0.25 mm larger. The stars and the bands must share one gauge, or the side points won’t line up over the valleys.
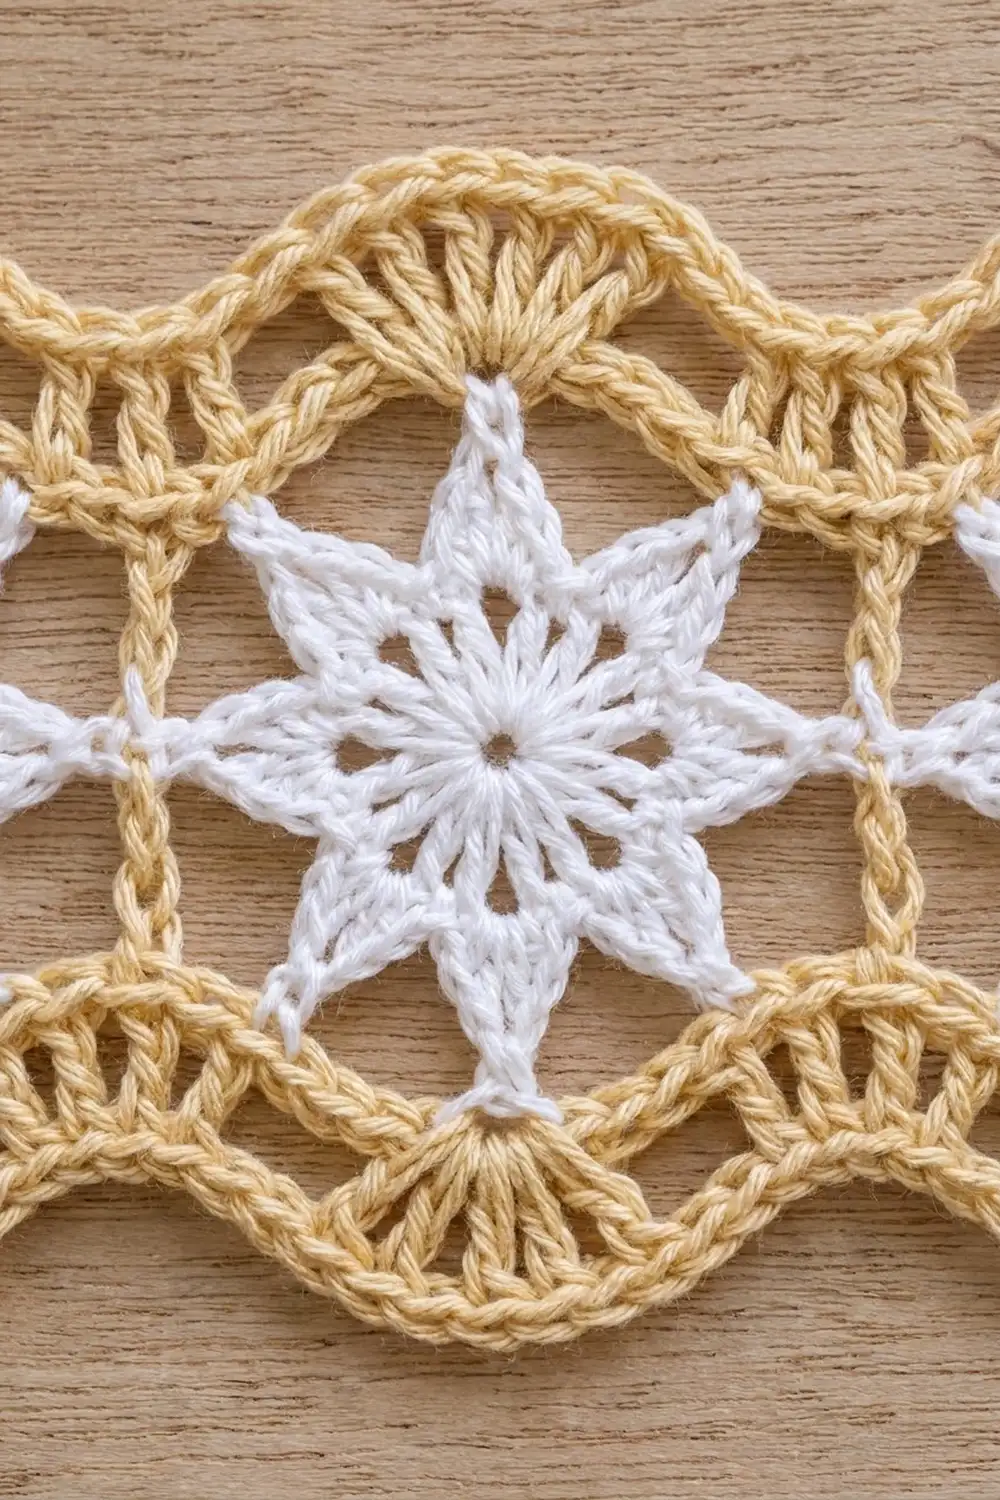
The Star Motif (Color B)
Each star has a small open center, a solid ring, and eight slim points. Rounds 1 and 2 are the same for every star. Round 3 changes depending on where the star sits in the panel.
Round 1: Make a magic ring. Ch 4 (counts as dc and ch 1), [dc in ring, ch 1] 7 times, sl st in 3rd ch of beginning ch-4. (8 dc and 8 ch-1 sps = 16 sts)
Round 2 (conversion round): Ch 1, sc in same st, 2 sc in next ch-1 sp, [sc in next dc, 2 sc in next ch-1 sp] 7 times, sl st in first sc. (16 sts worked 1 per st + 8 extra = 24 sc)
Round 3, test star (not joined): Ch 1, sc in same st, [Free Point, skip next 2 sc, sc in next sc] 7 times, Free Point, skip next 2 sc, sl st in first sc. (8 sc + 8 points of 6 sts = 56 sts) Fasten off.
The points are numbered in the order you work them. With RS facing, start at the bottom and go counterclockwise: P1 bottom, P2 lower right, P3 right side, P4 upper right, P5 top, P6 upper left, P7 left side, P8 lower left.
The Gold Ripple Bands (Color A)
Every gold row has 61 sts: 1 edge stitch plus 3 repeats of 20. Each repeat sits over one star column.
DR repeat (dc ripple): Dc2tog twice, dc in next 4 sts, 2 dc in each of next 4 sts, dc in next 4 sts, dc2tog twice. (Works into 20 sts and makes 2 + 4 + 8 + 4 + 2 = 20 sts)
SR repeat (sc ripple): Work the same as the DR repeat, but use sc2tog, sc, and 2 sc in place of dc2tog, dc, and 2 dc. (20 sts)
The increases form a peak in the center of each repeat, between its 10th and 11th sts. The decreases form a valley where two repeats meet.
Row 1 (RS): With Color A, ch 62. Sc in 2nd ch from hook and in each ch across. Turn. (61 sc)
Row 2 (WS): Ch 2 (does not count as a st), work the DR repeat 3 times, dc in last st. Turn. (60 + 1 = 61 sts)
Row 3 (RS): Ch 1, sc in first st, work the SR repeat 3 times. Turn. (1 + 60 = 61 sts)
Row 4 (WS): Work as Row 2. (61 sts) Fasten off.
Odd rows start with the edge stitch, and even rows end with it, so it always stays on the same side. This pattern calls that side the starting edge. With RS facing, it is on your right.
Make All Pieces
You need 9 stars in Color B. Work Rounds 1 and 2 of all 9 stars now, fasten off, and set them aside. You’ll work Round 3 of each star as you assemble the panel.
- Color B: 9 star centers (3 for each row of stars)
- Color A: 1 continuous body of 16 rows
Layout with RS facing (starting edge on the right):
Band 4 (Rows 13-16)  ~~~~~~~~~~~~~~~~~~~~~~
Stars  Star 3 | Star 2 | Star 1  (on Row 12)
Band 3 (Rows 9-12)   ~~~~~~~~~~~~~~~~~~~~~~
Stars  Star 3 | Star 2 | Star 1  (on Row 8)
Band 2 (Rows 5-8)    ~~~~~~~~~~~~~~~~~~~~~~
Stars  Star 3 | Star 2 | Star 1  (on Row 4)
Band 1 (Rows 1-4)    ~~~~~~~~~~~~~~~~~~~~~~
Joining
The stars join as you go in Round 3. A gold bridge row then catches their upper tips. Lay the panel RS up with Row 4 at the top.
Star 1, Round 3: Ch 1, sc in same st. Work P1 as a Joined Point into the peak of the first repeat (the sp between its 10th and 11th sts). Skip 2 sc, sc in next sc. Work P2 as a Leg Point into the 4th st from the starting-edge end of the repeat. Skip 2 sc, sc in next sc. Work P3 through P7 as Free Points, with “skip 2 sc, sc in next sc” between them. Work P8 as a Leg Point into the 4th st from the other end of the repeat. Skip 2 sc, sl st in first sc. (8 sc + 8 points = 56 sts, plus legs) Fasten off.
Star 2, Round 3: Work as Star 1, but into the second repeat, and make P3 a Post Point. Join it to Star 1’s P7 tip, and drop the post into the valley sp between repeats 1 and 2.
Star 3, Round 3: Work as Star 2 into the third repeat. Join P3 to Star 2’s P7, and drop the post into the valley between repeats 2 and 3. Star 3’s P7 stays free at the far edge.
Tension: Keep the joining sl sts snug but not tight, because a tight join puckers the point. Legs and posts should hang straight. If your posts bow, use ch 9 for them. If they pull, use ch 11. Either way, make every post in the panel the same length.
Row 5 (RS, bridge row): Join Color A with sc in Star 1’s P3 tip. [Ch 4, sc in P4 tip, ch 4, sc in P5 tip, ch 4, sc in P6 tip, ch 4, sc in P7 tip] across all 3 stars. Turn. (1 + 3 x (16 ch + 4 sc) = 61 sts)
On the next row, work into each chain itself, not around the space, so every chain counts as a stitch. The P5 sc lands on the 10th st of each repeat, right at the peak.
Rows 6-8: Work Row 6 as Row 2, Row 7 as Row 3, and Row 8 as Row 2. Fasten off. (61 sts in each row)
Rows 9-16: Join the second row of stars to Row 8, then work Rows 9-12 the same as Rows 5-8. Join the third row of stars to Row 12, then work Rows 13-16 the same as Rows 5-8.
Size checkpoint: The panel should measure 12.2 in x 15.5 in (31.0 cm x 39.4 cm). If it is wider than 12.5 in (31.8 cm), your ripple rows are loose. Block the panel before you add the border.
Border (Color A)
Border gauge: 5 sc = 1 in (2.5 cm) along the top and bottom. The sides average about 3.5 sts per inch, which is right for an open lace edge where chains span the star zones.
Round 1: With RS facing, join Color A in the first st of Row 16. Work 3 sc in that st (the middle sc is the corner), sc in each of next 59 sts, 3 sc in last st. (Top: 63 sts from corner to corner)
Work down the side into the row ends. Make 2 sc in each dc row end and 1 sc in each sc row end. At each star zone, ch 10 and sc in the outer star tip, so the sc lands on the tip that holds the bridge row’s end. Counts per section:
- Band 1: 1 + 2 + 1 + 2 = 6 sts
- Each star zone: 10 ch + 1 sc = 11 sts
- Bands 2-4: 2 + 1 + 2 = 5 sts each (the bridge row’s end is the star tip)
- Side total: 6 + (3 x 11) + (3 x 5) = 54 sts between the corners, or 56 including both corners
Work across the foundation into the free loops: 3 sc in first ch, sc in next 59 ch, 3 sc in last ch. (Bottom: 63 sts) Work the second side the same way (54 sts), then sl st in first sc. (2 x 63 + 2 x 54 = 234 sts)
Round 2 (trim round): Ch 1. Sc in each sc and each ch, with 3 sc in each corner sc. Sl st in first sc and fasten off. (234 sts worked 1 per st + 8 extra = 242 sts: 65 sts across the top and bottom, 58 sts on each side, corners included)
Why the math works: The top and bottom counts come straight from the 61-stitch rows, so those edges don’t ruffle. The side counts follow the row heights, and only the star tips anchor the chains, so the sides stay straight. Each round adds exactly 2 sts per corner. The two rounds add 0.5 in (1.3 cm) per side and bring 12.2 in x 15.5 in up to 13.2 in x 16.5 in (33.5 cm x 41.9 cm).
Final Blocking
- Weave in the ends along stitches of the same color: white tails inside the star rings, gold tails inside the bands.
- Soak the panel in cool water for 15 minutes. Press the water out in a towel without wringing.
- Lay the panel RS up and pin the corners to 13.2 in x 16.5 in (33.5 cm x 41.9 cm).
- Pin the straight sides, then pin each peak and valley along the top and bottom.
- Pin all 8 tips of every star outward, so each star measures 3.5 in (8.9 cm).
- Mist lightly and let the panel dry completely, at least 24 hours.
Final Quality-Control Checklist
- Every gold row has 61 sts.
- The peaks sit directly over each star’s P1 and P5 tips.
- Every star has 8 points and measures 3.5 in (8.9 cm).
- All posts and legs are the same length.
- After Round 2, the border has 65 sts across the top and bottom and 58 sts on each side.
- The blocked panel measures 13.2 in x 16.5 in (33.5 cm x 41.9 cm).
- No tails show on the RS.
Troubleshooting
Waves look flat: Check that every peak has 2 dc in each of 4 sts and every valley has both dc2tog pairs.
Star points curl: Loosen the tr at the base of each point, or pin the points while blocking.
Stars bunch together: Each Post Point needs its 2 bridge chains.
Bridge row pulls up: Your ch-4 spaces are too tight. Use a hook one size larger for that row only.
Sides ruffle: Work only 1 sc into each chain of the border.
Row is off by one stitch: You probably missed the edge stitch. It comes first in odd rows and last in even rows.
Care
Hand wash in cool water with mild soap and dry flat, re-pinning the star tips if needed. A cool iron through a pressing cloth will refresh the waves.
Final Notes
Each measurement builds on the one before it. The 1.5 in (3.8 cm) star centers grow into 3.5 in (8.9 cm) stars. Three 20-stitch repeats plus 1 edge stitch make 61-stitch rows that measure 12.2 in (31.0 cm) wide. Four bands and three rows of stars reach 15.5 in (39.4 cm), and two border rounds bring the panel to 13.2 in x 16.5 in (33.5 cm x 41.9 cm). If you check each step, the panel will lie flat with every star in place.
Happy crocheting!