

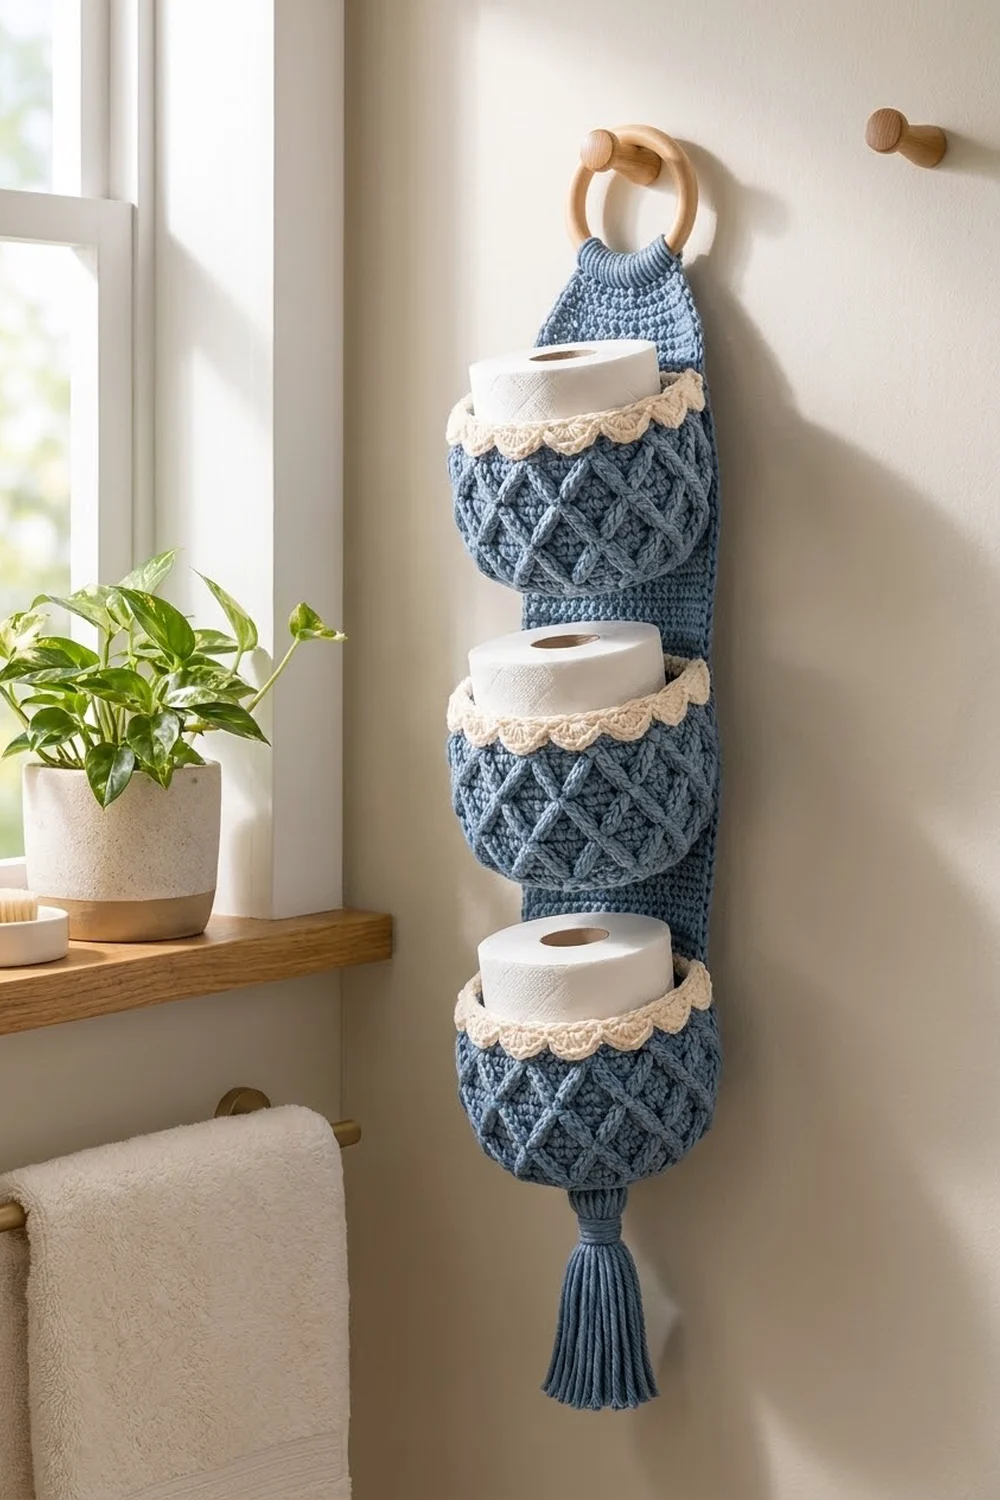
This hanging holder keeps three spare rolls tidy and visible in a bathroom. Three round baskets are stitched onto a long back strip. A wooden ring at the top hangs it from a hook or towel ring, and a soft tassel finishes the bottom.
The baskets are worked in dusty denim blue and covered in a raised diamond lattice made of crossing front-post double crochet. A cream rim with small shell scallops gives each basket a soft, coastal look. The back strip is plain blue single crochet with a narrow border, so the textured baskets stand out.
The pattern uses US crochet terms. Each basket measures about 5.5 in (14.0 cm) across and 4.3 in (10.9 cm) tall. The bordered strip measures 4.4 x 21 in (11.2 x 53.3 cm). Hung up, the holder is about 26 in (66.0 cm) long from the top of the ring to the tip of the tassel.
You’ll make each basket from the bottom up: a flat double crochet base, then lattice walls and a cream scallop rim. Next you’ll make the strip and give it a two-round border, then sew on the baskets, fold the top tab over the ring, and attach the tassel.
Finished Size and Construction
- Finished size: about 5.5 x 26 in (14.0 x 66.0 cm) hanging
- Skill level: Intermediate (post stitches, crossed posts)
- Terminology: US
- Yarn weight: Worsted (#4) cotton or cotton blend
- Hook: 5.0 mm (H-8)
- Number of pieces: 3 baskets, 1 back strip, 1 tassel, plus 1 wooden ring
- Layout: one vertical column of 3 baskets
- Piece size: basket 5.5 in (14.0 cm) across x 4.3 in (10.9 cm) tall; strip 4.4 x 21 in (11.2 x 53.3 cm)
- Strip size before border: 3.4 x 20 in (8.6 x 50.8 cm)
- Border depth: 0.5 in (1.3 cm) on each side
Materials
Use a smooth, firm cotton. It holds the post-stitch texture crisply and keeps the baskets upright. Acrylic works too, but the baskets will be softer.
- Color A, denim blue: 220 g (about 374 m), for baskets, strip and tassel
- Color B, cream: 40 g (about 68 m), for the basket rims
Tools:
– 5.0 mm (H-8) hook
– Wooden ring, 3 in (7.6 cm) across
– Yarn needle
– 8 locking stitch markers
– Cardboard rectangle 5.5 in (14.0 cm) tall, for the tassel
– Scissors, tape measure, blocking pins
The quantities include a margin of about 15% for gauge swatches and differences between yarn brands.
Abbreviations (US Terms)
- ch: chain
- sl st: slip stitch
- sc: single crochet
- hdc: half double crochet
- dc: double crochet
- sc2tog: single crochet 2 together
- BLO: back loop only
- st(s): stitch(es)
- sk: skip
- rnd: round
- FPdc (front post double crochet): Yarn over and insert the hook from front to back to front around the post of the stated stitch in the round below. Yarn over, pull up a loop, then [yarn over, pull through 2 loops] twice. Always skip the stitch top hidden behind each FPdc, so the stitch count stays the same.
- Shell: 5 dc in the same stitch.
Repeat positions: each lattice repeat is 4 stitches, called positions 1 to 4. There are 15 repeats per round.
Gauge and Checkpoints
- Hdc gauge: 14 sts x 11 rnds = 4 in (10.2 cm)
- Sc gauge: 14 sts x 16 rows = 4 in (10.2 cm)
Make one complete basket before you start the others. It acts as your gauge test.
Checkpoints for the base diameter:
– After Rnd 1: 1.25 in (3.2 cm)
– After Rnd 2: 2.25 in (5.7 cm)
– After Rnd 3: 3.25 in (8.3 cm)
– After Rnd 4: 4.25 in (10.8 cm)
– After Rnd 5: 5.25 in (13.3 cm)
Checkpoints for the wall height, measured from the base fold:
– After Rnd 10: 1.8 in (4.6 cm)
– After Rnd 15: 3.6 in (9.1 cm)
If your base is more than 0.2 in (0.5 cm) too big, go down to a 4.5 mm hook. If it’s too small, go up to a 5.5 mm hook. A standard roll is about 4.5 in (11.4 cm) across, so a basket that ends up smaller than 5 in (12.7 cm) will feel tight.
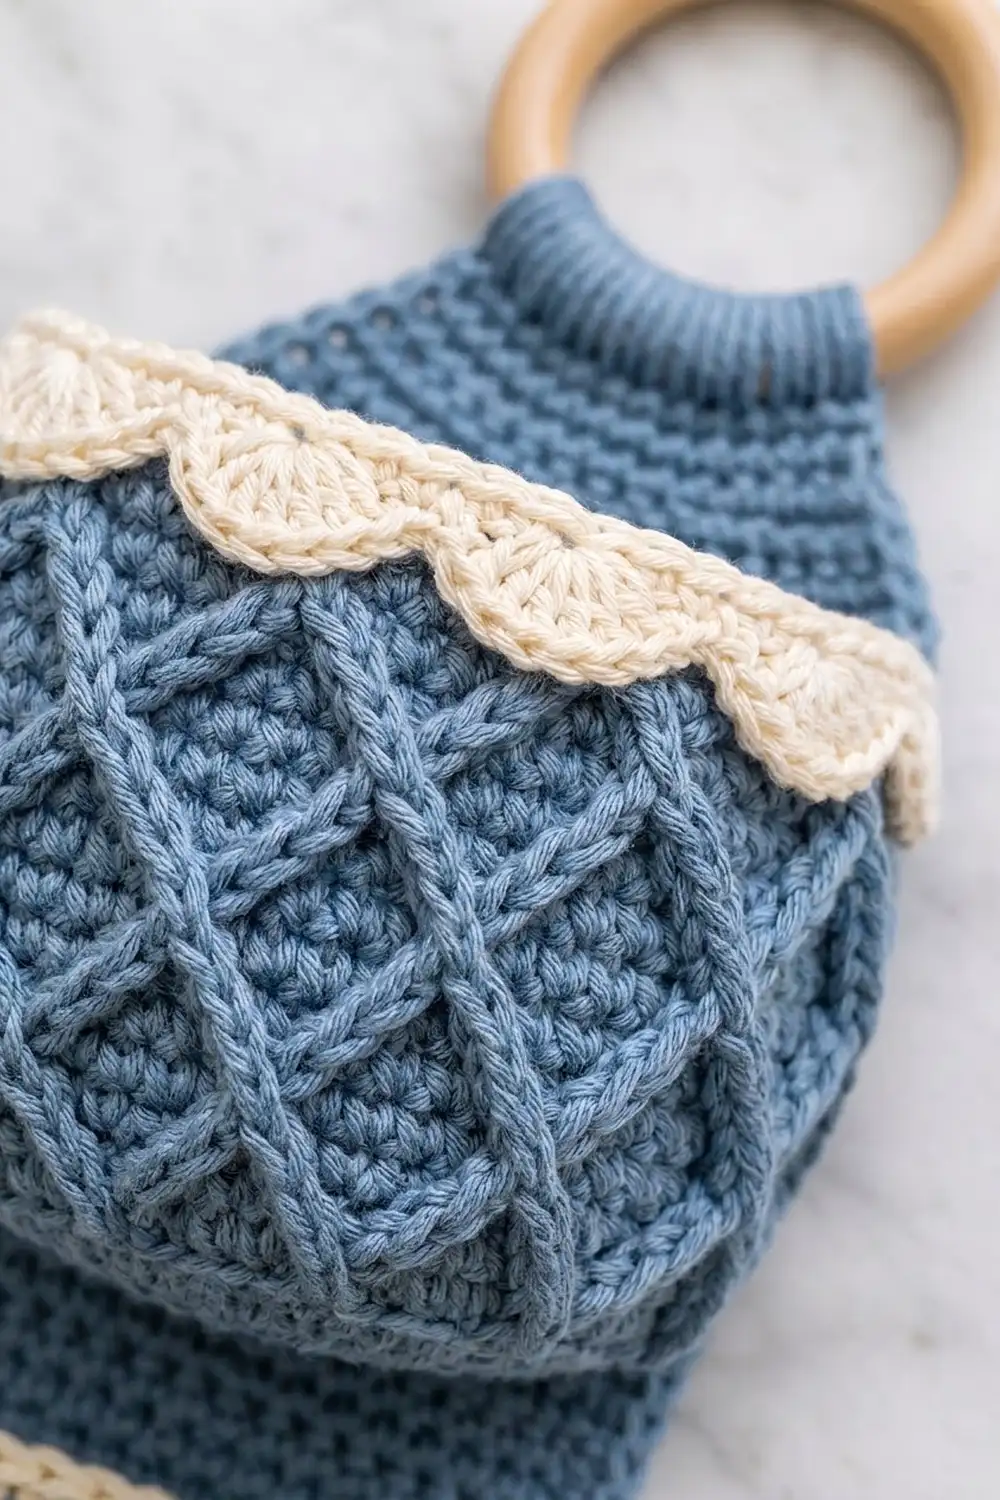
Basket (Make 3)
Base
Use Color A.
Rnd 1: Make a magic ring. Ch 2 (does not count as a st), work 12 dc into the ring, then sl st to the first dc. (12 sts)
Rnd 2: Ch 2, 2 dc in each st, sl st to join. (24 sts)
Rnd 3: Ch 2, dc in next st, 2 dc in next st, repeat around, sl st to join. (36 sts)
Rnd 4: Ch 2, dc in next 2 sts, 2 dc in next st, repeat around, sl st to join. (48 sts)
Rnd 5: Ch 2, dc in next 3 sts, 2 dc in next st, repeat around, sl st to join. (60 sts)
The base should lie flat and measure 5.25 in (13.3 cm) across.
Walls
For every wall round, ch 1 at the start (it does not count as a st) and sl st to the first st at the end.
Rnd 6: Hdc in BLO of each st. (60 sts) This makes a ridge, and the walls start to rise from here.
Rnd 7: Hdc in each st. (60 sts)
Rnd 8 (center cross): Hdc in next st, sk next st, FPdc around next st, FPdc around skipped st (work in front of the first FPdc), hdc in next st. Repeat 15 times. (60 sts: 30 hdc, 30 FPdc)
Rnd 9 (spread): FPdc around the FPdc 1 st ahead, hdc in top of each of the 2 FPdc, FPdc around the FPdc 1 st back. Repeat 15 times. (60 sts)
Rnd 10 (edge cross): FPdc around the FPdc 1 st back, hdc in next 2 sts, FPdc around the FPdc 1 st ahead. Repeat 15 times. (60 sts)
On the first repeat of Rnd 10, “1 st back” means the last FPdc of Rnd 9, across the join. On the last repeat, “1 st ahead” means the first FPdc of Rnd 9.
Rnd 11 (gather): Hdc in top of next FPdc, FPdc around that same FPdc, FPdc around the FPdc 1 st ahead, hdc in top of that FPdc. Repeat 15 times. (60 sts)
Rnd 12 (center cross): Hdc in next st, sk next FPdc, FPdc around next FPdc, FPdc around skipped FPdc (work in front of the first), hdc in next st. Repeat 15 times. (60 sts)
Rnd 13: Repeat Rnd 9. (60 sts)
Rnd 14: Repeat Rnd 10. (60 sts)
Rnd 15: Hdc in each st. (60 sts) Fasten off Color A.
Across these rounds, each post line moves one position per round. Lines cross at positions 2–3 in Rnds 8 and 12, and at the gap between repeats in Rnds 10 and 14. That gives you 15 diamonds around and two full bands of diamonds up the wall.
Scallop Rim
Use Color B.
Rnd 16: Join Color B in any st, ch 1, sc in each st, sl st to join. (60 sts)
Rnd 17: Ch 1, sc in first st, sk 2 sts, shell in next st, sk 2 sts, sc in next st. Repeat 8 more times, then sk 2, shell in next st, sk 2, and sl st to the first sc. (10 shells + 10 sc = 60 sts)
Fasten off and weave in the ends. The basket should now stand 4.3 in (10.9 cm) tall and measure 5.5 in (14.0 cm) across.
Back Strip
Use Color A.
Foundation: Ch 13.
Row 1: Sc in the 2nd ch from the hook and in each ch across. (12 sts)
Rows 2–64: Ch 1, turn, sc in each st across. (12 sts) The strip should now measure 16 in (40.6 cm).
Row 65: Ch 1, turn, sc2tog, sc in next 8 sts, sc2tog. (10 sts)
Row 66: Ch 1, turn, sc in each st. (10 sts)
Row 67: Ch 1, turn, sc2tog, sc in next 6 sts, sc2tog. (8 sts)
Row 68: Ch 1, turn, sc in each st. (8 sts)
Row 69: Ch 1, turn, sc2tog, sc in next 4 sts, sc2tog. (6 sts)
Rows 70–80: Ch 1, turn, sc in each st. (6 sts)
Don’t fasten off. Before the border, the strip should measure 3.4 x 20 in (8.6 x 50.8 cm).
Make All Pieces
Color A:
– 3 baskets (base, walls and lattice)
– 1 strip
– 1 tassel
Color B:
– 3 scallop rims, one per basket
Here is the layout, from top to bottom:
        ( RING )
       [  TAB   ]
      [ BASKET 1 ]
       [ STRIP  ]
      [ BASKET 2 ]
       [ STRIP  ]
      [ BASKET 3 ]
       [ STRIP  ]
        (TASSEL)
Border (Back Strip)
Border gauge: use the same sc gauge as the strip, 14 sts = 4 in (10.2 cm). Along the long sides, 16 rows also equal 4 in. So 14 sc fit into every 16 rows, which works out to 7 sc for every 8 rows.
Rnd 1: Ch 1. Work down the first long side, putting 1 sc in each row end but skipping every 8th row end. That gives 70 sc for the 80 rows.
Along the bottom edge, work 3 sc in the first foundation ch, sc in the next 10 ch, and 3 sc in the last ch.
Work up the second long side the same way. (70 sc)
Along the top edge, work 3 sc in the first st, sc in the next 4 sts, and 3 sc in the last st. Sl st to join.
Rnd 1 count: 70 + (3 + 10 + 3) + 70 + (3 + 4 + 3) = 180 sts.
If you count between the corner center sts instead, you get sides of 72, bottom 12, top 6, plus 4 corner centers. That also totals 180.
Rnd 2: Ch 1. Sc in each st, working 3 sc in each corner center st. Sl st to join and fasten off.
Rnd 2 count: 72 + 72 + 12 + 6 + (4 x 3) = 188 sts.
Why the math works: the sides use the 7-per-8 rate, so the edges stay flat and don’t ruffle. Each corner adds exactly 2 sts per round, so the corners turn cleanly without cupping. Two rounds add 0.5 in (1.3 cm) all around. The strip becomes 3.4 + 1.0 = 4.4 in wide (11.2 cm) and 20 + 1.0 = 21 in long (53.3 cm).
Joining
Ring
- Slide the narrow top tab through the wooden ring.
- Fold the top 2 in (5.1 cm) to the back.
- Whipstitch the tab edge to the back of the strip with Color A, catching both loops of each border st on the tab and 1 matching st on the strip.
After folding, the strip hangs 19 in (48.3 cm) below the ring.
Baskets
- Lay the strip right side up and measure from the fold.
- Place markers for the basket rims at 2 in (5.1 cm), 7.75 in (19.7 cm) and 13.5 in (34.3 cm).
- Check the gaps. Each basket is 4.3 in tall, so there will be about 1.5 in (3.8 cm) of strip between baskets. Below the bottom basket there will be 1.2 in (3.0 cm) of strip.
Method: whipstitch with Color A and a yarn needle.
- Choose the back of the basket. Mark 2 vertical lines 10 sts apart, centered at the back. These lines sit about 3 in (7.6 cm) apart, which is inside the strip’s width.
- Sew each line from Rnd 6 up to Rnd 16.
- Sew across the base fold, along those same 10 sts, catching 1 strip st for each basket st.
Stitch-to-stitch logic: 2 basket rounds are about the same height as 3 strip rows. On the vertical lines, take 3 strip rows for every 2 basket rounds.
Tension: Pull each stitch snug enough that the basket sits flush against the strip. Don’t pull so hard that the strip puckers, or it will hang crooked.
Size checkpoint: Lay the holder flat. The bottom basket should sit about 17.8 in (45.2 cm) below the fold.
Tassel
- Wrap Color A 30 times around the 5.5 in (14.0 cm) card.
- Tie the loops at the top and cut them at the bottom.
- Wrap a length of yarn tightly around the bundle 1 in (2.5 cm) below the top and secure it.
- Trim the tassel to 5 in (12.7 cm).
- Sew the tassel to the bottom center of the strip so it hangs about 4 in (10.2 cm) below the strip’s bottom edge.
Final Blocking
- Lightly mist the strip and pin it flat to 4.4 x 21 in (11.2 x 53.3 cm).
- Stuff each basket with a towel rolled to 5.5 in (14.0 cm) across, so the walls dry straight.
- Use your fingers to shape the shells into even scallops.
- Let everything air-dry fully. Keep it out of direct heat.
- Steam the tassel and comb the strands straight, then trim again if needed.
Final Quality-Control Checklist
- The base has 60 sts and lies flat at 5.25 in (13.3 cm).
- Every wall round has 60 sts.
- There are 15 diamonds around each basket, and the X crossings line up.
- Each rim has 10 even cream shells.
- Each basket stands 4.3 in (10.9 cm) tall.
- The strip border has 188 sts and edges that lie flat.
- The baskets are centered and level, with matching gaps.
- The ring fold is secure, and the tassel hangs at center.
- All ends are woven in on the back.
Troubleshooting
- The base cups: you’re working too tight. Go up a hook size for Rnds 1–5.
- The base ruffles: you’re working too loose, or added extra increases. Recount each round.
- The lattice drifts or the diamonds look uneven: you’ve lost track of the repeat positions. Place a marker at the start of each repeat in Rnd 8.
- The stitch count changes: you probably worked into a top hidden behind an FPdc. Skip every top that is covered by a post.
- The basket leans forward: it’s sewn only at the rim. Also sew both vertical lines and the base fold.
- The strip edges wave: you worked too many sts along the sides. Make sure you skip every 8th row end.
- The roll is too tight: the basket is below 5.5 in. Rework it with a larger hook.
Care
Hand wash in cool water, press out the water in a towel, and reshape the baskets over rolled towels to dry flat. Don’t tumble dry. The heat can relax the lattice texture.
Final Notes
The measurement chain is:
- Base: 5.25 in (13.3 cm)
- Basket walls: 3.6 in (9.1 cm), plus the rim for a total height of 4.3 in (10.9 cm)
- Strip: 3.4 x 20 in (8.6 x 50.8 cm), and 4.4 x 21 in (11.2 x 53.3 cm) after the border
- Hanging length: 19 in (48.3 cm) below the ring after folding, and about 26 in (66.0 cm) total including the ring and tassel
If you hit each checkpoint, the three rolls will slide in easily and the holder will hang straight.
Happy crocheting!