

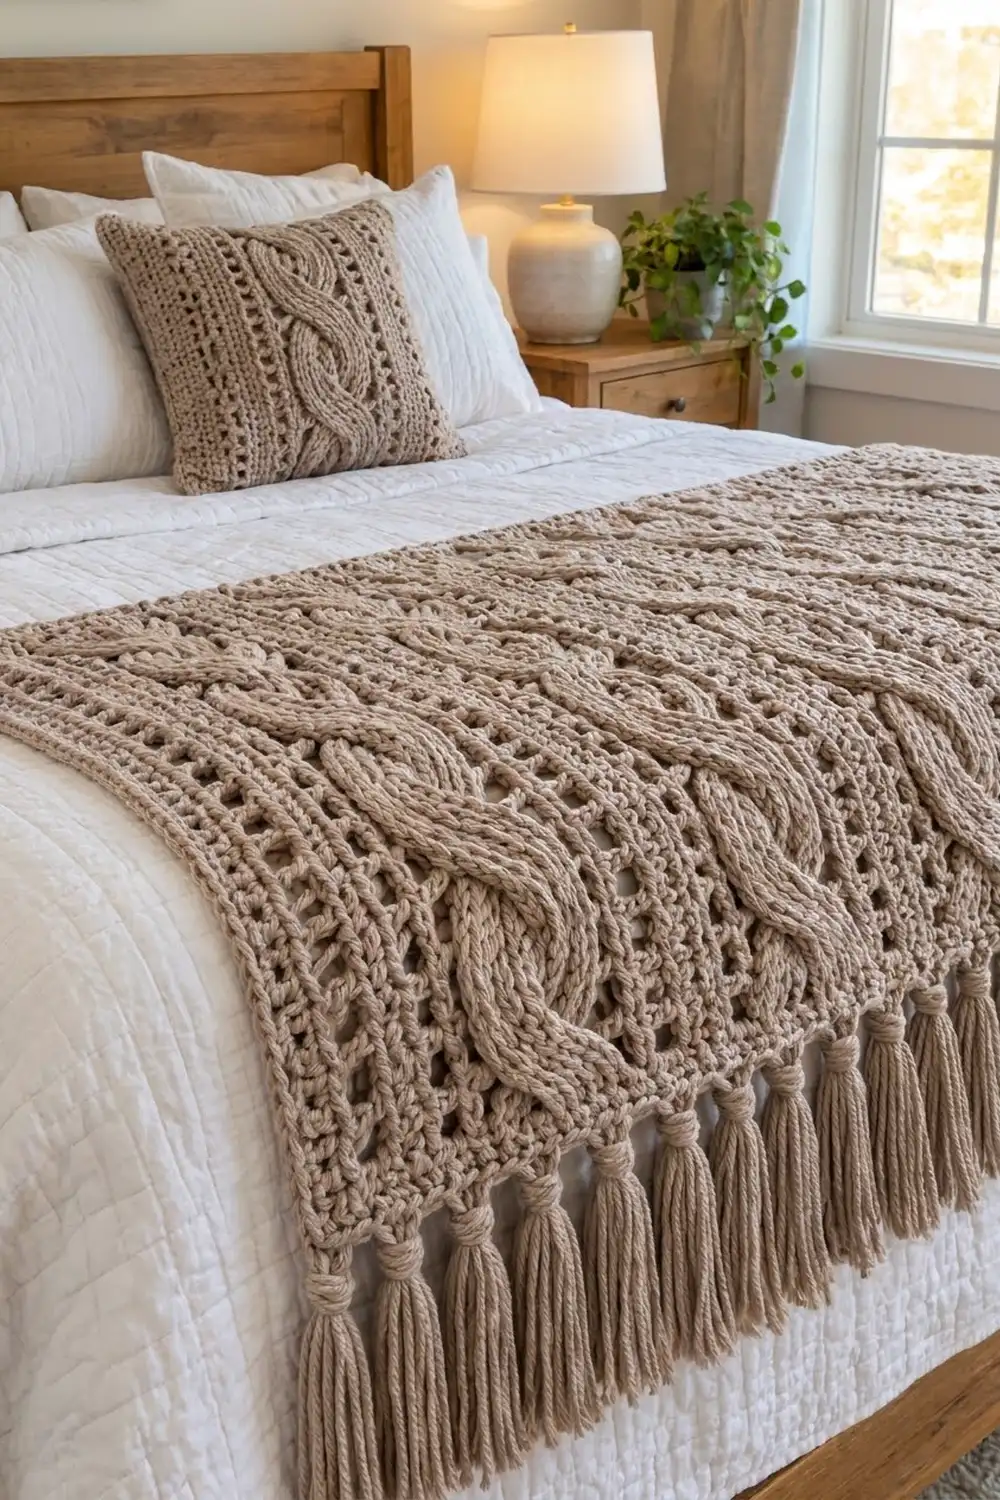
The Hearthside Cable Bed Runner is a long, cozy runner with three deep rope cables. Lacy eyelet columns frame each cable, and chunky wrapped tassels hang from both ends. It looks like a knitted cable throw, but every stitch is crochet.
It is made in a single soft taupe, so the texture does all the work. The cables are front post stitches that cross every six rows. The eyelets are simple chain-1 spaces stacked row on row. Together they give a calm, farmhouse look that suits a white quilt.
This pattern uses US crochet terms. The finished runner measures 18 in x 73 in (45.7 cm x 185.4 cm) without the tassels. The tassels add 5 in (12.7 cm) to each short end.
The runner is made in one piece, in rows, from one short end to the other. It begins and ends with a band of larger eyelets. Two rounds of single crochet go around the edge, and then the tassels are added. Nothing needs to be joined.
Finished Size and Construction
- Finished size: 18 in x 73 in (45.7 cm x 185.4 cm), not counting tassels
- Tassel length: 5 in (12.7 cm)
- Skill level: Intermediate (post stitches, cable crosses)
- Terminology: US
- Yarn weight: Bulky (#5)
- Hook: 6.5 mm (K-10.5)
- Number of pieces: 1
- Layout: One rectangle with 3 cables running lengthwise
- Size before border: 17 in x 72 in (43.2 cm x 182.9 cm), 50 stitches x 126 rows
- Border depth: 0.5 in (1.3 cm) on every side, 2 rounds of sc
Materials
Yarn: Use a smooth bulky yarn with good stitch definition. A wool blend or a soft acrylic works well. Avoid fuzzy, brushed, or highly variegated yarns, because they blur the cables and fill in the eyelets.
- Taupe (main and only color): about 900 g / 1,097 m (1,200 yd)
- Body: about 750 g / 914 m (1,000 yd)
- Border: about 75 g / 91.4 m (100 yd)
- Tassels: about 75 g / 91.4 m (100 yd)
These amounts include a margin of about 10 percent. Buy all of your yarn from one dye lot.
Tools:
- 6.5 mm (K-10.5) crochet hook
- Tapestry needle
- 4 locking stitch markers
- Sharp scissors
- Stiff card, 5.5 in (14.0 cm) tall, for cutting tassel strands
- Blocking mats, rust-proof pins, and a spray bottle
- Measuring tape
Abbreviations (US Terms)
- ch – chain
- sk – skip
- st(s) – stitch(es)
- sp – space
- sc – single crochet
- dc – double crochet
- FPdc – front post double crochet
- BPdc – back post double crochet
- FPtr – front post treble crochet
- RS / WS – right side / wrong side
Special stitch – 3/3 Cable Cross (6 sts): Sk the next 3 sts. FPtr around each of the next 3 sts. Working in front of the 3 sts you just made, FPtr around each of the 3 skipped sts, from right to left. This crosses one 3-strand rope over the other.
Turning chain: At the start of every row, ch 3. It counts as the first dc. Work the last st of each row into the top of the turning ch.
Gauge and Checkpoints
Gauge in dc and eyelet fabric: 11 sts and 7 rows = 4 in (10.2 cm), blocked.
Cable panel: Each 6-st cable pulls in to about 1.8 in (4.6 cm) wide.
Test swatch first. Ch 26. Work a foundation row of dc, starting in the 4th ch from the hook (24 sts). Next, work body rows R1–R6 twice, then R1 again, for 14 rows in total. In each pattern row, use only the left edge section, one cable, and the right edge section: 9 + 6 + 9 = 24 sts. Block the swatch. It should measure 8.4 in (21.3 cm) wide and 8 in (20.3 cm) tall.
- Swatch too big: Change to a 6 mm hook.
- Swatch too small: Change to a 7 mm hook.
- Width is right but height is wrong: Change how high you pull up the loop before finishing each dc. Don’t change the hook for this.
Checkpoints while you crochet:
- After Row 1: width 17 in (43.2 cm), slightly relaxed.
- After Row 28: length 16 in (40.6 cm).
- After Row 63: length 36 in (91.4 cm). This is the halfway point.
- After Row 126: 17 in x 72 in (43.2 cm x 182.9 cm).
If the runner is narrower than 17 in (43.2 cm), your cable crosses are probably too tight. Pull each FPtr up to the full height of the row.
Stitch Layout
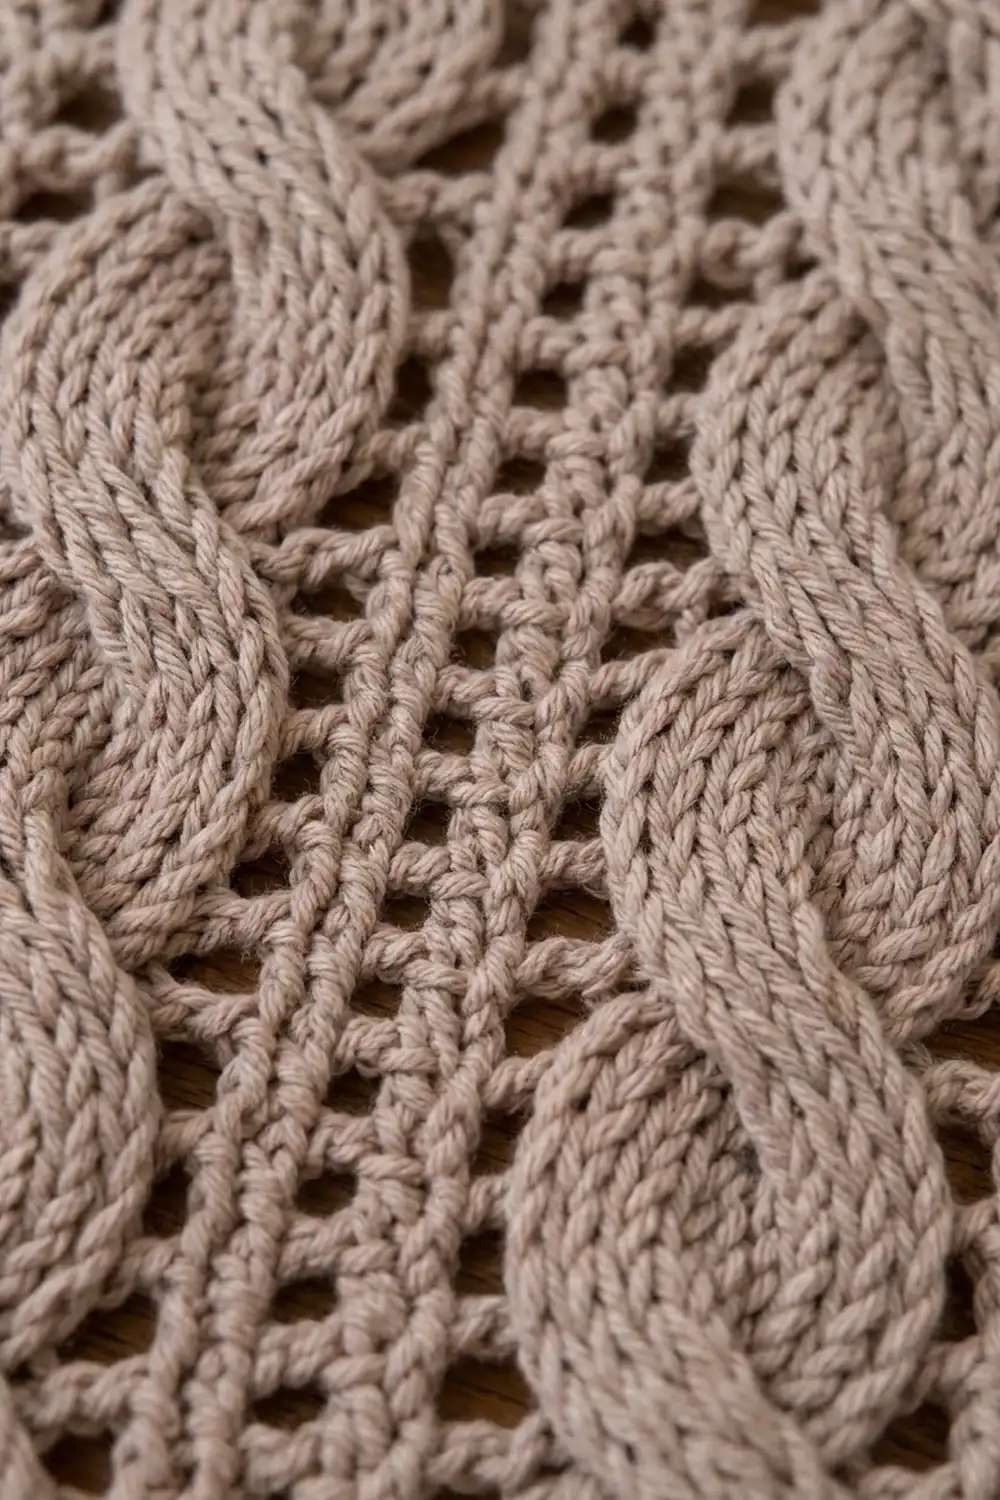
Every row has 50 sts. Ch-1 spaces count as stitches. From the side edge, the sections are:
| Section | Stitches | Pattern |
|---|---|---|
| Left edge | 9 | 3 dc, (ch 1, dc) x 3 |
| Cable A | 6 | post sts |
| Middle | 7 | dc, (ch 1, dc) x 3 |
| Cable B | 6 | post sts |
| Middle | 7 | dc, (ch 1, dc) x 3 |
| Cable C | 6 | post sts |
| Right edge | 9 | dc, (ch 1, dc) x 3, 2 dc |
Check the total: 9 + 6 + 7 + 6 + 7 + 6 + 9 = 50. Each row has 12 ch-1 sps, 20 dc, and 18 cable sts. The layout is symmetrical, so RS rows and WS rows read the same way. On WS rows, the first 9 sts follow the left edge pattern.
Main Pattern
Bottom Eyelet Band
Ch 52.
Row 1 (RS): Dc in the 4th ch from the hook and in each ch across. The skipped ch count as the first dc. Turn. (50 sts)
Row 2 (WS): Ch 3, dc in the next st. Ch 2, sk 2 sts, dc in each of the next 2 sts; repeat from * 11 more times. Turn. (50 sts: 12 ch-2 sps + 26 dc)*
Rows 3–4: Ch 3, dc in the next dc. Ch 2, sk the ch-2 sp, dc in each of the next 2 dc; repeat from * 11 more times. Turn. (50 sts)*
Row 5 (RS, conversion row): Ch 3, then dc in each dc and 2 dc in each ch-2 sp. Turn. (26 dc worked 1 into each dc + 24 dc worked into 12 sps = 50 sts)
Row 6 (WS): Ch 3, dc in each st across. Turn. (50 sts)
Cable Body (6-row repeat)
On the first R1 only, “sk 1” means skip the next dc. After that, it always means skip the ch-1 sp. Place a marker in the first st of each cable on Row 7, and move the markers up as you work.
R1 (RS, plain): Ch 3, dc in the next 2 sts, (ch 1, sk 1, dc in the next st) 3 times. [FPdc around each of the next 6 sts, dc in the next st, (ch 1, sk 1, dc in the next st) 3 times] 2 times. FPdc around each of the next 6 sts, dc in the next st, (ch 1, sk 1, dc in the next st) 3 times, dc in the last 2 sts. Turn. (50 sts)
R2 (WS): Work the same as R1, but use BPdc in place of FPdc. Working BPdc from the WS keeps the cable posts raised on the RS. (50 sts)
R3 (RS, cross row): Ch 3, dc in the next 2 sts, (ch 1, sk 1, dc in the next st) 3 times. [3/3 Cable Cross, dc in the next st, (ch 1, sk 1, dc in the next st) 3 times] 2 times. 3/3 Cable Cross, dc in the next st, (ch 1, sk 1, dc in the next st) 3 times, dc in the last 2 sts. Turn. (50 sts)
R4 (WS): Work the same as R2. (50 sts)
R5 (RS): Work the same as R1. (50 sts)
R6 (WS): Work the same as R2. (50 sts)
Work R1–R6 a total of 19 times, as Rows 7–120. Each cable crosses 19 times. Row 120 is a WS row.
Top Eyelet Band
Row 121 (RS, conversion row): Ch 3, dc in each dc and in each post st, and dc in each ch-1 sp. Turn. (38 dc worked 1 into each dc and post st + 12 dc worked into the 12 ch-1 sps = 50 sts)
Row 122 (WS): Ch 3, dc in each st across. Turn. (50 sts)
Rows 123–125: Work the same as Rows 2–4. (50 sts)
Row 126 (WS, conversion row): Work the same as Row 5. (26 + 24 = 50 sts)
Do not fasten off. The body is complete at 17 in x 72 in (43.2 cm x 182.9 cm).
Border
Border gauge: About 3 sc = 1 in (2.5 cm), or 12 sc = 4 in (10.2 cm).
Round 1: Ch 1 and turn so the RS faces you. You are now working along the top short edge.
- First short edge: 3 sc in the first st (corner group), sc in each of the next 48 sts, 3 sc in the last st (corner group). (54 sc, including both corner groups)
- Long edge: Rotate the work. Working into the row-ends, 2 sc in the next row-end, 2 sc in the next row-end, 1 sc in the next row-end; repeat from * 41 more times. (42 groups x 5 = 210 sc)*
- Second short edge: Working into the free loops of the foundation ch, 3 sc in the first ch, sc in each of the next 48 ch, 3 sc in the last ch. (54 sc)
- Second long edge: Work the same as the first long edge. (210 sc)
Sl st to the first sc. Total: 2 x 54 + 2 x 210 = 528 sc.
Keep your tension even and relaxed. Measure the long edges against the body. They should lie flat, without waving or pulling.
Round 2: Ch 1. Sc in each sc around, but work 3 sc in the center sc of each corner group. Sl st to the first sc. (528 sts worked 1 into each st + 8 extra corner sts = 536 sc. Each short edge has 58 sc and each long edge has 210 sc.) Fasten off.
Why the math works: Each short edge has 50 sts across 17 in (43.2 cm), which is about 2.9 sc per inch. Each long edge has 210 sc across 72 in (182.9 cm), which is also about 2.9 sc per inch. Both are close to the border gauge, so the edges stay flat without ruffling or cupping. Two rounds of sc add 0.5 in (1.3 cm) to each side. That gives 17 + 1 = 18 in (45.7 cm) and 72 + 1 = 73 in (185.4 cm).
Tassels
Make 36 tassels, 18 for each short end. For each tassel, wind yarn 8 times around the 5.5 in (14.0 cm) card. Cut along one edge to get 8 strands, each 11 in (27.9 cm) long.
Look at the Round 2 sts along one short edge, between the two corner center sc. There are 52 sts there. Attach a tassel in the 1st st, then in every 3rd st after it: 1, 4, 7, and so on up to 52. That gives 18 tassels about 1 in (2.5 cm) apart.
To attach a tassel, fold the strands in half and pull the fold through the st. Pass the ends through the loop and tighten. Wrap a separate 12 in (30.5 cm) strand tightly around the tassel 0.5 in (1.3 cm) below the border. Tie it off and bury its ends inside the tassel. Trim all strands to 5 in (12.7 cm).
Final Blocking
- Soak the runner in cool water for 15 minutes, then press the water out. Do not wring it.
- Roll it in towels to remove more water.
- Lay it flat on the mats with the RS up.
- Pin the corners to an 18 in x 73 in (45.7 cm x 185.4 cm) rectangle.
- Pin the long edges about every 4 in (10.2 cm), keeping the eyelet columns straight.
- Lift the cables with your fingers so they stay rounded. Don’t press them flat.
- Comb the tassels straight and let everything dry completely.
- Trim the tassels again if needed.
Final Quality-Control Checklist
- Every row has 50 sts, and the eyelet columns line up from end to end.
- Each cable crosses 19 times, always in the same direction.
- The body measured 17 in x 72 in (43.2 cm x 182.9 cm) before the border.
- Round 1 has 528 sc and Round 2 has 536 sc.
- The finished size is 18 in x 73 in (45.7 cm x 185.4 cm).
- Each end has 18 tassels, and every tassel is 5 in (12.7 cm) long.
- All yarn ends are woven into solid dc columns, not into the eyelets.
Troubleshooting
- The runner narrows at the cables: Pull each FPtr up taller, and loosen your BPdc.
- The eyelets slant or wander: You may have skipped the wrong st. Always sk the ch-1 sp, never a dc.
- The stitch count is off: Check the last 2 sts of the row. The turning ch counts as a st and must be worked into.
- The long edges ruffle: Use the 5 sc per 3 row-ends repeat. Don’t work 2 sc into every row-end.
- The long edges pull in: Work the border more loosely, or go up a hook size for the border only.
- The tassels look thin: Use 10 strands per tassel, and buy extra yarn.
Care
Hand wash in cool water with a gentle wool wash, and dry flat. Shake the tassels out and trim them as needed.
Final Notes
Here is how the measurements build on each other. The gauge is 11 sts and 7 rows to 4 in (10.2 cm). Fifty stitches, with three cables, make 17 in (43.2 cm) of width. 126 rows make 72 in (182.9 cm) of length. Two border rounds add 0.5 in (1.3 cm) to each side, for a final size of 18 in x 73 in (45.7 cm x 185.4 cm). The tassels add 5 in (12.7 cm) to each end. If you check your work at each of these steps, your runner will lie flat and square.
Happy crocheting!