

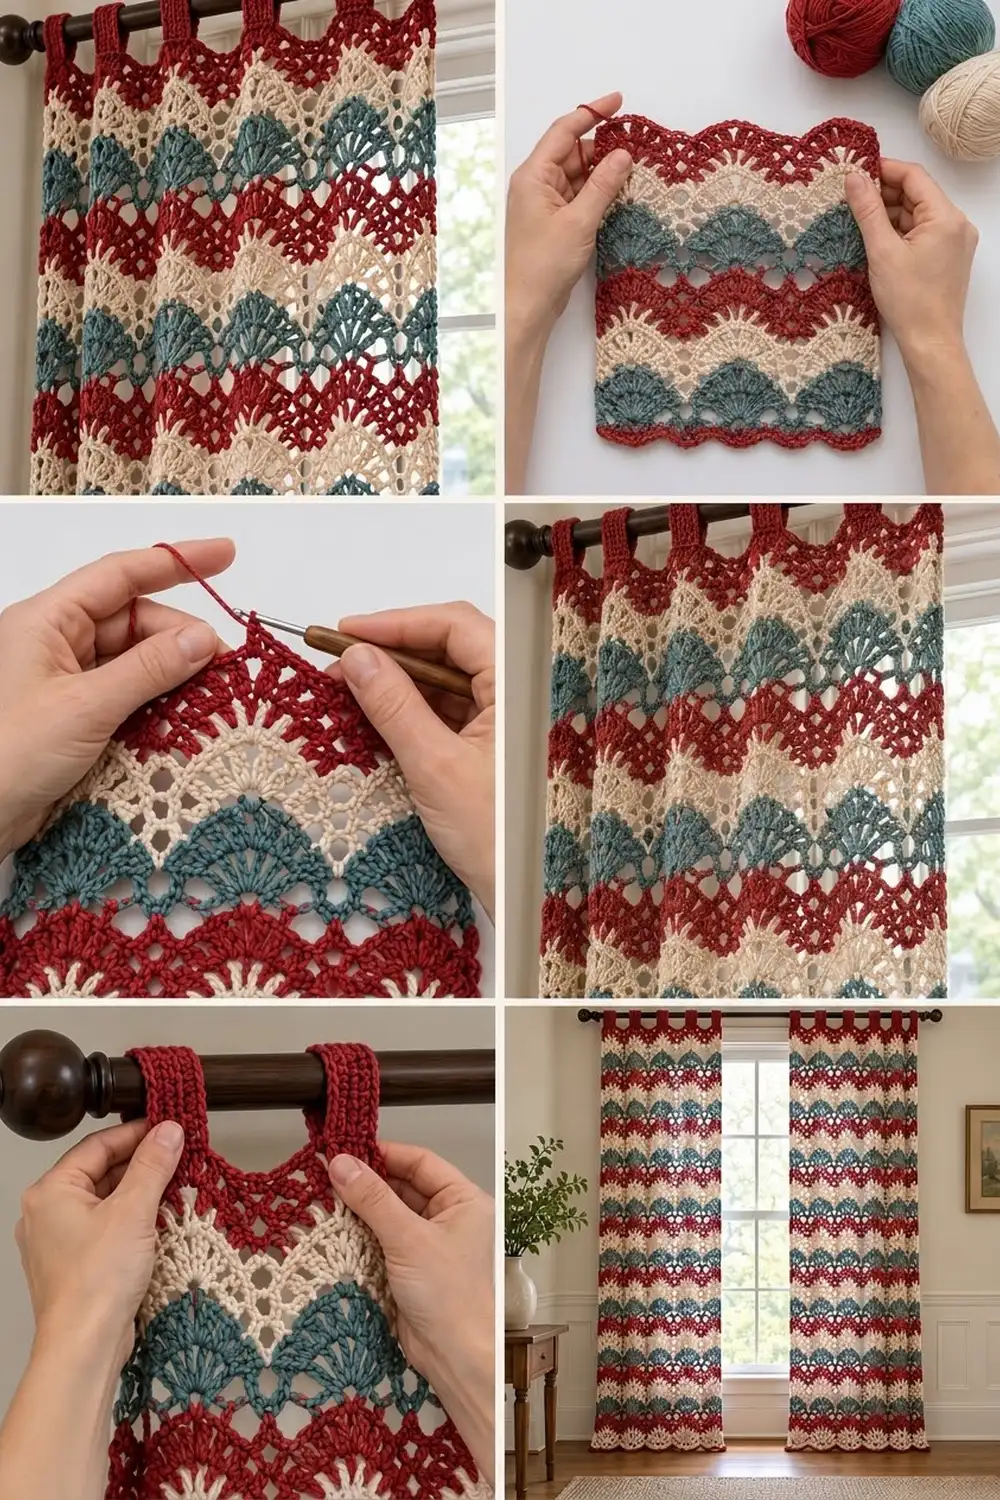
The Hearthside Fan Stripe Curtain Panel is a single tab-top panel. Wavy bands of fan shells and open lattice let soft daylight through. The stripes repeat brick red, cream, and dusty teal from bottom to top, and red finishes the scalloped hem and the hanging tabs.
The style is cozy farmhouse with a vintage feel. The fans give the stripes their gentle wave without any increasing or decreasing. The lattice rows keep the panel airy enough to hang over a window.
This pattern uses US crochet terms. The finished panel measures 31 1/4 in (79.4 cm) wide by 69 in (175.3 cm) long, not counting the tabs. The tabs add 3 in (7.6 cm), for a total hanging length of 72 in (182.9 cm).
Construction is simple. You crochet one flat piece from the bottom up in 2-row stripes and add six tabs to the top row. Then you work a 2-row border down one side, across the bottom (which makes the scallops), and up the other side. For a pair, make a second identical panel.
Finished Size and Construction
- Finished size: 31 1/4 in x 69 in (79.4 cm x 175.3 cm), plus 3 in (7.6 cm) tabs
- Skill level: Intermediate
- Terminology: US crochet terms
- Yarn weight: Worsted (#4), cotton or cotton blend
- Hook: 5.5 mm (I-9)
- Number of pieces: 1 panel per curtain (make 2 for a pair)
- Layout: one flat rectangle worked in rows, 10 fan repeats wide, 45 stripes tall
- Piece size before border: 30 1/4 in x 68 in (76.8 cm x 172.7 cm)
- Border depth: 1/2 in (1.3 cm) on each side, 1 in (2.5 cm) along the bottom
Materials
Use a smooth, mercerized or soft-spun cotton in worsted weight. Cotton drapes well, holds the fan shapes, and handles sunlight and washing better than acrylic. Avoid fuzzy yarns, because they blur the lattice.
Yarn amounts are for one panel and assume about 190 m per 100 g:
- Color A, Brick Red: 850 g (approx. 1,615 m)
- Color B, Cream: 600 g (approx. 1,140 m)
- Color C, Dusty Teal: 600 g (approx. 1,140 m)
These amounts include a margin of about 10–15% for your swatch and for differences in tension. Double them for a pair.
Tools:
– 5.5 mm (I-9) crochet hook
– Tapestry needle
– Stitch markers (at least 6)
– Measuring tape
– Rust-proof pins and blocking mats, or a clean carpet covered with towels
– Scissors
Abbreviations (US Terms)
- ch – chain
- sc – single crochet
- dc – double crochet
- sp – space
- st(s) – stitch(es)
- RS / WS – right side / wrong side
- rep – repeat
Special stitch – Fan: Work 9 dc into the same stitch.
Gauge and Checkpoints
Gauge: 16 sc = 4 in (10.2 cm). One fan repeat (12 sts) = 3 in (7.6 cm). 6 pattern rows (one full color cycle of 3 stripes) = 4 1/2 in (11.4 cm). One 2-row stripe = 1 1/2 in (3.8 cm).
Test swatch first. In Color A, ch 26. Work Row 1 (25 sc), then Rows 2–7 of the pattern, using 2 fan repeats per row instead of 10. Block the swatch and let it dry. It should measure 6 1/4 in (15.9 cm) wide and about 4 3/4 in (12.1 cm) tall.
If your swatch is too big, go down a hook size. If it is too small, go up a hook size. Across 10 repeats, a difference of just 1/4 in (0.6 cm) per repeat adds up to 2 1/2 in (6.4 cm) across the panel.
Measurement checkpoints:
– After Row 1: 30 1/4 in (76.8 cm) wide
– After Row 19: 13 3/4 in (34.9 cm) tall
– After Row 61: 45 1/4 in (114.9 cm) tall
– After Row 91: 67 3/4 in (172.1 cm) tall
– After Row 92: 68 in (172.7 cm) tall
Measure flat on a table without stretching. Let the piece relax for a minute before you measure.
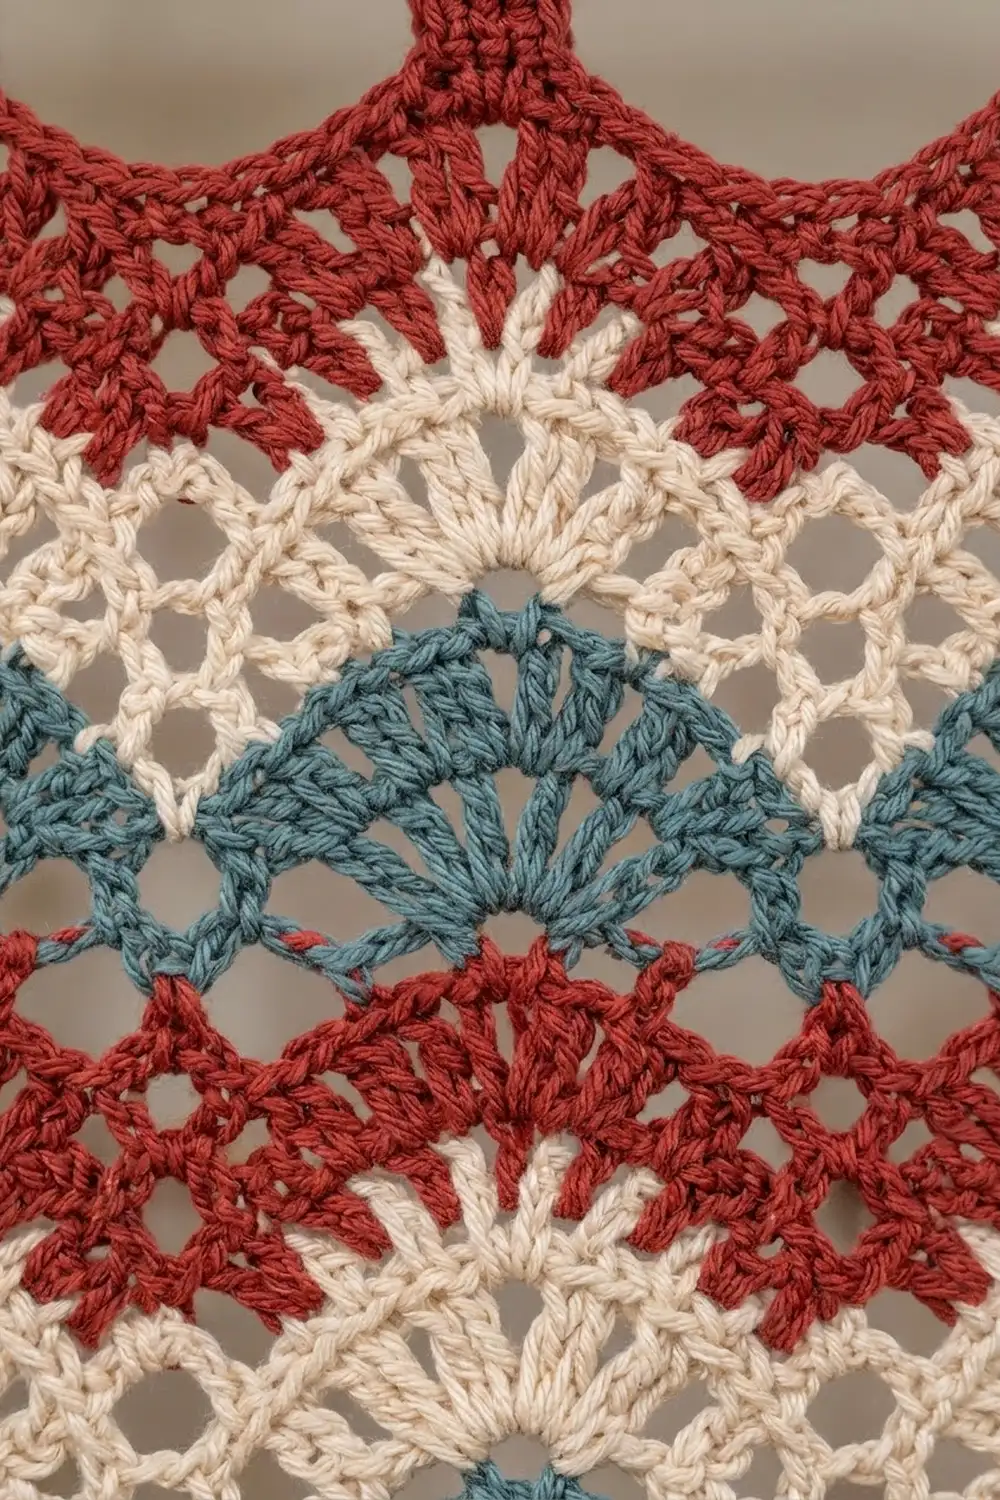
Panel Body
Stripe sequence: Every stripe is 2 rows (one fan row and one lattice row). Repeat the colors in this order: A, B, C. There are 45 stripes in total, so each color is used for 15 stripes.
Color changes: Change color during the last yarn-over of the final stitch of each lattice row. Every color change falls on the same edge. Carry the unused colors loosely up that edge. The border will cover them.
Foundation: With Color A, ch 122.
Row 1 (RS): Sc in the 2nd ch from hook and in each ch across, turn. (121 sc)
The 121 stitches are 10 repeats of 12, plus 1.
Stripe Rows
Row 2 (fan row): Ch 1, sc in the first st. Skip 5 sts, Fan in the next st, skip 5 sts, sc in the next st. Rep from * across, turn. (10 Fans + 11 sc = 101 sts)*
Row 3 (lattice row): Ch 3 (counts as dc). *Ch 1, skip the next dc, sc in the next dc, ch 3, skip 2 dc, sc in the next dc (the center dc of the Fan), ch 3, skip 2 dc, sc in the next dc, ch 1, skip the last dc of the Fan, dc in the next sc. Rep from * across. The final dc goes into the last sc. Turn.
Row 3 count: 11 dc + 30 sc + 20 ch-1 sps + 20 ch-3 sps = 121 sts and chs.
Each repeat is 12 positions wide (dc, ch, sc, 3 ch, sc, 3 ch, sc, ch). This is how the lattice row brings the width back to 121.
At the end of Row 3, change to Color B.
Row 4 (fan row): Ch 1, sc in the first dc. Skip the ch-1 sp, the sc, and the ch-3 sp (5 positions), Fan in the center sc. Skip the ch-3 sp, the sc, and the ch-1 sp (5 positions), sc in the next dc. Rep from * across. The final sc goes into the top of the turning ch-3. Turn. (10 Fans + 11 sc = 101 sts)*
Each new Fan sits directly on the center sc of the Fan below. This stacks the fans in columns and creates the waves.
Row 5 (lattice row): Work the same as Row 3. (121 sts and chs) Change to Color C.
Rows 6–7: Work Rows 4–5 in Color C. Change to Color A.
Rows 8–91: Repeat Rows 4–5, continuing the A, B, C sequence. Row 91 completes stripe 45, which is in Color C. Change to Color A at the end of Row 91.
Row 92 (top row): With Color A, ch 1, sc in each dc, sc, and ch across, turn. (121 sc)
Check the measurements: 30 1/4 in x 68 in (76.8 cm x 172.7 cm).
Tabs
Place markers to divide Row 92 into 11 sections of 11 sts each. Tabs go on sections 1, 3, 5, 7, 9, and 11, so there are 6 tabs and 5 gaps of 11 sts each (6 x 11 + 5 x 11 = 121).
Each tab:
– Row 1: With RS facing, join Color A in the first st of the tab section. Ch 1, sc in the same st and the next 10 sts, turn. (11 sc)
– Rows 2–24: Ch 1, sc in each st across, turn. (11 sc)
The tab strip should measure 6 in (15.2 cm). Fasten off and leave a 16 in (40.6 cm) tail. Fold the strip to the WS and whipstitch the last row to the back of the same 11 sts of Row 92. This makes a loop with a 3 in (7.6 cm) drop, which fits rods up to 1 3/8 in (3.5 cm) in diameter.
Rep for all 6 tabs. The two outer tabs line up with the panel edges.
Border
Border gauge: 4 sc per 1 in (2.5 cm) along every edge, the same as the body gauge.
The border is worked in 2 rows with Color A. It covers the left side, the bottom, and the right side. The top edge is left unbordered.
The counts for each side are defined this way: side edge = 272 sts, bottom = 121 sts, and the corner stitches are separate groups that are not included in those numbers.
Row 1 (RS): Join Color A at the top corner of the right-hand side edge.
– Down the side: Work 6 sc evenly along each stripe (3 sc along the fan row, 3 sc along the lattice row). Add 1 sc in the end of Row 92 and 1 sc in the end of Row 1. (45 x 6 + 2 = 272 sc)
– Corner: 3 sc in the corner.
– Across the bottom: Work 1 sc in each foundation ch loop. (121 sc)
– Corner: 3 sc in the corner.
– Up the other side: 272 sc, as on the first side. Turn.
Row 1 total: 272 + 3 + 121 + 3 + 272 = 671 sts
Row 2: Ch 1.
– First side: Sc in each of the 272 side sts.
– Corner: Sc in the first corner st, 3 sc in the center corner st, sc in the last corner st. (5)
– Bottom: Sc in the first bottom st. Skip 2 sts, 5 dc in the next st, skip 2 sts, sc in the next st. Rep from * 19 more times. (20 scallops: 21 sc + 100 dc = 121 sts)
– Corner: 5 sts, as before.
– Second side:* Sc in each of the 272 side sts. Fasten off.
Row 2 total: 272 + 5 + 121 + 5 + 272 = 675 sts
Why the math works:
– Each stripe is 1 1/2 in (3.8 cm) tall. At 4 sc per inch, it needs 6 sc. The 45 stripes need 270 sc, and the two sc rows add 1 each, for 272. That covers 68 in (172.7 cm) at exactly 4 sc per inch, so the edges neither ruffle nor pull in.
– The bottom has 121 sts. Each scallop uses 6 sts, so 20 scallops take 120 sts and the final sc takes 1 more.
Finished size: The width grows by 1/2 in (1.3 cm) on each side, to 31 1/4 in (79.4 cm). The length grows by 1 in (2.5 cm) at the bottom, to 69 in (175.3 cm).
Final Blocking
- Weave in all ends along stitches of the same color. Hide the carried strands inside the side border.
- Soak the panel in cool water with a little wool wash or mild soap for 15 minutes.
- Press out the water gently. Do not wring. Roll the panel in large towels to remove more moisture.
- Lay it flat and pin it to 31 1/4 in x 69 in (79.4 cm x 175.3 cm). Start with the four corners, then pin the middle of each edge.
- Pin the point of every bottom scallop. Use a pin to open each Fan into a smooth arch.
- Let the tabs lie naturally. Do not stretch them.
- Let the panel dry completely, which takes 24–48 hours for cotton, before you unpin it.
Final Quality-Control Checklist
- The panel measures 31 1/4 in x 69 in (79.4 cm x 175.3 cm) after blocking.
- All 45 stripes follow the A, B, C order. The first stripe and the last stripe sit next to red sc rows.
- Each fan row has 10 Fans that stack straight above the Fans below.
- Each lattice row counts 121 sts and chs.
- Each side border has 272 sc and lies flat.
- The bottom has 20 even scallops.
- The 6 tabs are evenly spaced, each 11 sts wide with a 3 in (7.6 cm) drop.
- All ends are secure and hidden.
Troubleshooting
- The panel gets narrower toward the top: Your lattice chains are too tight. Loosen the ch-3 sps, or work them with a hook one size larger.
- The Fans ruffle or cup: Your dc are too loose. Check the gauge again, or go down a hook size for the fan rows only.
- The Fans drift sideways: You skipped the wrong number of positions. Count 5 positions on each side of the center sc, and remember that a ch-3 sp counts as 3.
- The side edges wave: You worked more than 6 sc per stripe. Recount and redistribute the stitches.
- The side edges pull in: You worked fewer than 6 sc per stripe.
- The tabs twist: Line up the folded tab edges with their stitch columns before you sew them down.
- Carried strands show through: Lay them along the edge loosely, without tension, so the border can enclose them.
Care
Hand wash or machine wash the panel cold on a gentle cycle inside a large mesh laundry bag. Reshape it and dry it flat. Never hang a wet cotton panel, because the weight stretches it.
Final Notes
Everything in this panel follows one measurement chain:
– 16 sc = 4 in (10.2 cm) gives a 121-stitch body width of 30 1/4 in (76.8 cm).
– Each fan repeat is 3 in (7.6 cm), and each 2-row stripe is 1 1/2 in (3.8 cm).
– 45 stripes plus 2 sc rows make 68 in (172.7 cm).
– The border adds 1/2 in (1.3 cm) to each side and 1 in (2.5 cm) to the bottom, for a finished panel of 31 1/4 in x 69 in (79.4 cm x 175.3 cm).
– Six 3 in (7.6 cm) tabs complete the hanging length of 72 in (182.9 cm).
If you check your measurements at each checkpoint, the finished panel will hang straight with even stripes.
Happy crocheting!