

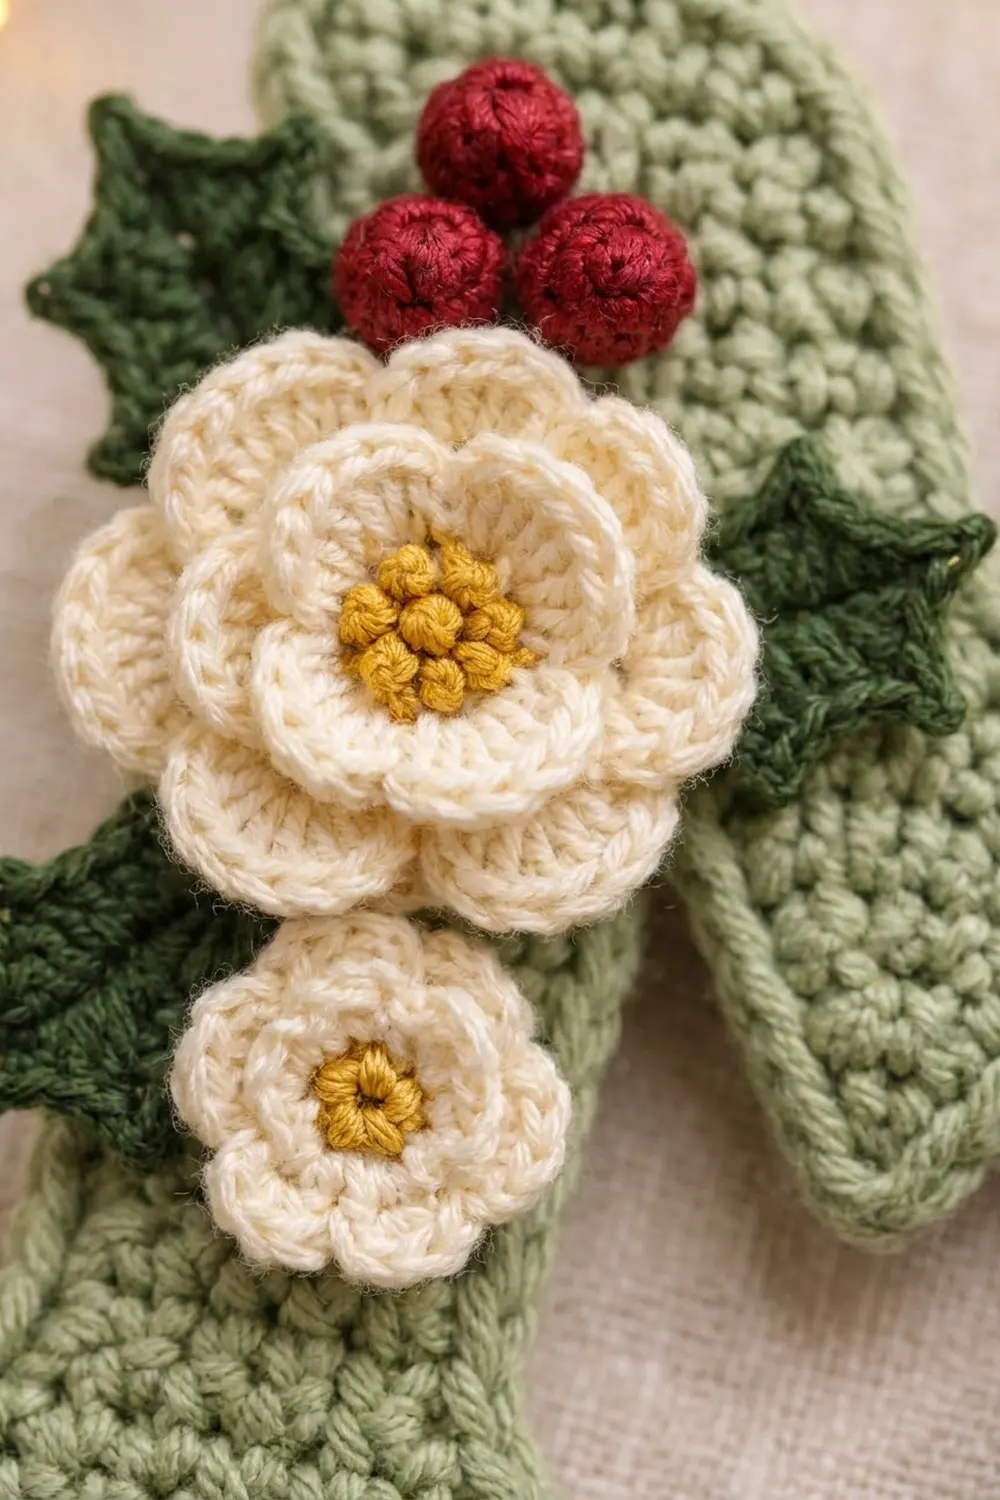
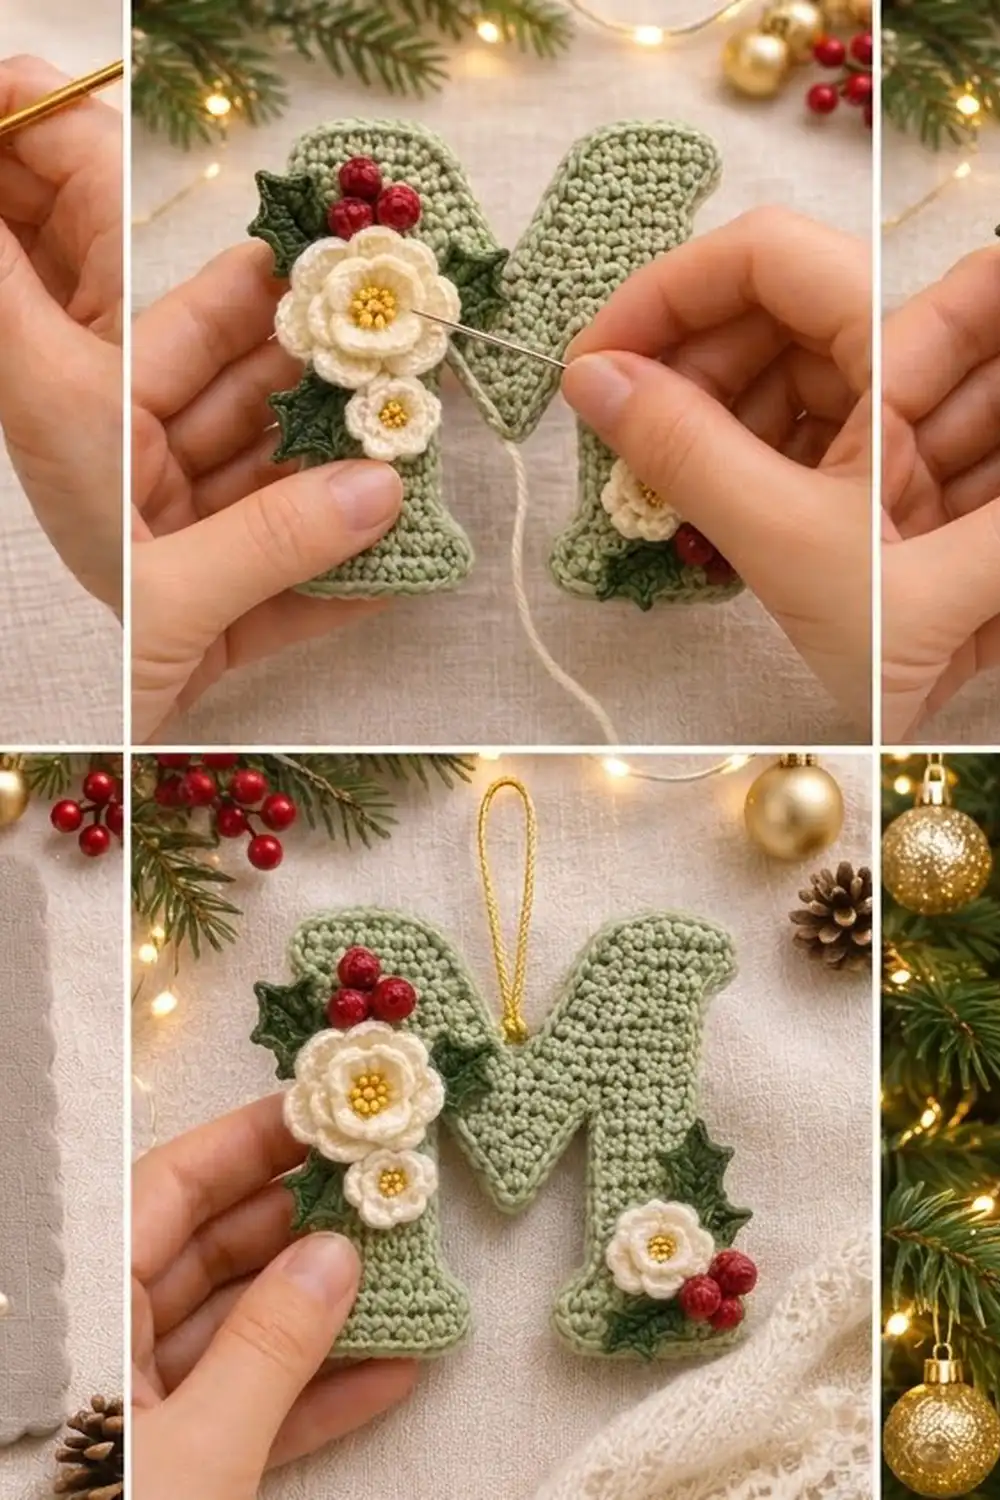
The Holly Bloom Letter M is a flat, sturdy initial ornament. It is worked in soft sage green single crochet and decorated with cream flowers, deep red berries and dark green holly leaves. It hangs from a thin gold cord and works as a gift tag, tree ornament or wreath accent.
The colors are calm and vintage: sage for the letter, cream for the blossoms, golden yellow for the flower centers, dark green for the holly and cranberry red for the berries. A tidy outlined edge keeps the letter shape crisp.
This pattern uses US crochet terms. The finished letter measures 4.8 in (12.2 cm) wide at the feet and 4.0 in (10.2 cm) tall, including the border.
The letter is worked flat in rows from the bottom up. First you make two legs and join them with a short chain that closes the arch. Then you work two full-width rows and split the work to shape the two top humps and the center V notch. A two-round border outlines the whole shape. The flowers, berries and leaves are made separately and sewn on.
Finished Size and Construction
- Finished size: 4.8 in (12.2 cm) wide x 4.0 in (10.2 cm) tall
- Skill level: Easy-intermediate
- Terminology: US crochet terms
- Yarn weight: DK (#3), cotton or cotton blend
- Hook: 3.5 mm (E-4)
- Number of pieces: 1 letter body, plus 14 small appliqués (1 large flower, 2 small flowers, 5 holly leaves, 6 berries)
- Layout: Single letter, no joining of main pieces
- Width before border: 4.4 in (11.2 cm) at the feet, 4.0 in (10.2 cm) at the widest body row
- Height before border: 3.6 in (9.1 cm)
- Border depth: 0.2 in (0.5 cm) on every edge
Materials
Choose a smooth DK cotton. It holds sharp corners and shows crisp stitch definition. Acrylic also works, but the letter will be softer.
- Sage green (letter): 15 g, about 35 m
- Cream (flowers): 6 g, about 14 m
- Dark green (holly leaves): 4 g, about 9 m
- Cranberry red (berries): 3 g, about 7 m
- Golden yellow (flower centers): 1 g, about 3 m
- Gold metallic cord: 8 in (20.3 cm) for the hanging loop
All quantities include a small margin for swatching and sewing tails.
Tools:
- 3.5 mm (E-4) crochet hook
- Tapestry needle
- 2 stitch markers
- Scissors
- Blocking board and rust-proof pins
- Spray bottle with water
- Small pinch of fiberfill or yarn scraps for the berries (optional)
Abbreviations (US Terms)
- ch: chain
- sl st: slip stitch
- sc: single crochet
- hdc: half double crochet
- dc: double crochet
- sc2tog: single crochet 2 together
- MR: magic ring
- st(s): stitch(es)
- BLO / FLO: back loop only / front loop only
- sk: skip
Special stitch, picot: ch 2, sl st in the 2nd ch from hook. This makes the small points on the holly leaves.
Gauge and Checkpoints
Gauge: 20 sc and 22 rows = 4 in (10.2 cm) in sc worked flat. That is 5 sts and 5.5 rows per inch.
Test one leg first. It is small and quick, and it tells you everything you need to know before you commit to the full letter.
Checkpoints:
- After Leg Row 3: the foot is 9 sts = 1.8 in (4.6 cm) wide.
- After Leg Row 8: the leg is 7 sts = 1.4 in (3.6 cm) wide.
- After Leg Row 12: the leg is 2.2 in (5.6 cm) tall.
- After Row 14: the body is 20 sts = 4.0 in (10.2 cm) wide and about 2.5 in (6.4 cm) tall.
- After Row 20: the body is 3.6 in (9.1 cm) tall and 4.4 in (11.2 cm) wide across the feet.
- After the border: 4.8 in (12.2 cm) x 4.0 in (10.2 cm).
If your leg is too big, go down a half or full hook size. If it is too small, go up a half or full size.
Letter Body
Work in rows. The ch 1 at the start of each row does not count as a stitch. Work into both loops unless the pattern says otherwise.
Leg (make 2)
With sage green, ch 10.
Row 1: Sc in 2nd ch from hook and in each ch across, turn. (9 sc)
Rows 2–3: Ch 1, sc in each st across, turn. (9 sc)
Row 4: Ch 1, sc2tog, sc in next 5 sts, sc2tog, turn. (7 sc)
Rows 5–8: Ch 1, sc in each st across, turn. (7 sc)
Row 9: Ch 1, sc in next 6 sts, 2 sc in last st, turn. (8 sc)
Row 10: Ch 1, sc in each st across, turn. (8 sc)
Row 11: Ch 1, sc in next 7 sts, 2 sc in last st, turn. (9 sc)
Row 12: Ch 1, sc in each st across, turn. (9 sc)
Row 4 narrows the leg evenly on both sides, which makes the foot flare. The increases in Rows 9 and 11 build the inner edge, which faces the center of the M. Place a marker on that edge.
First leg: fasten off.
Second leg: do not fasten off. Keep the loop live.
Joining the Legs (Rows 13–14)
Lay the legs side by side with the marked edges facing each other and both feet level. Single crochet looks nearly the same on both sides, so flip the first leg if needed so it mirrors the second.
Row 13: Ch 1, sc in each of the 9 sts of the second leg, ch 2. Then sc in each of the 9 sts of Row 12 of the first leg, starting at its marked inner edge, turn. (9 sc + 2 ch + 9 sc = 20 sts)
Row 14: Ch 1, sc in each sc and in each ch across, turn. (20 sc)
The gap between the legs is 4 sts wide at the feet, 6 sts at Rows 5–8, 4 sts at Rows 9–10 and 2 sts at Rows 11–12. The 2 chains close it, so the arch narrows to a point.
Checkpoint: 4.0 in (10.2 cm) wide.
First Top Hump (Rows 15–20)
Row 15: Ch 1, sc in next 10 sts, turn. Leave the remaining 10 sts unworked. (10 sc)
Row 16: Ch 1, sc in each st across, turn. (10 sc)
Row 17: Ch 1, sc in next 8 sts, sc2tog, turn. (9 sc)
Row 18: Ch 1, sc in each st across, turn. (9 sc)
Row 19: Ch 1, sc in next 7 sts, sc2tog, turn. (8 sc)
Row 20: Ch 1, sc in next 6 sts, sc2tog, turn. (7 sc)
Fasten off.
The decreases in Rows 17 and 19 sit on the inner edge and open the V notch. The decrease in Row 20 softens the top outer corner.
Second Top Hump (Rows 15–20)
Join sage green with a sl st in the outer-edge stitch of Row 14 on the unworked side.
Row 15: Ch 1, sc in same st and in next 9 sts, turn. (10 sc)
Rows 16–20: Work as for the first hump. (10, 9, 9, 8, 7 sc)
Do not fasten off. Continue to the border.
Checkpoint: 3.6 in (9.1 cm) tall. The V notch is 1.1 in (2.8 cm) deep and 0.8 in (2.0 cm) wide at the top.
Appliqués
Large Two-Layer Flower (make 1)
With cream:
Rnd 1: MR, ch 1, 10 sc in ring, sl st to first sc. (10 sc)
Rnd 2 (inner petals): Working in FLO, *ch 2, 2 dc in next st, ch 2, sl st in next st; repeat from * 4 more times. (5 petals)
Rnd 3: Working in the unused BLO of Rnd 1, ch 1, 2 sc in each st around, sl st to first sc. (20 sc)
Rnd 4 (outer petals): *Sk 1, 5 dc in next st, sk 1, sl st in next st; repeat from * 4 more times. (5 petals)
Fasten off, leaving a long tail. Diameter: about 1.6 in (4.1 cm).
Small Flower (make 2)
With cream:
Rnd 1: MR, ch 1, 10 sc in ring, sl st to first sc. (10 sc)
Rnd 2: *Ch 2, 2 dc in next st, ch 2, sl st in next st; repeat from * 4 more times. (5 petals)
Fasten off, leaving a tail. Diameter: about 1.0 in (2.5 cm).
Centers: With golden yellow, work 5–7 French knots in the center of each flower to fill the ring.
Holly Leaf (make 5)
With dark green, ch 9. You work into the 8 chains after the hook, then around to the other side of the chain.
Side 1: Sl st in 2nd ch from hook, sc in next ch, hdc in next ch, picot, dc in next 2 ch, picot, hdc in next ch, sc in next ch, then work (sc, picot, sc) in last ch for the tip.
Side 2: Working in the opposite side of the chain, sc in next ch, hdc in next ch, picot, dc in next 2 ch, picot, hdc in next ch, sc in next ch, sl st in last ch.
Fasten off, leaving a tail. Each leaf is about 1.5 in (3.8 cm) long, with 2 points per side plus the tip.
Berry (make 6)
With cranberry red:
Rnd 1: MR, 6 sc in ring. (6 sc)
Rnd 2: Sc in each st around. (6 sc)
Stuff with a tiny pinch of fiberfill or the yarn tail. Thread the tail through the front loops of all 6 sts and pull tight. Diameter: about 0.4 in (1.0 cm).
Border
Border gauge: each border round adds about 0.2 in (0.5 cm) to every edge. In Rnd 1, work 1 sc per row end and 1 sc per stitch, with 3 sc in each outer corner stitch.
Continue with the live loop on the second hump.
Rnd 1: Ch 1, then sc around the whole letter as follows:
- Second hump top: 3 sc in first st, sc in next 5 sts, 3 sc in last st. (11 sc)
- Inner V, down: 1 sc in each row end of Rows 19–16. (4 sc)
- V point: sc2tog over the Row 15 row end of this hump and the Row 15 row end of the other hump. (1 st)
- Inner V, up: 1 sc in each row end of Rows 16–19. (4 sc)
- First hump top: 3 sc in first st, sc in next 5 sts, 3 sc in last st. (11 sc)
- Outer edge, down: 1 sc in each row end of Rows 20–1. (20 sc)
- Foot bottom: working in the foundation chain, 3 sc in first ch, sc in next 7 ch, 3 sc in last ch. (13 sc)
- Inner arch: 1 sc in each row end of Rows 1–12 up the inner leg, 2 sc in the underside of the 2 joining chains, then 1 sc in each row end of Rows 12–1 down the other inner leg. (26 sc)
- Foot bottom: 3 sc in first ch, sc in next 7 ch, 3 sc in last ch. (13 sc)
- Outer edge, up: 1 sc in each row end of Rows 1–20. (20 sc)
Sl st to first sc. Total: 123 sc.
Rnd 2: Working in BLO, sl st in each sc around. (123 sl sts)
Fasten off and weave in the ends. The front loops of Rnd 1 roll slightly forward, and the slip stitches sit on top as a neat raised outline.
Why the math works: Rnd 1 is a conversion round. The edge units are:
- 9 + 9 foot stitches
- 7 + 7 hump stitches
- 20 + 20 outer row ends
- 8 V row ends
- 2 V-point row ends
- 24 inner row ends
- 2 chains
Working 1 sc into each unit, with the V point worked as one sc2tog, gives 107 sc. Each of the 8 outer corners (2 per foot, 2 per hump) gets 2 extra sc: 8 x 2 = 16. So 107 + 16 = 123. Rnd 2 works 1 sl st per sc, so it stays at 123.
Final Blocking
- Weave in all ends on the letter, but leave the appliqué tails long.
- Mist the letter lightly until it is damp, not soaked.
- Pin it to 4.8 in (12.2 cm) wide at the feet and 4.0 in (10.2 cm) tall.
- Pin each outer corner, then the V point and the arch point, so all edges are straight.
- Let it dry completely, usually 4–6 hours.
- Arrange the appliqués:
- Upper left: large flower overlapping the left edge, about 1.2 in (3.0 cm) below the top. Small flower below it, 3 berries above it, and 3 leaves tucked behind.
- Lower right leg: small flower about 0.8 in (2.0 cm) above the foot, with 3 berries at its lower right and 2 leaves.
- Sew the leaves first, then the flowers, then the berries. Use small stitches through the back loops of the letter.
- Fold the gold cord in half, knot the ends and stitch the knot to the back of the V point.
Final Quality-Control Checklist
- The letter measures 4.8 in (12.2 cm) x 4.0 in (10.2 cm).
- Both legs are the same height and both feet sit level.
- The arch narrows to a point and the V notch is centered.
- Border Rnd 1 has 123 sc and the corners lie flat.
- The large flower shows two clear petal layers.
- The appliqués are secure and no stitches show on the front.
- The letter hangs straight from the loop.
Troubleshooting
Legs are different heights: recount the rows. Each leg needs exactly 12 rows before joining.
Arch is wide or rounded at the top: check that the increases are on the inner edge and that you used only 2 joining chains.
Border ruffles: use exactly 1 sc per row end.
Border pulls in: work more loosely, or go up a half hook size for the border only.
Letter hangs crooked: move the cord knot so it sits exactly at the V point.
Care
Spot clean with cool water and mild soap, then reshape and dry flat. Do not machine wash the ornament or iron the appliqués.
Final Notes
The measurements build in this order:
- A 9-stitch foot: 1.8 in (4.6 cm) wide
- A 12-row leg: 2.2 in (5.6 cm) tall
- A 20-stitch body: 4.0 in (10.2 cm) wide
- A 20-row letter: 3.6 in (9.1 cm) tall
- A 123-stitch border: adds 0.2 in (0.5 cm) per edge
The finished letter is 4.8 in (12.2 cm) x 4.0 in (10.2 cm).
Happy crocheting!