

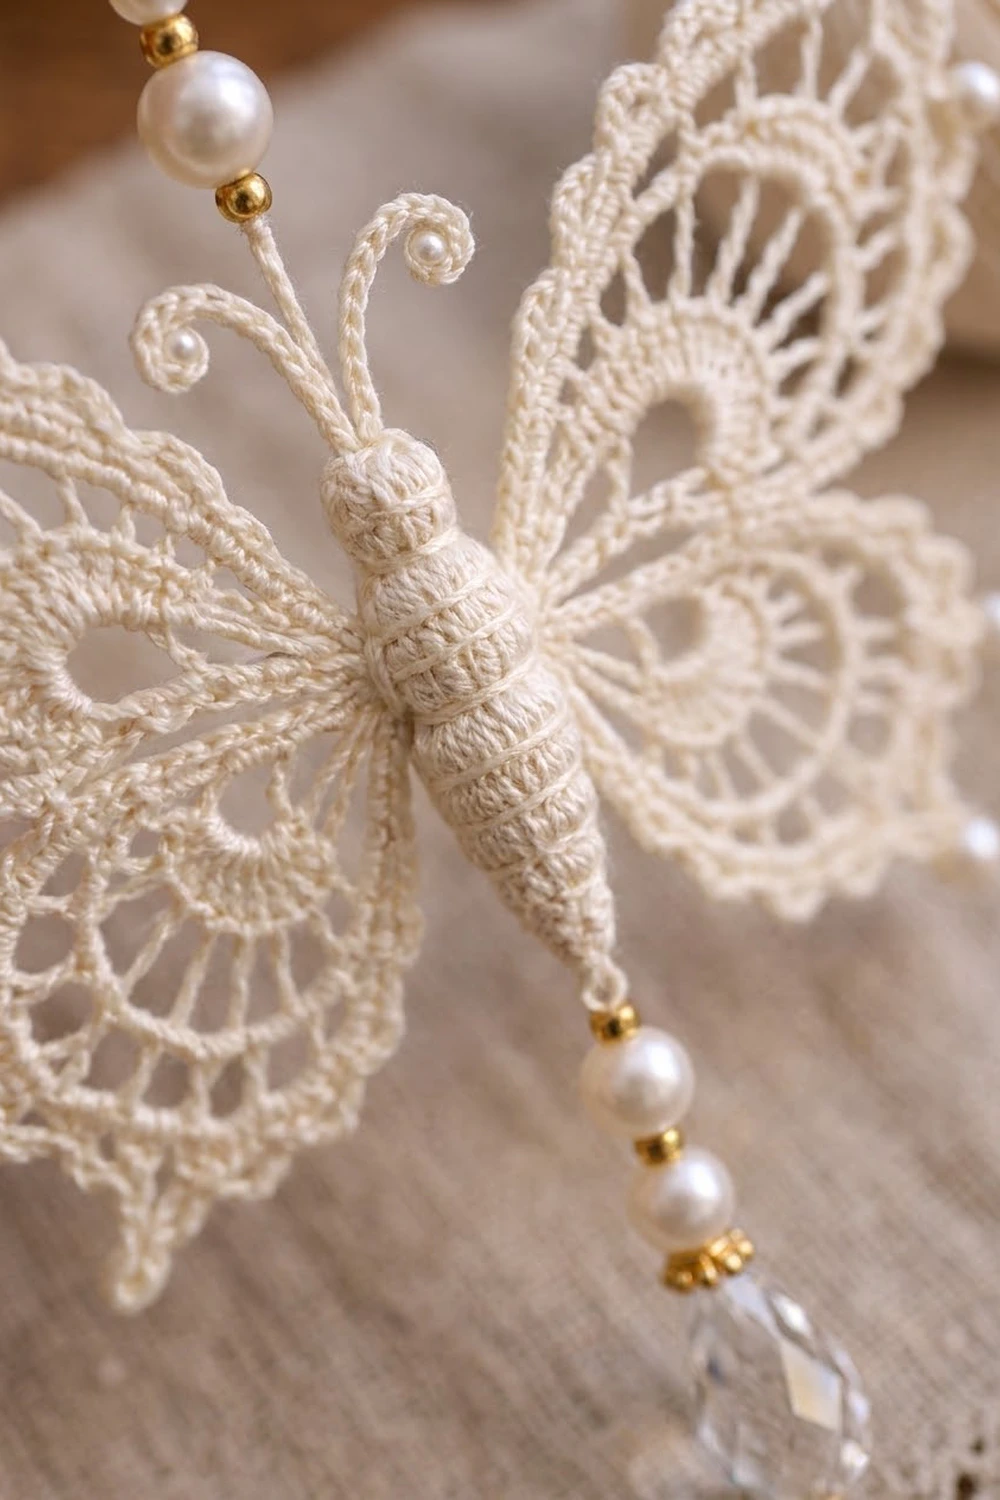
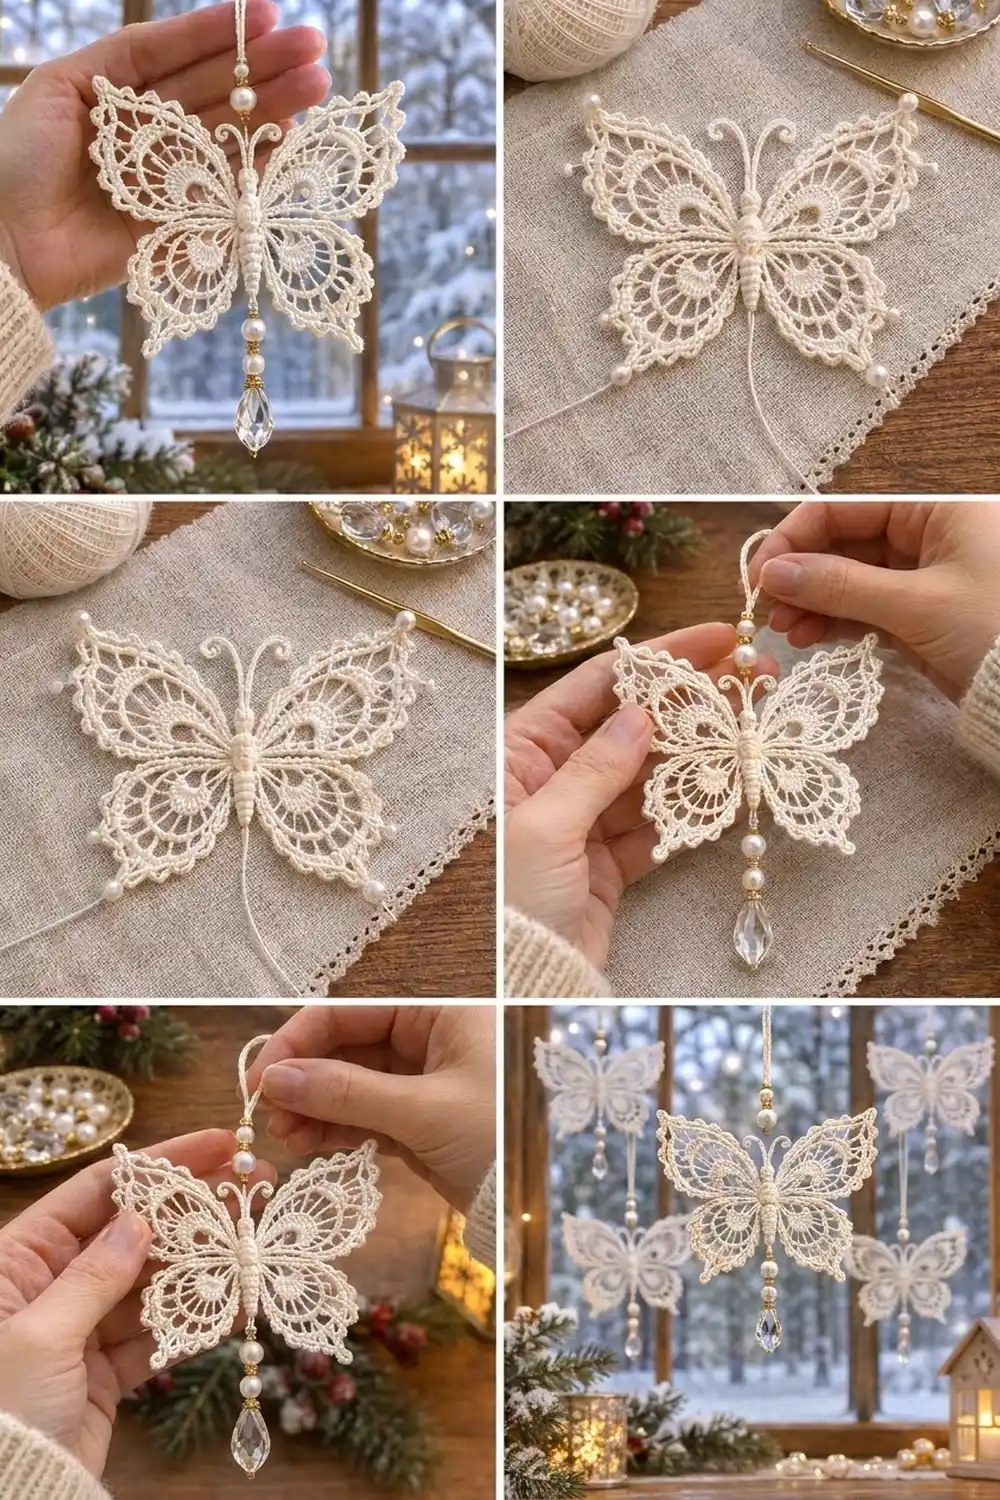
The Frost Lace Butterfly is a delicate thread-crochet ornament. It has four lacy wings, a padded segmented body and curled antennae. Pearls, gold spacers and a crystal teardrop finish it. Hang it in a window and the lace catches the light the way frost does on glass.
The whole piece is worked in one color: soft ivory cotton thread. The wings are open and airy, with radiating spokes and scalloped shells, and a fine picot edge outlines each one. A small curled crescent on each wing adds texture and depth.
This pattern uses US crochet terms. The finished butterfly measures 5.5 in (14.0 cm) across the wings and 4.5 in (11.4 cm) from the top of the upper wings to the bottom of the lower wings. With the hanging loop and bead dangle, the ornament hangs about 9.5 in (24.1 cm) long.
Construction is simple. You crochet four round wing motifs, edge each one with picots, and block them into wing shapes. Then you make a stuffed body with antennae, add four small curls, and sew everything together. The beads go on last.
Finished Size and Construction
- Finished size: 5.5 in (14.0 cm) wingspan × 4.5 in (11.4 cm) wing height
- Hanging length: about 9.5 in (24.1 cm) including loop and dangle
- Skill level: Intermediate
- Terminology: US crochet terms
- Thread: Size 10 mercerized cotton crochet thread
- Hook: 1.5 mm steel hook (US steel size 8)
- Number of pieces: 9 crocheted pieces (2 upper wings, 2 lower wings, 1 body with antennae, 4 curls), plus 1 hanging cord
- Layout: Upper wings above and lower wings below on each side of a central body
- Upper wing size: 3 in (7.6 cm) round before blocking, 3.25 in × 2.5 in (8.3 cm × 6.4 cm) blocked
- Lower wing size: 2.25 in (5.7 cm) round before blocking, 2.5 in × 2 in (6.4 cm × 5.1 cm) blocked
- Size before border: upper wing 2.75 in (7.0 cm), lower wing 2 in (5.1 cm)
- Border depth: about 0.125 in (0.3 cm) picot edge
Materials
Use a smooth, mercerized size 10 cotton thread. Mercerized thread holds its shape after stiffening and shows the stitch definition clearly. Pick a warm ivory or cream rather than bright white so the gold beads stand out.
- Ivory size 10 cotton thread: 15 g (about 80 m)
- Small amount of fiberfill or thread scraps for stuffing the body
- 3 white pearl beads, 6 mm
- 3 gold spacer beads, 4 mm
- 1 clear faceted teardrop crystal, about 10 × 20 mm, top-drilled
- Tools: 1.5 mm steel hook, fine tapestry needle, beading needle or big-eye needle, rust-proof pins, foam blocking board, fabric stiffener or starch, scissors, stitch marker
The thread amount includes a margin of about 25% for gauge swatching and weaving in ends.
Abbreviations (US Terms)
- ch – chain
- sl st – slip stitch
- sc – single crochet
- hdc – half double crochet
- dc – double crochet
- tr – treble crochet
- sc2tog – single crochet 2 together
- BLO – back loop only
- sp – space
- st(s) – stitch(es)
- rep – repeat
Special stitches
- Ch-3 picot: ch 3, sl st in the top of the last sc made.
- Ch-5 picot: ch 5, sl st in the top of the last sc made.
- Regular shell: (sc, hdc, 5 dc, hdc, sc) all in the same loop. That is 9 sts.
- Tip shell: (sc, hdc, 2 dc, 4 tr, 2 dc, hdc, sc) all in the same loop. That is 12 sts.
Gauge and Checkpoints
Gauge is not critical for an ornament, but it controls how well the wings fit the body. Make one upper wing first and check it before making the rest.
Base gauge: Rounds 1–3 of the upper wing measure 1.25 in (3.2 cm) across.
Upper wing checkpoints (unblocked):
– After Round 3: 1.25 in (3.2 cm)
– After Round 5: 2.25 in (5.7 cm)
– After Round 6: 2.75 in (7.0 cm)
– After Round 7: 3 in (7.6 cm)
Lower wing checkpoints (unblocked):
– After Round 3: 1 in (2.5 cm)
– After Round 4: 1.5 in (3.8 cm)
– After Round 5: 2 in (5.1 cm)
– After Round 6: 2.25 in (5.7 cm)
Body checkpoint: 1.75 in (4.4 cm) long and about 0.4 in (1.0 cm) wide at the thorax.
If your upper wing is more than 0.25 in (0.6 cm) too large, go down to a 1.25 mm hook. If it is more than 0.25 in (0.6 cm) too small, go up to a 1.75 mm hook. Chain loops that ruffle usually mean your chains are looser than your stitches, so tighten your chain tension instead of changing hooks.
Upper Wing (make 2)
Round 1: Ch 8, sl st to the first ch to form a ring. Ch 1, work 16 sc in the ring, sl st to the first sc. (16 sc)
Round 2: Ch 4 (counts as dc + ch 1), dc in next sc, ch 1, rep from * 14 more times, sl st to 3rd ch of beginning ch-4. (16 dc, 16 ch-1 sps)
These are the radiating spokes around the open center.
Round 3: Sl st in first ch-1 sp, ch 1, 2 sc in each ch-1 sp around, sl st to first sc. (32 sc)
Round 4: Ch 1, sc in first sc, ch 5, skip next sc, sc in next sc, rep from * around, ending ch 5, skip last sc, sl st to first sc. (16 sc, 16 ch-5 loops)
Round 5: Sl st in each of the first 3 ch of the first loop, ch 1, sc in same loop, ch 6, sc in next loop, rep from * 14 more times, ch 6, sl st to first sc. (16 sc, 16 ch-6 loops)
Round 6: Sl st in the first ch-6 loop, ch 1. Work 1 tip shell in this loop and place a marker in the 6th st of the tip shell. Work 1 regular shell in each of the next 15 loops, skipping the sc between loops. Sl st to the first sc. (15 × 9 + 12 = 147 sts)
The tip shell makes the pointed outer corner of the wing. The 8 loops directly across from it form the inner edge that will be sewn to the body.
Round 7: Work the Border (see Border section). Fasten off and weave in the ends.
Lower Wing (make 2)
Round 1: Ch 6, sl st to form a ring. Ch 1, work 12 sc in the ring, sl st to first sc. (12 sc)
Round 2: Ch 4 (counts as dc + ch 1), dc in next sc, ch 1, rep from * 10 more times, sl st to 3rd ch of beginning ch-4. (12 dc, 12 ch-1 sps)
Round 3: Sl st in first ch-1 sp, ch 1, 2 sc in each ch-1 sp around, sl st to first sc. (24 sc)
Round 4: Ch 1, sc in first sc, ch 6, skip next sc, sc in next sc, rep from * around, ending ch 6, skip last sc, sl st to first sc. (12 sc, 12 ch-6 loops)
Round 5: Sl st in the first ch-6 loop, ch 1. Work 1 tip shell in this loop and place a marker in the 6th st. Work 1 regular shell in each of the next 11 loops. Sl st to first sc. (11 × 9 + 12 = 111 sts)
Round 6: Work the Border. Fasten off and weave in the ends.
Body with Antennae (make 1)
Work in continuous spirals and move a marker up each round. Leave a 10 in (25.4 cm) tail at the start.
Head
– Round 1: 6 sc in a magic ring. (6)
– Round 2: 2 sc in each st around. (12)
– Rounds 3–4: Sc in each st around. (12)
– Round 5: Sc in next st, sc2tog, rep 4 times. (8)
Stuff the head firmly.
Thorax
– Round 6: Sc in next st, 2 sc in next st, rep 4 times. (12)
– Rounds 7–9: Sc in each st around. (12)
– Round 10: Sc in next 2 sts, sc2tog, rep 3 times. (9)
Stuff the thorax.
Abdomen (all rounds worked in BLO to raise the segment ridges)
– Round 11: 2 sc in next st, sc in next 2 sts, rep 3 times. (12)
– Rounds 12–16: Sc in each st around. (12)
– Round 17: Sc in next 2 sts, sc2tog, rep 3 times. (9)
– Rounds 18–19: Sc in each st around. (9)
– Round 20: Sc in next st, sc2tog, rep 3 times. (6)
Add the last of the stuffing.
- Round 21: Sc2tog 3 times. (3)
Fasten off and leave a 12 in (30.5 cm) tail. You will use this tail for the bead dangle.
Antennae (make 2 on the head)
Join the thread at the top of the head, slightly to one side of center. Ch 20. Work 2 sc in the 2nd ch from the hook and in each of the next 4 ch (10 sc, which forms the curled tip). Then sl st in each of the remaining 14 ch and sl st into the head.
Check the count: 1 skipped ch + 5 + 14 = 20 ch.
Sl st across 2 sts on top of the head and work the second antenna the same way. Fasten off. Roll each tip outward with your fingers.
Wing Curls (make 4)
Upper wing curl (make 2): Ch 16. Work 2 hdc in the 3rd ch from the hook and in each ch across. (14 ch × 2 = 28 hdc) Fasten off and leave a 6 in (15.2 cm) tail.
Lower wing curl (make 2): Ch 12. Work 2 hdc in the 3rd ch from the hook and in each ch across. (10 ch × 2 = 20 hdc) Fasten off and leave a tail.
The extra stitches make each strip coil into a C-shaped crescent.
Make All Pieces
All pieces use ivory thread.
| Piece | Quantity | Thread (approx.) |
|---|---|---|
| Upper wing | 2 | 4 g each |
| Lower wing | 2 | 2 g each |
| Body with antennae | 1 | 1.5 g |
| Curls | 4 | 0.25 g each |
| Hanging cord | 1 | 0.25 g |
Layout (front view):
        [antennae]
[Upper L] [Head ] [Upper R]
[Upper L] [Thorax] [Upper R]
[Lower L] [Abdomen] [Lower R]
          [ dangle ]
Joining
Work the Border (next section) on all four wings and block them before you join anything.
Method: Whipstitch with a tapestry needle and ivory thread. Sew through the Round 6 (upper) or Round 5 (lower) shell stitches, just inside the picot edge.
Upper wings: Find the shell directly across from the tip shell. On the upper wing that is the 9th loop’s shell, counting the tip shell as loop 1. Sew its 9 sts along one side of the thorax, Rounds 6–10 (5 rounds). Work about 2 shell sts per body round and add the extra stitch at Round 8. Sew the second upper wing to the other side as a mirror image, with the tips pointing up and out.
Lower wings: The joining shell is the 7th loop’s shell, counting the tip shell as loop 1. Sew its 9 sts along the abdomen, Rounds 11–15, with the same 2-to-1 spacing. Slide each lower wing about 0.25 in (0.6 cm) behind its upper wing so they overlap.
Wing-to-wing tack: Where the upper and lower wing on each side touch, tack 3 picots together with 2 small stitches each.
Curls: Pin each curl along Round 3 of its wing, on the side nearest the body, with the open side of the C facing the tip. Tack it down every 3–4 sts.
Tension: Pull each stitch just snug. If you pull too hard, the wing puckers and tilts toward the body.
Checkpoint: The joined butterfly should measure 5.5 in (14.0 cm) across and 4.5 in (11.4 cm) tall.
Border
The picot border is the final round of each wing.
Border gauge: 4 repeats (12 sc + 4 picots) = 1 in (2.5 cm) measured along the scalloped edge.
Upper wing, Round 7: Ch 1, starting in the first sc of the tip shell, sc in next 3 sts, ch-3 picot, rep around. When you reach the marked 6th st of the tip shell, work a ch-5 picot after it instead of a ch-3 picot. Sl st to first sc.
– Count: 147 sc, 49 picots (48 ch-3 + 1 ch-5)
– Per regular shell: 9 sc, 3 picots
– Tip shell: 12 sc, 4 picots
Lower wing, Round 6: Work the same way.
– Count: 111 sc, 37 picots (36 ch-3 + 1 ch-5)
Why the math works: A regular shell has 9 sts, which is exactly 3 repeats. A tip shell has 12 sts, which is exactly 4 repeats. Both totals divide evenly by 3: 147 ÷ 3 = 49 and 111 ÷ 3 = 37.
Because the border starts at the first stitch of the tip shell, every shell starts on a repeat boundary. That has three results:
– In each regular shell, the picots fall after sts 3 and 6, evenly on either side of the center dc, plus one picot in the valley after st 9.
– In the tip shell, the picot after st 6 sits exactly at the point, between the two center tr. That is why the ch-5 picot goes there.
– The round ends with no leftover stitches.
Final Blocking
- Mix fabric stiffener as directed, or use a medium-strength starch.
- Dip the butterfly and gently squeeze out the excess. Blot it in a towel.
- Lay it face up on the foam board.
- Pin each upper wing tip out and up until the wing measures 3.25 in (8.3 cm) from tip to body and 2.5 in (6.4 cm) across.
- Pin each lower wing tip out and down to 2.5 in (6.4 cm) × 2 in (5.1 cm).
- Pin every ch-6 loop and every picot so the shells fan evenly.
- Shape the antennae into curls and pin them.
- Check the wingspan: 5.5 in (14.0 cm).
- Let it dry completely, about 24 hours.
Add the beads after blocking:
– Hanging cord: Ch 50. Sl st in the back bump of each ch from the 2nd ch from the hook. (49 sl st, about 4 in / 10.2 cm) Fold the cord into a 2 in (5.1 cm) loop. Thread both ends through a pearl and then a gold spacer, and sew them firmly into the top of the head between the antennae.
– Dangle: Thread the 12 in (30.5 cm) tail onto a beading needle. String a pearl, a spacer, a pearl, a spacer and the crystal. Pass the needle through the crystal’s hole, back up through all the beads and into the abdomen. Knot it and bury the end.
Final Quality-Control Checklist
- Upper wings have 49 picots each and lower wings have 37
- Each wing has one sharp ch-5 tip
- Both upper wings mirror each other in angle and size
- Lower wings overlap the upper wings by about 0.25 in (0.6 cm)
- Body segments show clear BLO ridges
- Antennae curl evenly
- Curls sit on Round 3, close to the body
- All ends are hidden and nothing pokes through the lace
- The ornament hangs level from its loop
Troubleshooting
- Wing cups or curls: Your shells are too tight. Re-block it wetter and pin more points.
- Wing ruffles: Your chain loops are too long. Chain more firmly or go down a hook size.
- Tip isn’t pointed: Check that the ch-5 picot sits after the 6th st of the tip shell.
- Body leans: The stuffing is uneven. Massage it toward the low side before closing.
- Ornament tilts when hung: Move the loop attachment until it is centered on the head.
- Beads slip: Pass the thread through the beads a second time.
Care
Dust it gently with a soft brush. If it needs cleaning, hand-wash it in cool water, then re-stiffen and re-block. Store it flat in tissue paper.
Final Notes
Here is the measurement chain, in order:
1. The upper wing’s base reaches 1.25 in (3.2 cm) by Round 3 and grows to 3 in (7.6 cm) with its 49-picot border.
2. The lower wing reaches 2.25 in (5.7 cm) with 37 picots.
3. Blocking stretches the upper wings to 3.25 in × 2.5 in (8.3 cm × 6.4 cm) and the lower wings to 2.5 in × 2 in (6.4 cm × 5.1 cm).
4. Sewn to a 1.75 in (4.4 cm) body, the wings give a 5.5 in (14.0 cm) wingspan and 4.5 in (11.4 cm) height.
5. The loop and dangle bring the hanging length to 9.5 in (24.1 cm).
Check each stage and the finished butterfly will fall into place.
Happy crocheting!