

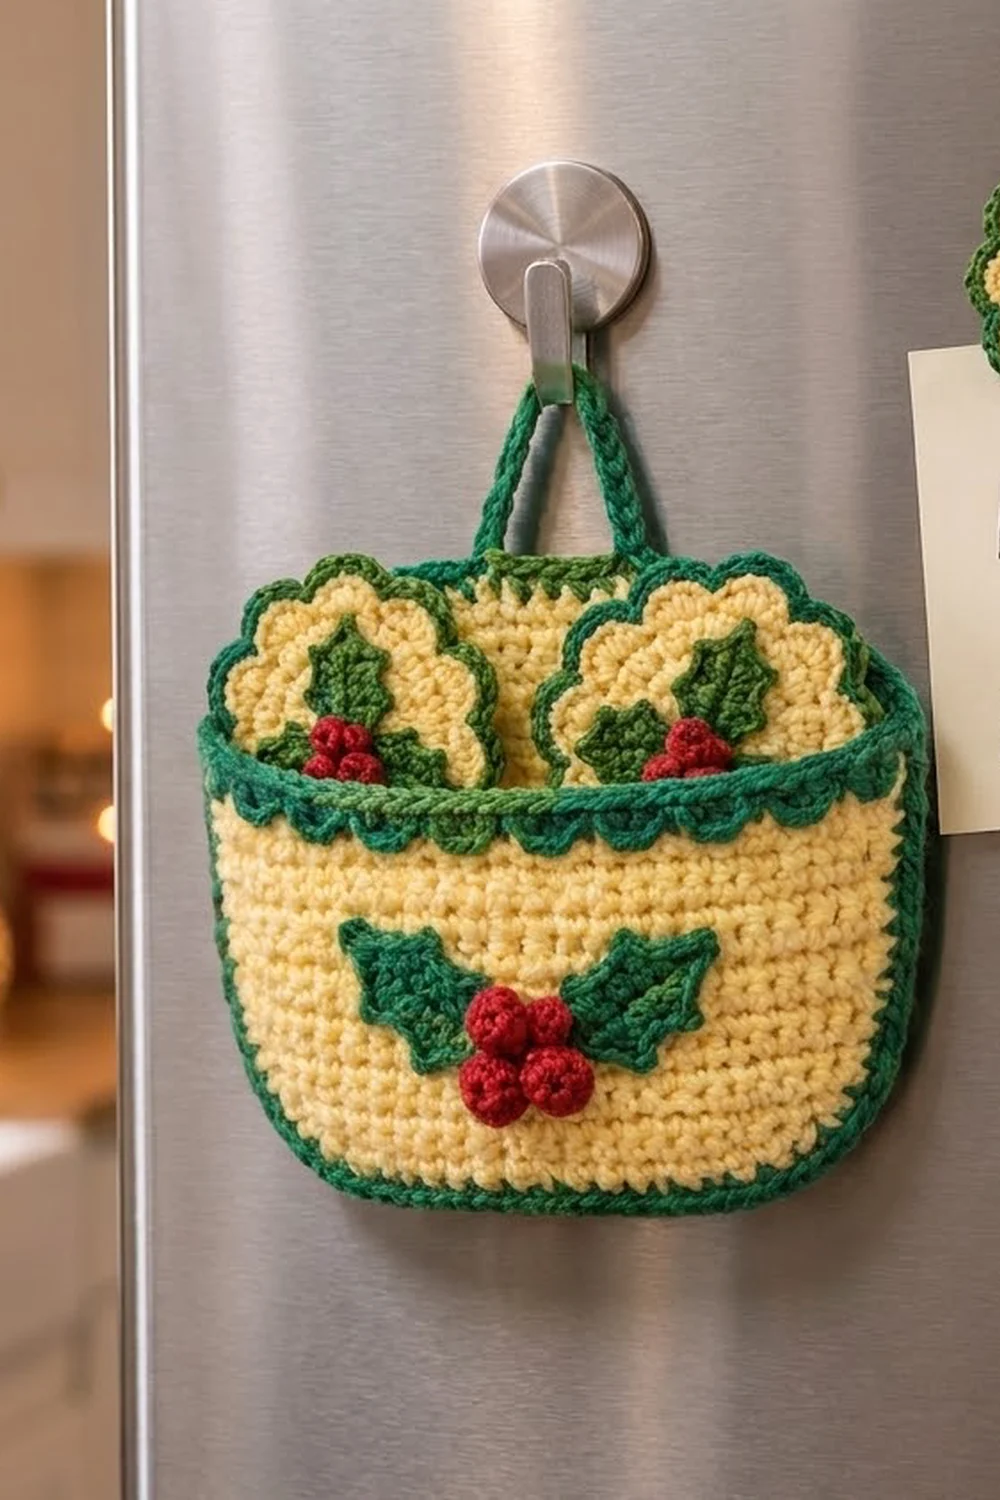
This little set brings Christmas to the kitchen. It has one hanging wall pocket and three round fridge magnets, all in soft buttercream yellow with deep green edges and bright red holly berries. When you’re not using the magnets, they tuck into the pocket. Take them out to pin notes, recipes, and shopping lists to the fridge.
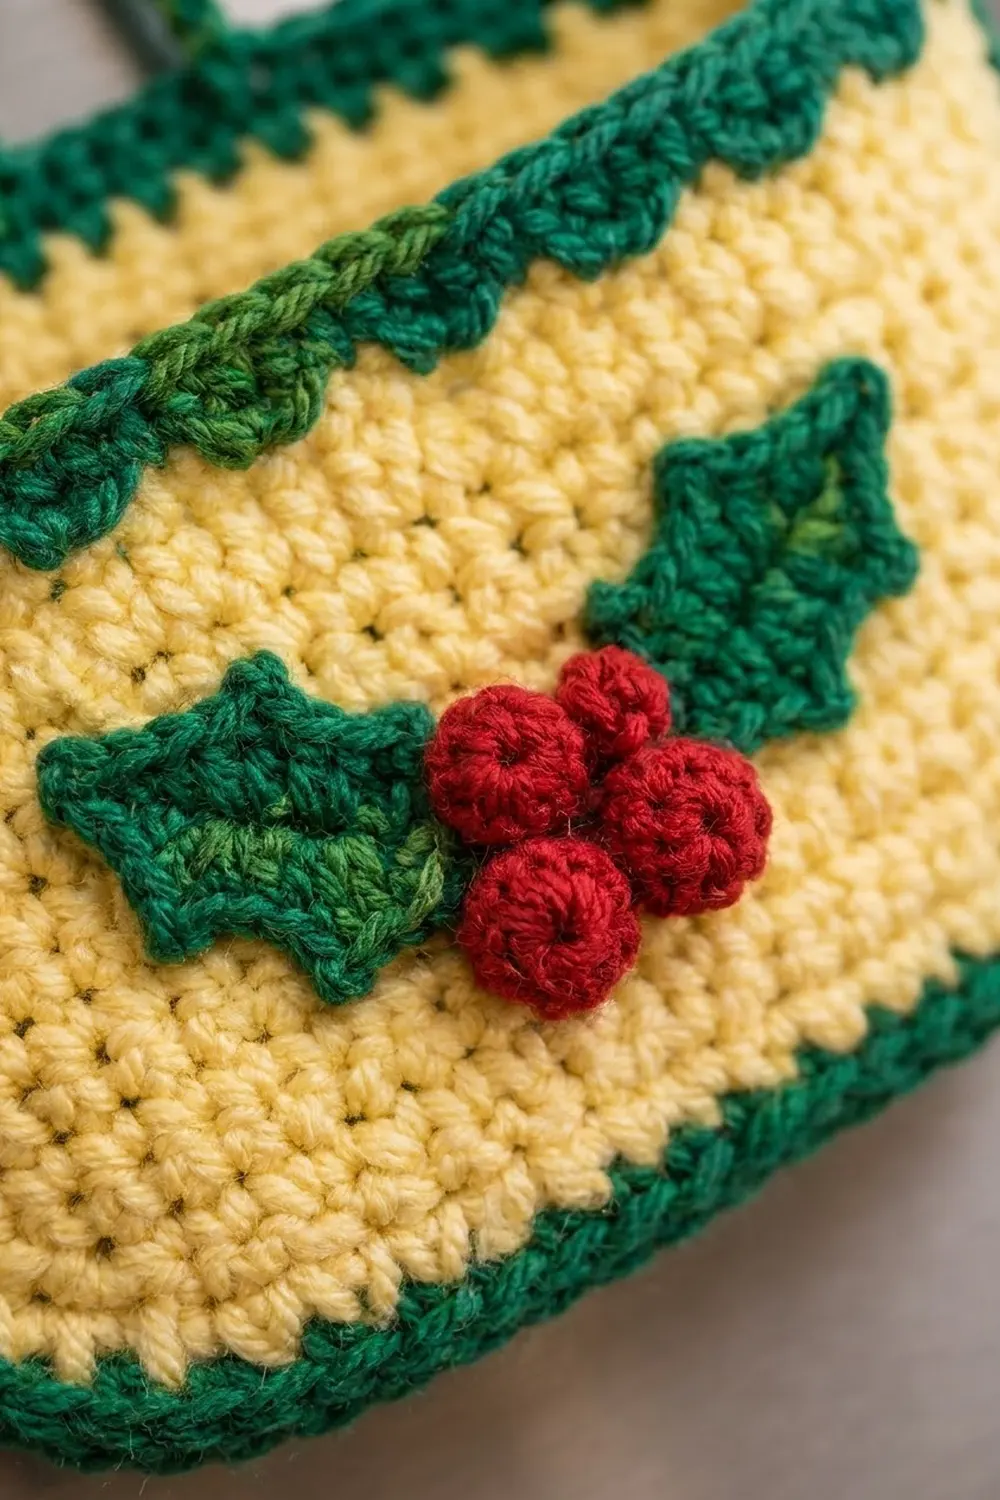
Each magnet is a round motif with nine scallops, a thin green outline, and a holly appliqué of three pointed leaves and three bobble berries. The pocket is a shallow U-shape with:
- a scalloped green trim along the front opening
- a two-round green border
- a small hanging loop
- its own holly sprig on the front
The pattern uses US crochet terms. The finished pocket measures 6.4 in (16.3 cm) wide by 5.2 in (13.2 cm) tall, not counting the loop. Each magnet measures 3.5 in (8.9 cm) across, scallop tip to scallop tip.
Construction is simple:
- Magnets: Work the fronts in the round, then sew on a solid green back circle with a disc magnet inside.
- Pocket: Work the front and back as flat pieces in rows. The green border joins them and edges the whole pocket in one pass.
- Appliqués: Make the leaves and berries separately and sew them on before any joining.
Finished Size and Construction
- Finished pocket size: 6.4 in (16.3 cm) wide x 5.2 in (13.2 cm) tall, plus a 1.5 in (3.8 cm) loop
- Finished magnet size: 3.5 in (8.9 cm) across
- Skill level: Easy to intermediate
- Terminology: US
- Yarn weight: Worsted (#4) cotton
- Hook: 4.0 mm (G-6)
- Number of pieces: 1 pocket (front panel and back panel) and 3 magnets (a front and a back each), plus 11 leaves and 12 berries
- Layout: Separate items. The magnets are not attached to the pocket. They just sit inside it.
- Pocket panel size before border: 5.6 in (14.2 cm) wide. The back is 4.4 in (11.2 cm) tall. The front is 3.6 in (9.1 cm) tall, including the scallops.
- Magnet size before green edge: 3.1 in (7.9 cm)
- Border depth: 0.4 in (1.0 cm) per side on the pocket, 0.2 in (0.5 cm) per side on the magnets
Materials
Use a smooth worsted-weight cotton or cotton blend with about 170 m per 100 g. Cotton keeps the stitches crisp and stops the pocket from sagging under the weight of the magnets.
- Cream / pale yellow: 40 g (68 m) for the pocket panels and magnet fronts
- Green: 30 g (51 m) for the magnet backs, edging, scallop trim, border, loop, and leaves
- Red: 5 g (9 m) for the berries
These amounts include about a 15% margin.
Tools:
– 4.0 mm (G-6) crochet hook
– Tapestry needle
– 3 round disc magnets, 1 in (2.5 cm) across and about 0.1 in (0.3 cm) thick
– Stitch markers
– Rustproof pins
– Scissors
– Spray bottle and blocking mat
Abbreviations (US Terms)
- ch – chain
- sl st – slip stitch
- sc – single crochet
- hdc – half double crochet
- dc – double crochet
- inc – 2 sc in the same stitch
- sk – skip
- st(s) – stitch(es)
- RS / WS – right side / wrong side
Special stitches:
- Ch-2 picot: Ch 2, then sl st in the top of the stitch you just made.
- 5-dc bobble: *Yarn over, insert hook in the stitch, pull up a loop, yarn over, pull through 2 loops; repeat from * 4 more times in the same stitch (6 loops on hook). Yarn over and pull through all 6 loops.
Gauge and Checkpoints
Gauge: 18 sc and 20 rows = 4 in (10.2 cm), worked flat in cream.
Make one magnet front before anything else. It uses very little yarn and shows you right away whether your tension is right.
Checkpoints:
- Magnet Round 3 (18 sts): 1.2 in (3.0 cm) across
- Magnet Round 6 (36 sts): 2.4 in (6.1 cm) across
- Magnet Round 7 (scallops): 3.1 in (7.9 cm) across
- Magnet Round 8 (green edge): 3.5 in (8.9 cm) across
- Pocket Row 1 (15 sts): 3.3 in (8.4 cm) wide
- Pocket Row 6 (25 sts): 5.6 in (14.2 cm) wide
If your piece is too big, go down one hook size, to 3.75 mm (F-5). If it’s too small, go up to 4.5 mm (7).
A magnet front that cups means your tension is tight. One that ruffles means it’s loose. In either case, change hooks rather than stitch counts, because the scallop repeat needs exactly 36 stitches in Round 6.
Magnet Front (make 3)
Work in joined rounds with RS facing. Join each round with a sl st to the first st. Ch 1 to begin the next round (the ch 1 does not count as a stitch).
With cream, make a magic ring.
Round 1: 6 sc in ring. Join. (6 sts)
Round 2: Inc in each st around. (12 sts)
Round 3: Sc in next st, inc in next st; repeat from * 6 times. (18 sts)*
Round 4: Sc in next 2 sts, inc in next st; repeat from * 6 times. (24 sts)*
Round 5: Sc in next 3 sts, inc in next st; repeat from * 6 times. (30 sts)*
Round 6: Sc in next 4 sts, inc in next st; repeat from * 6 times. (36 sts)*
Check the size: it should be 2.4 in (6.1 cm) across.
Round 7 (scallops): Sc in next st, sk 1 st, 5 dc in next st, sk 1 st; repeat from * 9 times. Join to the first sc. (9 scallops; 54 sts = 9 sc + 45 dc)*
Each repeat uses 4 stitches of Round 6, and 9 x 4 = 36. The scallops close evenly with no stitch left over. Fasten off cream.
Round 8 (green edge): Join green in any sc. Sc in sc, sc in next 2 dc, 2 sc in the 3rd (center) dc, sc in next 2 dc; repeat from * 9 times. Join. (63 sts = 54 worked one per stitch + 9 extra at the scallop tips)*
The extra stitch at each tip keeps the outline from flattening the scallops. Fasten off and weave in the ends.
Magnet Back (make 3)
With green, work Rounds 1–6 of the Magnet Front. (36 sts) Fasten off, leaving a 16 in (40.6 cm) tail for sewing.
Holly Leaf (make 11)
You need 9 leaves for the magnets (3 each) and 2 for the pocket.
With green, ch 9.
Side 1: Sl st in 2nd ch from hook, sc in next ch, hdc in next ch, ch-2 picot, dc in next 2 ch, ch-2 picot, hdc in next ch, sc in next ch, sl st in last ch. (8 sts, 2 picots)
Tip: Ch-2 picot, made off the sl st.
Side 2: Rotate the work so you can crochet along the other side of the foundation chain. Sl st in first ch, sc in next ch, hdc in next ch, ch-2 picot, dc in next 2 ch, ch-2 picot, hdc in next ch, sc in next ch, sl st in last ch. (8 sts, 2 picots)
The leaf now has 5 points: 2 on each side and 1 at the tip. It should be about 1.25 in (3.2 cm) long and 0.75 in (1.9 cm) wide. Fasten off, leaving a 6 in (15.2 cm) tail.
Holly Berry (make 12)
You need 9 berries for the magnets (3 each) and 3 for the pocket.
With red, ch 3. Make a 5-dc bobble in the 3rd ch from hook, then ch 1 to close it. Fasten off, leaving a 6 in (15.2 cm) tail. Use the tails to pull the bobble into a firm, round ball about 0.3 in (0.8 cm) across.
Pocket Back Panel (make 1)
Work flat in rows. At the end of every row, ch 1 and turn (the ch 1 does not count as a stitch). The increase rows shape the rounded bottom.
With cream, ch 16.
Row 1: Sc in 2nd ch from hook and in each ch across. (15 sts)
Row 2: Inc in first st, sc in next 13 sts, inc in last st. (17 sts)
Row 3: Inc in first st, sc in next 15 sts, inc in last st. (19 sts)
Row 4: Inc in first st, sc in next 17 sts, inc in last st. (21 sts)
Row 5: Inc in first st, sc in next 19 sts, inc in last st. (23 sts)
Row 6: Inc in first st, sc in next 21 sts, inc in last st. (25 sts)
Check the width: it should be 5.6 in (14.2 cm).
Rows 7–22: Sc in each st across. (25 sts)
The panel should be 4.4 in (11.2 cm) tall. Fasten off.
Pocket Front Panel (make 1)
Rows 1–6: Work exactly as for the Back Panel. (25 sts)
Rows 7–16: Sc in each st across. (25 sts) Fasten off cream.
Row 17 (green scallop trim): With RS facing, join green in the first st. Sc in first st, sk 1 st, 3 dc in next st, sk 1 st, sc in next st; repeat from * 6 times. (6 scallops; 25 sts = 7 sc + 18 dc)*
The first sc uses 1 stitch and each repeat uses 4, so 1 + (6 x 4) = 25. Fasten off.
The front should measure 3.6 in (9.1 cm) from the bottom edge to the tops of the scallops.
Appliqué Placement
Magnets: Pin 3 leaves on each magnet front with their bases meeting in the center. Point the tips up, lower left, and lower right. Set 3 berries in a small triangle over the spot where the leaves meet. Whipstitch each leaf down along its center and at its points. Sew each berry through its center using its own tails.
Pocket: Center 2 leaves on the pocket front between Rows 5 and 12, with their bases touching and their tips pointing out to the sides. Sew 3 berries in a triangle where the leaves meet.
Sew on all the appliqués before you do any joining, so your needle only goes through one layer.
Joining
Magnets
Place a disc magnet in the center of the WS of a magnet front. Lay a green back on top with its RS facing out. Line up its 36 Round 6 stitches with the 36 stitches of the front’s Round 6, which sit just inside the base of the scallops.
Using the green tail, whipstitch one back stitch to one front stitch. Go under the back loop of the green back and through the base of the front’s Round 7 stitch. Work all the way around for 36 stitches.
Pull each stitch just snug. Pulling too hard puckers the edge, and leaving the stitches loose lets the magnet slide around. The scallops and green edge stay free and hide the back from the front.
Checkpoint: 3.5 in (8.9 cm) across, with the back hidden when you look at the front.
Lay the back panel flat with RS up. Place the front panel on top, also RS up. Match the foundation chains, and match Rows 1–17 at the side edges, one row end to one row end. Pin the sides and bottom. The border round joins the two layers, so you don’t need a separate seam.
Border (Pocket)
Border gauge: Same as the body, 18 sc = 4 in (10.2 cm). Each row end gets 1 sc.
Round 1: With RS facing, join green in the top right corner stitch of the back panel (the last st of Row 22).
- Top edge (back panel only): 3 sc in corner st, sc in next 23 sts, 3 sc in last st. (29 sts)
- Left side: Work 1 sc in each row end from Row 21 down to Row 1. (21 sts) Where the front overlaps (Rows 17 to 1), go through both layers.
- Bottom (both layers): Work into the foundation chains: 2 sc in first ch, sc in next 13 ch, 2 sc in last ch. (17 sts)
- Right side: Work 1 sc in each row end from Row 1 up to Row 21, going through both layers for Rows 1–17. (21 sts)
Join to the first sc. Total: 29 + 21 + 17 + 21 = 88 sts.
Why the math works:
- The top’s 29 stitches are the 25 panel stitches plus 2 extra at each corner.
- The end stitches of Row 22 are the corner stitches, so each side starts at Row 21. No corner gets counted twice.
- The bottom’s 17 stitches are the 15 chains plus 1 extra at each rounded end.
Round 2: Ch 1. Sc in each st around, working 3 sc in the center st of each top corner group. Join. (92 sts = 88 worked one per stitch + 4 extra) Fasten off.
Hanging loop: Find the center stitch of the top edge. With RS facing, join green 3 sts to the right of center. Ch 16, sk 5 sts, and sl st in the next st, so the loop spans 7 centered stitches. Turn. Work 24 sc into the ch-16 loop, then sl st in the starting st. Fasten off. The loop stands 1.5 in (3.8 cm) tall.
Checkpoint: 6.4 in (16.3 cm) wide x 5.2 in (13.2 cm) tall, not counting the loop.
Final Blocking
- Weave in all the ends, hiding the green tails inside the green border.
- Lay the pocket and magnets flat on the mat, RS up.
- Mist them until they’re damp but not soaked.
- Pin the pocket to 6.4 in x 5.2 in (16.3 cm x 13.2 cm). Keep the bottom curved and the top edge straight.
- Pin each scallop on the pocket trim and the magnets so the tips stand out evenly. Pin the magnets to 3.5 in (8.9 cm), keeping the pins away from the magnet itself.
- Shape the leaf points with your fingers and roll each berry round.
- Let everything dry completely flat before you unpin it.
Final Quality-Control Checklist
- Each magnet front has 36 sts in Round 6 and 9 even scallops.
- Each magnet edge has 63 green sts, with the scallop tips slightly pointed.
- The magnets are centered, and the backs can’t be seen from the front.
- The pocket front has 6 green scallops, and its side edges are caught in the border.
- Border Round 1 has 88 sts, and Round 2 has 92 sts.
- The pocket opening lies flat without gaping.
- The loop is centered and firmly anchored.
- Every leaf and berry is secured.
- The finished sizes match the checkpoints.
Troubleshooting
Magnet cups or ruffles: Your tension is off. Change hook size, not stitch counts.
Scallops look crowded: You probably missed a skip on one side. Recount Round 7. Each repeat should use 4 sts of Round 6.
Pocket sides wave: You worked more than 1 sc in some row ends. Rip back and work exactly 21 sts per side.
Pocket front gapes away from the back: The layers shifted while you worked. Repin them row end to row end before you work the border.
Leaf points look soft: Pull each picot snug, and pin the points when you block.
Magnet is too weak through the crochet: Use a stronger neodymium disc magnet.
Care
Spot clean with a damp cloth. Don’t put the magnets in water, and keep them away from phones and bank cards.
Final Notes
Every measurement in this pattern comes from the gauge of 18 sc to 4 in (10.2 cm).
- Magnets: 36 stitches make a 2.4 in (6.1 cm) circle. The 9 scallops bring it to 3.1 in (7.9 cm), and the green edge finishes it at 3.5 in (8.9 cm).
- Pocket: 25 stitches give a width of 5.6 in (14.2 cm), and the back’s 22 rows give a height of 4.4 in (11.2 cm). The two-round border adds 0.4 in (1.0 cm) on each side, for a finished size of 6.4 in x 5.2 in (16.3 cm x 13.2 cm).
If each checkpoint matches, the next stage will too, and the three holly magnets will fit neatly in their pocket all season.
Happy crocheting!