

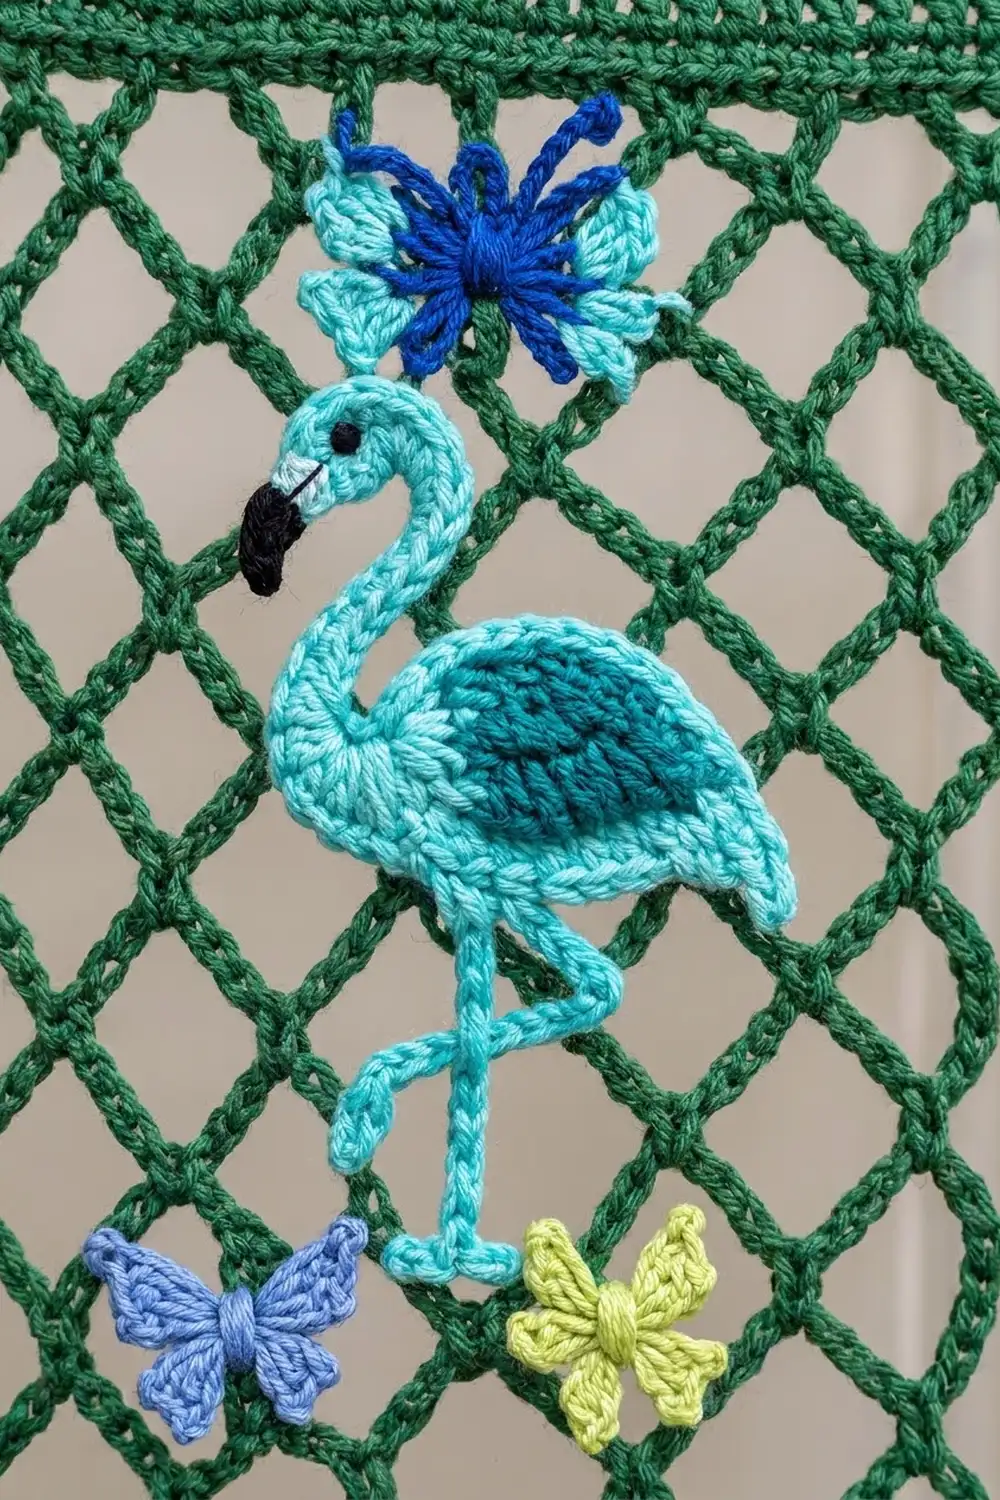
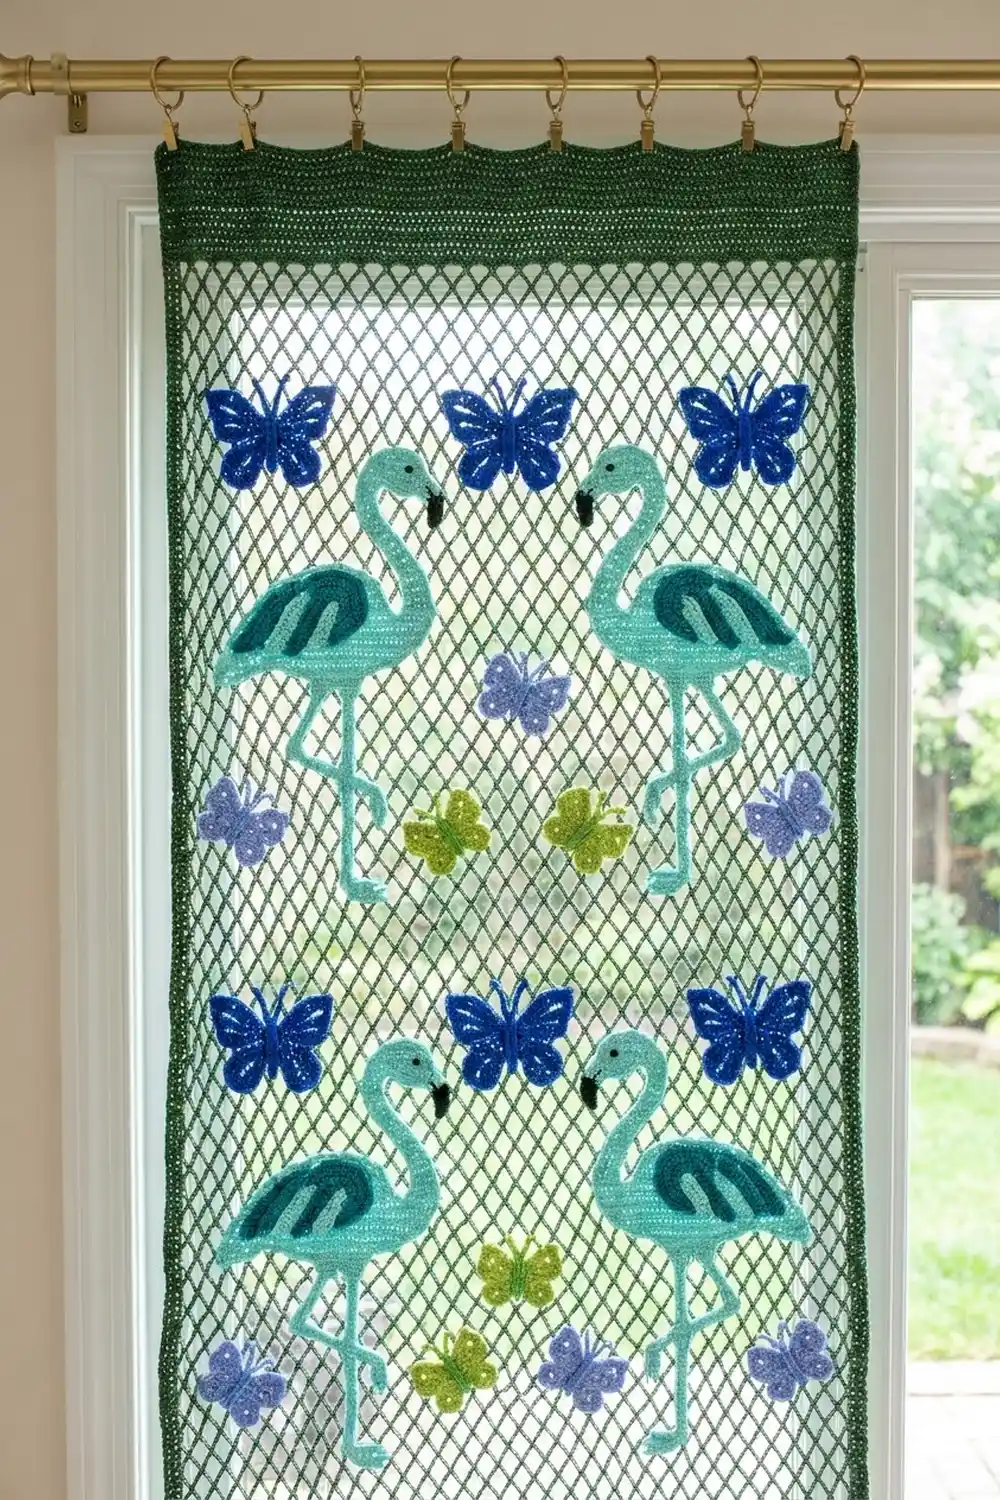
This curtain panel pairs an open diamond net with a parade of crocheted flamingos. The mesh is forest green, and the flamingos are aqua, each with a layered teal wing and a small black beak. A royal blue butterfly sits above each bird, and a periwinkle butterfly and a lime butterfly sit below its feet.
The look is airy and garden-like. Light comes through the diamonds, so the appliqués look like they are resting on a trellis. A solid green header band across the top takes curtain clip rings, so you don’t need a rod pocket.
The pattern uses US crochet terms. One finished panel measures 31.25 in (79.4 cm) wide by 79.5 in (201.9 cm) long. Make two panels for a pair.
Construction is simple. You crochet the header band, work the diamond mesh down from it in one piece, and add a two-row border. Then you make the flamingos and butterflies separately and sew them onto the mesh in a 3 x 7 grid.
Finished Size and Construction
- Finished size (one panel): 31.25 in x 79.5 in (79.4 cm x 201.9 cm)
- Skill level: Intermediate
- Terminology: US
- Yarn weight: Worsted (#4) cotton or cotton blend
- Hooks: 5.0 mm (H-8) for the panel, 4.0 mm (G-6) for the appliqués
- Number of pieces: 1 mesh panel + 21 flamingos + 63 butterflies
- Layout: appliqués in 3 columns x 7 rows of cells
- Cell size: 10 in x 11 in (25.4 cm x 27.9 cm)
- Size before border: 30.25 in x 79 in (76.8 cm x 200.7 cm)
- Border depth: 0.5 in (1.3 cm) on the sides and bottom
Materials
Choose a smooth cotton or cotton blend. Cotton holds the diamond shape and sags less than acrylic once the panel is hanging. Avoid fuzzy yarns, which blur the mesh.
Amounts are for one panel. Double them for a pair.
- Forest green (header, mesh, border): 300 g / 510 m
- Aqua (flamingo body, neck, head, legs): 100 g / 170 m
- Teal (outer wing): 25 g / 42 m
- Dark teal (wing center): 25 g / 42 m
- Black (beaks): 10 g / 17 m
- Royal blue (upper butterflies): 50 g / 85 m
- Periwinkle (lower butterflies): 25 g / 42 m
- Lime green (lower butterflies): 25 g / 42 m
Tools: 5.0 mm (H-8) and 4.0 mm (G-6) hooks, tapestry needle, about 40 rust-proof pins, stitch markers, measuring tape, scissors, spray bottle, and 8–10 curtain clip rings per panel.
All quantities include a margin of about 15% for swatching and sewing tails.
Abbreviations (US Terms)
- ch – chain
- sl st – slip stitch
- sc – single crochet
- hdc – half double crochet
- dc – double crochet
- tr – treble crochet
- sk – skip
- st(s) – stitch(es)
- rnd – round
- rep – repeat
- RS – right side
Special stitch – ch-9 loop: ch 9 worked between two sc. It hangs as a V and forms one side of a diamond.
Half loop: ch 4 at the edge of an even mesh row. Together with a tr, it keeps the side edges straight.
Gauge and Checkpoints
Header gauge (5.0 mm hook): 16 sc and 16 rows = 4 in (10.2 cm).
Mesh gauge: One ch-9 loop spans 8 sc, which is 2 in (5.1 cm) wide. Two mesh rows = 2 in (5.1 cm) tall, which makes one full diamond.
Test one piece first. Ch 34 and work 4 rows of sc (33 sts). Then work 6 mesh rows with 4 loops per row. The swatch should measure 8.25 in (21.0 cm) wide, and the mesh section should be 6 in (15.2 cm) tall when lightly stretched.
Checkpoints:
- After header Row 8: 30.25 in x 2 in (76.8 cm x 5.1 cm)
- After Mesh Row 10: 12 in (30.5 cm) total length
- After Mesh Row 77: 79 in (200.7 cm) total length
- Flamingo: 3.5 in x 6.5 in (8.9 cm x 16.5 cm)
- Royal blue butterfly: 2.5 in (6.4 cm) across
- Small butterfly: 2 in (5.1 cm) across
Too big? Go down one hook size. Too small? Go up one hook size. Don’t change the stitch counts, or the border and the appliqué grid won’t line up.
Panel
Header Band
With green and the 5.0 mm hook, ch 122.
Row 1 (RS): Sc in 2nd ch from hook and in each ch across. Turn. (121 sc)
Rows 2–8: Ch 1, sc in each st across. Turn. (121 sc)
Checkpoint: 30.25 in x 2 in (76.8 cm x 5.1 cm).
Diamond Mesh
Mesh Row 1: Ch 1, sc in first sc, ch 9, sk 7 sc, sc in next sc; rep from * 14 more times. Turn. (15 ch-9 loops, 16 sc)*
This uses all 121 header sts: 1 + (15 x 8) = 121.
Mesh Row 2: Ch 8 (counts as tr + ch-4 half loop), sc in first ch-9 loop, ch 9, sc in next ch-9 loop; rep from * 13 more times, ch 4, tr in last sc. Turn. (14 full loops, 2 half loops, 15 sc)*
Mesh Row 3: Ch 1, sc in first tr, ch 9, sc in next ch-9 loop; rep from * 13 more times, ch 9, sc in 4th ch of turning ch-8. Turn. (15 ch-9 loops, 16 sc)*
Mesh Rows 4–77: Alternate Rows 2 and 3. Even rows match Row 2 and odd rows match Row 3. You will end with Row 77: 15 ch-9 loops, 16 sc. Fasten off.
Appliqués
Use the 4.0 mm hook for all appliqués so they come out firm and flat. Leave a 10 in (25.4 cm) tail on every piece for sewing.
Flamingo Body (aqua)
Ch 9.
Rnd 1: 3 sc in 2nd ch from hook, sc in next 6 ch, 3 sc in last ch. Working along the opposite side of the chain, sc in next 6 ch. Join with sl st to first sc. (18 sc)
Rnd 2: Ch 1, 2 sc in each of next 3 sts, sc in next 6, 2 sc in each of next 3 sts, sc in next 6. Join. (24 sc)
Rnd 3: Ch 1, [sc in next st, 2 sc in next st] 3 times, sc in next 6, [sc in next st, 2 sc in next st] 3 times, sc in next 6. Join. (30 sc)
Tail point: Sl st to the center st of the second rounded end. Ch 3, sl st in 2nd ch from hook, sc in next ch, sl st in the same st where the ch-3 started. Fasten off.
The body is an oval about 3 in x 2 in (7.6 cm x 5.1 cm) with a small tail point.
Wing (dark teal and teal)
With dark teal, ch 6.
Rnd 1: 3 sc in 2nd ch from hook, sc in next 3 ch, 3 sc in last ch. Working along the opposite side, sc in next 3 ch. Join. (12 sc) Fasten off.
Rnd 2: Join teal in any st. Ch 1, 2 hdc in each of next 3 sts, hdc in next 3, 2 hdc in each of next 3 sts, hdc in next 3. Join. (18 hdc) Fasten off.
The wing is about 2 in x 1.25 in (5.1 cm x 3.2 cm), with a dark teal center inside a teal outer round.
Neck (aqua)
Ch 13.
Row 1: Sc in 2nd ch from hook and in each ch across. Turn. (12 sc)
Row 2: Ch 1, sc in each st. (12 sc) Fasten off.
Head (aqua) and Beak (black)
Head: Make a magic ring, work 8 sc in the ring, and join. (8 sc) Fasten off.
Beak: With black, ch 4. Sl st in 2nd ch from hook, sc in next ch, hdc in last ch. (3 sts) Fasten off. The hdc end is the wide base of the beak.
Legs (aqua, make 2)
Ch 16. Sc in 2nd ch from hook and in each ch across. (15 sc)
Foot: Ch 3, sl st in 2nd ch from hook and in next ch. Fasten off.
Each leg is about 3 in (7.6 cm) long.
Assemble the Flamingo
- Sew the wing onto the back half of the body, with its tip toward the tail.
- Sew one end of the neck to the top front of the body. Curve the neck up and then forward into a hook, and tack it along the inside of the curve.
- Sew the head to the free end of the neck.
- Sew the base of the beak to the front of the head so it points down.
- Sew both legs under the middle of the body. Leave one leg straight. Fold the other in half to make a bent knee, angle the lower half back, and tack the fold.
Royal Blue Butterfly
Make a magic ring.
Rnd 1: Ch 1, 8 sc in ring. Join. (8 sc)
Rnd 2: (Dc, tr, ch 3, sl st in 3rd ch from hook, tr, dc) in next st, sl st in next st; rep from * 3 more times. (4 wings)*
Antennae: Ch 6, sl st in 2nd ch from hook and in each ch back down. Sl st in the next st, then make a second antenna the same way. Fasten off.
The picot tips and tall stitches make the spiky, starburst wings.
Small Butterfly (periwinkle or lime)
Make a magic ring.
Rnd 1: Ch 3, 3 dc in ring, ch 3, sl st in ring; rep from * once more for the 2 upper wings. Ch 2, 3 hdc in ring, ch 2, sl st in ring; rep from * once more for the 2 lower wings. Pull the ring tight. (4 wings)
Wrap the tail around the center 3 times to make the body, then secure it at the back.
Make All Pieces
Per panel:
- Flamingos: 21 (aqua, teal, dark teal, black)
- Royal blue butterflies: 21
- Periwinkle butterflies: 21
- Lime butterflies: 21
Layout grid (one panel, RS facing, header at the top):
          Col 1      Col 2      Col 3
Header  [================================]
Row 1   [R/F/P-L]  [R/F/P-L]  [R/F/P-L]
Row 2   [R/F/P-L]  [R/F/P-L]  [R/F/P-L]
Row 3   [R/F/P-L]  [R/F/P-L]  [R/F/P-L]
Row 4   [R/F/P-L]  [R/F/P-L]  [R/F/P-L]
Row 5   [R/F/P-L]  [R/F/P-L]  [R/F/P-L]
Row 6   [R/F/P-L]  [R/F/P-L]  [R/F/P-L]
Row 7   [R/F/P-L]  [R/F/P-L]  [R/F/P-L]
Inside each cell:
     R        R = royal blue butterfly
     F        F = flamingo, facing left
   P   L      P = periwinkle, L = lime
Joining: Attaching the Appliqués
Each cell is 5 diamonds wide (10 in / 25.4 cm) and 11 mesh rows tall (11 in / 27.9 cm). Cell row 1 covers Mesh Rows 1–11, cell row 2 covers Rows 12–22, and so on down to Rows 67–77.
- Center each flamingo on the 3rd diamond of its 5-diamond column, with the body across cell rows 4–6.
- Pin the royal blue butterfly across cell rows 1–2, centered over the head.
- Pin the periwinkle butterfly below and to the left of the feet, and the lime butterfly below and to the right, across cell rows 10–11.
- Whipstitch each piece with its own tail, catching only the mesh cords behind it. Use 2–3 small stitches wherever a cord crosses the appliqué’s edge.
Tension: Sew loosely enough that the diamonds keep their shape. If a diamond puckers, take out that tack and redo it with less pull.
Size checkpoint: The panel should still lie flat at 30.25 in x 79 in (76.8 cm x 200.7 cm).
Border
Border gauge: 4 sc = 1 in (2.5 cm), the same as the header.
The border goes down one side, across the bottom and up the other side. The top edge stays plain for the clip rings.
Row 1 (RS): Join green at the top corner of the header.
- Side: Work 1 sc in each header row-end (8 sc). Then work 4 sc around each mesh row-end, either around the tr/ch-8 post or into the edge sc (77 x 4 = 308 sc). Side total: 316 sc.
- Bottom corner: 3 sc in the first sc of Row 77.
- Bottom: 7 sc in the next ch-9 loop, sc in next sc, 7 sc in next ch-9 loop; rep from * 13 more times = 119 sc*.
- Bottom corner: 3 sc in the last sc.
- Side: 316 sc to match the first side.
Turn. (316 + 3 + 119 + 3 + 316 = 757 sc)
Row 2: Ch 1, sc in each st, working 3 sc in the center st of each corner. (757 worked 1-per-st + 4 extra = 761 sc)
That gives 316 per side, 5 per corner and 119 along the bottom. Fasten off.
Why the math works: Each side has 316 sc, and at 4 sc per inch that is 79 in (200.7 cm), the same as the panel’s length. Along the bottom, the 119 sc plus the 2 corner center sts sit on 121 positions, the same as the header’s 121 sts. That means the bottom edge won’t ruffle or pull in.
Final Blocking
- Lay the panel face down on towels or blocking mats. Pin out a rectangle of 31.25 in x 79.5 in (79.4 cm x 201.9 cm).
- Pin along the border every 4 in (10.2 cm).
- Ease the diamonds into even shapes about 2 in (5.1 cm) across.
- Mist the panel until it’s damp, avoiding heavy soaking.
- Let it dry completely before unpinning, about 24 hours.
- Turn the panel over and press the appliqués flat with your hands.
Final Quality-Control Checklist
- Header has 121 sts and measures 30.25 in (76.8 cm).
- Every odd mesh row has 15 full loops, and every even row has 14 full loops plus 2 half loops.
- There are 21 flamingos per panel, all facing left.
- Each flamingo has one straight leg and one bent leg.
- Each cell has one royal blue, one periwinkle and one lime butterfly.
- Border Row 2 has 761 sc.
- All tails are woven in on the wrong side.
Troubleshooting
Side edges curve inward: Your half loops are too short. Check that each even row starts with ch 8 and ends with ch 4 + tr.
Mesh is too long: Cotton stretches when hung. Measure flat after blocking, not while it’s hanging.
Flamingo body cups: Your tension is too tight. Go up half a hook size or add 1 extra sc at each end in Rnd 3.
Bottom border ruffles: You probably worked 8 or more sc per loop. Use exactly 7.
Butterflies flop forward: Add a tack stitch at each wing tip.
Care
Hand wash in cool water with mild soap. Press out the water in a towel, then lay flat to dry. Never hang the panel while it’s wet.
Final Notes
Everything depends on one measurement chain: 4 sc per inch in the header, 8 sc per loop, and 1 in (2.5 cm) per mesh row. That gives a 30.25 in x 79 in (76.8 cm x 200.7 cm) panel, which divides into 21 cells of 10 in x 11 in (25.4 cm x 27.9 cm). The border then brings the panel to 31.25 in x 79.5 in (79.4 cm x 201.9 cm). Check the header first and the rest will follow.
Happy crocheting!