

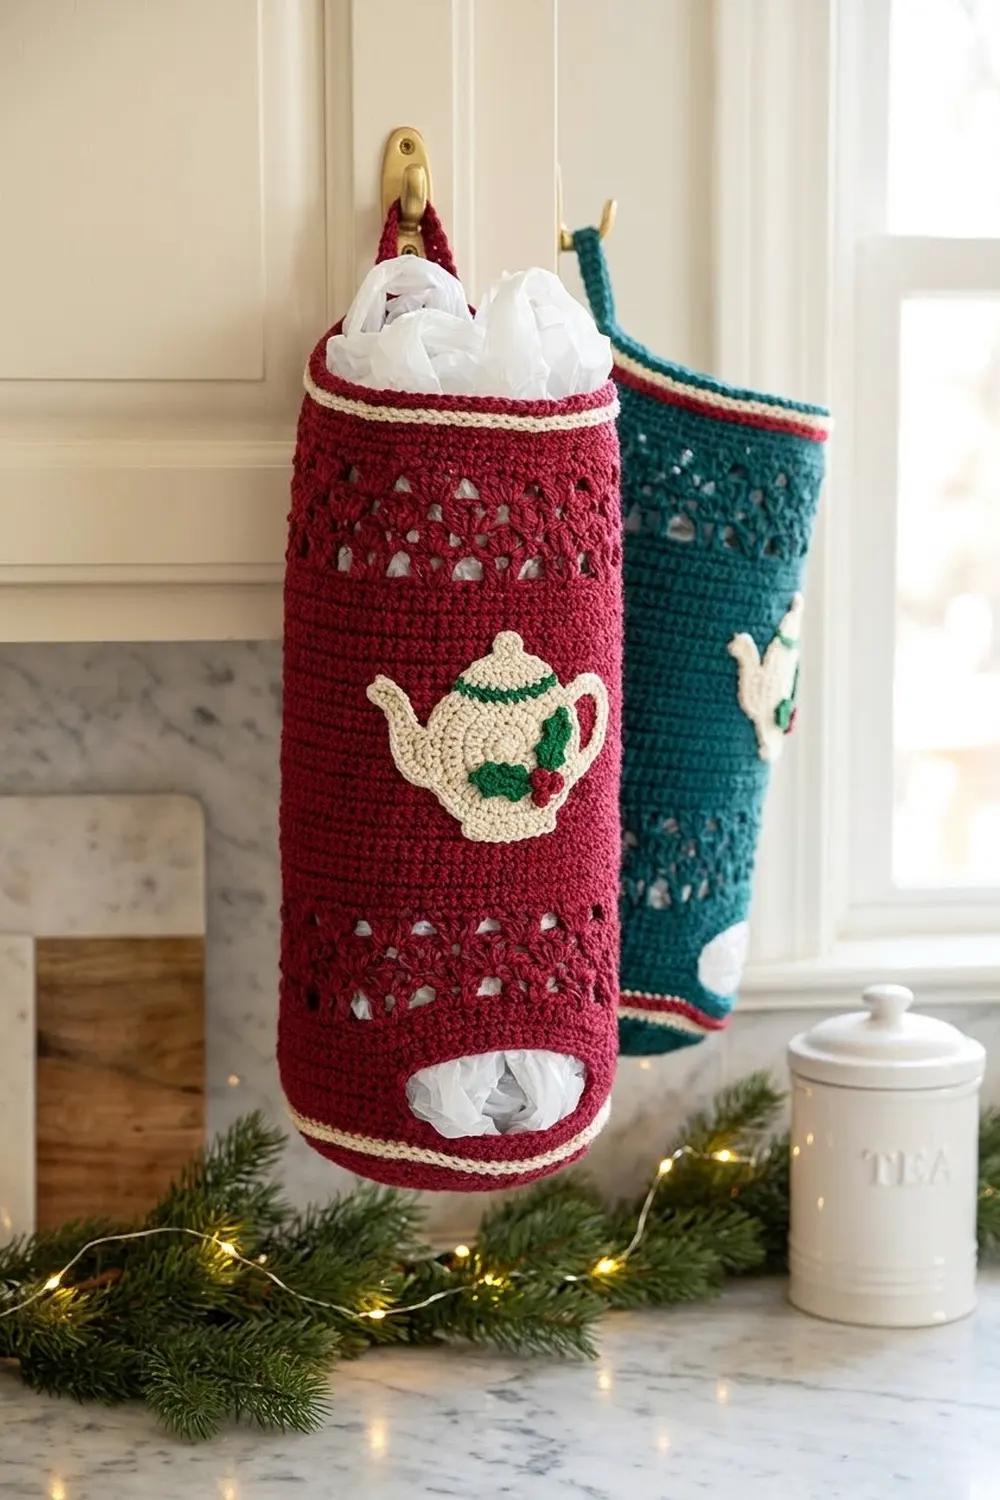
This holiday kitchen helper is a lacy tube that holds plastic grocery bags. You stuff them in at the top and pull them out one at a time through a snug opening at the bottom. A covered ring above the top band lets the holder hang from a cabinet hook or door knob.
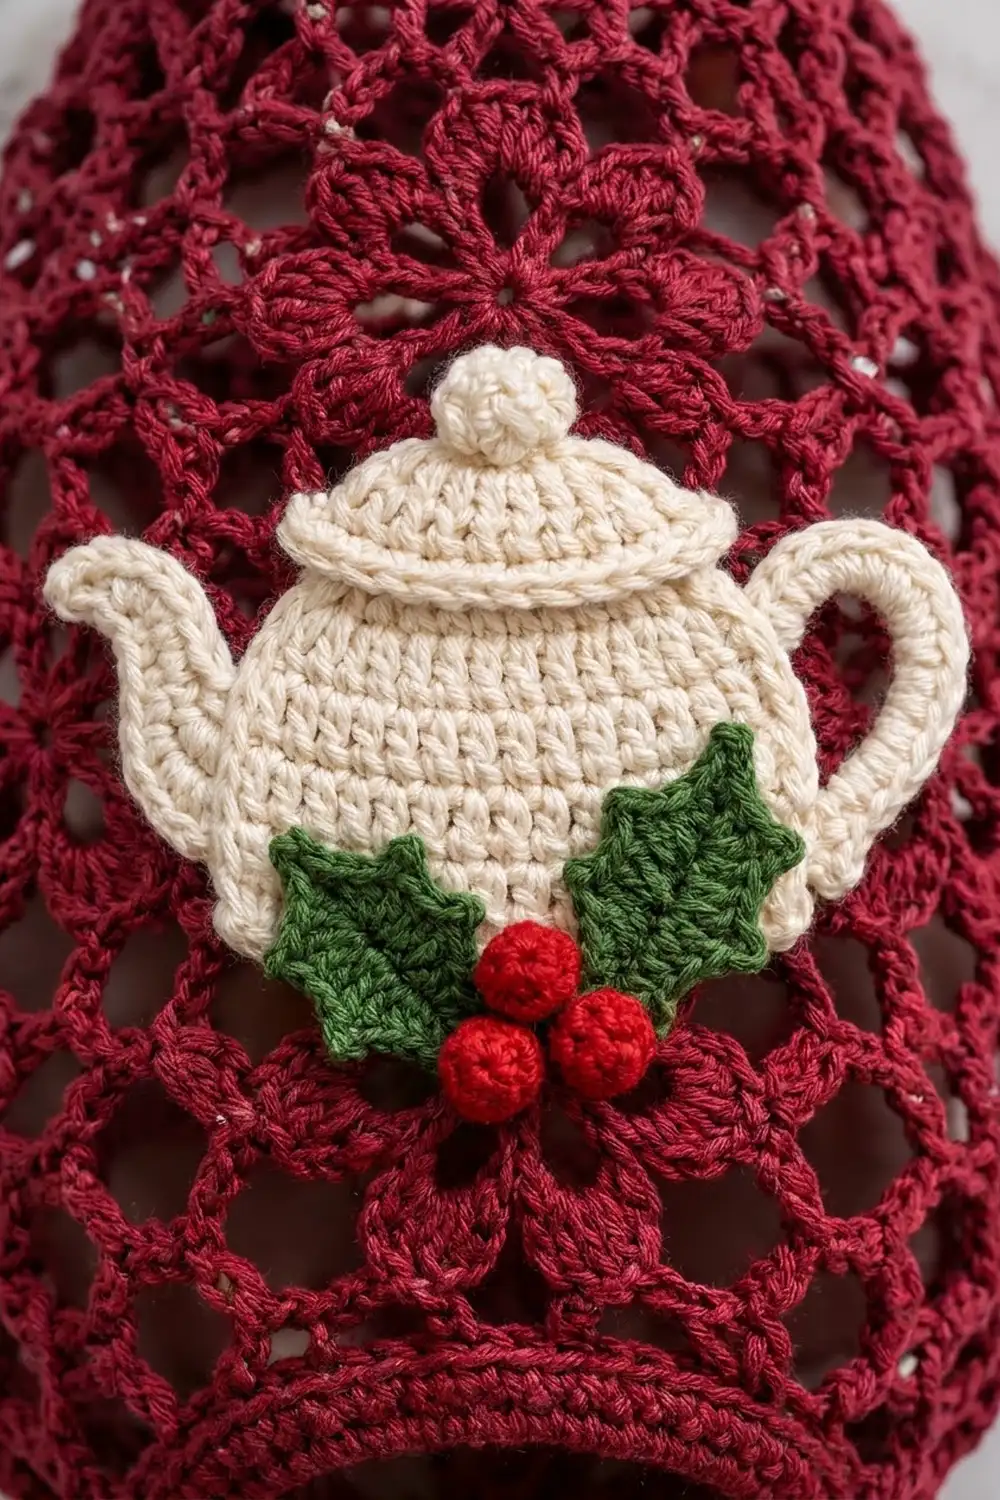
The body is deep cranberry red in a staggered flower-fan lace that looks like rows of little blossoms framed by open mesh. On the front sits a cream teapot appliqué with a popcorn lid knob, plus two pointed green holly leaves and a cluster of three bright red berries. It looks just as festive in deep teal with the same trims.
This pattern uses US crochet terms. The finished holder is about 8 in (20.3 cm) wide flat at its widest point. The body is 12.8 in (32.5 cm) tall, or about 16.8 in (42.7 cm) to the top of the ring.
You work the body from the bottom up in joined rounds, in this order: a solid single crochet base band, one increase round, sixteen rounds of fan-and-mesh lace, and a narrowing round. Borders then finish both openings. The ring, teapot, leaves, and berries are made separately and sewn on.
Finished Size and Construction
- Finished size: 8 in (20.3 cm) wide flat at widest; body 12.8 in (32.5 cm) tall; about 16.8 in (42.7 cm) with ring
- Skill level: Intermediate
- Terminology: US crochet terms
- Yarn weight: Worsted (#4), cotton or cotton blend
- Hook: 4.5 mm (US 7)
- Number of pieces: 1 body tube, 1 covered ring with tab, 1 teapot, 2 holly leaves, 3 berries
- Layout: Single tube, flattened front and back; appliqués centered on the front
- Body size before border: 8 in (20.3 cm) wide flat × 11.5 in (29.2 cm) tall
- Openings: 6 in (15.2 cm) wide flat, 12 in (30.5 cm) around
- Border depth: top 0.9 in (2.3 cm); bottom 0.4 in (1.0 cm)
Materials
Choose a smooth, firm cotton or cotton-acrylic blend. Cotton keeps the lace open, resists stretching under a full load of bags, and washes well. Avoid fuzzy yarns, which blur the fans.
- Cranberry red (main color): 120 g, about 200 m (219 yd) for the body, ring cover, and tab
- Cream: 15 g, about 25 m (27 yd) for the teapot
- Holly green: 8 g, about 14 m (15 yd) for the leaves
- Bright red: 5 g, about 8 m (9 yd) for the berries
All quantities include a margin of about 15% for swatching and weaving in.
Tools:
- 4.5 mm (US 7) crochet hook
- 3 in (7.6 cm) plastic or metal ring
- Stitch marker and tapestry needle
- Scissors
- Fiberfill or yarn scraps for the berries
- Rust-proof pins and a rolled towel for blocking
Abbreviations (US Terms)
- ch – chain
- sl st – slip stitch
- sc – single crochet
- hdc – half double crochet
- dc – double crochet
- sc2tog – single crochet 2 together
- sp – space
- st(s) – stitch(es)
- rnd – round
Special stitches:
- Cl (3-dc cluster): *Yarn over, insert hook in the indicated sp, pull up a loop, yarn over, pull through 2 loops. Repeat from * 2 more times in the same sp, then yarn over and pull through all 4 loops on the hook.
- Fan: (Cl, ch 3, cl, ch 3, cl) in the same sp. Each fan has 3 clusters and 2 ch-3 sps.
- Pc (5-dc popcorn): Work 5 dc in the same st and drop the loop. Insert the hook front to back in the first dc, pick up the dropped loop, and pull it through.
- P (picot): Ch 3, sl st in 3rd ch from hook.
- Rev sc (reverse single crochet): Single crochet worked left to right (for right-handers), making a corded edge.
Gauge and Checkpoints
Gauge: 16 sc and 18 rnds = 4 in (10.2 cm), worked in the round with the 4.5 mm hook.
Make the base band first as your test piece. It is quick, and it tells you how the whole holder will fit.
- Checkpoint 1 (after Rnd 4): The band is 6 in (15.2 cm) wide flat and about 0.9 in (2.3 cm) tall.
- Checkpoint 2 (after Rnd 5): The tube is 8 in (20.3 cm) wide flat and about 1.1 in (2.8 cm) tall.
- Checkpoint 3 (after Rnd 13): The lace (Rnds 6–13) is about 5 in (12.7 cm) tall when gently stretched.
- Checkpoint 4 (after Rnd 22): The body is 11.5 in (29.2 cm) tall and about 8 in (20.3 cm) wide flat through the lace.
If the band is wider than 6 in (15.2 cm), restart with a hook one size smaller. If it is narrower, go up one size. If your lace comes out short, add one more mesh-and-fan pair before Rnd 22. This does not change any stitch counts.
Body
Work in joined rounds with the right side facing. Do not turn.
Base Band
Foundation: With cranberry, ch 48. Join with a sl st to the first ch, without twisting the chain.
Rnd 1: Ch 1, sc in each ch around, sl st to first sc. (48 sc)
Rnds 2–4: Ch 1, sc in each st around, sl st to first sc. (48 sc per rnd)
Rnd 5 (increase round): Ch 1, *sc in next 2 sts, 2 sc in next st; repeat from * 15 more times, sl st to first sc. (48 sts worked once + 16 added sts = 64 sc)
Flower-Fan Lace
The lace alternates mesh rounds with fan rounds. Fan Rounds A and B put the fans in alternating loops, so each row of flowers sits between the flowers of the row below.
Rnd 6 (first mesh round): Ch 1, sc in first st, *ch 5, skip next 3 sts, sc in next st; repeat from * 14 more times, ch 5, skip last 3 sts, sl st to first sc. (16 sc, 16 ch-5 loops)
Rnd 7 (Fan Round A): Sl st in first 3 ch of first loop. Ch 1, sc in same loop, *ch 2, fan in next loop, ch 2, sc in next loop; repeat from * 6 more times, ch 2, fan in last loop, ch 2, sl st to first sc. (8 sc, 8 fans = 24 cl, 16 ch-2 sps, 16 ch-3 sps)
Rnd 8 (mesh round): Ch 1, sc in first sc, *ch 5, sc in top of center cl of next fan, ch 5, sc in next sc; repeat from * 6 more times, ch 5, sc in top of center cl of last fan, ch 5, sl st to first sc. (16 sc, 16 ch-5 loops)
Rnd 9 (Fan Round B): Sl st in each of the 5 ch of the first loop and in the next sc, then sl st in the first 3 ch of the second loop. Ch 1, sc in same loop, *ch 2, fan in next loop, ch 2, sc in next loop; repeat from * 6 more times, ch 2, fan in the first loop of the round, ch 2, sl st to first sc. (8 sc, 8 fans = 24 cl, 16 ch-2 sps, 16 ch-3 sps)
Rnd 10: Work as Rnd 8. (16 sc, 16 ch-5 loops)
Rnds 11–21: Repeat Rnds 7–10 twice, then Rnds 7–9 once. That gives 8 fan rounds in total: Round A on Rnds 7, 11, 15, and 19, and Round B on Rnds 9, 13, 17, and 21.
Rnd 22 (narrowing mesh round): Ch 1, sc in first sc, *ch 3, sc in top of center cl of next fan, ch 3, sc in next sc; repeat from * 6 more times, ch 3, sc in top of center cl of last fan, ch 3, sl st to first sc. (16 sc, 16 ch-3 loops)
The shorter loops pull the top in toward 6 in (15.2 cm) flat, which forms the rounded vase shoulder. Do not fasten off. Go straight on to the Top Border.
Hanging Ring
Ring cover: Join cranberry with a sl st around the 3 in (7.6 cm) ring. Ch 1 and sc over the ring, packing the stitches tightly until no ring shows (about 56 sc). Sl st to first sc. Do not fasten off.
Tab, Row 1: Ch 1, sc in same st and next 5 sts. (6 sc)
Rows 2–8: Ch 1, turn, sc in each st across. (6 sc)
Fasten off, leaving a 12 in (30.5 cm) tail. The tab is 1.5 in (3.8 cm) wide and about 1.8 in (4.6 cm) long.
Teapot Appliqué
With cream, work in rows. Turn with ch 1 (does not count as a st).
Foundation: Ch 9.
Row 1: Sc in 2nd ch from hook and in each ch across. (8 sc)
Row 2: 2 sc in first st, sc in next 6 sts, 2 sc in last st. (10 sc)
Row 3: 2 sc in first st, sc in next 8 sts, 2 sc in last st. (12 sc)
Row 4: 2 sc in first st, sc in next 10 sts, 2 sc in last st. (14 sc)
Rows 5–9: Sc in each st across. (14 sc)
Row 10: Sc2tog, sc in next 10 sts, sc2tog. (12 sts)
Row 11: Sc2tog, sc in next 8 sts, sc2tog. (10 sts)
Row 12: Sc in each st across. (10 sc)
Row 13 (lid): Sl st in first 2 sts, sc in next 6 sts, sl st in last 2 sts. (2 sl st + 6 sc + 2 sl st)
Row 14: Turn, skip the sl sts, and sc2tog 3 times across the 6 sc. (3 sts)
Row 15 (knob): Sl st in first st, pc in next st, sl st in last st. Fasten off.
Spout: Hold the teapot with Row 1 at the bottom. Join cream at the left edge, at the end of Row 4.
- Row 1: Ch 1, work 4 sc evenly across the ends of Rows 4–7. (4 sc)
- Row 2: Sc2tog, sc in next 2 sts. (3 sts)
- Row 3: Sc in first st, sc2tog. (2 sts)
- Row 4: (Sc, hdc) in first st, (hdc, sc) in last st. (4 sts) Fasten off.
Handle: Join cream at the right edge, at the end of Row 9. Ch 10 and sl st into the end of Row 4 on the same side. Turn, work 14 sc into the ch-10 loop, and sl st into the end of Row 9. Fasten off. Leave the center of the handle open.
Lid line: With cream, work surface sl sts across Row 12 to mark the lid rim.
The teapot is about 5 in (12.7 cm) wide including spout and handle, and 3.5 in (8.9 cm) tall including the knob.
Holly Leaves (Make 2)
With green, ch 11.
Side 1: Working in the back bumps: sc in 2nd ch from hook, hdc in next ch, (dc, p) in next ch, dc in next ch, (dc, p) in next ch, dc in next ch, (dc, p) in next ch, hdc in next ch, sc in next ch. (9 sts, 3 picots)
Tip: (Sc, p, sc) in the last ch.
Side 2: Turn the piece and work along the other side of the chain: sc in next ch, hdc in next ch, (dc, p) in next ch, dc in next ch, (dc, p) in next ch, dc in next ch, (dc, p) in next ch, hdc in next ch, sc in next ch. (9 sts, 3 picots) Sl st to first sc and fasten off.
Each leaf has 7 points and is about 2.75 in (7.0 cm) long and 1.25 in (3.2 cm) wide.
Berries (Make 3)
With bright red, work in continuous rounds.
Rnd 1: 6 sc in a magic ring. (6 sc)
Rnd 2: 2 sc in each st around. (12 sc)
Rnd 3: Sc in each st around. (12 sc)
Rnd 4: Sc2tog 6 times. (6 sts)
Stuff lightly, close the hole, and fasten off with a long tail. Each berry is about 0.75 in (1.9 cm) across.
Border
The borders use the body gauge of 4 sc per inch. That means 48 sc is 12 in (30.5 cm) around, or 6 in (15.2 cm) flat with 24 sts on each flattened side.
Top Border
Rnd 23 (conversion round): Ch 1, 3 sc in each ch-3 loop around, sl st to first sc. (16 loops × 3 sc = 48 sc; 24 per side)
Rnds 24–25: Ch 1, sc in each st around, sl st to first sc. (48 sc; 24 per side)
Rnd 26: Ch 1, rev sc in each st around, sl st to first st. (48 sts; 24 per side) Fasten off.
Bottom Border
Rnd 1: With the bottom edge facing you, join cranberry in a free loop of the foundation chain. Ch 1, sc in each free loop around, sl st to first sc. (48 sc; 24 per side)
Rnd 2: Ch 1, rev sc in each st around, sl st to first st. (48 sts; 24 per side) Fasten off.
Why the math works: Both openings have 48 sts, the same as the base band. At the top, 16 loops × 3 sc makes exactly 48, so the shoulder draws in evenly. At the bottom, the foundation chain already has 48 free loops. At 4 sts per inch, 24 sts per side is 6 in (15.2 cm), so the two bands match.
Assembly
- Flatten the body so the fans are centered on the front and back.
- Tuck the last 0.75 in (1.9 cm) of the tab inside the top border at center back. Whipstitch its end and sides to Rnds 23–25.
- Pin the teapot centered on the front, with its base about 3 in (7.6 cm) above the bottom edge.
- Lay the leaves in a V across the teapot’s lower edge, just right of center, with the tips pointing up and out.
- Group the berries where the leaves meet.
- Slide cardboard inside the tube so you sew through the front layer only. Then sew each piece down with matching yarn.
Final Blocking
- Weave in all ends.
- Mist the body and appliqués lightly, or soak them and gently squeeze out the water.
- Fill the body with a rolled towel so it holds an 8 in (20.3 cm) flat width.
- Gently ease each fan open so the mesh loops are even.
- Shape both bands to 6 in (15.2 cm) wide flat.
- Pin the leaf points flat and smooth the teapot outline.
- Let everything dry completely.
Final Quality-Control Checklist
- Body is 8 in (20.3 cm) wide flat and 12.8 in (32.5 cm) tall.
- Both bands are 6 in (15.2 cm) wide flat, with 48 sts each.
- Every fan round has 8 fans and 24 clusters.
- Fan rows alternate position from round to round.
- The tab is centered on the back and firmly sewn.
- The ring is fully covered.
- The appliqués are on the front layer only, and all ends are secure.
Troubleshooting
Fans stack straight up. You probably started Rnd 9 in the first loop. Rework it, slipping over to the second loop before the first sc.
Top flares out. The Rnd 22 loops are too loose. Rework with firmer tension, or use ch 2 instead of ch 3.
Bags fall out of the bottom. Rework the bottom border with a hook one size smaller.
Gaps in the ring cover. Add sc and push them together.
Teapot curls. Block it flat under a damp cloth before sewing it on.
Care
Hand wash in cool water. Reshape over a rolled towel and lay flat to dry, without wringing.
Final Notes
Here is the measurement chain:
- A 48-st base band is 6 in (15.2 cm) flat.
- Rnd 5 grows it to 64 sts and 8 in (20.3 cm).
- Sixteen lace rounds add about 10 in (25.4 cm).
- The ch-3 round draws the top back in.
- Two 48-st borders finish both openings at 6 in (15.2 cm).
If every checkpoint matches, your holder will finish at 8 in (20.3 cm) by 12.8 in (32.5 cm), ready to hang and fill.
Happy crocheting!