

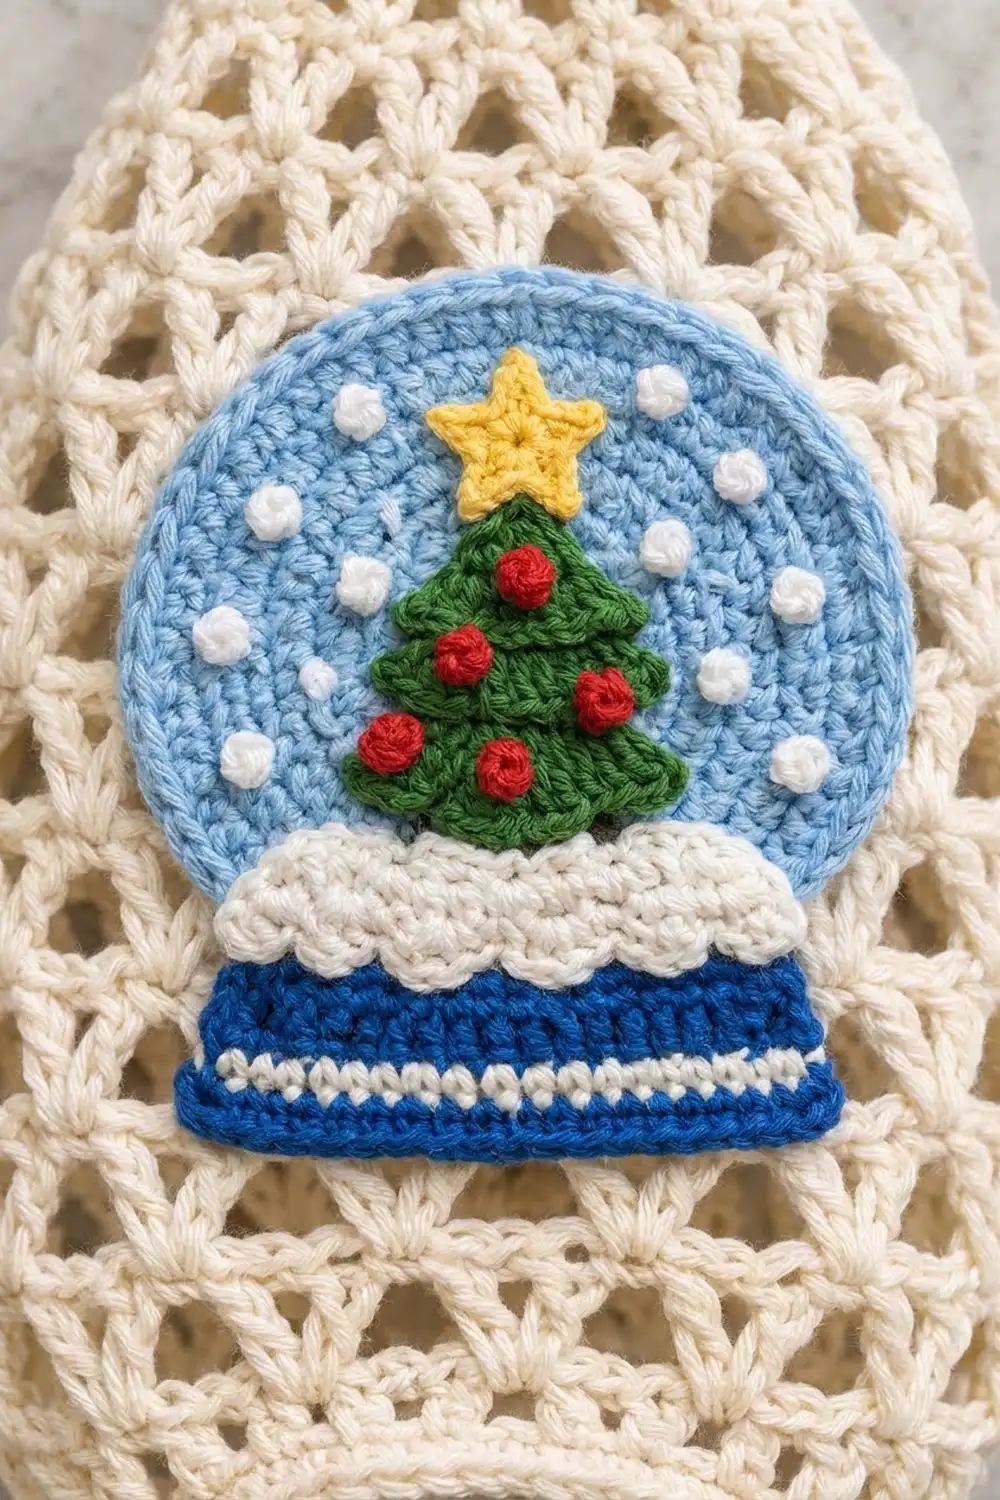
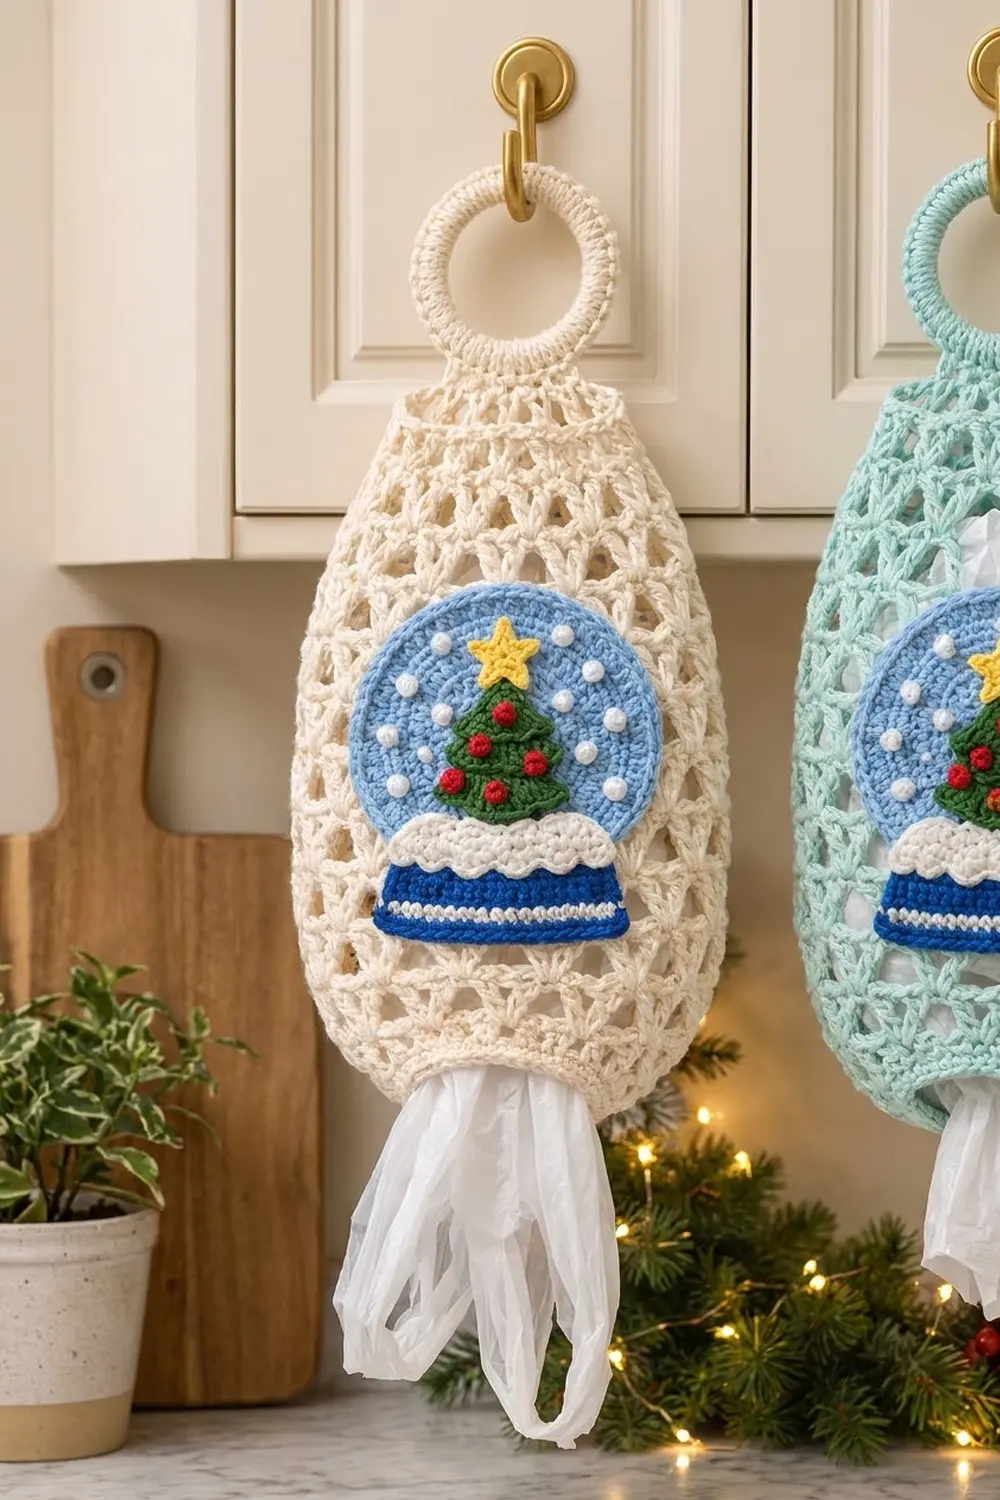
This holder keeps plastic grocery bags in one place: you push bags in at the top and pull them out one at a time through the bottom. The body is an airy cream lattice of fans and clusters. On the front sits a layered snow globe with a blue dome, white snow dots, a green tree with red ornaments, a yellow star, a white snow drift and a royal-blue base.
The cream body suits a neutral kitchen, and the snow globe adds holiday color. For a softer look, make the body in mint and keep the appliqué colors the same.
The pattern uses US crochet terms. Laid flat, the holder measures 9 in (22.9 cm) wide and 18 in (45.7 cm) long including the ring. The bottom opening is 5.5 in (14.0 cm) across.
You work the body in the round from the bottom up. First you make a solid sc band, then 16 rounds of lattice, then decrease into a neck and close the top onto a covered ring. Next you add a two-round rim to the bottom opening. Last, you crochet the five small appliqué pieces and stack them onto the front.
Finished Size and Construction
- Finished size: 9 in (22.9 cm) wide × 18 in (45.7 cm) long, measured flat
- Skill level: Intermediate
- Terminology: US
- Yarn weight: Worsted (#4) cotton or cotton blend
- Hooks: 5.0 mm (H-8) for the body; 3.5 mm (E-4) for the appliqué
- Number of pieces: 1 body (with the ring) plus 5 small appliqué pieces sewn on
- Layout: Single item. The appliqué is centered on the front.
- Body height before border: 14.25 in (36.2 cm), not counting the ring
- Border depth: 0.25 in (0.6 cm) at the bottom opening
- Snow globe appliqué, assembled: about 5.75 in (14.6 cm) wide × 6.5 in (16.5 cm) tall
Materials
Cotton is the best choice here. It holds its shape under the weight of the bags, it doesn’t pill, and it washes well. Pick a smooth, plied yarn so the fans and clusters show clearly.
- Cream (body): 130 g / 210 m
- Light blue (globe): 15 g / 24 m
- Royal blue (base): 8 g / 13 m
- Green (tree): 8 g / 13 m
- White (snow drift, snow dots, base stripe): 6 g / 10 m
- Red (ornaments): 2 g / 3 m
- Yellow (star): 2 g / 3 m
These quantities include a margin of about 15%.
Tools:
– 5.0 mm (H-8) and 3.5 mm (E-4) crochet hooks
– One 3 in (7.6 cm) metal or plastic ring (a macramé ring works well)
– Tapestry needle
– Stitch markers
– Rust-proof pins
– Measuring tape
Abbreviations (US Terms)
- ch – chain
- sl st – slip stitch
- sc – single crochet
- sc2tog – single crochet 2 together
- dc – double crochet
- rev sc – reverse single crochet (crab stitch)
- MR – magic ring
- sp – space
- st(s) – stitch(es)
Special stitches
- Fan: (dc, ch 1, dc, ch 1, dc) all in the same st. This makes three legs that spread upward.
- Cl (3-leg cluster): *yarn over, insert hook in the given place, yarn over, pull up a loop, yarn over, pull through 2 loops*. Work this once in each of the three given places, then yarn over and pull through all 4 loops on the hook. The three legs meet in one point.
- French knot: bring the needle up, wrap the yarn around the needle 3 times, then insert the needle next to where it came up and pull it through.
Gauge and Checkpoints
Body gauge (5.0 mm hook): 16 sc and 20 rounds = 4 in (10.2 cm).
Lattice gauge: one fan round plus one cluster round = 1.5 in (3.8 cm) tall.
Appliqué gauge (3.5 mm hook): 18 sc and 20 rows = 4 in (10.2 cm).
Before you start the body, crochet the light-blue globe. It’s small, so it’s a quick way to check your tension. It should measure 5.5 in (14.0 cm) across.
Checkpoints (measure flat):
– After Rnd 4: 6 in (15.2 cm) wide, 1 in (2.5 cm) tall
– After Rnd 8: about 7.5 in (19.1 cm) wide, 4 in (10.2 cm) tall
– After Rnd 16: 9 in (22.9 cm) wide, 10 in (25.4 cm) tall
– After Rnd 20: about 8 in (20.3 cm) wide, 13 in (33.0 cm) tall
– After Rnd 26: 14.25 in (36.2 cm) tall
If your piece is too big, go down half a hook size. In the lattice, also check that your chains aren’t loose. If it’s too small, go up half a hook size. Gauge in the sc band matters most, because every later round builds on its 48 stitches.
Body
With the 5.0 mm hook and cream yarn:
Foundation: Ch 44 and join with a sl st to the first ch to form a ring. Don’t twist the chain.
Rnd 1: Ch 1, sc in each ch around, then join with a sl st to the first sc. (44 sc)
Rnds 2–3: Ch 1, sc in each st around, join. (44 sc)
Rnd 4: Ch 1, *sc in next 10 sts, 2 sc in next st*; repeat 4 times, join. (48 sc)
Checkpoint: 6 in (15.2 cm) wide flat. 48 sc gives 12 fan repeats of 4 sts each.
Lattice, lower section (Rnds 5–8)
Rnd 5 (fan round): Ch 4 (counts as dc + ch 1). Work (dc, ch 1, dc) in the same st to finish the first Fan. *Ch 2, skip 3 sc, Fan in next sc*; repeat 10 more times. Ch 2, then join to the 3rd ch of the starting ch-4. (12 Fans, 12 ch-2 sps)
Rnd 6 (cluster round): Sl st in the first ch-1 sp, then sl st in the center dc of the Fan. Ch 1, sc in the same dc. *Ch 3, then work a Cl with one leg in each of these places: the next ch-1 sp of the current Fan, the ch-2 sp, and the first ch-1 sp of the next Fan. Ch 3, then sc in the center dc of the next Fan*. Repeat 12 times in total. On the last repeat, leave out the final sc and join to the first sc instead. (12 sc, 12 Cl, 24 ch-3 sps)
Rnd 7 (fan round): Sl st in each of the next 3 ch and in the top of the Cl. Ch 4, then (dc, ch 1, dc) in the same Cl. *Ch 2, skip (ch-3, sc, ch-3), then Fan in the next Cl*; repeat 10 more times. Ch 2, join. (12 Fans, 12 ch-2 sps)
Each Fan now sits on a cluster, which puts it halfway between the Fans of Rnd 5. This offset makes the triangle lattice.
Rnd 8: Repeat Rnd 6. (12 sc, 12 Cl, 24 ch-3 sps)
Checkpoint: about 7.5 in (19.1 cm) wide and 4 in (10.2 cm) tall.
Lattice, wide section (Rnds 9–16)
The body widens because the chains get longer, not because you add repeats.
Rnds 9, 11, 13, 15: Work as Rnd 7, but ch 3 between Fans. (12 Fans, 12 ch-3 sps)
Rnds 10, 12, 14, 16: Work as Rnd 6, but ch 4 on each side of every Cl. In the next fan round, sl st across 4 ch before reaching the Cl. (12 sc, 12 Cl, 24 ch-4 sps)
Checkpoint: 9 in (22.9 cm) wide and 10 in (25.4 cm) tall.
Lattice, upper section (Rnds 17–20)
Rnds 17, 19: Work as Rnd 7 (ch 2 between Fans). (12 Fans, 12 ch-2 sps)
Rnds 18, 20: Work as Rnd 6 (ch 3 on each side of every Cl). (12 sc, 12 Cl, 24 ch-3 sps)
Checkpoint: about 8 in (20.3 cm) wide and 13 in (33.0 cm) tall.
Top and neck (Rnds 21–26)
Rnd 21 (conversion round): Ch 1, then starting in the joining sc: *sc in the sc, sc in the ch-3 sp, sc in the Cl, sc in the ch-3 sp*; repeat 12 times, join. This gives 24 sts worked one into each sc and Cl, plus 24 sts added in the ch-sps. (48 sc)
Rnd 22: Ch 1, *sc in next 2 sts, sc2tog*; repeat 12 times, join. (36 sc)
Rnd 23: Ch 1, *sc in next st, sc2tog*; repeat 12 times, join. (24 sc)
Rnds 24–25: Ch 1, sc in each st around, join. (24 sc)
The neck is now 3 in (7.6 cm) wide flat. Don’t fasten off.
Covered ring
With a separate length of cream yarn, attach the yarn to the 3 in (7.6 cm) ring. Work 60 sc tightly around the ring, pushing the stitches together so the ring doesn’t show, then join and fasten off. The covered ring measures 3.5 in (8.9 cm) across.
Rnd 26 (closing row): Flatten the neck so the round join sits at one side fold. Place the covered ring centered above the neck. Working through both layers of the neck and under the back loops of 12 sc along the bottom of the ring, work 12 sc. (12 sc) Fasten off and weave in the end.
Checkpoint: the body measures 14.25 in (36.2 cm) from the foundation chain to the closing row.
Border (Bottom Opening Rim)
Border gauge: 2 rounds = 0.25 in (0.6 cm), with 16 sts = 4 in (10.2 cm) around the opening.
With the 5.0 mm hook, join cream yarn in the free loop of the foundation chain at one fold of the opening.
Rnd 1: Ch 1, then sc in each free loop of the foundation chain, join. When flat, this is 22 sc along the front edge and 22 sc along the back edge. There are no corners on an oval opening, so nothing is counted twice. (44 sc)
Rnd 2: Ch 1, then rev sc in each st around, join. (44 rev sc; 22 per side)
Why the math works: The foundation has 44 chains, and the border works exactly one stitch into each of them. The rim therefore keeps the same 11 in (27.9 cm) circumference as the sc band above it, which is 5.5 in (14.0 cm) flat. If you added stitches, the rim would flare open and bags would fall out. If you skipped stitches, the rim would pucker and pulling bags out would be harder. The rev sc round rolls the edge into the firm rim you can see in the finished piece. Fasten off and weave in.
Snow Globe Appliqué
Use the 3.5 mm hook for every appliqué piece. Leave a 12 in (30.5 cm) tail on each piece for sewing.
Globe (light blue)
Rnd 1: In a MR, ch 3 (counts as dc), then work 11 dc. Join. (12 dc)
Rnd 2: Ch 3, dc in the same st, then 2 dc in each st around, join. (24 dc)
Rnd 3: Ch 3, 2 dc in next st, *dc in next st, 2 dc in next st* around, join. (36 dc)
Rnd 4: Ch 3, dc in next st, 2 dc in next st, *dc in next 2 sts, 2 dc in next st* around, join. (48 dc)
Rnd 5: Ch 3, dc in next 2 sts, 2 dc in next st, *dc in next 3 sts, 2 dc in next st* around, join. (60 dc)
Rnd 6 (trim round): Ch 1, sc in each st around, join. This is 60 sc worked one into each st, with 0 added. (60 sc)
The globe should be 5.5 in (14.0 cm) across. With white yarn, scatter 14 French knots over the upper two-thirds of the circle.
Base (royal blue with white stripe)
Row 1: Ch 27. Sc in the 2nd ch from the hook and in each ch across, turn. (26 sc)
Row 2: Ch 1, sc across, turn. (26 sc)
Row 3: Change to white. Ch 1, sc across, turn. (26 sc)
Row 4: Change to royal blue. Ch 1, sc2tog, sc in next 22 sts, sc2tog, turn. (24 sc)
Row 5: Ch 1, sc across, turn. (24 sc)
Row 6: Ch 1, sc2tog, sc in next 20 sts, sc2tog, turn. (22 sc)
Row 7: Ch 1, sc across. (22 sc) Don’t turn.
Edging: Sc evenly around the whole piece, working 3 sc in each corner. Join and fasten off.
The base is a trapezoid 5.75 in (14.6 cm) wide at the bottom, 5 in (12.7 cm) wide at the top, and 1.5 in (3.8 cm) tall.
Snow drift (white)
Row 1: Ch 22. Sc in the 2nd ch from the hook and in each ch across, turn. (21 sc)
Row 2: Sl st in the first st. *Skip 1 st, 5 dc in next st, skip 1 st, sl st in next st*; repeat 5 times. (1 sl st + 5 scallops of 4 sts = 21 sts)
The drift is 4.75 in (12.1 cm) wide and 0.75 in (1.9 cm) tall, with five rounded bumps along the top.
Tree (green)
Row 1: Ch 2, then 3 sc in the 2nd ch from the hook, turn. (3 sc)
Row 2: Ch 1, 2 sc in first st, sc in next st, 2 sc in last st, turn. (5 sc)
Row 3: Ch 1, 2 sc in first st, sc in next 3 sts, 2 sc in last st, turn. (7 sc)
Row 4 (tier step): Ch 1, sc2tog, sc in next 3 sts, sc2tog, turn. (5 sc)
Row 5: Ch 1, 2 sc in first st, sc in next 3 sts, 2 sc in last st, turn. (7 sc)
Row 6: Ch 1, 2 sc in first st, sc in next 5 sts, 2 sc in last st, turn. (9 sc)
Row 7 (tier step): Ch 1, sc2tog, sc in next 5 sts, sc2tog, turn. (7 sc)
Row 8: Ch 1, 2 sc in first st, sc in next 5 sts, 2 sc in last st, turn. (9 sc)
Row 9: Ch 1, 2 sc in first st, sc in next 7 sts, 2 sc in last st, turn. (11 sc)
Row 10: Ch 1, 2 sc in first st, sc in next 9 sts, 2 sc in last st. (13 sc)
Edging: Sc evenly around the whole tree, working 3 sc at the top point and at both bottom corners. Fasten off.
The tier steps in Rows 4 and 7 pull the edges in, which makes the three-tier shape. The tree is 3 in (7.6 cm) wide and 2.5 in (6.4 cm) tall. With red yarn, add 7 French knots as ornaments.
Star (yellow)
Rnd 1: Work 5 sc in a MR, then join. (5 sc)
Rnd 2: *Ch 3, sl st in the 2nd ch from the hook, sc in the next ch, sl st in the next sc of Rnd 1*; repeat 5 times. (5 points)
The star is 1 in (2.5 cm) across.
Stacking and sewing
- Lay the body flat with the round join at one side. Center the globe on the front so its top edge sits 3 in (7.6 cm) below the closing row.
- Lay the base under the globe so the base’s top edge covers the lower 0.5 in (1.3 cm) of the globe.
- Place the drift across the seam between globe and base, so the scallops sit on the globe.
- Tuck the tree behind the drift so its lowest 0.5 in (1.3 cm) is hidden. Sew the star to the tip of the tree.
- Sew the layers to each other first. Then whipstitch the whole unit to the front layer of the body, catching the lattice stitches all around the outer edge. Make sure you sew through the front layer only.
Final Blocking
- Wet the finished holder in cool water and gently press the water out.
- Lay it flat on a blocking mat with the appliqué facing up.
- Pin the body to 9 in (22.9 cm) wide at the widest point and 14.5 in (36.8 cm) long from the bottom rim to the closing row.
- Ease each Fan open so the triangles are even.
- Shape the globe into a true circle, and push the scallops of the drift into rounded bumps.
- Leave it to dry completely before you unpin it.
Final Quality-Control Checklist
- 44 sts at the bottom opening, with 22 on each side when flat
- 12 Fans and 12 clusters in every lattice round
- Rnd 21 has 48 sc and the neck has 24 sc
- The ring is fully covered with 60 sc and centered over the 12 closing sc
- The body is 9 in (22.9 cm) wide and the total length is 18 in (45.7 cm)
- The appliqué is centered, sewn through the front layer only, and has no loose tails
Troubleshooting
- The lattice is twisting around the body: you’ve moved the start of the round. Make sure every round starts by sl st-ing over to the same point.
- The triangles look uneven: your cluster legs are too long. Pull each leg up to the same height.
- Bags slide out on their own: the opening is too loose. Rework the border with a smaller hook.
- The globe is cupping: your tension is too tight. Go up half a hook size for Rnds 4–6.
- The globe has ruffles: your tension is too loose. Go down half a hook size.
- The ring shows through the stitches: add 2–4 more sc and push them together.
Care
Hand wash in cool water, reshape, and dry flat. Don’t tumble dry, because the appliqué layers can distort.
Final Notes
Here is the measurement chain from start to finish. The 44-st foundation gives an opening 5.5 in (14.0 cm) wide, and the increase to 48 sts sets up 12 lattice repeats. Longer chains widen the body to 9 in (22.9 cm). Rnd 21 brings it back to 48 sts and the neck to 24 sts. The closing row of 12 sts joins the neck to a 3.5 in (8.9 cm) ring, for a total length of 18 in (45.7 cm). Check each stage as you go and the snow globe will sit neatly on a well-shaped holder.
Happy crocheting!