

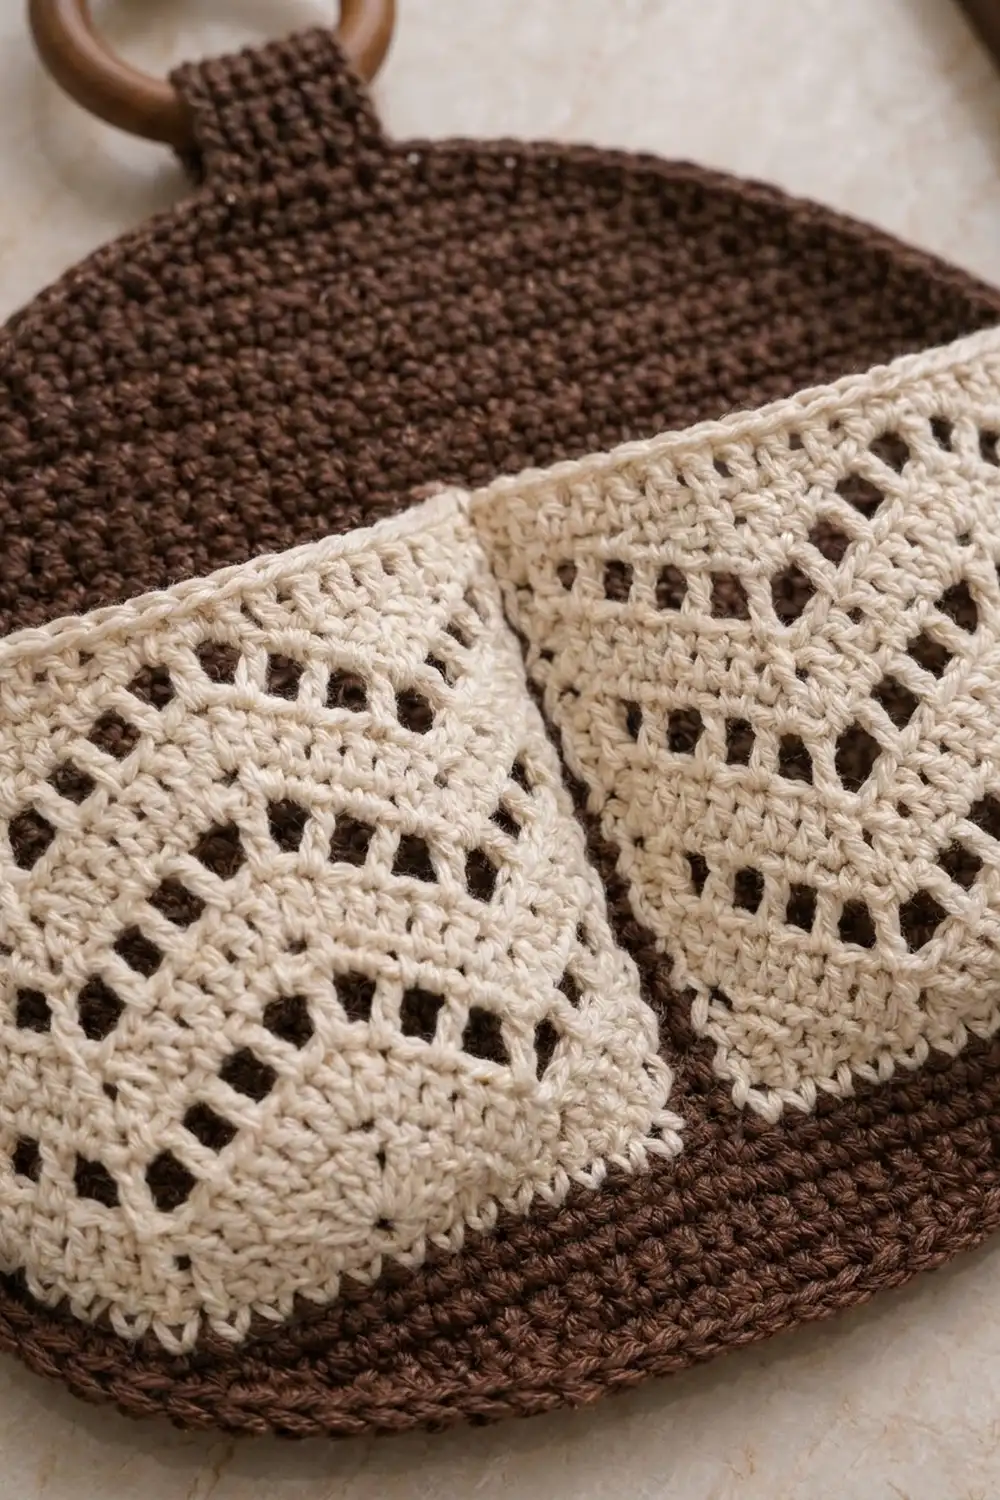
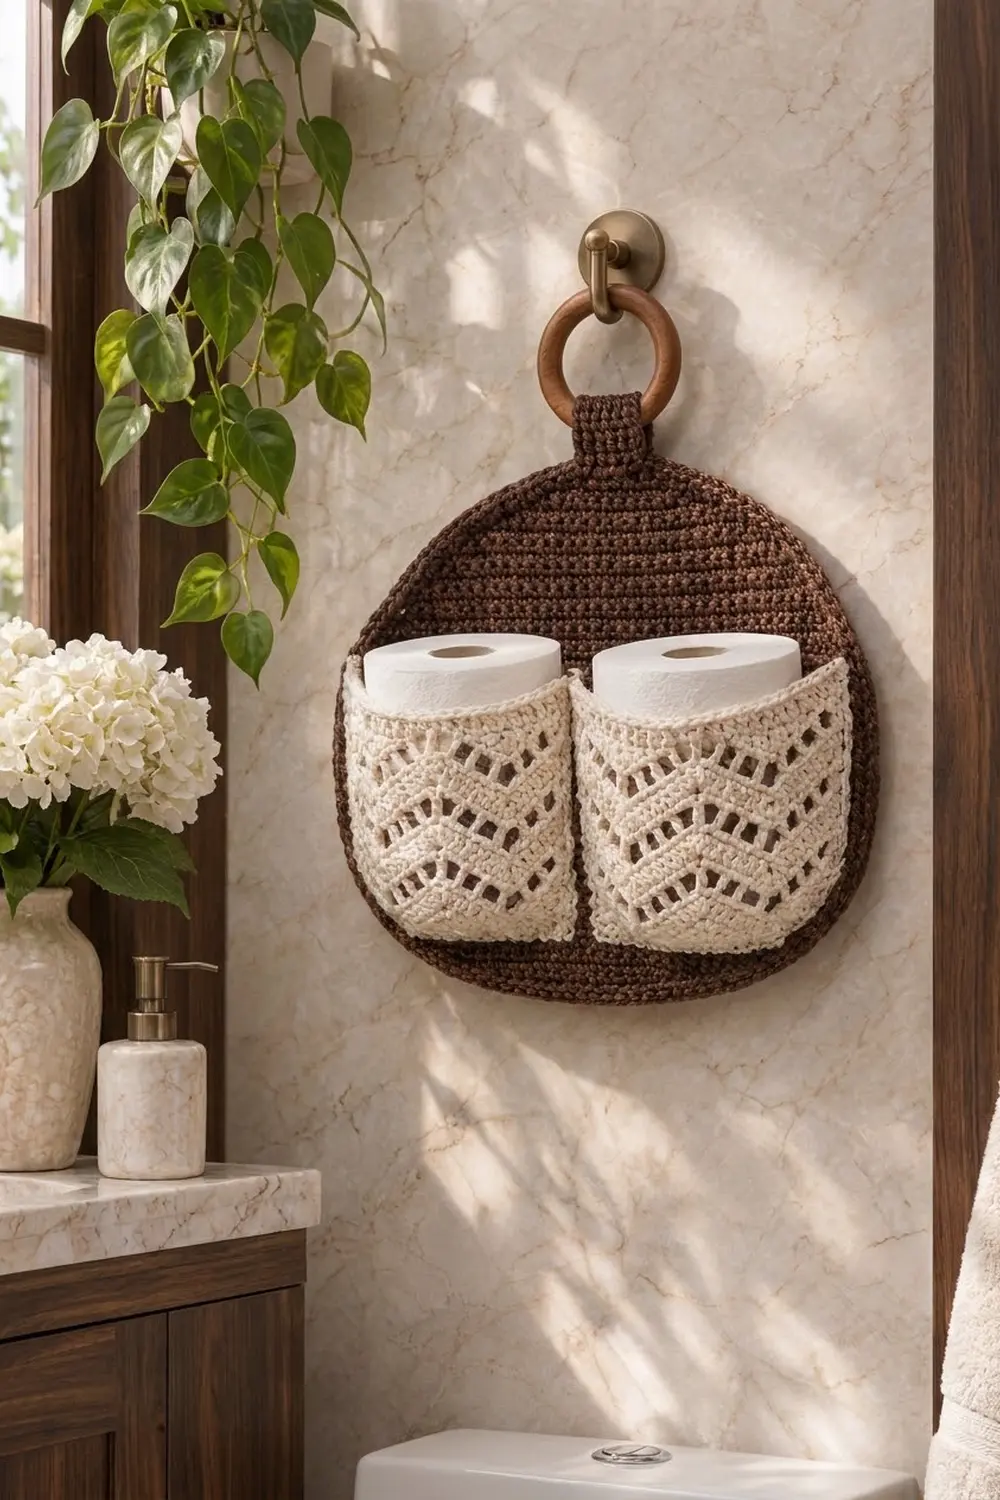
This hanging toilet paper holder pairs a dense chocolate-brown backing with a lacy cream chevron pocket. The backing is a rounded panel with a gently flattened bottom and a raised rope-like edge. A short brown tab at the top loops through a wooden ring. The cream pocket is sewn to the lower half and divided down the center, so it holds two standard rolls side by side.
The colors are warm and calm: deep mocha brown with natural cream cotton. They suit stone, wood or neutral bathrooms. In the pocket, solid zigzag rows alternate with eyelet zigzag rows, so the pocket looks light while the backing stays sturdy.
This pattern uses US crochet terms. The finished backing measures 12 in wide x 13 in tall (30.5 cm x 33.0 cm), plus the tab and ring. Before it is sewn on, the pocket panel measures 12 in x 6 in (30.5 cm x 15.2 cm).
To make it:
1. Crochet the backing flat in single crochet rows, shaping it with increases and decreases.
2. Crochet the pocket panel flat in chevron lace with straight edges.
3. Sew the pocket on with small tucks that make room for the rolls.
4. Add a two-round rope border to the backing.
5. Sew on the tab through the ring.
Finished Size and Construction
- Finished size: 12 in x 13 in (30.5 cm x 33.0 cm). About 15 in (38.1 cm) tall including the tab and ring.
- Skill level: Intermediate (chevron shaping and sewing)
- Terminology: US crochet terms
- Yarn weight: Worsted (#4) cotton
- Hook: 4.0 mm (G-6)
- Number of pieces: 3 (backing, pocket panel, tab)
- Layout: Pocket panel centered on the lower half of the backing and divided into 2 pockets. Tab centered at the top.
- Backing before border: 11 in x 12 in (27.9 cm x 30.5 cm)
- Border depth: 0.5 in (1.3 cm) on every side
- Pocket panel: 12 in x 6 in (30.5 cm x 15.2 cm)
- Tab: 2 in x 6 in (5.1 cm x 15.2 cm) before folding
Materials
Choose a smooth, firmly plied worsted cotton or cotton blend. Cotton holds its shape under the weight of two rolls and copes well with bathroom humidity. Avoid splitty or very soft yarns: they blur the chevron edges and let the backing sag.
- Color A, Chocolate Brown: 100 g, approx. 170 m (backing, border, tab)
- Color B, Cream: 50 g, approx. 85 m (pocket panel and sewing)
These amounts include a margin of about 20% for a gauge swatch and sewing tails.
Tools:
- 4.0 mm (G-6) crochet hook
- Wooden ring, 2.5 in (6.4 cm) outer diameter
- Tapestry needle
- Locking stitch markers (at least 10)
- Pins, measuring tape, scissors and a blocking mat
Abbreviations (US Terms)
- ch: chain
- sk: skip
- st(s): stitch(es)
- sc: single crochet
- hdc: half double crochet
- dc: double crochet
- tr: treble crochet
- sc2tog: single crochet 2 together
- dc2tog: double crochet 2 together
- dc3tog: double crochet 3 together
- rev sc: reverse single crochet
- RS / WS: right side / wrong side
Reverse single crochet (rev sc): This stitch makes the twisted, rope-like edge. Work from left to right (if you are right-handed). Insert the hook into the next st to the right, yarn over and pull up a loop. Yarn over again and pull through both loops.
Pocket counting rule: Every ch-1 counts as 1 st. In the next row, work into each ch-1 space as if it were a st.
Gauge and Checkpoints
Backing gauge: 16 sc and 18 rows = 4 in (10.2 cm).
Pocket gauge: One 12-st chevron repeat = 3 in (7.6 cm) wide. 8 pattern rows = 4 in (10.2 cm) tall.
Test the backing first. Crochet its first 7 rows and measure: Row 7 should be 11 in (27.9 cm) wide. If it is wider, go down half a hook size. If it is narrower, go up half a size.
Checkpoints:
- Backing Row 7: 44 sts, 11 in (27.9 cm) wide, about 1.6 in (4.1 cm) tall
- Backing Row 30: about 6.7 in (17.0 cm) tall
- Backing Row 54: 12 in (30.5 cm) tall, with a top edge 3 in (7.6 cm) wide
- Pocket Row 2: 49 sts, 12 in (30.5 cm) wide
- Finished pocket panel: 12 in x 6 in (30.5 cm x 15.2 cm)
- Backing after border: 12 in x 13 in (30.5 cm x 33.0 cm)
If the pocket panel is too wide, it will bunch when you sew it on, so go down a hook size. If it is too narrow, the rolls won’t fit, so go up a hook size.
Backing (Color A)
Work flat in rows from the bottom up. The ch 1 at the start of each row does not count as a st. Turn at the end of every row.
Row 1 (RS): Ch 33. Sc in 2nd ch from hook and in each ch across. (32 sts)
Row 2: Ch 1, 2 sc in first st, sc in each st across to last st, 2 sc in last st. (34 sts)
Rows 3–7: Repeat Row 2.
– Row 3: 36 sts
– Row 4: 38 sts
– Row 5: 40 sts
– Row 6: 42 sts
– Row 7: 44 sts
These increase rows round off the bottom corners and leave a flat base 8 in (20.3 cm) wide.
Rows 8–30: Ch 1, sc in each st across. (44 sts per row, 23 rows)
Two row types shape the top:
- Dec row: Ch 1, sc2tog, sc in each st across to last 2 sts, sc2tog. (2 sts fewer than the previous row)
- Even row: Ch 1, sc in each st across. (Same count as the previous row)
The top is shaped like a dome. Decreases start slowly, then come on every row.
- Row 31: Dec row. (42 sts)
- Rows 32–34: Even rows. (42 sts)
- Row 35: Dec row. (40 sts)
- Rows 36–37: Even rows. (40 sts)
- Row 38: Dec row. (38 sts)
- Row 39: Even row. (38 sts)
- Row 40: Dec row. (36 sts)
- Row 41: Even row. (36 sts)
- Row 42: Dec row. (34 sts)
- Row 43: Even row. (34 sts)
- Rows 44–54: Work a dec row on every row.
- Row 44: 32 sts
- Row 45: 30 sts
- Row 46: 28 sts
- Row 47: 26 sts
- Row 48: 24 sts
- Row 49: 22 sts
- Row 50: 20 sts
- Row 51: 18 sts
- Row 52: 16 sts
- Row 53: 14 sts
- Row 54: 12 sts
Do not fasten off. Put the live loop on a locking marker; you’ll use it for the border.
Check: 54 rows ÷ 4.5 rows per in = 12 in (30.5 cm) tall. Widest point: 44 sts ÷ 4 sts per in = 11 in (27.9 cm).
Pocket Panel (Color B)
Work flat from the bottom up. The panel has a straight bottom edge, nine chevron rows and a straight top edge.
Row 1 (RS): Ch 50. Sc in 2nd ch from hook and in each ch across. Turn. (49 sts)
Row 2 (wave setup): Ch 1, sc in first st. *Sc in next st, hdc in next 2 sts, dc in next st, tr in next 3 sts, dc in next st, hdc in next 2 sts, sc in next 2 sts; repeat from * 3 more times. Turn. (1 + 4 x 12 = 49 sts)
This row keeps the bottom edge straight while building height where the peaks will sit.
Row 3 (solid chevron): Ch 2, dc in next st (the ch-2 and dc count as a dc2tog). Dc in next 4 sts, 3 dc in next st, dc in next 4 sts, dc3tog over next 3 sts; repeat from * 3 more times, ending the last repeat at *. Dc2tog over last 2 sts. Turn. (1 + 3 x 12 + 11 + 1 = 49 sts)
Row 4 (lace chevron): Ch 2, dc in next st (counts as a dc2tog). [Ch 1, sk next st, dc in next st] twice, (dc, ch 1, dc) in next st, [dc in next st, ch 1, sk next st] twice, dc3tog over next 3 sts; repeat from * 3 more times, ending the last repeat at *. Dc2tog over last 2 sts. Turn. (49 sts, counting each ch-1 as a st)
Each peak is worked into the center st of the peak below. Counting the first st as st 1, that is st 7 of every 12. In lace rows, the center of the peak is the ch-1 space. This keeps the zigzags stacked neatly.
Rows 5, 7, 9 and 11: Repeat Row 3, working into each dc and each ch-1 space. (49 sts each)
Rows 6, 8 and 10: Repeat Row 4. (49 sts each)
Row 12 (leveling): Ch 4 (counts as a tr). *Tr in next st, dc in next 2 sts, hdc in next st, sc in next 3 sts, hdc in next st, dc in next 2 sts, tr in next 2 sts; repeat from * 3 more times. Turn. (1 + 4 x 12 = 49 sts)
The tall sts fill the valleys and the short sts sit on the peaks, which makes the top edge straight.
Row 13: Ch 1, sc in each st across. (49 sts) Fasten off, leaving a 36 in (91.4 cm) tail.
The panel now has 5 solid chevron rows and 4 eyelet chevron rows, with straight sc edges at the top and bottom. St 25 sits at the bottom of a valley in every chevron row and marks the pocket divider.
Tab (Color A)
Row 1: Ch 9. Sc in 2nd ch from hook and in each ch across. Turn. (8 sts)
Rows 2–27: Ch 1, sc in each st across. Turn. (8 sts per row)
Fasten off, leaving a 12 in (30.5 cm) tail. The tab measures 2 in x 6 in (5.1 cm x 15.2 cm).
Make All Pieces
- Color A: 1 backing and 1 tab
- Color B: 1 pocket panel
Layout (front view):
            [ ring ]
            [ tab  ]
     /---- backing dome ----\
    |   backing Rows 35-54    |
    |-------------------------|
    | Pocket 1   |  Pocket 2  |  <- backing Rows 8-34
    | sts 1-24   |  sts 26-49 |
    |-------------------------|
     \-- backing Rows 1-7 --/
Joining
1. Mark the backing. With the RS facing, place markers on Row 8:
– at sts 3 and 42 for the side seams
– between sts 22 and 23 for the center line
Place the same markers on Row 34. The seam span is sts 3–42, which is 40 sts = 10 in (25.4 cm). On Rows 31–34 the edge steps in by 1 st, so there the side seam sits 2 sts in from the edge.
2. Tuck the bottom corners. Each pocket has 24 panel sts (6 in / 15.2 cm) to fit onto 20 backing sts (5 in / 12.7 cm). At each lower corner of each pocket, fold 2 panel sts to the WS: sts 1–2, 23–24, 26–27 and 48–49. Pin them. The tucks give each pocket room for a roll.
3. Sew the bottom seam stitch to stitch. With Color B, whipstitch the panel’s bottom edge to Row 8 of the backing:
– Panel sts 3–22 to backing sts 3–22, one to one
– Panel st 25 to the center line
– Panel sts 28–47 to backing sts 23–42, one to one
Sew through both layers of each tuck.
4. Sew the side seams. Whipstitch each 13-row side edge of the panel to its marked side line, from Row 8 up to Row 34. Take about 2 backing rows for each panel row.
5. Sew the center seam. Whipstitch up the panel’s st 25 column to the center line, from Row 8 to Row 34. Leave the top edge of the panel open.
Tension: Pull each stitch snug but not tight, so the backing stays flat under the seam.
Size check:
– The panel’s sewn width is 10 in (25.4 cm).
– Its top edge sits about 7.6 in (19.3 cm) above the backing’s bottom edge.
– Each pocket opening bows out slightly.
Border (Color A)
Border gauge: 1 sc per row end along the sides and 1 sc per st across the top and bottom.
Put the live loop from Row 54 back on your hook. Turn so the RS faces you.
Round 1:
1. Ch 1, 2 sc in first st of Row 54, sc in next 10 sts, 2 sc in last st. (14 sts across the top)
2. Sc in each row end down the first side. (54 sts)
3. Working into the other side of the foundation ch: 2 sc in first ch, sc in next 30 ch, 2 sc in last ch. (34 sts across the bottom)
4. Sc in each row end up the second side. (54 sts)
5. Join with a sl st to the first sc.
Round 1 total: 152 sts worked 1 per existing st or row end, + 4 extra = 156 sts.
Round 2: Ch 1, rev sc in each st around. Join with a sl st to the first rev sc. (156 sts) Fasten off.
Why the math works:
– Every edge st and row end gets exactly one sc, so the border follows the shape without ruffling.
– The 4 extra sts sit at the 4 bends where the flat top and flat bottom meet the curved sides.
– The rope round adds no sts.
– Together the two rounds add 0.5 in (1.3 cm) per side. The width becomes 11 in + 1 in = 12 in (30.5 cm) and the height 12 in + 1 in = 13 in (33.0 cm).
Attach the tab:
1. Thread the tab through the wooden ring and fold it in half.
2. Center both ends on the WS of the backing top, over sts 3–10 of Row 54.
3. Let the ends overlap 1 in (2.5 cm) below the border.
4. Whipstitch all edges of the overlap.
About 2 in (5.1 cm) of folded tab shows above the border.
Final Blocking
- Mist the whole holder lightly with water until it is damp.
- Lay it RS up on a blocking mat.
- Pin the backing to 12 in x 13 in (30.5 cm x 33.0 cm), smoothing the dome into an even curve.
- Pin the pocket’s bottom seam straight. Gently open the eyelets with your fingers.
- Loosely stuff each pocket with a rolled towel so it dries with room for a roll.
- Let it dry completely before hanging.
Final Quality-Control Checklist
- The backing measures 12 in x 13 in (30.5 cm x 33.0 cm).
- The border has 156 sts and an even rope edge.
- The pocket’s top and bottom edges are straight.
- The chevron peaks line up in all 9 chevron rows.
- The center seam sits on the backing’s center line.
- Each pocket holds one roll without straining.
- The tab is centered and secure, and the ring hangs straight.
- All tails are woven in on the WS.
Troubleshooting
Backing edges curl: Your tension is tight. Go up half a hook size, or block the piece firmly.
Dome looks pointed: Check that you worked the even rows in Rows 32–43.
Chevrons drift sideways: You missed a peak or a valley. Count to 49 after every row.
Pocket top is wavy: Recheck Row 12. The tr sts must sit in the valleys.
Pockets are too shallow: Make the corner tucks 3 sts deep instead of 2.
Care
Hand wash in cool water with mild soap. Press out the water in a towel, then reshape the pockets and dry flat.
Final Notes
At a gauge of 16 sc = 4 in (10.2 cm), 44 sts make a backing 11 in (27.9 cm) wide, and 54 rows make it 12 in (30.5 cm) tall. The border adds 0.5 in (1.3 cm) per side, for a finished size of 12 in x 13 in (30.5 cm x 33.0 cm). The 49-st pocket panel is four 3 in (7.6 cm) repeats wide. It is eased onto a 10 in (25.4 cm) seam span with four tucks, which forms two roomy pockets. Check each stage as you go, and your holder will hang flat and neat.
Happy crocheting!