

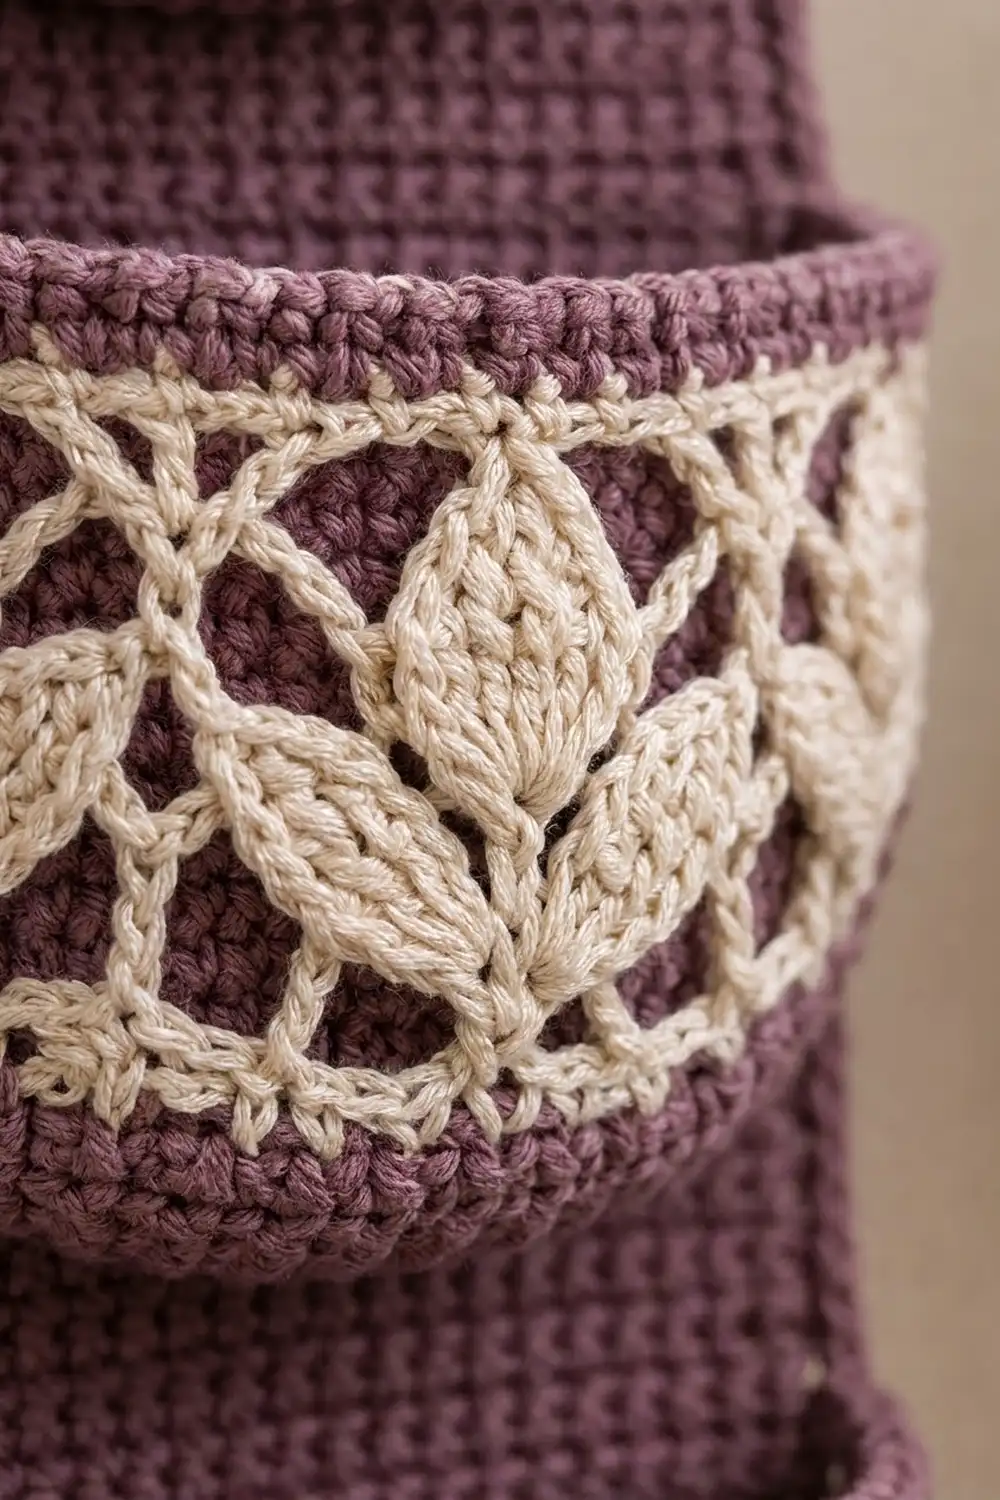
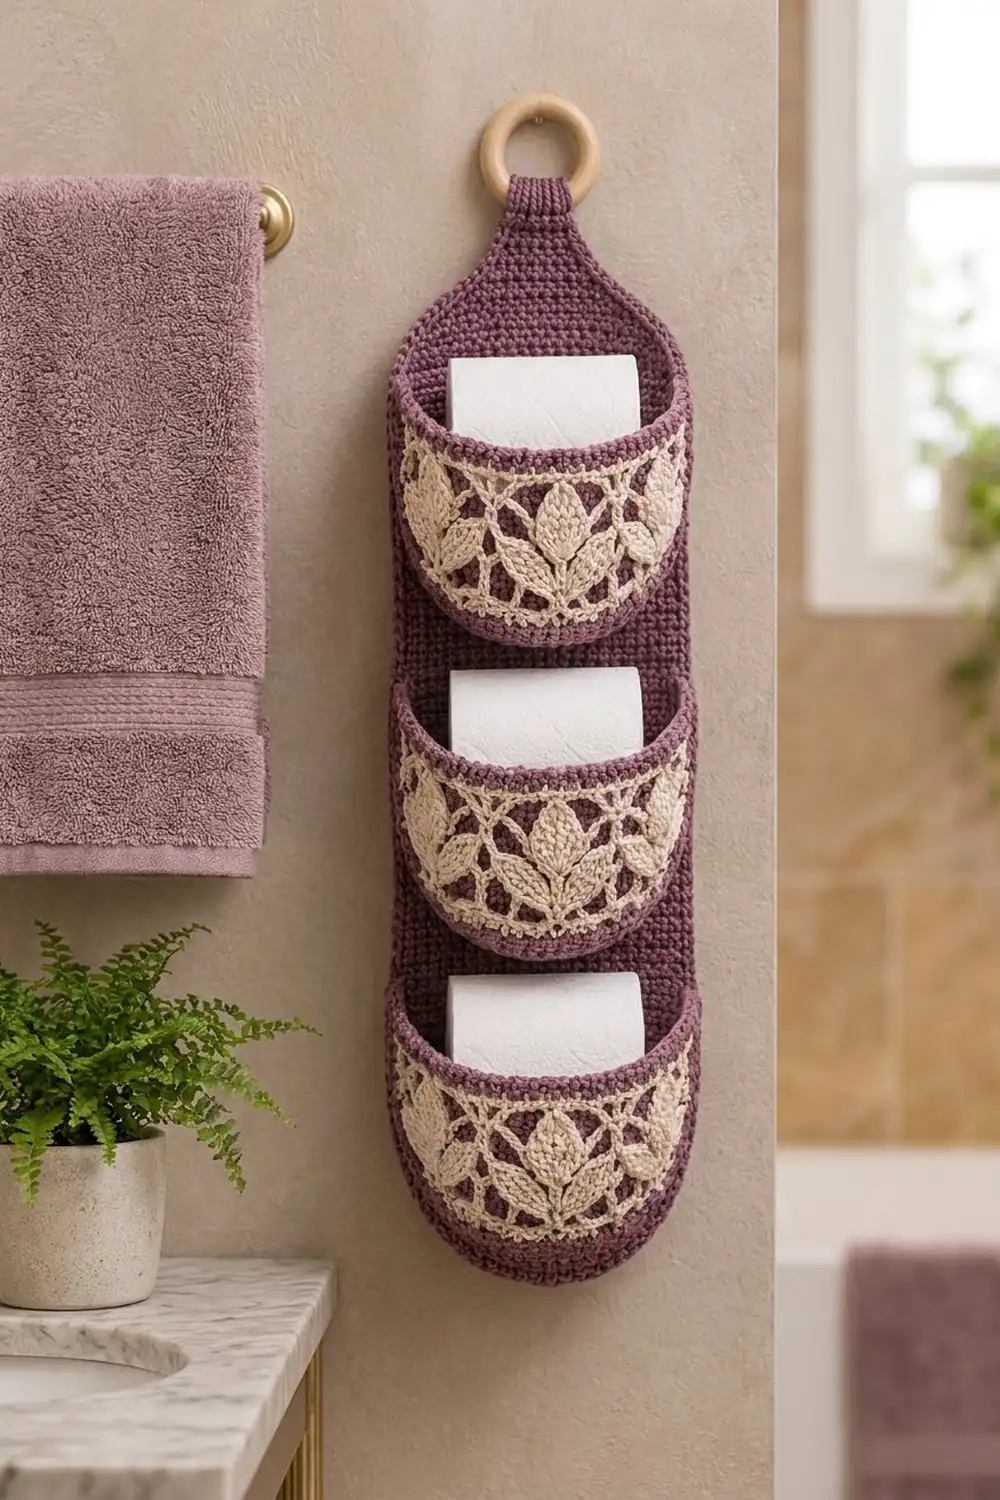
This hanging holder stores three spare rolls on a single strip of wall. A long plum back panel carries three rounded pockets, and each pocket has a cream band of leaf lace across the front. A natural wooden ring at the top lets you hang it on a hook or a towel bar.
The palette is a muted plum with a soft ivory, which suits warm neutral bathrooms well. The back panel is plain, dense single crochet. All of the decoration is in the pockets, where three-leaf sprays sit between open chain arches.
The pattern uses US crochet terms. The finished back panel is 7 in (17.8 cm) wide and 22.25 in (56.5 cm) long including the border, plus the tab and ring. Hung up, the whole piece is about 25 in (63.5 cm) tall.
Construction is simple. You crochet the back panel flat from the bottom up, shaping the rounded bottom and tapered top as you go. Each pocket starts as a flat half-circle base, and the wall, lace band and rim are worked up from its curved edge. The pockets are then sewn to the panel, the panel gets a two-row border, and the tab is folded over the ring.
Finished Size and Construction
- Finished size: 7 in (17.8 cm) wide × 22.25 in (56.5 cm) long panel; about 25 in (63.5 cm) hanging length including ring
- Skill level: Intermediate
- Terminology: US
- Yarn weight: Worsted (#4), cotton or cotton blend
- Hook: 5 mm (H-8)
- Number of pieces: 4 (1 back panel, 3 pockets)
- Layout: 3 pockets stacked in a single vertical column
- Back panel before border: 6.5 in (16.5 cm) × 22 in (55.9 cm)
- Pocket size: base straight edge 5.3 in (13.5 cm), depth 2.7 in (6.9 cm), height 3.5 in (8.9 cm)
- Border depth: 0.25 in (0.6 cm)
Materials
Use a smooth worsted-weight cotton. Cotton holds its shape, copes with bathroom humidity and shows the leaf texture clearly. Amounts below assume a 50 g / 85 m (93 yd) ball.
- Color A – Plum: 160 g, 272 m (297 yd)
- Color B – Cream: 40 g, 68 m (74 yd)
These quantities include a margin of about 20% or more, so you have spare yarn for a gauge swatch and for seaming.
Tools:
- 5 mm (H-8) crochet hook
- Wooden ring, 3 in (7.6 cm) outer diameter
- Tapestry needle
- Stitch markers (at least 6)
- Scissors and measuring tape
- Pins, blocking mat and spray bottle
Abbreviations (US Terms)
- ch – chain
- sc – single crochet
- dc – double crochet
- tr – treble crochet
- sl st – slip stitch
- st(s) – stitch(es)
- sp – space
- sk – skip
- inc – 2 sc in the same st
- sc2tog – single crochet 2 together
- BLO – back loop only
- MR – magic ring
- RS / WS – right side / wrong side
Special stitches:
- CL (4-tr cluster): *Yo twice, insert hook in the indicated sp, yo and pull up a loop, (yo, pull through 2 loops) twice; repeat from * 3 more times in the same sp, then yo and pull through all 5 loops on hook. Each CL is one leaf.
- Fan: (CL, ch 3, CL, ch 3, CL) all in the same sp. Each fan is one three-leaf spray.
Gauge and Checkpoints
Gauge: 16 sc and 18 rows = 4 in (10.2 cm) with a 5 mm hook. That works out to 4 sts and 4.5 rows per inch.
Before starting the panel, make one complete pocket as your test piece. The pocket uses all of the stitch types in the pattern, and its measurements show you right away whether your tension works.
Checkpoints:
- Swatch: 16 sc wide = 4 in (10.2 cm).
- Pocket base, Row 12: straight edge 5.3 in (13.5 cm), depth 2.7 in (6.9 cm).
- Pocket, Row 5: 43 dc measure about 10.75 in (27.3 cm) along the curve.
- Finished pocket: about 3.5 in (8.9 cm) tall.
- Panel, Row 7: 6.5 in (16.5 cm) wide.
- Panel, Row 89: about 19.75 in (50.2 cm) long.
- Panel, Row 99: 22 in (55.9 cm) long.
If your pieces come out too big, go down half a hook size. If they come out too small, go up half a size. Check width before length: an incorrect width will also throw off where the pockets sit.
Back Panel
Make 1 in Color A. Work flat from the bottom up. The ch 1 at the start of each row does not count as a stitch.
Rounded bottom:
Row 1: Ch 15, sc in 2nd ch from hook and in each ch across, turn. (14 sts)
Row 2: Ch 1, inc in first st, sc across to last st, inc in last st, turn. (16 sts)
Rows 3–7: Repeat Row 2. Each row adds 2 sts, giving 18, 20, 22, 24 and finally 26 sts. (Row 7: 26 sts)
Checkpoint: the panel is 6.5 in (16.5 cm) wide, and the bottom edge forms a shallow curve.
Straight section:
Rows 8–89: Ch 1, sc in each st across, turn. (26 sts per row)
Place markers at the end of Rows 9, 41 and 72. These rows set the pocket placement lines at 2 in (5.1 cm), 9 in (22.9 cm) and 16 in (40.6 cm) from the bottom edge.
Tapered top:
Row 90: Ch 1, sc2tog, sc across to last 2 sts, sc2tog, turn. (24 sts)
Rows 91–99: Repeat Row 90. Each row is 2 sts fewer, giving 22, 20, 18, 16, 14, 12, 10, 8 and finally 6 sts. (Row 99: 6 sts)
Checkpoint: the panel is 22 in (55.9 cm) long.
Hanging tab:
Rows 100–108: Ch 1, sc in each st across, turn. (6 sts per row)
The tab is 1.5 in (3.8 cm) wide and 2 in (5.1 cm) long. Fasten off and leave a 12 in (30.5 cm) tail for sewing.
Make 3. Each pocket is worked flat in one continuous piece: base first, then the wall, lace band and rim.
Half-circle base (Color A):
Row 1: MR, ch 1, 3 sc in ring, pull ring closed, turn. (3 sts)
Row 2: Ch 1, inc in each st, turn. (6 sts)
Row 3: Ch 1, (sc, inc) 3 times, turn. (9 sts)
Row 4: Ch 1, (sc 2, inc) 3 times, turn. (12 sts)
Rows 5–12: Keep adding 3 sts per row, with one more plain sc before each inc every row. Row 5 has 15 sts, and the count goes up to Row 12 with (sc 10, inc) 3 times. (Row 12: 36 sts)
On alternate rows, move the increases half a repeat over so the curve stays round and doesn’t form points. The straight edge has 24 row ends (12 on each side of the ring) and measures 5.3 in (13.5 cm).
Wall (Color A):
Row 1 (RS): Ch 1, sc in BLO of each st along the curved edge only, turn. (36 sts)
The unused front loops make a crisp fold line, so the wall stands up from the base.
Row 2 (WS): Ch 1, (sc 11, inc) 3 times, turn. (39 sts)
Row 3: Ch 1, sc in each st, turn. (39 sts)
Row 4: Ch 1, sc 1, (sc 8, inc) 4 times, sc 2, turn. (43 sts)
Fasten off Color A.
Leaf lace band (Color B):
Row 5 (RS): Join Color B in first st. Ch 3 (counts as dc), dc in each st across, turn. (43 sts)
Row 6 (WS): Ch 1, sc in first st, ch 5, sk 5 sts, sc in next st; repeat from * 6 more times, working the last sc in top of turning ch, turn. (8 sc and 7 ch-5 sps)*
Row 7 (RS, leaf row): Ch 1, sc in first sc, *ch 3, sc in next ch-5 sp, ch 3, sc in next sc (arch made), Fan in next ch-5 sp, sc in next sc; repeat from * 2 more times, then ch 3, sc in last ch-5 sp, ch 3, sc in last sc, turn.
(4 arches and 3 fans: 12 sc, 9 CL, 14 ch-3 sps)
Row 8 (WS): Ch 1, sc in first sc. Then work these two steps:
- Arch: 2 sc in ch-3 sp, sc in sc, 2 sc in ch-3 sp, sc in next sc.
- Fan: sc in top of CL, 2 sc in ch-3 sp, sc in CL, 2 sc in ch-3 sp, sc in CL, sc in next sc.
Work (Arch, Fan) 3 times, then one final Arch. Turn.
(1 + 4 arches × 6 + 3 fans × 8 = 49 sts)
Fasten off Color B.
The rise from 43 to 49 sts gives the opening its slight bowl flare.
Rim (Color A):
Row 9 (RS): Join Color A, ch 1, sc in each st across, turn. (49 sts)
Row 10 (WS): Ch 1, sc in each st across. (49 sts)
Fasten off and leave a 24 in (61.0 cm) tail for sewing.
Checkpoint: the pocket is 3.5 in (8.9 cm) tall from fold line to rim.
Make All Pieces
- Back panel: 1, Color A (about 95 g)
- Pockets: 3, each using about 12 g Color A and 9 g Color B (36 g A and 27 g B in total)
Layout (front view, top to bottom):
        ( ring )
        [ tab  ]
      / taper   \
     | Pocket 3 |   base on Row 72, 16 in (40.6 cm)
     |          |
     | Pocket 2 |   base on Row 41, 9 in (22.9 cm)
     |          |
     | Pocket 1 |   base on Row 9, 2 in (5.1 cm)
      \ curve  /
The pocket bases are 7 in (17.8 cm) apart. That leaves room for a roll about 4.5 in (11.4 cm) tall to stand in each pocket.
Joining
Weave in all pocket tails except the long rim tail. Join with a whipstitch through both loops of the panel and the outer edge of the pocket.
Base seam: Lay the panel RS up. Pin the pocket’s straight base edge along the marked row, centered over panel sts 3–24. That covers 22 sts and leaves 2 sts free on each side, about 0.5 in (1.3 cm).
The base edge has 24 row ends to fit onto 22 panel sts. Make one stitch per row end into one panel st each. At the two outermost points, put two row ends into the same panel st. This takes up the 2 extra row ends without stretching the seam.
Wall seams: Stand the wall up so the BLO fold sits on the seam. Sew each wall end upward along the column of panel st 3 on the left and st 24 on the right. Work one stitch per wall row and include both rim rows. The wall ends cover about 16 panel rows.
Tension: Pull each stitch snug but not tight. The panel must stay flat behind the pocket. If it ripples, take the seam out and redo it more loosely.
Size checkpoint: after joining, the panel still measures 6.5 in (16.5 cm) across between pockets. A roll should slide in with light resistance.
Border
Border gauge: 4.5 sc per inch along row-end edges, matching the row gauge.
The border runs from one side of the tab base, down that side, around the bottom curve and up to the other side of the tab base. The tab itself is not bordered.
Row 1 (Color A): With RS facing, join at the left row end of Row 99. Ch 1, then work as follows:
- 1 sc in each row end down the left side (99 sts)
- 1 sc in each foundation ch across the bottom (14 sts)
- 1 sc in each row end up the right side (99 sts)
Turn. (212 sts)
Row 2: Ch 1, sl st in each sc across. (212 sts)
Fasten off.
Why the math works: each side has 99 rows, so it takes exactly 99 sc. The bottom has 14 foundation chains, so it takes exactly 14 sc. Total: 99 + 14 + 99 = 212. There are no corners, so no extra corner stitches are needed.
On the straight sides, one sc per row end matches the row gauge. On the curve and the taper, the same rate tightens the edge slightly, which helps those edges keep their shape. The border adds 0.25 in (0.6 cm) on each side, giving 7 in (17.8 cm) wide, and adds 0.25 in (0.6 cm) at the bottom, giving 22.25 in (56.5 cm) long.
Ring: Pass the tab through the ring from front to back. Fold it down onto the WS and sew Row 108 across the WS of Rows 99–100.
Final Blocking
- Fill each pocket with a roll, or a rolled towel of the same size, to set the bowl shape.
- Lay the holder flat, RS up, on a blocking mat.
- Pin the panel to 7 in × 22.25 in (17.8 cm × 56.5 cm), keeping the bottom curve smooth.
- Mist evenly until damp, not soaked.
- Gently open each fan so the three leaves spread evenly and the arches sit open.
- Let it dry completely, then remove the pins and the rolls.
Final Quality-Control Checklist
- Panel measures 7 in × 22.25 in (17.8 cm × 56.5 cm).
- All three pockets have 3 fans and 4 arches, with leaves pointing upward.
- Pocket rims have 49 sts and flare evenly.
- Pocket bases sit on Rows 9, 41 and 72, centered over sts 3–24.
- Border has 212 sts with no ripples.
- Tab is sewn securely and the ring sits centered.
- All tails are woven in on the WS.
Troubleshooting
- Pocket base cups or ruffles: cupping means your tension is tight, and ruffling means it is loose. Change hook size, or space the increases more evenly.
- Fans look crowded: check that Row 6 has exactly 7 ch-5 sps, and that each fan sits in its own sp.
- Pocket too shallow for a roll: add one more plain row to the wall at Row 3.
- Panel ripples behind a pocket: the seam was pulled too tight. Resew it more loosely.
- Border flares: use a hook half a size smaller for border Row 1.
- Holder tilts when hung: center the tab on the ring and check that the rolls are evenly loaded.
Care
Hand wash cool and lay flat to dry, reshaping the pockets while damp. Avoid wringing, which can distort the leaf clusters.
Final Notes
The measurement chain is easy to follow. A 4 in (10.2 cm) gauge of 16 sc gives a 6.5 in (16.5 cm) panel. 99 rows give 22 in (55.9 cm), and the border brings it to 7 in × 22.25 in (17.8 cm × 56.5 cm). Each pocket’s 36-stitch base grows to 43 sts for the lace and 49 sts for the rim. Check the numbers at every checkpoint and the finished holder will hang straight and hold its rolls neatly.
Happy crocheting!