

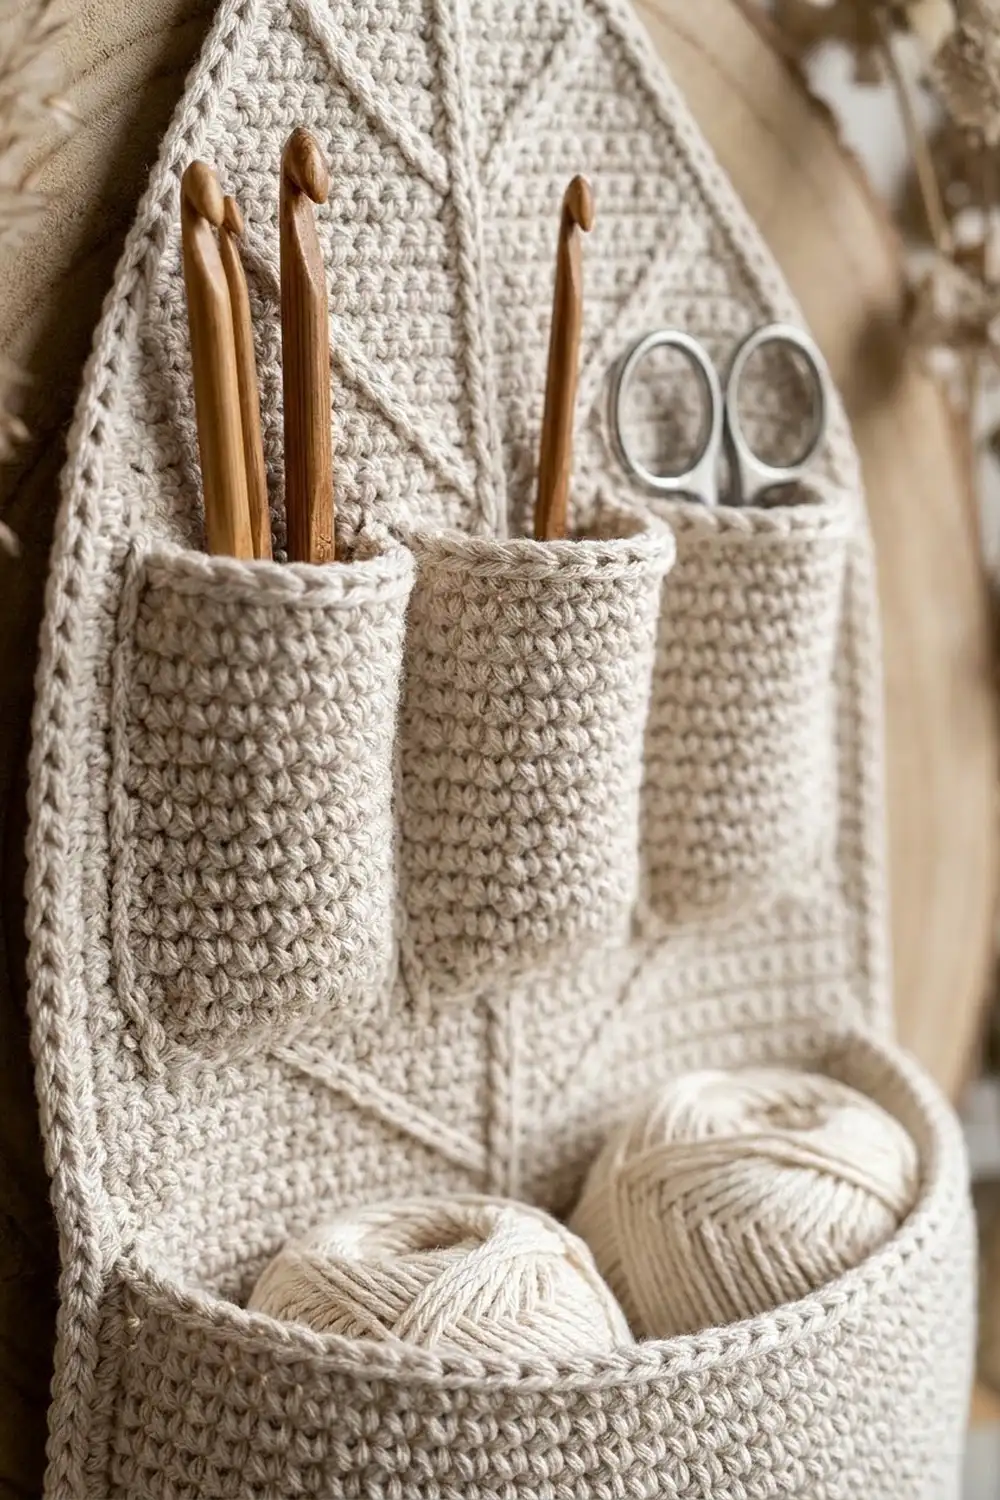
This wall organizer is shaped like an oak leaf, with soft wavy lobes, a raised center vein and a corded edge. Three small cups across the middle hold hooks, scissors or pens, and a wide basket pocket below holds yarn balls or notions. A narrow tab at the top wraps around a wooden ring so you can hang it.
It uses one color, a warm oatmeal cotton, so the texture does the decorating. Dense single crochet gives a firm fabric that keeps its shape on the wall. The veins are slip-stitched on top afterward.
The pattern uses US crochet terms. The finished leaf measures about 10.75 in (27.3 cm) wide and 16.25 in (41.3 cm) from tip to tab base. The visible tab adds about 1.75 in (4.4 cm).
You work the leaf panel in rows from the pointed tip up to the tab. You shape the lobes by increasing and decreasing at the row ends. Next you add the veins and the border, then make the three cups and the basket in the round and sew them on.
Finished Size and Construction
- Finished leaf size: 10.75 in (27.3 cm) wide × 16.25 in (41.3 cm) tall, plus 1.75 in (4.4 cm) of visible tab
- Hanging height, including the 3 in (7.6 cm) ring: about 21 in (53.3 cm)
- Skill level: Intermediate
- Terminology: US
- Yarn weight: Worsted (#4) cotton
- Hook: 4.5 mm (US 7)
- Number of pieces: 5 (1 leaf panel, 3 cups, 1 basket)
- Layout: cups in a row of 3 over rows 39–55; basket centered over rows 23–37
- Leaf size before border: 9.75 in (24.8 cm) × 15.75 in (40.0 cm)
- Border depth: 0.5 in (1.3 cm)
- Cup size: 2 in (5.1 cm) wide flat × 3.75 in (9.5 cm) tall
- Basket size: 6.75 in (17.1 cm) wide flat × 3.3 in (8.4 cm) tall
Materials
Yarn advice: Use a smooth worsted-weight cotton or cotton blend. Cotton gives the crisp stitch definition that makes the veins and corded edges stand out, and it doesn’t stretch much under the weight of tools. The quantities below assume about 170 m per 100 g.
Oatmeal (single color): 250 g / 425 m in total. Approximate use per piece:
– Leaf panel, tab and veins: 95 g / 162 m
– Border: 15 g / 26 m
– Three cups: 30 g / 51 m
– Basket: 45 g / 77 m
Tools:
– 4.5 mm (US 7) crochet hook
– Wooden ring, 3 in (7.6 cm) across
– Tapestry needle
– Stitch markers (at least 4)
– Blocking mat and rust-proof pins
– Scissors
– Optional: leather strap and wall hook for hanging
The 250 g total includes a margin of about 35% over the expected 185 g, which covers your gauge test, a dye-lot buffer and any re-dos.
Abbreviations (US Terms)
- ch – chain
- sc – single crochet
- sc2tog – single crochet 2 together
- sl st – slip stitch
- BLO – back loop only
- rev sc – reverse single crochet
- inc – 2 sc in the same stitch
- st(s) – stitch(es)
- rnd – round
- RS / WS – right side / wrong side
Surface slip stitch: Hold the working yarn behind the fabric. Insert the hook from front to back through the fabric, pull up a loop, then pull it through the loop on your hook. Move one stitch or one row along the line you are following and repeat. This makes a raised chain on the RS.
Reverse single crochet (rev sc): Work from left to right (right-handers) without turning. Insert the hook into the next stitch to the right, yarn over, pull up a loop, yarn over and pull through both loops. This makes a twisted, corded edge.
Turning chains: In all leaf rows, the ch 1 at the start does not count as a stitch.
Gauge and Checkpoints
Gauge: 16 sc and 18 rows = 4 in (10.2 cm) in sc worked in rows. One sc is 0.25 in (0.6 cm) wide, and 4.5 rows make 1 in (2.5 cm).
Test one piece first: Make one cup before you start the leaf. Pressed flat, it should measure 2 in (5.1 cm) wide and 3.75 in (9.5 cm) tall. If it does, your gauge works for every piece.
Leaf checkpoints:
– After Row 10: 21 sts, 5.25 in (13.3 cm) wide, about 2.2 in (5.6 cm) tall
– After Row 35: 39 sts, 9.75 in (24.8 cm) wide, about 7.75 in (19.7 cm) tall
– After Row 71: 7 sts, 15.75 in (40.0 cm) tall from the tip
– Tab: 7 sts, 1.75 in (4.4 cm) wide, 3.5 in (8.9 cm) long
If your piece is too big: go down 0.5 mm in hook size. If it is too small: go up 0.5 mm. Don’t add or remove stitches. The pockets only fit the panel when both are made at the same gauge.
Leaf Panel
The panel is worked in rows from the bottom tip upward. Every shaping row changes the count by the same amount at both ends, so the center stitch stays in the same column. Place a marker in the middle stitch of Row 1 and move it up every few rows. It marks the center vein line.
Row types:
– Inc row: ch 1, turn, 2 sc in first st, sc across to last st, 2 sc in last st. (+2 sts)
– Even row: ch 1, turn, sc in each st across. (no change)
– Dec row: ch 1, turn, sc2tog, sc across to last 2 sts, sc2tog. (−2 sts)
Tip
Row 1 (RS): Ch 2. Work 3 sc in 2nd ch from hook. (3 sts)
Rows 2–10: Inc row. (Row 2: 5 sts; Row 10: 21 sts)
Lobe 1
Rows 11–14: Inc row. (Row 14: 29 sts)
Rows 15–16: Even row. (29 sts)
Rows 17–19: Dec row. (Row 19: 23 sts; this is the first notch)
Lobe 2
Rows 20–25: Inc row. (Row 25: 35 sts)
Rows 26–27: Even row. (35 sts)
Rows 28–30: Dec row. (Row 30: 29 sts)
Lobe 3 (widest)
Rows 31–35: Inc row. (Row 35: 39 sts)
Rows 36–38: Even row. (39 sts)
Rows 39–41: Dec row. (Row 41: 33 sts)
Lobe 4
Rows 42–43: Inc row. (Row 43: 37 sts)
Rows 44–45: Even row. (37 sts)
Rows 46–49: Dec row. (Row 49: 29 sts)
Lobe 5
Rows 50–51: Inc row. (Row 51: 33 sts)
Rows 52–53: Even row. (33 sts)
Rows 54–57: Dec row. (Row 57: 25 sts)
Lobe 6 and shoulder
Rows 58–59: Inc row. (Row 59: 29 sts)
Row 60: Even row. (29 sts)
Rows 61–68: Dec row. (Row 68: 13 sts)
Rows 69–71: Dec row. (Row 71: 7 sts)
Tab
Rows 72–87: Even row. (7 sts)
Fasten off and leave a 12 in (30.5 cm) tail for sewing the tab.
Count check: Across all 71 leaf rows, the counts follow the pattern 3 → 21 → 29 → 23 → 35 → 29 → 39 → 33 → 37 → 29 → 33 → 25 → 29 → 13 → 7. Every number is odd, which is what keeps a true center column.
Veins
Center vein: With the RS facing, join yarn at the tip. Work a surface slip stitch up the marked center column, one sl st per row, through Row 79 of the tab. That is 79 sl sts. Fasten off.
Side veins: Each vein starts beside the center vein and travels in a straight diagonal line up and outward. It stops 2 sts in from the edge. Work one sl st per stitch you move sideways, and climb rows evenly along the way. Make each pair mirrored on both sides:
- Vein A: from the center at Row 6 to Row 13, 11 sts out
- Vein B: from the center at Row 15 to Row 21, 11 sts out
- Vein C: from the center at Row 56 to Row 60, 12 sts out
- Vein D: from the center at Row 63 to Row 68, 4 sts out
Rows 23–55 have no side veins because the pockets cover them.
Cups (make 3)
The cups are worked in continuous rounds. Mark the first stitch of each round.
Rnd 1: Ch 5. Sc in 2nd ch from hook and next 2 ch, 3 sc in last ch. Working along the other side of the chain, sc in next 2 ch, 2 sc in last ch. (10 sts)
Rnd 2: 2 sc in next st, sc in next 2, 2 sc in each of next 3, sc in next 2, 2 sc in each of next 2. (16 sts)
Rnd 3: Sc in BLO of each st. (16 sts; this turns the base up into the wall)
Rnds 4–18: Sc in each st. (16 sts)
Rnd 19: Rev sc in each st. (16 sts; corded rim)
Fasten off and leave an 18 in (45.7 cm) tail.
Check: Pressed flat, each cup is 8 sts across, which is 2 in (5.1 cm). Rnds 3–19 make 17 rounds, about 3.75 in (9.5 cm) tall.
Basket
Rnd 1: Ch 24. Sc in 2nd ch from hook and next 21 ch, 3 sc in last ch. Working along the other side of the chain, sc in next 21 ch, 2 sc in last ch. (48 sts)
Rnd 2: 2 sc in next st, sc in next 21, 2 sc in each of next 3, sc in next 21, 2 sc in each of next 2. (54 sts)
Rnd 3: Sc in BLO of each st. (54 sts)
Rnds 4–16: Sc in each st. (54 sts)
Rnd 17: Rev sc in each st. (54 sts)
Fasten off and leave a 24 in (61.0 cm) tail.
Check: Pressed flat, the basket is 27 sts across, which is 6.75 in (17.1 cm). Rnds 3–17 make 15 rounds, about 3.3 in (8.4 cm) tall. The circumference is 13.5 in (34.3 cm).
Make All Pieces
You need:
– 1 leaf panel
– 3 cups
– 1 basket
All in oatmeal. Layout on the panel (RS facing):
            [ wooden ring ]
          tab (rows 72-87)
     open leaf + veins C, D (rows 56-71)
     [ cup ][ cup ][ cup ]   (rows 39-55)
     [      basket      ]    (rows 23-37)
     open leaf + veins A, B (rows 1-21)
             tip
Fit check:
– The cups take 24 sts of width side by side (6 in / 15.2 cm). The narrowest row they cover is 29 sts (7.25 in / 18.4 cm).
– The basket takes 27 sts (6.75 in / 17.1 cm). The narrowest row it covers is Row 30, at 29 sts.
– Both pockets therefore sit inside the edge, and the lobes flare out beyond them.
Joining
You can work the border (next section) before or after you sew on the pockets, because the pockets never touch the edge.
Method: Whipstitch with matching yarn through the back half of each pocket and into the panel only. Don’t stitch through to the RS borders.
Cups:
1. Pin the cups with their bases along Row 39. Center the middle cup on the vein, with the side cups touching it.
2. Flatten each cup so the base fold sits at the back.
3. Sew along the back of the BLO ridge, 8 sts per cup, into Row 39.
4. Sew up the back of each side edge, one stitch per round (17 rounds), into the panel columns underneath.
5. Where two cups touch, also tack their sides together at 3 points.
Basket:
1. Pin the basket with its base along Row 23, centered on the vein.
2. Sew the back 27 sts of the BLO ridge into Row 23.
3. Sew up both side edges, one stitch per round (15 rounds).
4. Leave the front free so it bows outward and makes room for yarn balls.
Tension advice: Sew firmly but don’t pucker the panel. Lay the panel flat after every few stitches to check. Each stitch should sit at the same gauge as the panel under it.
Ring:
1. Pass the tab through the ring from front to back.
2. Fold Rows 80–87 down onto the WS.
3. Whipstitch Row 87 across all 7 sts to the WS of Row 72.
Size checkpoint: The leaf should still measure 9.75 in (24.8 cm) at Row 35 before the border, or 10.75 in (27.3 cm) after it. Rows 72–79 should show 1.75 in (4.4 cm) of tab.
Border
Border gauge: 16 sc = 4 in (10.2 cm). Each border stitch is 0.25 in (0.6 cm) along the edge.
The border is worked as a single edge that runs from one side of the tab base around to the other. You don’t border the tab sides.
Border Row 1 (RS):
1. Join yarn at the left base of the tab, in the Row 71 row-end.
2. Left edge: [sc in next 3 row-ends, 2 sc in next row-end] 17 times, sc in last 3 row-ends. (88 sts)
3. Tip: 3 sc in the free loop of the foundation ch. (3 sts)
4. Right edge: starting at Row 1, [sc in next 3 row-ends, 2 sc in next row-end] 17 times, sc in last 3 row-ends. (88 sts)
Total: 88 + 3 + 88 = 179 sts.
Border Row 2: Do not turn. Ch 1, rev sc in each st back around. (179 sts: 88 per side + 3 at the tip)
Fasten off and weave the tails into the tab base.
Why the math works:
– Each side has 71 row-ends. Repeating 17 groups of 4 row-ends uses 68 of them, and the last 3 make 71.
– Each group gets 5 sc, so 17 × 5 + 3 = 88 sts per side.
– Most rows are shaping rows, so each row-end runs on a slight diagonal. That makes each side edge about 22 in (55.9 cm) long.
– At 0.25 in per sc, 88 sts cover 22 in exactly, so the border lies flat without cupping or ruffling.
Final Blocking
- Spray the whole organizer with water until it is damp, not soaked.
- Lay it RS up on the blocking mat.
- Pin the tip, then pin the widest lobe to 10.75 in (27.3 cm).
- Pin each lobe outward and each notch inward to sharpen the wave.
- Pin the tip-to-tab-base length to 16.25 in (41.3 cm).
- Stuff the cups and basket with rolled washcloths so they dry rounded.
- Let it dry completely, at least 12 hours.
Final Quality-Control Checklist
- Leaf is 10.75 in (27.3 cm) × 16.25 in (41.3 cm)
- Center vein is straight from the tip through Row 79
- Side veins mirror each other and stop 2 sts in from the edge
- All 6 lobes on each side match their partner
- Border has 179 sts and lies flat
- Each cup is 2 in (5.1 cm) wide, and the 3 together are 6 in (15.2 cm)
- Basket is 6.75 in (17.1 cm) wide
- Pockets are sewn level, with fronts free
- Tab is secure around the ring and all tails are woven in
Troubleshooting
- Center vein drifts sideways: An inc or dec was missed at one end. Recount the row against the pattern and re-work it.
- Lobes look blunt: Block harder and pin each lobe out separately.
- Border ruffles at the notches: Skip the “2 sc” in the group that lands inside a notch, then make it up in the next lobe so the side still totals 88.
- Border pulls tight: Your row gauge is taller than 18 rows per 4 in. Change to “2 sc” in every third row-end instead of every fourth.
- Cups sag forward: Add a tack at the center back of each cup rim.
- Panel puckers behind the pockets: Your seams are too tight. Remove them and re-sew more loosely.
Care
Spot clean whenever you can. If you need to wash it, hand wash cold, press out the water in a towel, and reshape and dry it flat with the pockets stuffed.

Final Notes
Everything depends on one gauge: 16 sc and 18 rows = 4 in (10.2 cm). That gauge gives 39 sts at the widest row, or 9.75 in (24.8 cm), and 71 rows for 15.75 in (40.0 cm). The 179-stitch border adds 0.5 in (1.3 cm), for a finished leaf of 10.75 in (27.3 cm) × 16.25 in (41.3 cm). Cups of 2 in (5.1 cm) and a basket of 6.75 in (17.1 cm) fit inside that outline. Check each of these measurements and the organizer will come together cleanly. Happy crocheting!