

The Sage Trio is a hanging toilet paper holder. It has one long back panel and three round pockets, and the whole thing hangs from a natural wooden ring. Each pocket holds one standard roll, and the top of the roll sits just above the rim so it is easy to grab.
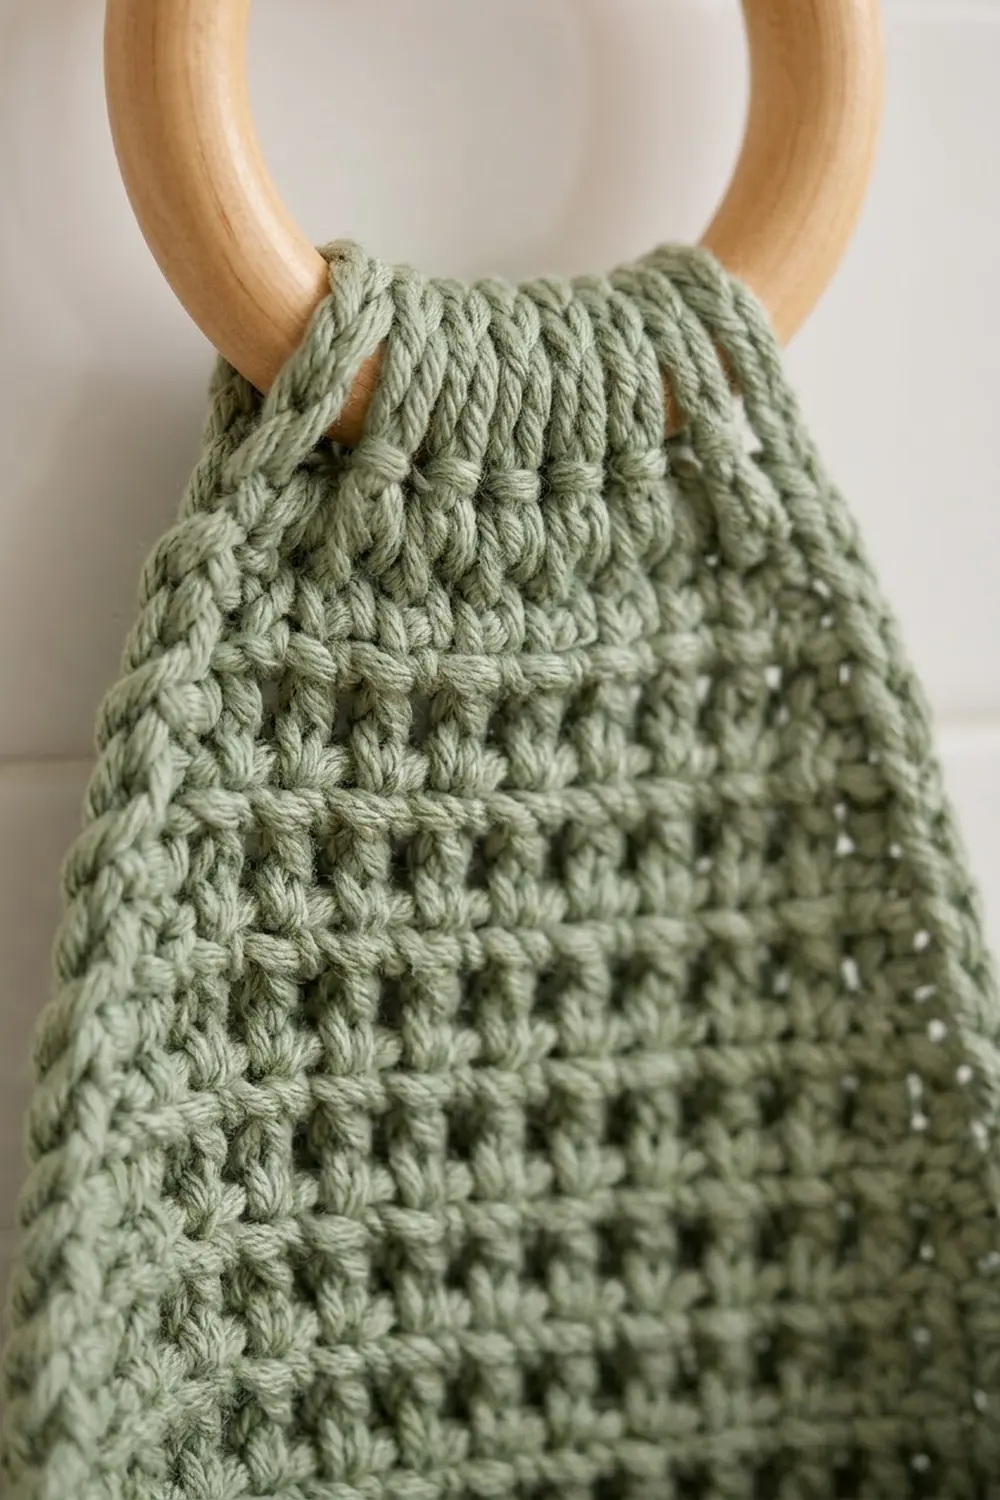
Every piece is worked in soft sage green cotton in a raised grid texture. Front post double crochets make the vertical columns, and post stitches worked on alternate rounds make the horizontal bars. The look is calm and natural, so it suits a bathroom with plants, wood and white tile.
This pattern uses US crochet terms. The bordered back panel measures 5.5 in (14.0 cm) wide by 21 in (53.3 cm) long when flat. Once the top tab is folded around the ring, the panel hangs 19.25 in (48.9 cm) below it. Each pocket is 4.75 in (12.1 cm) across and 3.75 in (9.5 cm) tall.
You work the panel flat from the bottom up, taper it at the top and finish with a narrow tab. Each pocket starts as a flat round base and then turns up into textured walls. A single round of sc borders the panel, the tab wraps around the ring, and the pockets are sewn on in a vertical stack.
Finished Size and Construction
- Finished size (flat): 5.5 x 21 in (14.0 x 53.3 cm)
- Hanging length below ring: 19.25 in (48.9 cm)
- Skill level: Easy-Intermediate
- Terminology: US crochet terms
- Yarn weight: Worsted (#4), cotton or cotton blend
- Hook: 5.0 mm (US H-8)
- Number of pieces: 4 (1 back panel and 3 pockets), plus 1 wooden ring
- Layout: 3 pockets stacked vertically on 1 panel
- Piece size: panel 5 x 20.5 in (12.7 x 52.1 cm) before border; each pocket 4.75 in (12.1 cm) across x 3.75 in (9.5 cm) tall
- Size before border: 5 x 20.5 in (12.7 x 52.1 cm)
- Border depth: 0.25 in (0.6 cm), 1 round of sc
Materials
Pick a smooth worsted-weight cotton or cotton blend. Cotton keeps the grid sharp, holds the pocket shape and copes well with bathroom humidity. Avoid splitty yarn, because post stitches are much easier to work in a rounded, plied yarn.
Yarn
– Sage green: 350 g (approx. 560 m / 612 yd)
The project uses about 300 g. The quantity above includes a margin of about 50 g for your gauge swatch and for seaming.
Tools
– 5.0 mm (US H-8) crochet hook
– 1 wooden ring, 3 in (7.6 cm) outer diameter
– Tapestry needle
– 4–6 stitch markers
– Locking pins or sewing clips
– Measuring tape and scissors
– Blocking mat, rust-proof pins and a spray bottle
Abbreviations (US Terms)
- ch – chain
- sl st – slip stitch
- sc – single crochet
- dc – double crochet
- dc2tog – double crochet 2 together
- fpdc – front post double crochet
- bpdc – back post double crochet
- BLO – back loop only
- st(s) – stitch(es)
- RS / WS – right side / wrong side
Special stitches
- fpdc: Yarn over (yo). Insert the hook from front to back around the post of the stitch indicated, yo and pull up a loop, then (yo, pull through 2 loops) twice.
- bpdc: Yo. Insert the hook from back to front around the post of the stitch indicated, yo and pull up a loop, then (yo, pull through 2 loops) twice.
- dc2tog: (Yo, insert the hook in the next st, yo, pull up a loop, yo, pull through 2 loops) twice, then yo and pull through all 3 loops.
Turning chains: The ch 1 or ch 2 at the start of a row or round never counts as a stitch.
Gauge and Checkpoints
Gauge: 16 sts x 8 rows = 4 in (10.2 cm) in the flat grid pattern.
Make one pocket before you start the panel. It is small and uses the same stitches, and its base tells you right away if your gauge is right.
Checkpoints
– Pocket base after Rnd 3: about 3 in (7.6 cm) across.
– Pocket base after Rnd 5: 4.75 in (12.1 cm) across, lying flat.
– Pocket after Rnd 13: 3.75 in (9.5 cm) tall. A roll should slide in snugly, with about 0.75 in (1.9 cm) showing above the rim.
– Panel after Row 1: 5 in (12.7 cm) wide.
– Panel after Row 32: 16 in (40.6 cm) long.
– Panel before border: 5 x 20.5 in (12.7 x 52.1 cm).
If your piece is too big, change to a 4.5 mm hook. If it is too small, or the roll won’t fit, change to a 5.5 mm hook. Post stitches tend to get tighter as you go, so keep your loops relaxed, especially on bpdc rounds.
Pocket (Make 3)
Work the pocket in joined rounds with the RS always facing you. Join each round with a sl st to the first st.
Base
Rnd 1: Make a magic ring and ch 2. Work 12 dc in the ring, pull it closed and join. (12 sts)
Rnd 2: Ch 2, 2 dc in each st around. Join. (24 sts)
Rnd 3: Ch 2, dc in next st, 2 dc in next st 12 times. Join. (36 sts)
Rnd 4: Ch 2, dc in next 2 sts, 2 dc in next st 12 times. Join. (48 sts)
Rnd 5: Ch 2, dc in next 3 sts, 2 dc in next st 12 times. Join. (60 sts)
Checkpoint: the base should be 4.75 in (12.1 cm) across.
Walls
Rnd 6 (turning round): Ch 2, dc in BLO of each st around. Join. (60 sts)
This leaves the front loops of Rnd 5 unworked and makes a crisp fold, so the walls stand straight up from the base.
Rnd 7 (Grid A): Ch 2, fpdc around next st, dc in next 2 sts 20 times. Join. (60 sts: 20 fpdc + 40 dc)
Rnd 8 (Grid B): Ch 2, fpdc around next st (the fpdc), bpdc around next 2 sts 20 times. Join. (60 sts: 20 fpdc + 40 bpdc)
The fpdc stack up into raised vertical columns. The bpdc push their top loops to the RS and form the horizontal bars. Together they make the grid.
Rnds 9–12: Repeat Rnds 7 and 8 twice more. (60 sts each round)
Rnd 13 (rim): Ch 1, sc in each st around. Join. (60 sts)
Fasten off and leave an 18 in (45.7 cm) tail for sewing. Weave in the magic ring tail.
Height check: Rnds 6–12 are 7 rounds of dc-height stitches at 0.5 in (1.3 cm) each, which gives 3.5 in (8.9 cm). The sc rim adds 0.25 in (0.6 cm), for a total of 3.75 in (9.5 cm).
Back Panel
Work the panel flat in rows from the bottom edge up. The row has 20 sts, which is a multiple of 3 plus 2 and fits the grid repeat.
Row 1 (WS, foundation): Ch 22. Dc in the 3rd ch from the hook and in each ch across. Turn. (20 sts)
Row 2 (RS): Ch 2, dc in first st, fpdc around next st, dc in next 2 sts 6 times, dc in last st. Turn. (20 sts: 6 fpdc + 14 dc)
Row 3 (WS): Ch 2, dc in first st, fpdc around next 2 sts, bpdc around next st 6 times, dc in last st. Turn. (20 sts: 12 fpdc + 6 bpdc + 2 dc)
The 6 bpdc in Row 3 are worked around the 6 fpdc from Row 2, so the columns stay raised on the RS. Front post stitches worked from the WS push their top loops to the RS, which makes the same horizontal bars you see on the pockets.
Rows 4–32: Repeat Rows 2 and 3, ending after a Row 2. (20 sts each row)
Checkpoint: the panel should be 5 in (12.7 cm) wide and 16 in (40.6 cm) long.
Top Taper
Work the taper in plain dc so the decreases stay neat.
Row 33: Ch 2, dc2tog, dc in each st to the last 2 sts, dc2tog. Turn. (18 sts)
Row 34: Ch 2, dc2tog, dc across to the last 2 sts, dc2tog. Turn. (16 sts)
Row 35: Repeat Row 34. (14 sts)
Row 36: Repeat Row 34. (12 sts)
Row 37: Repeat Row 34. (10 sts)
Row 38: Repeat Row 34. (8 sts)
The taper is 6 rows, or 3 in (7.6 cm).
Ring Tab
Rows 39–44: Ch 1, sc in each st across. Turn. (8 sts each row)
The tab is 1.5 in (3.8 cm) long and 2 in (5.1 cm) wide. Don’t fasten off. Go straight on to the border.
Checkpoint: the panel, including the taper and tab, should measure 5 x 20.5 in (12.7 x 52.1 cm).
Make All Pieces
All pieces use the sage green yarn.
- Back panel: 1 (approx. 120 g)
- Pockets: 3 (approx. 60 g each, 180 g total)
- Wooden ring: 1, 3 in (7.6 cm)
Layout (RS facing, top to bottom):
     [  RING  ]
     [  TAB   ]
     [ TAPER  ]
     |  panel |
     |POCKET 3|
     |  panel |
     |POCKET 2|
     |  panel |
     |POCKET 1|
     |________|
Border
Border gauge: 4 sc = 1 in (2.5 cm) along every edge. Each dc row is 0.5 in (1.3 cm) tall, so it takes 2 sc. Each sc row is 0.25 in (0.6 cm) tall, so it takes 1 sc.
Rnd 1: With the RS facing, ch 1. Sc in each of the 8 tab sts (top edge: 8 sc), then ch 1 for the corner.
Work down the first long side as follows:
– 1 sc in each of the 6 tab row ends (6 sc)
– 2 sc in each of the 6 taper row ends (12 sc)
– 2 sc in each of the 32 grid row ends (64 sc)
That gives 82 sc for the side. Ch 1 for the corner.
Along the bottom, sc in each of the 20 foundation chs (bottom edge: 20 sc). Ch 1 for the corner.
Work up the second long side as for the first, in reverse order (82 sc). Ch 1 for the corner, then sl st to the first sc.
Total: 8 + 82 + 20 + 82 = 192 sc, plus 4 ch-1 corner spaces.
Why the math works: The 20 sc on the bottom edge cover 5 in (12.7 cm) at 4 sc per inch. Each side has 82 sc, and 82 ÷ 4 = 20.5 in (52.1 cm), which is exactly the length of the panel before the border. The ch-1 corners belong to no side, so no stitch is counted twice. The border adds 0.25 in (0.6 cm) on every edge, making the panel 5.5 x 21 in (14.0 x 53.3 cm). The taper edge runs on a slight diagonal, so its 12 sc draw it in a little, which helps the top gather neatly into the ring.
Fasten off and weave in the ends.
Joining
Attach the ring: Pass the tab through the ring from front to back. Fold it down onto the WS so the fold wraps around the ring. The folded part, which is the tab plus its border, is 1.75 in (4.4 cm) long. Whipstitch the top edge of the tab to the WS of the taper where it lands, around Row 35. The bordered tab is 2.5 in (6.4 cm) wide, so it gathers slightly inside the ring.
Pocket placement: Lay the panel RS up. Measure each position from the bordered bottom edge:
– Pocket 1: base seam along the top of Row 1, at 0.75 in (1.9 cm). Rim at 4.5 in (11.4 cm).
– Pocket 2: base seam along the top of Row 11, at 5.75 in (14.6 cm). Rim at 9.5 in (24.1 cm).
– Pocket 3: base seam along the top of Row 21, at 10.75 in (27.3 cm). Rim at 14.5 in (36.8 cm).
This leaves a 1.25 in (3.2 cm) gap between each rim and the base above it, which is room for the top of the roll.
Stitch-to-stitch logic: On each pocket, mark 15 rim sts in a row. They cover 3.75 in (9.5 cm) of the 15 in (38.1 cm) circumference and form the back of the pocket. Also mark the 15 unworked front loops of Rnd 5 directly below them. Center this section on the panel so 0.875 in (2.2 cm) of panel stays free on each side.
Sewing: Thread the tail onto a tapestry needle. Whipstitch the 15 rim sts to the panel, 1 sewing stitch per rim st. Then whipstitch the 15 marked front loops along the base line. Finally, sew a vertical seam from base to rim at each end of the marked section.
Tension: Keep the seams snug but not tight. Tight seams pucker the panel, and loose ones let the pocket sag forward when it holds a roll.
Size checkpoint: With all three pockets attached, the panel should still lie flat at 5.5 in (14.0 cm) wide and hang 19.25 in (48.9 cm) below the ring.
Final Blocking
- Lightly mist the whole holder with water.
- Lay the panel RS up. Pin it to 5.5 x 19.25 in (14.0 x 48.9 cm) below the ring, keeping the long edges straight.
- Put a toilet roll, or a jar about 4.5 in (11.4 cm) across, inside each pocket so the walls dry round and upright.
- Press the grid gently with your fingers so the columns line up straight.
- Leave it to dry completely, which takes about 12–24 hours, then unpin it.
Final Quality-Control Checklist
- The panel is 5.5 in (14.0 cm) wide along its whole length.
- The border has 82 sc on each side, 20 sc on the bottom and 8 sc on the top.
- Each pocket rim has 60 sts and each pocket is 3.75 in (9.5 cm) tall.
- The grid columns run straight and don’t spiral.
- The pockets are centered and level, with 1.25 in (3.2 cm) gaps.
- The ring tab is secure and all ends are woven in.
- Each roll shows about 0.75 in (1.9 cm) above its rim.
Troubleshooting
- Pocket columns spiral: Join every round in the same spot and keep the ch 2 straight.
- Pocket is too tight for the roll: Remake it with a 5.5 mm hook. You can also add one more increase round after Rnd 5 (dc in next 4 sts, 2 dc in next st 12 times, for 72 sts) and then work 24 repeats in each wall round.
- Panel edges are wavy: You worked too many sc into the row ends. Use exactly 2 sc per dc row.
- Panel narrows: Make sure you work into the first and last st of every row, and check that each row has 20 sts.
- Pocket flops forward: Lengthen the vertical seams, or sew 2 more rim sts on each side.
- Bars are faint: Snug up your bpdc and your WS fpdc.
Care
Hand wash, or machine wash on a gentle cool cycle. Reshape and dry flat; don’t tumble dry, because heat can shrink the cotton and soften the grid.

Final Notes
Everything follows from one measurement chain. At a gauge of 16 sts = 4 in (10.2 cm), the 20-st panel is 5 in (12.7 cm) wide and 32 grid rows make 16 in (40.6 cm). The finished panel is 20.5 in (52.1 cm) long before the border and 5.5 x 21 in (14.0 x 53.3 cm) after it. It hangs 19.25 in (48.9 cm) below the ring. Each pocket has a 60-st base 4.75 in (12.1 cm) across and is 3.75 in (9.5 cm) tall. If your first pocket meets its checkpoints, the rest will match.
Happy crocheting!