

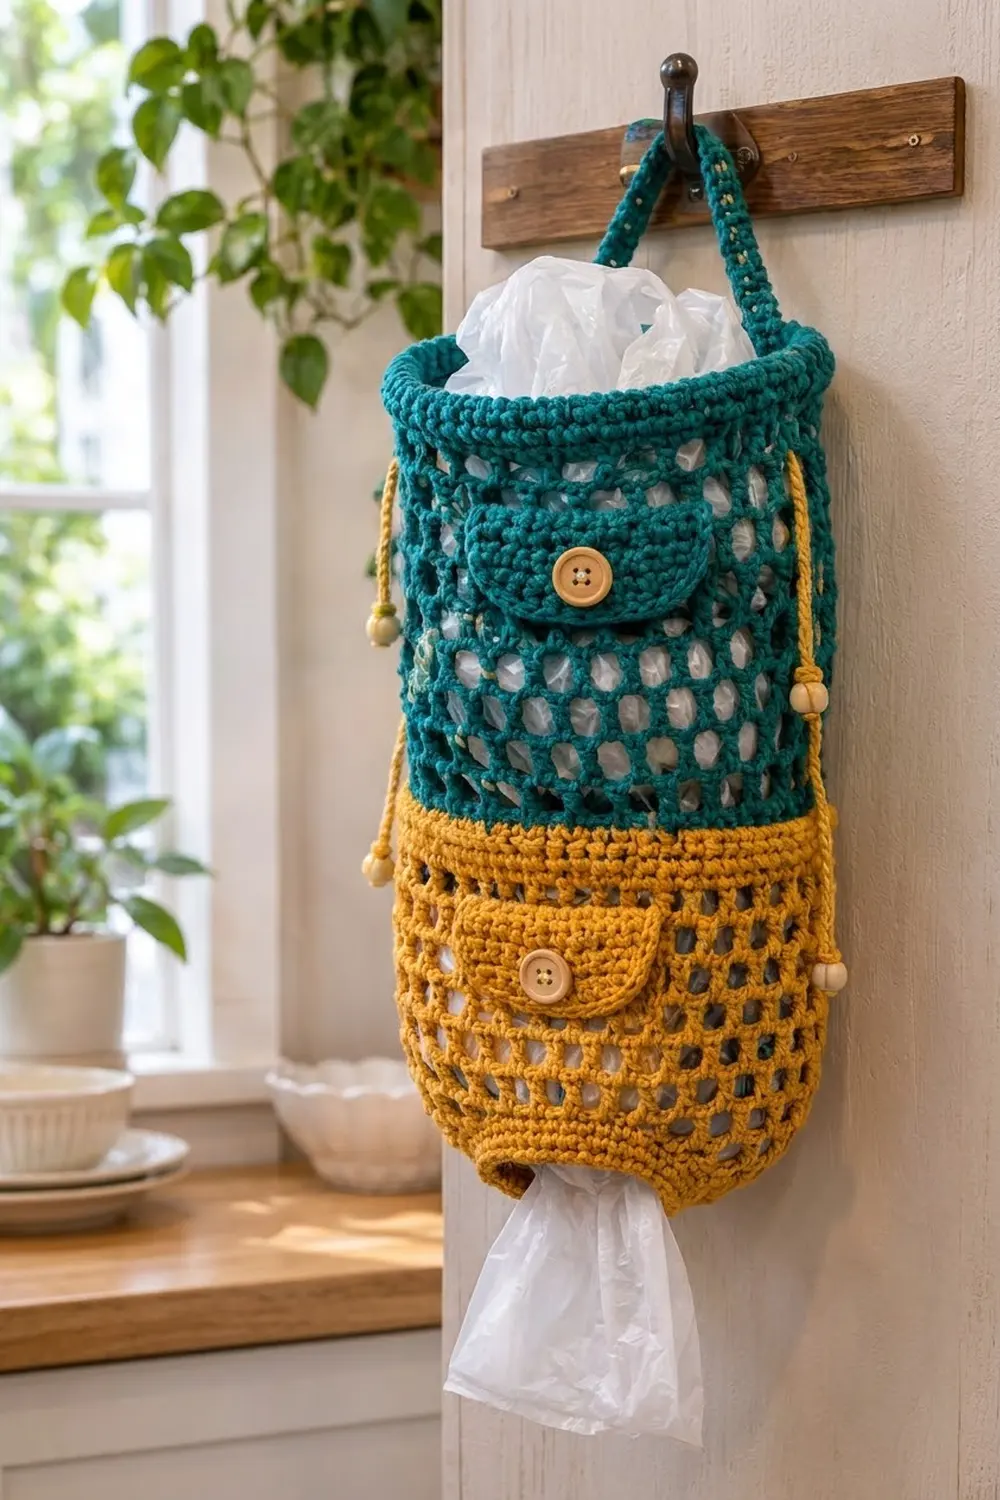
Plastic grocery bags pile up fast. This hanging dispenser stores them neatly: you stuff bags in at the top and pull them out one at a time from the bottom. The open honeycomb mesh lets you see when stock is running low, and the solid rims keep the shape crisp on the wall.
The design uses two colors: deep teal on the upper half and warm mustard gold on the lower half. Each half has its own small button-flap pocket, which is handy for spare bag ties, folded produce bags or tissue packs. Mustard cords tipped with wooden beads hang down both sides.
This pattern uses US crochet terms. The finished dispenser measures 7.5 in (19.1 cm) wide laid flat and 17 in (43.2 cm) tall, not counting the strap. With the strap loop, it hangs about 24 in (61.0 cm) long.
You work the body as one seamless tube from the bottom up. You start at the small dispensing opening, increase to full width, then alternate solid single-crochet bands with mesh sections and switch color halfway. Then you make the strap, pockets, flaps and cords separately and sew them on. A reverse single-crochet edge finishes the top and bottom rims.
Finished Size and Construction
- Finished size: 7.5 in (19.1 cm) wide flat × 17 in (43.2 cm) tall
- Skill level: Easy-Intermediate
- Terminology: US crochet terms
- Yarn weight: Worsted (#4), cotton or cotton blend
- Hook: 5.0 mm (H-8)
- Number of pieces: 1 body tube, plus 1 strap, 2 pockets, 2 flaps and 2 cords
- Layout: a vertical tube, teal on top and mustard below, with one pocket centered on the front of each color section
- Body circumference: 60 sts = 15 in (38.1 cm)
- Bottom opening: 36 sts = 9 in (22.9 cm) around, 4.5 in (11.4 cm) flat
- Size before border: 16.5 in (41.9 cm) tall
- Border depth: 0.25 in (0.6 cm) at the top rim and 0.25 in (0.6 cm) at the bottom rim
Materials
Yarn: Choose a smooth worsted-weight cotton or cotton blend. Cotton holds its shape under the weight of the bags and shows the mesh clearly. Avoid very stretchy acrylic, because the tube will sag lengthwise once it is full.
- Color A, Teal: 120 g / about 190 m (208 yd)
- Color B, Mustard: 100 g / about 160 m (175 yd)
These quantities include about a 15% margin for your gauge swatch and tension differences.
Tools and notions:
- 5.0 mm (H-8) crochet hook
- Tapestry needle
- 2 wooden buttons, 1 in (2.5 cm)
- 4 wooden beads, 12–16 mm, with holes large enough for the chain cord
- Stitch marker
- Scissors and measuring tape
- Sewing pins or locking stitch markers for placing the pockets
Abbreviations (US Terms)
- ch = chain
- sl st = slip stitch
- sc = single crochet
- dc = double crochet
- sc2tog = single crochet 2 together
- sp = space
- st(s) = stitch(es)
- rev sc = reverse single crochet (crab stitch)
- rnd = round
Special stitch: Reverse single crochet (rev sc). Working from left to right (right-handers), insert the hook into the next stitch to the right, yarn over, pull up a loop, yarn over, and pull through both loops on the hook. This makes a corded, rolled edge.
Mesh repeat: (dc, ch 2) counts as 3 stitches of width. 20 repeats = 60 sts.
Gauge and Checkpoints
Single crochet gauge: 16 sts and 18 rnds = 4 in (10.2 cm).
Mesh gauge: 4 repeats = 3 in (7.6 cm) wide, and 5 mesh rnds = 3 in (7.6 cm) tall. Each mesh round is about 0.6 in (1.5 cm).
Work Rnds 1–6 first and treat them as your gauge test. Lay the tube flat and measure.
Checkpoints:
- After Rnd 3: 4.5 in (11.4 cm) wide flat
- After Rnd 6: 7.5 in (19.1 cm) wide flat
- After Rnd 16: 7.3 in (18.5 cm) tall
- After Rnd 19: 8 in (20.3 cm) tall
- After Rnd 31: 15.2 in (38.6 cm) tall
- After Rnd 37: 16.5 in (41.9 cm) tall
If your piece is too big, switch to a 4.5 mm (US 7) hook. If it is too small, go up to a 5.5 mm (I-9) hook. Don’t add or remove stitches: the 60-stitch count is what makes the mesh-to-solid conversions come out even.
Body
The body is worked in joined rounds. Do not turn. Place a marker in the first stitch of each round.
Bottom Opening and Base Shaping (Color B, Mustard)
With Color B, ch 36. Join with a sl st to the first ch to form a ring, taking care not to twist the chain.
Rnd 1: Ch 1, sc in each ch around, join with sl st to first sc. (36 sts)
Rnds 2–3: Ch 1, sc in each st around, join. (36 sts)
Rnd 4 (growth round): Ch 1, sc in next 2 sts, 2 sc in next st; repeat from * 12 times, join. (48 sts)
Rnd 5 (growth round): Ch 1, sc in next 3 sts, 2 sc in next st; repeat from * 12 times, join. (60 sts)
Rnd 6: Ch 1, sc in each st around, join. (60 sts)
These two growth rounds flare the base outward, which gives the bottom its rounded, tapered shape.
Lower Mesh (Color B)
Rnd 7 (conversion round, solid to mesh): Ch 5 (counts as dc + ch 2), skip next 2 sts, dc in next st, ch 2, skip next 2 sts; repeat from * 19 times, join with sl st to 3rd ch of beginning ch-5. (20 dc + 20 ch-2 sps = 60 sts)
Rnd 8: Sl st into next ch-2 sp, ch 5 (counts as dc + ch 2), dc in next ch-2 sp, ch 2; repeat from * 19 times, join to 3rd ch of beginning ch-5. (20 dc + 20 ch-2 sps)
Rnds 9–16: Repeat Rnd 8. (20 dc + 20 ch-2 sps)
Because every dc is worked into a space rather than into a stitch, each round shifts half a repeat. That stagger is what makes the honeycomb holes. You now have 10 mesh rounds, about 6 in (15.2 cm).
Middle Band
Rnd 17 (conversion round, mesh to solid): Ch 1, sc in same st as join, 2 sc in next ch-2 sp, sc in next dc, 2 sc in next ch-2 sp; repeat from * 19 times, join. (20 sc in dc + 40 sc in spaces = 60 sts)
Rnd 18: Ch 1, sc in each st, join. Change to Color A on the final pull-through of the join. Fasten off Color B. (60 sts)
Rnd 19 (Color A, Teal): Ch 1, sc in each st, join. (60 sts)
Upper Mesh (Color A)
Rnd 20 (conversion round): Work as Rnd 7. (20 dc + 20 ch-2 sps = 60 sts)
Rnds 21–31: Work as Rnd 8. (20 dc + 20 ch-2 sps)
You now have 12 mesh rounds, about 7.2 in (18.3 cm).
Top Band
Rnd 32 (conversion round): Work as Rnd 17. (60 sts)
Rnds 33–37: Ch 1, sc in each st, join. (60 sts)
Don’t fasten off; the top border comes next. The top band is 6 rounds, about 1.3 in (3.3 cm). That gives the rim enough body to hold its round shape.
Strap (Color A)
Ch 65.
Row 1: Sc in 2nd ch from hook and in each ch across, turn. (64 sts)
Rows 2–4: Ch 1, sc in each st, turn. (64 sts)
Fasten off and leave a long tail. The strap measures 16 in (40.6 cm) × 0.9 in (2.3 cm).
Pockets (Make 2: 1 in Color A, 1 in Color B)
Ch 17.
Row 1: Sc in 2nd ch from hook and in each ch across, turn. (16 sts)
Rows 2–13: Ch 1, sc in each st, turn. (16 sts)
Edging round (trim round): Ch 1. Work 3 sc in the first st, sc in the next 14 sts, and 3 sc in the last st. Then work 1 sc in each of the 13 row-ends down the side. Along the foundation, work 3 sc in the first loop, sc in the next 14, and 3 sc in the last. Work 1 sc in each of the 13 row-ends up the other side, then join.
Count: (58 sts worked one-per-stitch) + (8 extra corner sts) = 66 sts.
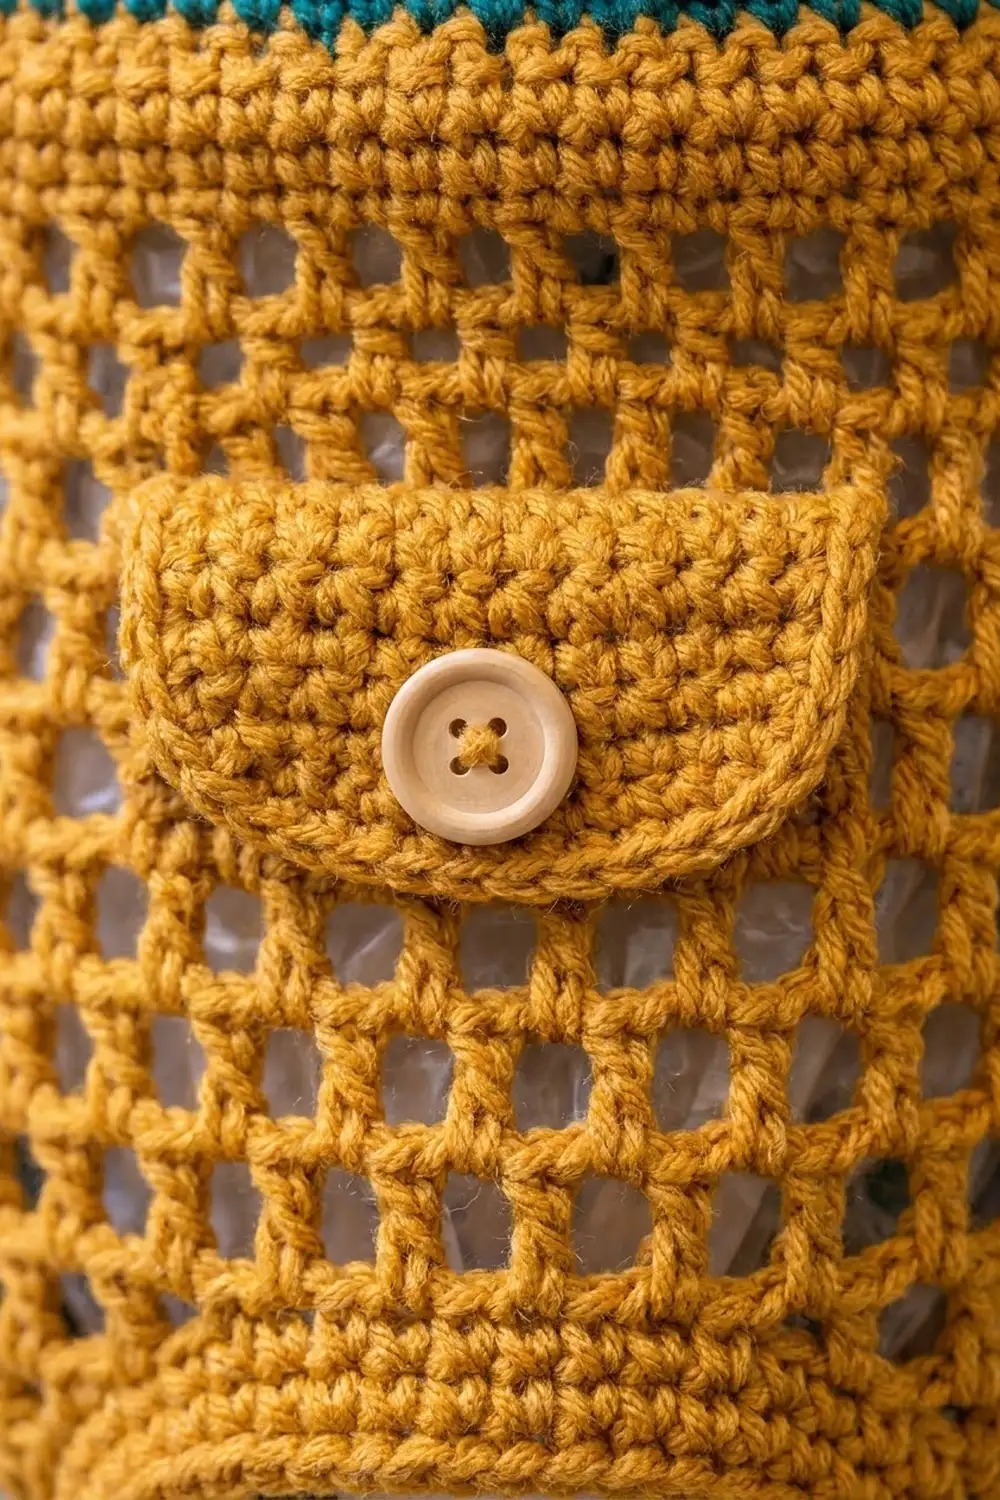
The finished pocket is about 4.5 in (11.4 cm) wide × 3.4 in (8.6 cm) tall. The 3-sc corners soften it into the rounded shape in the photo.
Flaps (Make 2: 1 in Color A, 1 in Color B)
Ch 17.
Row 1: Sc in 2nd ch from hook and in each ch across, turn. (16 sts)
Rows 2–5: Ch 1, sc in each st, turn. (16 sts)
Row 6: Ch 1, sc2tog, sc in next 12 sts, sc2tog, turn. (14 sts)
Row 7 (buttonhole): Ch 1, sc2tog, sc in next 4 sts, ch 2, skip next 2 sts, sc in next 4 sts, sc2tog, turn. (12 sts, counting each ch as 1)
Row 8: Ch 1, sc2tog, sc in next 3 sts, 2 sc in ch-2 sp, sc in next 3 sts, sc2tog. (10 sts)
Edging (trim round): Don’t turn. Work 8 sc down the first side (1 per row-end). Across Row 8, work 2 sc in the first st, sc in the next 8 sts, and 2 sc in the last st. Work 8 sc up the second side. Leave the Row 1 edge unworked, because that edge gets sewn down.
Count: (26 sts worked one-per) + (2 extra) = 28 sts.
The flap is about 4.5 in (11.4 cm) wide × 2 in (5.1 cm) deep.
Cords (Make 2, Color B)
Chain until the cord measures 22 in (55.9 cm), about 85 ch. Fasten off and leave 4 in (10.2 cm) tails at both ends.
Border
Border gauge: Rev sc is worked one per stitch at the same 4 sts per inch as the sc body, so the rims don’t ruffle or pull in.
Top border, Rnd 38 (Color A): Ch 1, rev sc in each st around, join. (60 sts) Laid flat, that is 30 sts on the front edge and 30 on the back edge. Fasten off.
Bottom border (Color B): Turn the tube upside down. Join Color B in any free loop of the foundation chain.
Rnd 1: Ch 1, rev sc in each free loop around, join. (36 sts) Laid flat, that is 18 sts on the front and 18 on the back. Fasten off.
Why the math works: Each border round matches the stitch count of the round it sits on: 60 at the top and 36 at the bottom. Nothing is added or skipped, so each rim stays exactly 15 in (38.1 cm) and 9 in (22.9 cm) around. The height grows from 16.5 in (41.9 cm) to 17 in (43.2 cm).
Assembly
- Strap: Center one strap end on the inside of the top band, at the side fold. Overlap it 1.5 in (3.8 cm) down and whipstitch it securely. Attach the other end the same way at the opposite side fold. That leaves a 13 in (33.0 cm) strap, which forms the loop above the rim.
- Teal pocket: Pin it centered on the front of the teal mesh, with its top edge 1.5 in (3.8 cm) below Rnd 32. Whipstitch the sides and bottom only, catching the dc posts of the mesh.
- Mustard pocket: Pin it centered on the front of the mustard mesh, with its top edge 1 in (2.5 cm) below Rnd 17. Sew the sides and bottom only.
- Flaps: Sew each flap’s Row 1 edge to the body 0.25 in (0.6 cm) above its matching pocket, so the flap hangs down over the pocket opening.
- Buttons: Fold each flap down and mark the spot under the buttonhole. Sew a button on the pocket front at that mark.
- Cords: Fold one cord in half. Weave the folded end through the side mesh spaces from the top band down to Rnd 19 and tack it in place under the top band. Thread a bead onto each free end and knot it. Repeat on the opposite side.
Final Blocking
- Weave in all ends along the solid bands, where they won’t show through the mesh.
- Wet the dispenser in cool water and gently squeeze out the excess. Don’t wring it.
- Roll it in a towel to remove more moisture.
- Stuff the tube with a rolled towel to fill it to 7.5 in (19.1 cm) flat width. Keep the height at 17 in (43.2 cm).
- Pin the pockets and flaps flat, then open up the mesh holes evenly with your fingers.
- Let it dry completely before hanging.
Final Quality-Control Checklist
- [ ] The body has 60 sts at every full-width round.
- [ ] The bottom opening has 36 sts and fits a hand easily.
- [ ] All mesh rounds have 20 dc and 20 ch-2 spaces.
- [ ] The color change sits cleanly between Rnds 18 and 19.
- [ ] Both pockets have 66 edging sts and both flaps have 28.
- [ ] The buttonholes line up with the buttons.
- [ ] The strap ends are secure and can hold a full load.
- [ ] Measurements: 7.5 in (19.1 cm) wide, 17 in (43.2 cm) tall.
Troubleshooting
The mesh is spiraling. Make sure you start each round with a sl st into the next ch-2 space and join to the 3rd ch of the beginning ch-5.
The holes are lining up instead of staggering. You are working the dc into stitches. Work each dc into a ch-2 space instead.
The bottom is puckering. Your increases are too tight. Loosen your tension on Rnds 4–5, or work them with a 5.5 mm hook.
The tube sags when it’s full. Your mesh gauge is too loose. Use a smaller hook or a firmer cotton.
The pocket is gaping. Sew it more closely, catching every mesh post along the sides.
The rim is ruffling. You have extra rev sc stitches. Recount to 60.
Care
Hand wash in cool water and lay flat to dry, reshaping as needed. Don’t tumble dry, because heat can shrink cotton and distort the mesh.
Final Notes
Every measurement here follows from the gauge. At 16 sc stitches per 4 in (10.2 cm), 36 stitches give a 9 in (22.9 cm) opening and 60 give a 15 in (38.1 cm) tube, 7.5 in (19.1 cm) flat. The 20 mesh repeats of 3 stitches each keep that same width. Fifteen solid rounds and 22 mesh rounds make 16.5 in (41.9 cm) of height, and the two rev sc rims bring it to 17 in (43.2 cm). Check your gauge early and keep your counts steady, and the dispenser will hang straight and work well.
Happy crocheting!