

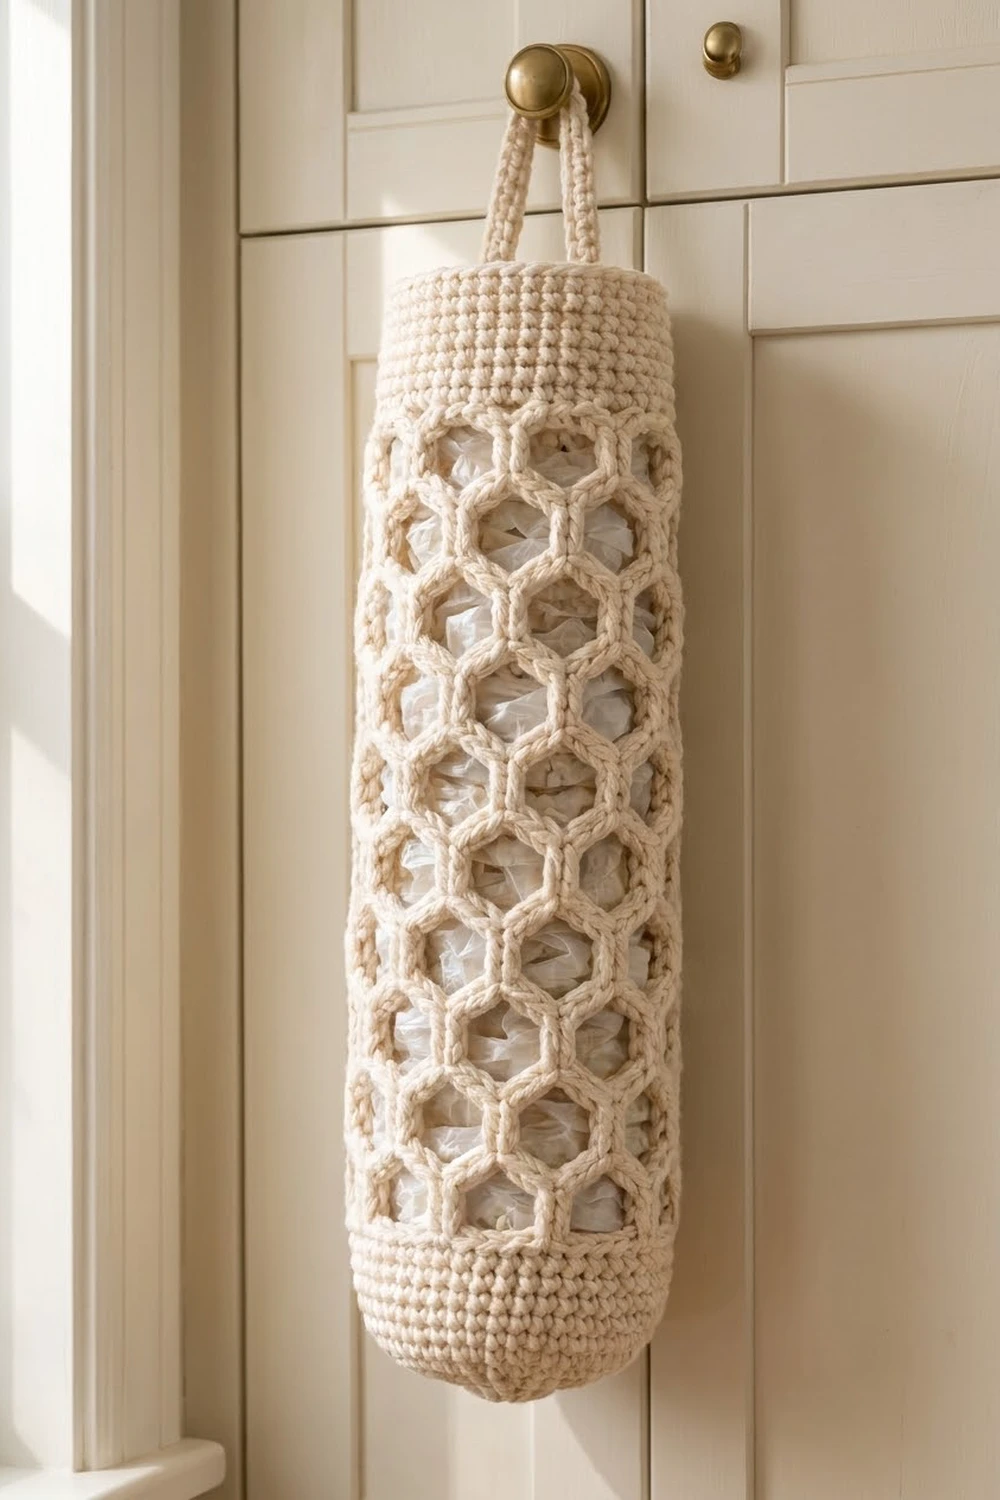
This hanging plastic bag holder turns a pile of grocery bags into something you’re happy to leave on display. The body is an open honeycomb mesh of chunky stitch bars and chain arches. Each cell is a clear hexagon, so the bags show through and you can see when it’s time to restock.
The sample is worked in a soft cream bulky cotton. A warm taupe works just as well and gives a more rustic kitchen look. Solid single crochet bands frame the top and bottom, and a narrow strap loop at the top hangs over a cabinet knob or hook. This pattern uses US crochet terms throughout.
The finished holder is 7.3 in (18.5 cm) wide laid flat, 14.7 in (37.3 cm) around and 21 in (53.3 cm) long. The hanging loop adds about 3 in (7.6 cm), for 24 in (61.0 cm) overall. You stuff bags in through the top and pull them out through the narrower bottom opening.
Construction is simple:
– Crochet the honeycomb mesh as one flat panel.
– Seam it into a tube.
– Add a single crochet band in rounds to each open edge.
– Work the strap straight off the top band.
It’s one continuous piece with one seam. There are no separate motifs to join.
Finished Size and Construction
- Finished size: 7.3 in (18.5 cm) flat width × 21 in (53.3 cm) body length; 14.7 in (37.3 cm) around
- Skill level: Easy / Intermediate
- Terminology: US crochet terms
- Yarn weight: Bulky (#5) cotton or cotton blend
- Hook: 6.0 mm (US J-10)
- Number of pieces: 1 (mesh panel seamed into a tube; bands and strap worked from it)
- Layout: Vertical tube, open at both ends, seam at center back
- Mesh panel size: 14.8 in (37.6 cm) wide × 17 in (43.2 cm) tall
- Size before bands: Tube 17 in (43.2 cm) tall
- Band depth: 2 in (5.1 cm) each at top and bottom
Materials
Use a smooth, firmly plied bulky cotton or cotton blend. Cotton holds the honeycomb shape, doesn’t stretch much under the weight of bags, and washes well. Avoid very fluffy or loosely spun yarn, because the chain arches lose their crisp outline.
- Cream (main color): 150 g, about 165 m (180 yd)
For a taupe version, use the same amount of taupe. The quantity includes about 25% extra for your gauge swatch, a few ripped-out rows, and seaming.
Tools:
- 6.0 mm (US J-10) crochet hook
- Tapestry needle with a large eye
- 4 locking stitch markers
- Scissors
- Measuring tape
- Blocking mat and rust-proof pins
Abbreviations (US Terms)
- ch – chain
- sl st – slip stitch
- sc – single crochet
- sc2tog – single crochet 2 together (decrease)
- dc – double crochet
- sp – space
- st(s) – stitch(es)
- rnd – round
- RS / WS – right side / wrong side
Special stitch – Bar: 2 dc worked side by side. In Row 1, make the bar by working 1 dc in each of the next 2 chains. In every later row, work both dc of the bar into the same space. Each bar forms one vertical side of a honeycomb cell. The ch-3 arches between bars form the slanted tops and bottoms.
Gauge and Checkpoints
There are two gauges, one for the mesh and one for the bands.
- Mesh: 10 sts = 4 in (10.2 cm) wide; 4 rows = 4 in (10.2 cm) tall
- Single crochet: 12 sc × 14 rnds = 4 in (10.2 cm)
Test first. Ch 14 and work Rows 1–4 of the mesh below with 2 repeats (3 bars in odd rows). Row 3 should have 12 sts. After Row 3 the swatch should be 4.8 in (12.2 cm) wide and 3 in (7.6 cm) tall. Then work 14 rows of 12 sc to check the band gauge.
Checkpoints during the project:
- After Row 4: panel 14.8 in (37.6 cm) wide, 4 in (10.2 cm) tall.
- After Row 17: panel 14.8 in (37.6 cm) wide, 17 in (43.2 cm) tall.
- After seaming: tube about 7.4 in (18.8 cm) wide when flat.
- At Rnd 4 of each band: tube 14.7 in (37.3 cm) around.
If your piece is too big, go down one hook size (5.5 mm). If it’s too small, go up one hook size (6.5 mm). Fix gauge with the hook and keep the stitch counts as written. Changing the counts breaks the 37-to-44 band math explained below.
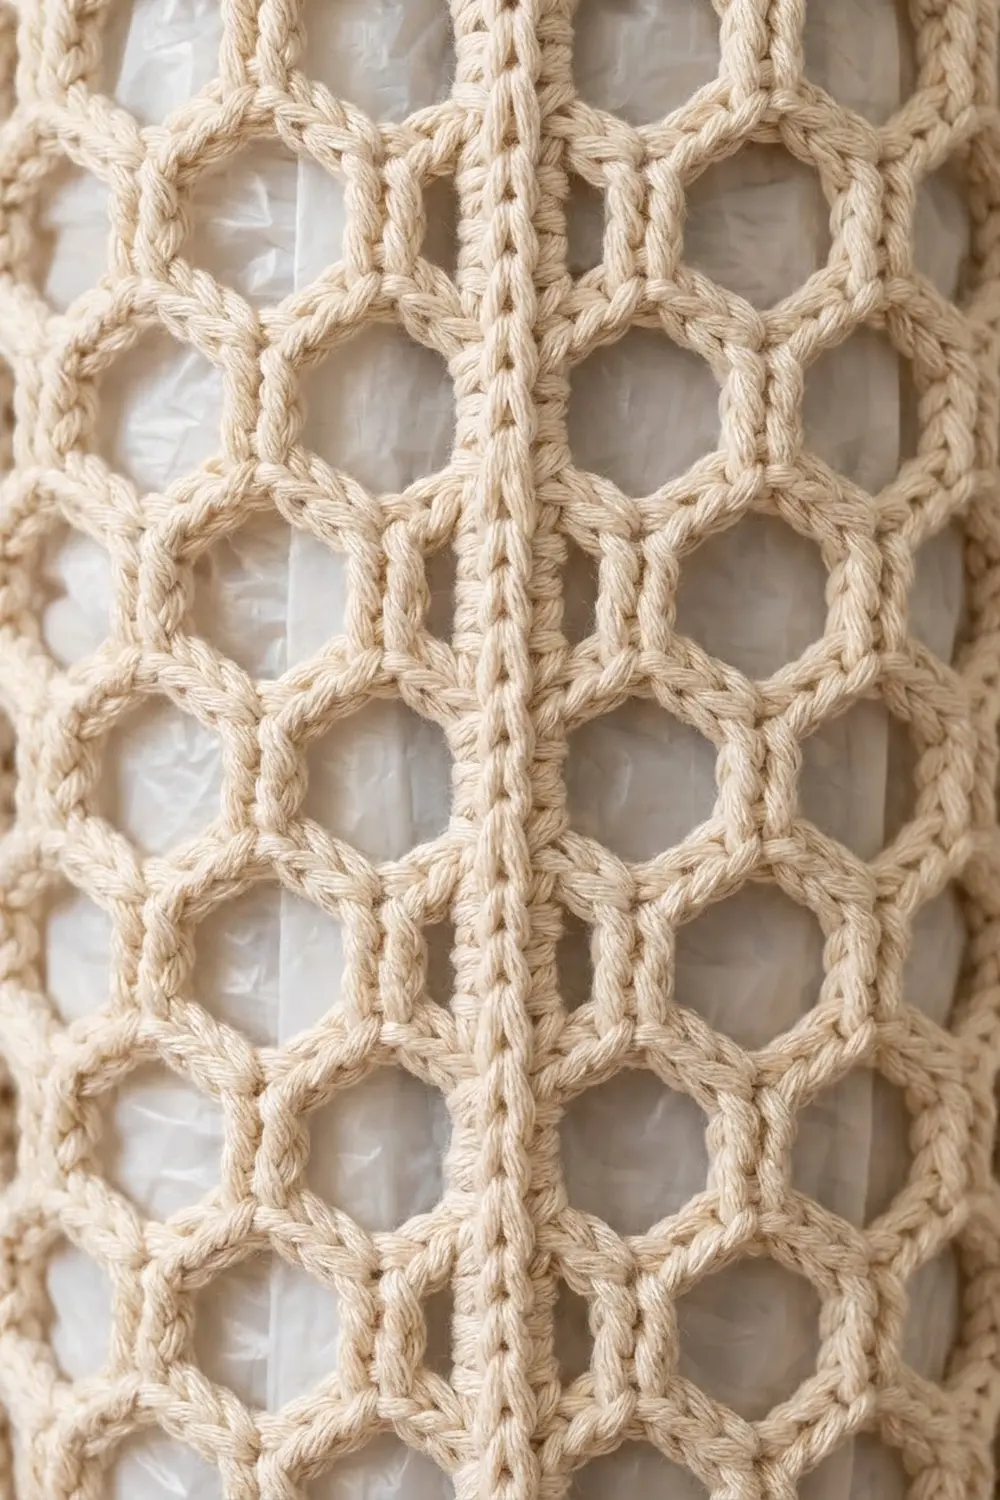
Honeycomb Mesh Panel
You work the panel flat in rows. Odd rows have 8 full bars and 37 sts. Even rows have 7 full bars plus a single dc at each edge, for 36 sts. The turning chain counts as a st throughout.
Foundation: Ch 39.
Row 1 (RS): Dc in 4th ch from hook (skipped 3 ch count as first dc; first bar made), ch 3, skip next 3 ch, dc in each of next 2 ch (bar made); repeat from * 6 more times. Turn. (8 bars, 7 ch-3 sps; 37 sts)
Chain check: the first bar uses 4 ch and each of the 7 repeats uses 5 ch, so 4 + 35 = 39 ch.
Row 2 (WS): Ch 4 (counts as dc + ch 1), 2 dc in next ch-3 sp, ch 3, 2 dc in next ch-3 sp; repeat from * 5 more times, ch 1, dc in top of turning ch. Turn. (7 bars, 6 ch-3 sps, 2 edge dc, 2 ch-1 sps; 36 sts)
Each new bar sits in the middle of a space below, and each ch-3 arches over a bar below. This half-step offset is what turns the openings into hexagons.
Row 3 (RS): Ch 3 (counts as dc), dc in first ch-1 sp (edge bar made), ch 3, 2 dc in next ch-3 sp; repeat from * 5 more times, ch 3, dc in last ch-1 sp, dc in 3rd ch of turning ch-4 (edge bar made). Turn. (8 bars, 7 ch-3 sps; 37 sts)
Rows 4–17: Work Row 2 on every even row and Row 3 on every odd row. End after Row 17, a RS row. (Row 17: 8 bars, 7 ch-3 sps; 37 sts)
Fasten off, leaving a 24 in (61.0 cm) tail for seaming. The panel should measure 14.8 in (37.6 cm) × 17 in (43.2 cm).
Seam the Tube
Fold the panel in half with the RS facing out, so the two side edges (the row ends) meet. Row 1 is at the bottom and Row 17 is at the top.
Using the long tail, whipstitch the side edges together. Work 2 stitches into each row end, catching the edge dc or turning chain on both sides, for 34 whipstitches in all. Keep the stitches snug but not tight. The seam should be as tall as the panel, 17 in (43.2 cm), with no puckering.
Lay the tube flat with the seam at the center back. It should be about 7.4 in (18.8 cm) wide.
Top and Bottom Bands
Work the bands in joined rounds straight into the open edges of the tube. Start every round at the seam. The ch 1 at the start of a round doesn’t count as a stitch.
Band gauge: 3 sc per inch, 3.5 rnds per inch.
Why the Math Works
Each open edge of the panel has 37 sts: 8 bars × 2 dc = 16 sts, plus 7 ch-3 sps × 3 ch = 21 sts. At 3 sc per inch, 37 sc would only cover 12.3 in (31.2 cm) and would pull in the 14.8 in (37.6 cm) mesh. Adding 1 extra sc in each of the 7 spaces gives 37 + 7 = 44 sc, and 44 sc ÷ 3 = 14.7 in (37.3 cm). That’s within 0.1 in (0.3 cm) of the mesh width, so the band lies flat without ruffling or pulling in.
Bottom Band
With the RS facing, join yarn at the seam on the bottom edge. Work into the underside of the foundation chain.
Rnd 1 (conversion): Ch 1, 2 sc under next bar (1 sc in each of the 2 chains at its base), 4 sc into the 3 skipped chains under next ch-3 sp (1 sc in each ch + 1 extra sc); repeat from * 6 more times, 2 sc under last bar. Sl st to first sc. (37 sc worked 1 per st + 7 extra = 44 sc)
Rnds 2–4: Ch 1, sc in each st around, sl st to first sc. (44 sc)
Checkpoint: the band should measure 14.7 in (37.3 cm) around.
Rnd 5 (decrease): Ch 1, sc in next 9 sts, sc2tog; repeat from * 3 more times, sl st to first sc. (40 sc)
Rnd 6: Ch 1, sc in each st around, sl st to first sc. (40 sc)
Rnd 7 (decrease): Ch 1, sc in next 8 sts, sc2tog; repeat from * 3 more times, sl st to first sc. (36 sc)
Fasten off. The 7 rnds make a 2 in (5.1 cm) band. The 36 sc opening is 12 in (30.5 cm) around, about 3.8 in (9.7 cm) across. That’s narrow enough to hold the bags in and wide enough to pull one out.
Top Band
With the RS facing, join yarn at the seam on the top edge (Row 17).
Rnd 1 (conversion): Ch 1, sc in each of the 2 dc of next bar, 4 sc in next ch-3 sp (1 sc for each of its 3 ch + 1 extra sc); repeat from * 6 more times, sc in each of the 2 dc of last bar. Sl st to first sc. (37 sc worked 1 per st + 7 extra = 44 sc)
Rnds 2–7: Ch 1, sc in each st around, sl st to first sc. (44 sc)
Fasten off. The top band is 2 in (5.1 cm) deep. The opening is 14.7 in (37.3 cm) around and about 4.7 in (11.9 cm) across, so bags are easy to stuff in.
Hanging Strap
Number the Rnd 7 stitches of the top band 1 to 44, starting just after the seam. Place markers in sts 39 and 41, and in sts 4 and 6. The strap’s two ends attach at these markers. The 6 sts between them (42, 43, 44, 1, 2, 3) center the loop over the seam.
Join yarn in st 39.
Row 1: Ch 1, sc in sts 39, 40 and 41. Turn. (3 sc)
Rows 2–28: Ch 1, sc in each st across. Turn. (3 sc)
The strap is 1 in (2.5 cm) wide and 8 in (20.3 cm) long. Fasten off, leaving a 10 in (25.4 cm) tail. Bend the strap up into an arch without twisting it. Whipstitch Row 28 to the tops of sts 4, 5 and 6, going through each stitch twice for strength. The finished loop stands about 3 in (7.6 cm) above the top band.
Final Blocking
- Weave in every end along the seam or inside a band. Leave the tails untrimmed for now.
- Soak the holder in cool water with a little mild detergent for 15 minutes.
- Gently press out the water without wringing, then roll the holder in a towel.
- Slide a rolled towel inside the body to fill it to about 4.7 in (11.9 cm) across.
- Shape the honeycomb by hand. Nudge each bar upright and open every cell into an even hexagon.
- Check the size: 7.3 in (18.5 cm) wide when flat and 21 in (53.3 cm) long.
- Pin the strap flat so it dries straight.
- Let it dry completely, then trim the tails.
Final Quality-Control Checklist
- Odd rows: 8 bars and 37 sts; even rows: 7 bars and 36 sts
- 17 mesh rows; panel 14.8 in (37.6 cm) × 17 in (43.2 cm)
- Seam straight at center back, no puckers
- Bottom band: 44, 44, 44, 44, 40, 40, 36 sc
- Top band: 7 rnds of 44 sc
- Strap 3 sc wide, 28 rows, centered over the seam
- Body 21 in (53.3 cm) long, 14.7 in (37.3 cm) around
- All ends secure and hidden
Troubleshooting
Cells look like diamonds, not hexagons. Your bars are too short or your chains are too loose. Work each dc to full height, keep the ch-3 snug, and block firmly.
Edges slant or wander. Make sure the turning chains count as stitches. End every row with a dc in the top of the turning chain.
Panel gets narrower. You probably skipped the ch-1 edge spaces in an odd row. Count 8 bars on every odd row.
Band ruffles. Your sc gauge is looser than 3 per inch. Use a hook one size smaller for the bands only.
Band pulls the mesh in. You missed the extra sc in each ch-3 sp. Rnd 1 must have 44 sc.
Bags fall out the bottom. Add one more decrease round: sc in next 7 sts, sc2tog 4 times (32 sc).
Care
Hand wash, or machine wash cold on a gentle cycle inside a mesh bag. Reshape while damp and dry flat.
Final Notes
Each measurement follows from the one before:
– At 10 mesh sts per 4 in (10.2 cm), the 37-st panel is 14.8 in (37.6 cm) wide.
– At 1 in (2.5 cm) per row, 17 rows make 17 in (43.2 cm) of honeycomb.
– Each 37-st edge plus 7 extra sc becomes 44 sc, or 14.7 in (37.3 cm) around.
– Two 2 in (5.1 cm) bands bring the body to 21 in (53.3 cm).
– The bottom band narrows to 36 sc so bags pull out one at a time.
Check those numbers at each stage and your holder will hang straight and neat.
Happy crocheting!