

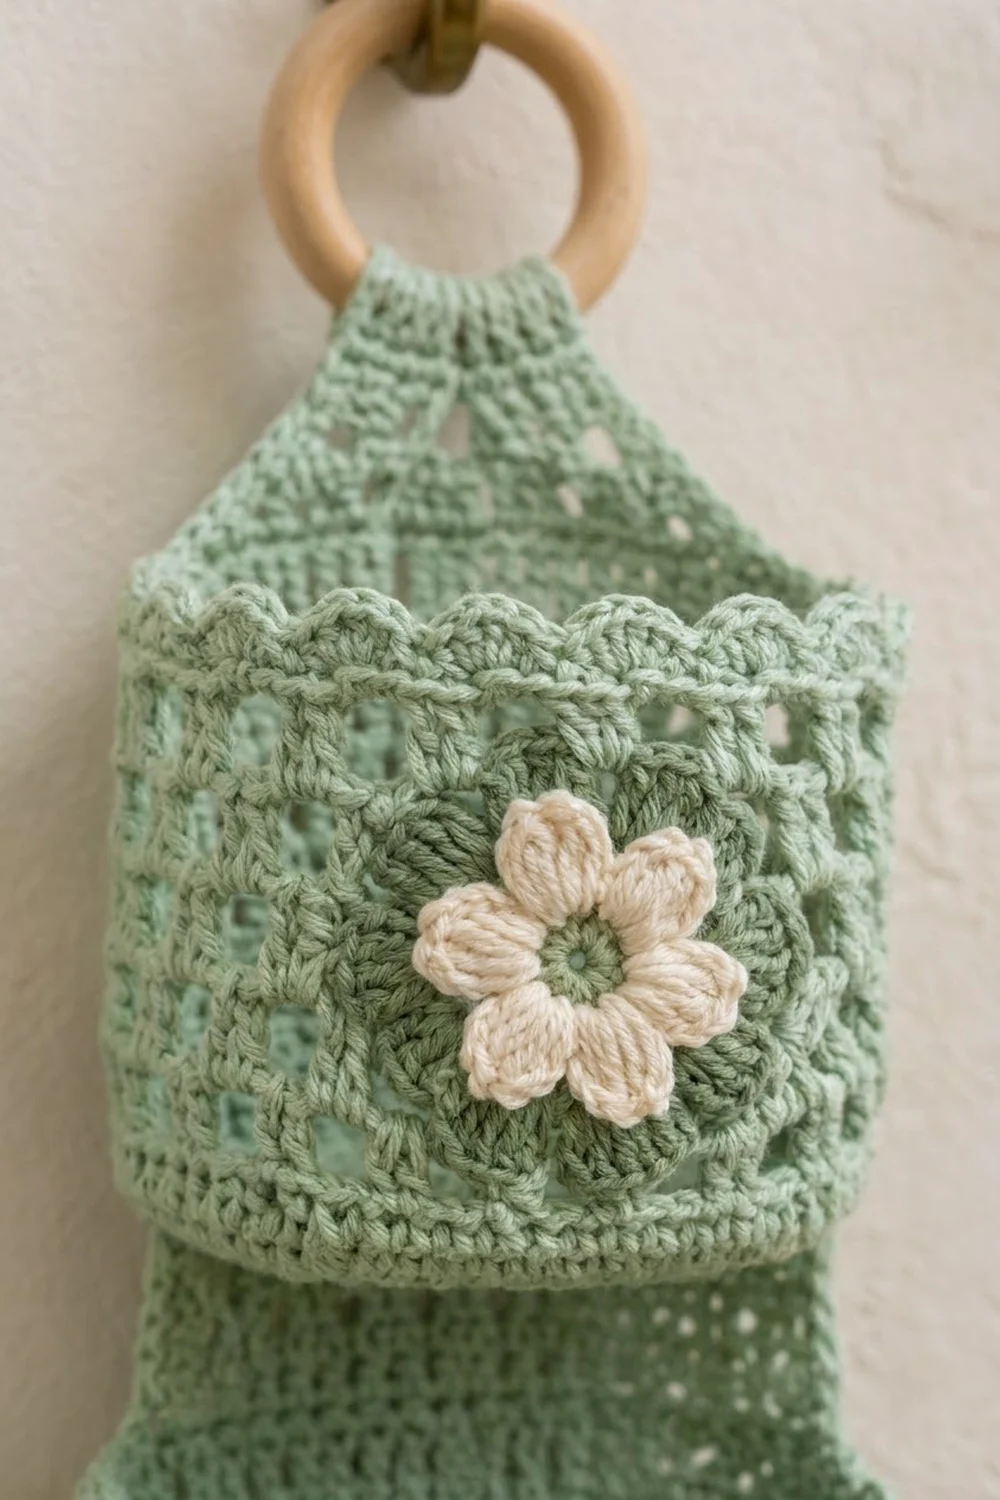
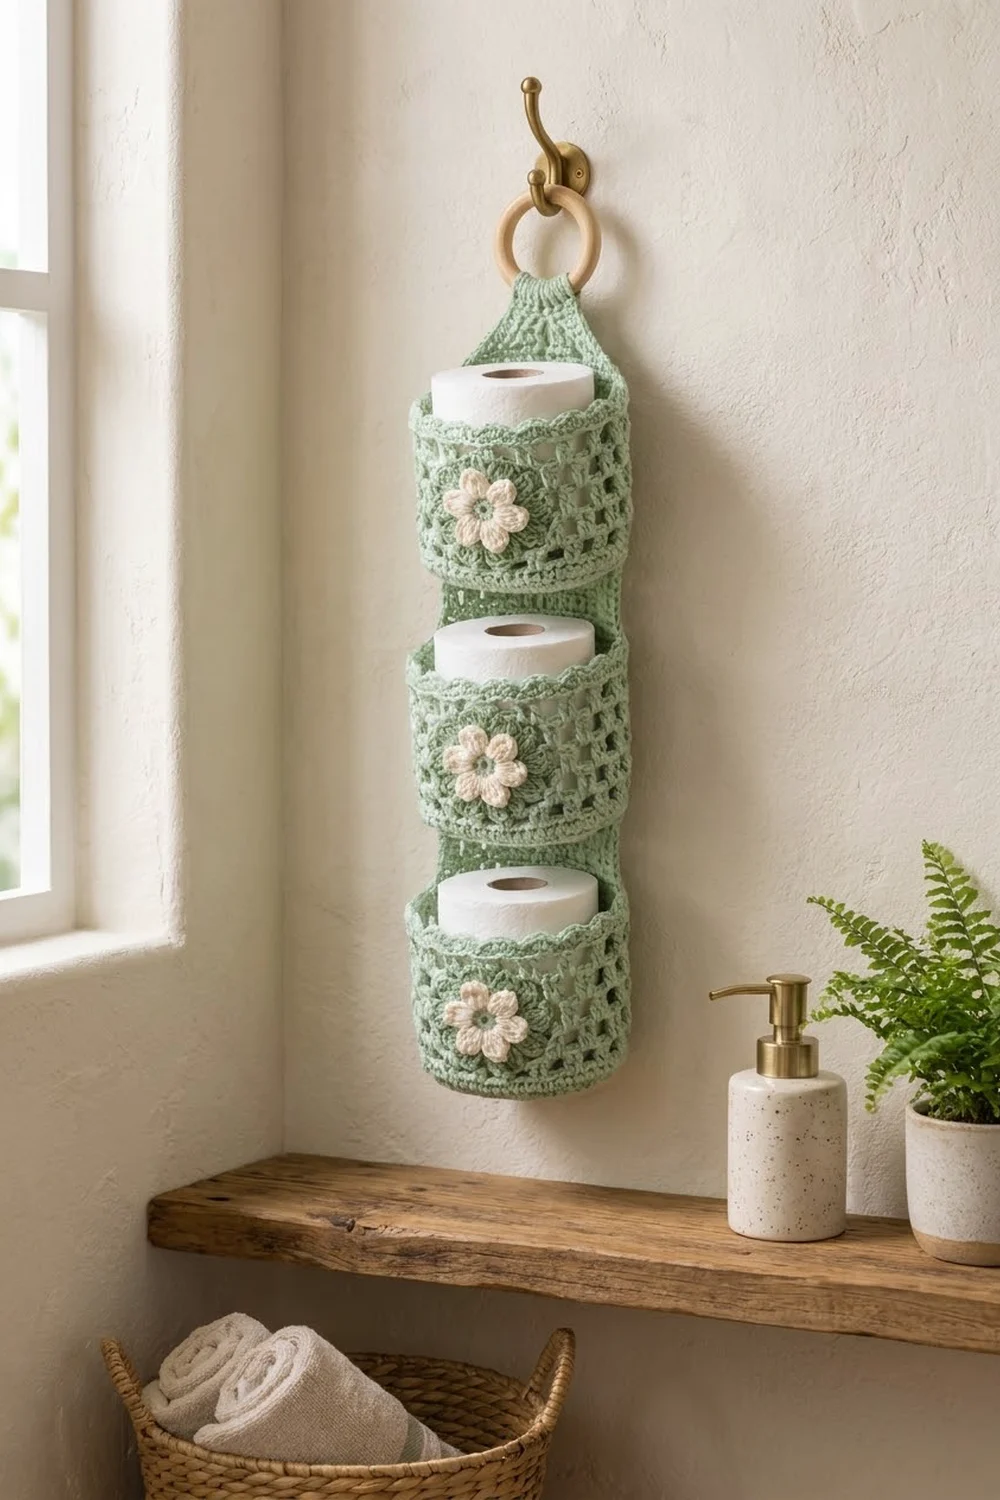
The Sage Blossom Hanging Toilet Paper Holder is a three-pocket storage piece. It hangs from a wooden ring and holds three standard rolls, one above the other. Each pocket has a solid round base, an open square-mesh wall, a solid band at the top and a soft scalloped rim.
The colors are sage green with cream accents. A layered flower sits on the front of each pocket: a green disc with a scalloped edge, a cream five-petal flower on top and a small green center. The style is fresh and cottage-like, and it suits a bathroom with natural wood, brass and plants.
This pattern uses US crochet terms. The finished holder measures about 5.5 in (14.0 cm) wide and 18.25 in (46.4 cm) long, from the bottom pocket to the top of the hanging loop. Each pocket stands 4.4 in (11.2 cm) tall.
Construction is simple. First you crochet three identical pockets in joined rounds, starting at the base and working up. Next you work a flat back spine in rows that narrows into a hanging strap. Then you make three two-layer flower appliqués, sew the pockets to the spine and fold the strap around the ring.
Finished Size and Construction
- Finished size: 5.5 in (14.0 cm) wide x 18.25 in (46.4 cm) long
- Skill level: Easy–Intermediate
- Terminology: US
- Yarn weight: Worsted (#4), cotton or cotton blend
- Hook: 5.0 mm (H-8)
- Number of pieces: 10 (3 pockets, 1 spine, 3 green discs, 3 cream flowers)
- Layout: 1 column of 3 pockets, stacked on the spine
- Pocket size: 5.5 in (14.0 cm) base diameter x 4.4 in (11.2 cm) tall
- Pocket height before rim border: 3.5 in (8.9 cm)
- Rim border depth: 0.9 in (2.3 cm)
Materials
Choose a smooth worsted-weight cotton. Cotton keeps the mesh crisp and the pockets upright, and it handles bathroom humidity well. Avoid fuzzy or very stretchy yarns, because the square holes will lose their shape.
- Sage green: 150 g, about 255 m (pockets, spine, discs, flower centers)
- Cream: 15 g, about 25 m (flower petals)
- 5.0 mm (H-8) crochet hook
- Wooden ring, 2.5 in (6.4 cm) diameter
- 4 stitch markers
- Tapestry needle
- Scissors
- Measuring tape
- Rustproof pins
The yarn amounts include a margin of about 25% for gauge differences and swatching.
Abbreviations (US Terms)
- ch – chain
- sl st – slip stitch
- sc – single crochet
- hdc – half double crochet
- dc – double crochet
- sc2tog – single crochet 2 together
- BLO – back loop only
- MR – magic ring
- sk – skip
- sp – space
- st(s) – stitch(es)
Special stitch – Scallop: sc in next st, sk 1 st, 5 dc in next st, sk 1 st. One scallop uses 4 stitches.
Gauge and Checkpoints
Single crochet gauge: 14 sc and 16 rows = 4 in (10.2 cm).
Mesh gauge: 7 mesh squares (14 sts) = 4 in (10.2 cm) wide; 2 mesh rounds = 1 in (2.5 cm) tall.
Make one complete pocket before anything else. It is your real gauge test. Check these points:
- After Rnd 5 (30 sts): base diameter 2.7 in (6.9 cm)
- After Rnd 10 (60 sts): base diameter 5.5 in (14.0 cm)
- After Rnd 18: wall height 3.5 in (8.9 cm), measured from the base edge
- After Rnd 21: full pocket height 4.4 in (11.2 cm)
Too big? Go down 0.5 mm. A loose base makes a floppy pocket. Too small? Go up 0.5 mm, and check that a roll slides in easily. A standard roll is about 4.5 in (11.4 cm) across, so the base must stay close to 5.5 in (14.0 cm).
Pocket (Make 3)
Work in joined rounds with green. Do not turn. The ch 1 at the start of a round does not count as a stitch. Keep the round’s joining seam at the center back of the pocket. The flower will go on the opposite side.
Base
Rnd 1: MR, ch 1, 6 sc in ring, sl st to first sc. (6 sts)
Rnd 2: Ch 1, 2 sc in each st around, sl st to first sc. (12 sts)
Rnd 3: Ch 1, sc in next st, 2 sc in next st 6 times, sl st to first sc. (18 sts)
Rnd 4: Ch 1, sc in next 2 sts, 2 sc in next st 6 times, sl st to first sc. (24 sts)
Rnd 5: Ch 1, sc in next 3 sts, 2 sc in next st 6 times, sl st to first sc. (30 sts)
Rnd 6: Ch 1, sc in next 4 sts, 2 sc in next st 6 times, sl st to first sc. (36 sts)
Rnd 7: Ch 1, sc in next 5 sts, 2 sc in next st 6 times, sl st to first sc. (42 sts)
Rnd 8: Ch 1, sc in next 6 sts, 2 sc in next st 6 times, sl st to first sc. (48 sts)
Rnd 9: Ch 1, sc in next 7 sts, 2 sc in next st 6 times, sl st to first sc. (54 sts)
Rnd 10: Ch 1, sc in next 8 sts, 2 sc in next st 6 times, sl st to first sc. (60 sts)
Checkpoint: the base lies flat and measures 5.5 in (14.0 cm) across.
Wall
Rnd 11: Ch 1, sc in BLO of each st around, sl st to first sc. (60 sts) The unused front loops form a ridge, and the wall turns upward.
Rnd 12: Ch 1, sc in each st around, sl st to first sc. (60 sts)
Rnd 13 (mesh set-up): Ch 4 (counts as dc + ch 1), sk next st, dc in next st, ch 1, sk next st 29 times, sl st to 3rd ch of beg ch-4. (30 dc + 30 ch-1 sps = 60 sts, 30 mesh squares)
Rnds 14–18: Ch 4 (counts as dc + ch 1), sk ch-1 sp, dc in next dc, ch 1, sk ch-1 sp 29 times, sl st to 3rd ch of beg ch-4. (30 dc + 30 ch-1 sps = 60 sts each round)
Checkpoint: the six mesh rounds measure 3 in (7.6 cm), and the wall measures 3.5 in (8.9 cm) from the base ridge. The dc columns stack straight up to form clean square windows.
Do not fasten off. Go on to the rim border below.
Back Spine (Make 1)
Work flat in rows with green.
Foundation: Ch 11.
Row 1: Sc in 2nd ch from hook and in each ch across, turn. (10 sts)
Rows 2–60: Ch 1, sc in each st across, turn. (10 sts)
Checkpoint: 2.9 in (7.4 cm) wide x 15 in (38.1 cm) long.
Row 61: Ch 1, sc2tog, sc in next 6 sts, sc2tog, turn. (8 sts)
Row 62: Ch 1, sc in each st across, turn. (8 sts)
Row 63: Ch 1, sc2tog, sc in next 4 sts, sc2tog, turn. (6 sts)
Row 64: Ch 1, sc in each st across, turn. (6 sts)
Row 65: Ch 1, sc2tog, sc in next 2 sts, sc2tog, turn. (4 sts)
Rows 66–81: Ch 1, sc in each st across, turn. (4 sts)
The tapered section (Rows 61–65) adds 1.25 in (3.2 cm). The strap is 1.1 in (2.8 cm) wide and 4 in (10.2 cm) long. Fasten off, leaving a 12 in (30.5 cm) tail.
Flower Appliqué (Make 3 Sets)
Green Disc
Rnd 1: With green, MR, ch 3 (counts as dc), 11 dc in ring, sl st to top of ch-3. (12 sts)
Rnd 2: Ch 3 (counts as dc), dc in same st, 2 dc in each st around, sl st to top of ch-3. (24 sts)
Rnd 3: Ch 1, sc in next st, sk 1 st, 5 dc in next st, sk 1 st 6 times, sl st to first sc. (6 scallops)
The disc measures 3 in (7.6 cm) across. Fasten off with a 12 in (30.5 cm) tail.
Cream Flower
Rnd 1: With green, MR, ch 1, 10 sc in ring, sl st to first sc. (10 sts) Fasten off. This center is 0.75 in (1.9 cm) across.
Rnd 2: Join cream in any sc. (Hdc, 3 dc, hdc) in next st, sl st in next st 5 times; the last sl st lands at the join. (5 petals)
The flower measures 2.25 in (5.7 cm) across. Fasten off with a 10 in (25.4 cm) tail.
Assemble the Layers
Center the cream flower on the green disc, with each petal between two green scallops. Use the cream tail to sew around the green center and through the base of each petal. The green scallops show behind the petals.
Make All Pieces
- Green: 3 pockets, 1 spine, 3 discs, 3 flower centers
- Cream: 3 petal rounds
Layout (front view, top to bottom):
      [ ring ]
       \strap/
      [ spine ]
  [ Pocket 3 + flower ]   spine Rows 41–56
  [ Pocket 2 + flower ]   spine Rows 21–36
  [ Pocket 1 + flower ]   spine Rows 1–16
Joining
Placement: Count spine rows from the bottom. Pocket 1 covers Rows 1–16, Pocket 2 covers Rows 21–36 and Pocket 3 covers Rows 41–56. This leaves a 0.6 in (1.5 cm) gap above each scallop rim, plus 1 in (2.5 cm) of spine (Rows 57–60) above the top pocket.
Stitch-to-stitch logic: The back of each pocket is the 10 stitches centered on the seam: the last 5 and first 5 stitches of each round. That matches the spine’s 10 stitches exactly.
- Pin the 10 back stitches of Rnd 11 across the matching spine row (Row 1, 21 or 41). Whipstitch them 1 to 1.
- Pin the 10 back stitches of Rnd 20 across the top row of that zone (Row 16, 36 or 56). Whipstitch them 1 to 1.
- Sew the two side edges. Each sc round (Rnds 11, 12, 19 and 20) joins to 1 spine row-end. Each mesh round (Rnds 13–18) joins to 2 spine row-ends, because one mesh round equals 2 sc rows. Total: 4 + 12 = 16 row-ends, which is exactly the 16 rows in the zone.
Tension: Pull each stitch snug but not tight. The spine should stay flat, with no puckers behind the mesh.
Hanging loop: Fold the strap through the wooden ring toward the back. Use the tail to sew Row 81 to the back of Row 65.
Checkpoint: Hung from the ring, the holder measures 18.25 in (46.4 cm) long: 15 in (38.1 cm) spine + 1.25 in (3.2 cm) taper + 2 in (5.1 cm) folded strap.
Appliqués: Center one flower set on the front of each pocket, opposite the spine, with its middle between Rnds 15 and 16. Sew around the outer edge of the green disc, stitching through the dc posts of the mesh.
Border (Pocket Rim)
Border gauge: 14 sc = 4 in (10.2 cm); 2 sc rounds = 0.5 in (1.3 cm); scallop height about 0.4 in (1.0 cm).
Work this on each pocket, continuing straight on from Rnd 18.
Rnd 19 (conversion): Ch 1, sc in each dc and in each ch-1 sp around, sl st to first sc. (30 sc in dc + 30 sc in ch-1 sps = 60 sts; 30 sts on the front half, 30 sts on the back half)
Rnd 20: Ch 1, sc in each st around, sl st to first sc. (60 sts; 30 front, 30 back)
Checkpoint: pocket height is 4 in (10.2 cm).
Rnd 21: Ch 1, work Scallop 15 times around, sl st to first sc. (15 scallops) Fasten off and weave in ends.
Why the math works: Each mesh round has 30 dc and 30 ch-1 spaces, so 1 sc in each gives back exactly 60 stitches. One scallop uses 4 stitches, and 60 ÷ 4 = 15 scallops with nothing left over. The rim adds 0.9 in (2.3 cm) to the 3.5 in (8.9 cm) wall, for a total of 4.4 in (11.2 cm).
Final Blocking
- Weave in all ends before blocking.
- Soak the holder in cool water for 10 minutes. Press out the water in a towel; do not wring it.
- Put a dry roll in a plastic bag into each pocket, or use a rolled towel of the same size.
- Straighten the mesh columns so the windows are square.
- Pin each scallop and the flower petals flat.
- Lay the holder flat and let it dry completely, about 24 hours.
- Check the measurements: 5.5 in (14.0 cm) wide, 4.4 in (11.2 cm) per pocket and 18.25 in (46.4 cm) overall.
Final Quality-Control Checklist
- Each base has 60 sts and lies flat.
- Each mesh round has 30 dc and 30 ch-1 spaces.
- Each rim has 15 even scallops.
- The spine is 10 sts wide and 15 in (38.1 cm) long before the taper.
- All pockets are centered, with even 0.6 in (1.5 cm) gaps.
- Every flower faces forward and sits level.
- The ring loop is sewn securely through both layers.
- No ends show on the front.
Troubleshooting
The base cups or ruffles. Cupping means your tension is too tight; ruffling means you have extra stitches. Recount each base round: every round should add 6 stitches.
The mesh leans. Make sure each dc goes into the top of the dc below, not into the ch-1 space.
A roll will not fit. The base is too small. Remake it with a larger hook, or block it over a roll.
A pocket sags forward. Add a few extra tacking stitches between Rnd 20 and the spine.
The scallops don’t divide evenly. The rim count is not 60. Recount Rnd 19.
The spine twists. Chain 1 and turn at the end of every row, and keep the count at 10.
Care
Hand wash in cool water with mild soap and lay flat to dry. While the holder is damp, reshape each pocket around a roll.
Final Notes
Every size in this pattern comes back to your gauge. At 14 sc = 4 in (10.2 cm), the 60-stitch base is 5.5 in (14.0 cm) across. Two sc rounds, six mesh rounds and two more sc rounds bring the pocket to 4 in (10.2 cm), and the scallop rim adds the last 0.4 in (1.0 cm) for 4.4 in (11.2 cm). The 16 joining rounds of each pocket match 16 spine rows, and the three pockets stack on a 15 in (38.1 cm) spine for a finished length of 18.25 in (46.4 cm).
Make the first pocket and check it against these numbers. Once it matches, the rest of the holder goes together easily.
Happy crocheting!