

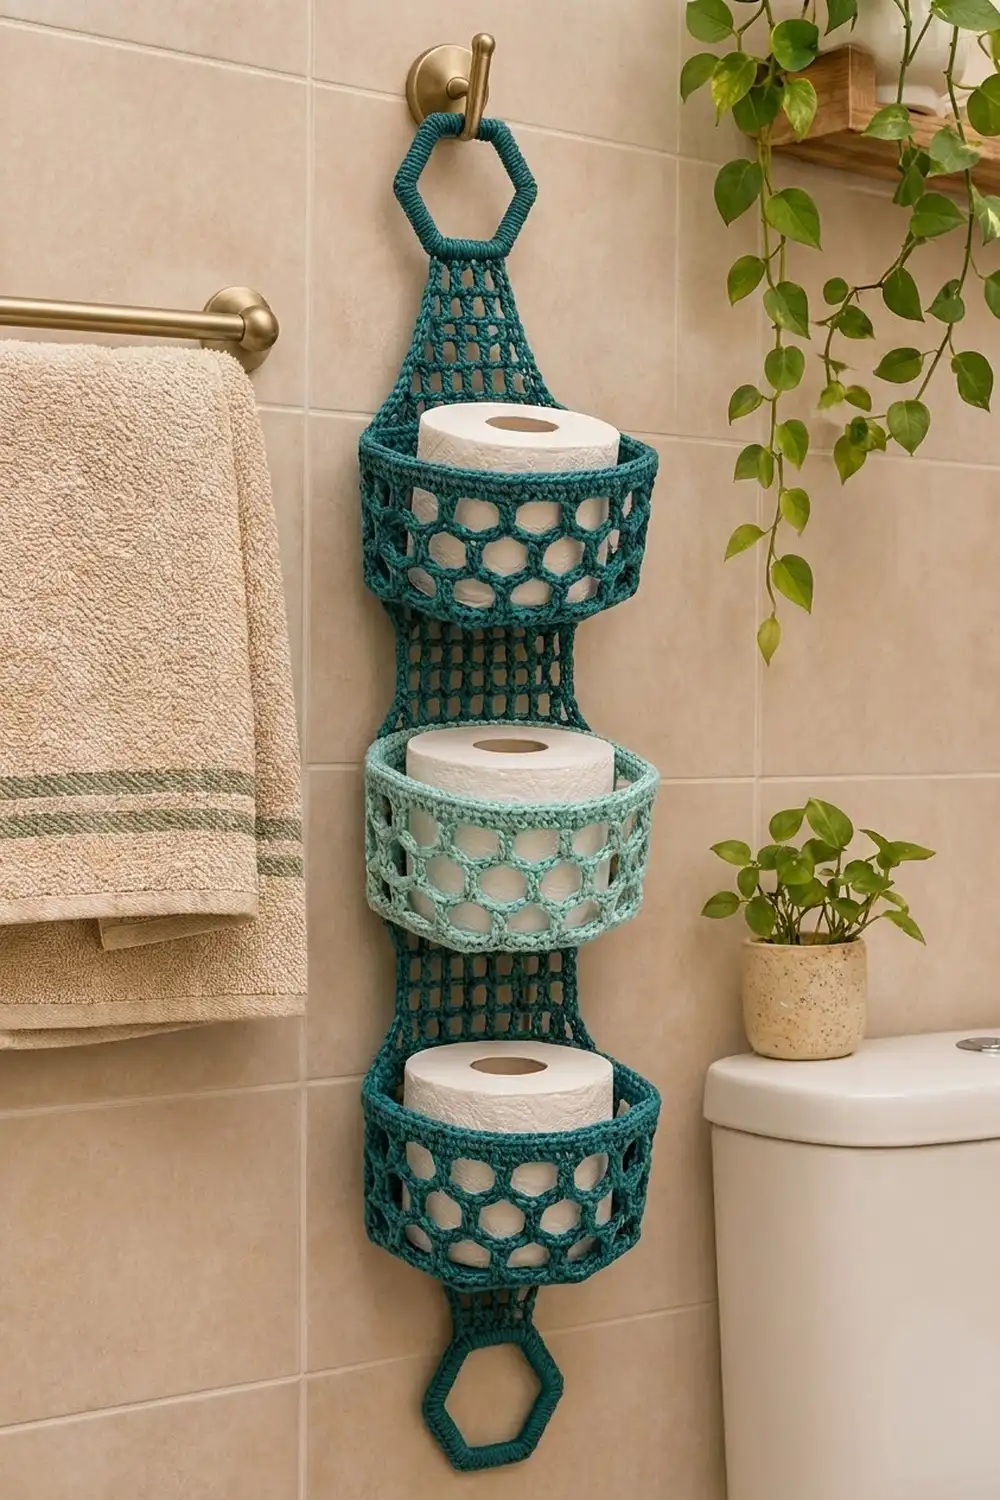
This hanging organizer keeps three spare toilet rolls tidy in a small space. Three hexagonal baskets with open honeycomb walls are sewn onto a long filet-mesh back panel. A small hexagon ring at the top slips over a towel hook or door hook.
The sample uses dark teal for the top and bottom baskets, the panel, and the ring. The middle basket is light aqua. The open mesh looks light and modern, and it lets air move around the rolls in a damp bathroom.
This pattern uses US crochet terms. The finished organizer is 7 in (17.8 cm) wide at the widest part of the panel and 29 in (73.7 cm) long, including the ring. Each basket is 8 in (20.3 cm) point to point, 7 in (17.8 cm) flat to flat, and 3.5 in (8.9 cm) tall.
You work each basket base in the round as a lacy hexagon, then turn up the walls without a seam. You work the panel flat from the bottom up with filet shaping and make the ring separately. Last, you edge the panel and sew everything together.
Finished Size and Construction
- Finished size: 7 in (17.8 cm) x 29 in (73.7 cm)
- Skill level: Intermediate
- Terminology: US crochet terms
- Yarn weight: Worsted (#4) cotton
- Hook: 4.5 mm (US 7)
- Number of pieces: 5 (3 baskets, 1 back panel, 1 hanging ring)
- Layout: 3 baskets stacked vertically on 1 panel, with the ring at the top
- Basket size: 8 in (20.3 cm) point to point x 3.5 in (8.9 cm) tall
- Panel size before border: 6.5 in (16.5 cm) x 26.25 in (66.7 cm)
- Border depth: 0.25 in (0.6 cm) on every panel edge
Materials
Choose a firm worsted-weight cotton or cotton blend. Cotton holds its shape, handles humidity, and washes well. Acrylic works too, but the baskets will be softer.
- Dark teal: 250 g / about 425 m (465 yd), for 2 baskets, the panel, and the ring
- Light aqua: 80 g / about 136 m (149 yd), for 1 basket
These quantities include a margin of about 15% for swatching and differences between brands.
Tools:
- 4.5 mm (US 7) hook
- Tapestry needle
- 6 stitch markers
- Measuring tape and scissors
- Blocking pins and a mat
- A box about 6.5 in (16.5 cm) across for shaping the baskets (optional)
- Fabric stiffener (optional)
Abbreviations (US Terms)
- ch – chain
- sl st – slip stitch
- sc – single crochet
- dc – double crochet
- BLO – back loop only
- sk – skip
- sp – space
- st(s) – stitch(es)
- rnd – round
Special stitch – filet square: one square is dc, ch 1, dc, and it shares its dc with the next square. A row of N squares has N + 1 dc and N ch-1 sps, for 2N + 1 sts in total.
Gauge and Checkpoints
- Single crochet: 16 sc and 16 rows = 4 in (10.2 cm)
- Filet mesh: 8 squares and 8 rows = 4 in (10.2 cm), so each square is 0.5 in (1.3 cm) wide and each row is 0.5 in (1.3 cm) tall
Make one basket base (Rnds 1–6) first. It is your real gauge test.
Base checkpoints (point to point, lying flat):
- After Rnd 1: 1.5 in (3.8 cm)
- After Rnd 2: 3.5 in (8.9 cm)
- After Rnd 3: 5.5 in (14.0 cm)
- After Rnd 4: 7 in (17.8 cm)
- After Rnd 6: 8 in (20.3 cm)
If your base is more than 0.25 in (0.6 cm) too big, go down one hook size. If it is too small, go up one size. If the chain loops ruffle but the sc rounds measure correctly, chain more tightly.
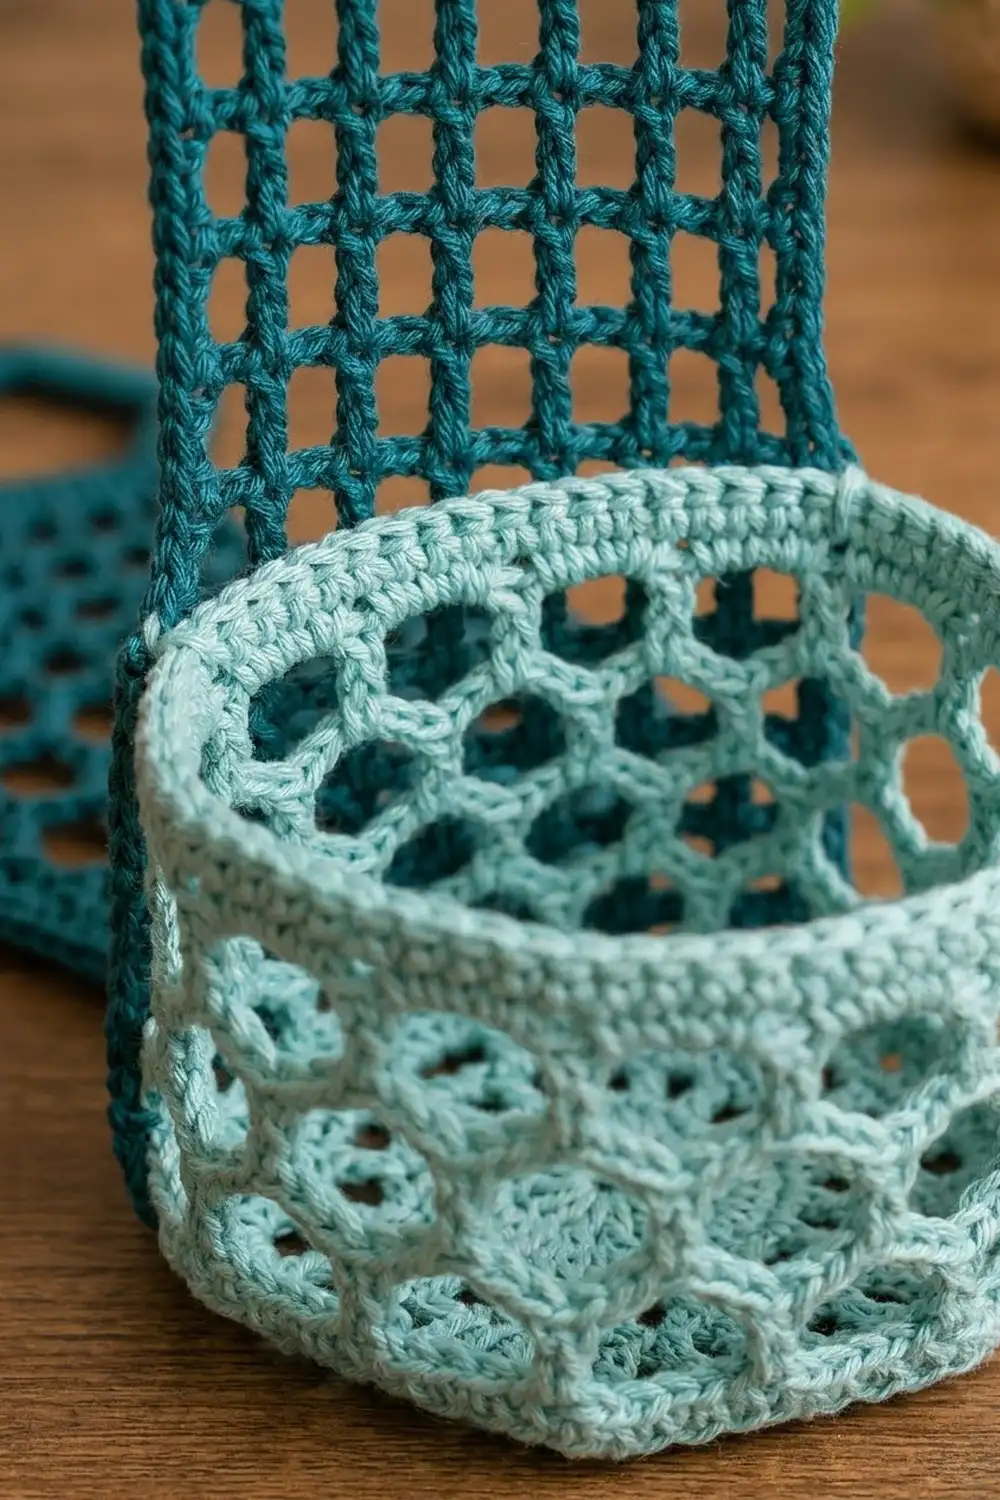
Basket (Make 3)
Base
Rnd 1: Magic ring. Ch 3 (counts as dc), 17 dc in ring. Join with sl st to top of ch-3. (18 dc)
Rnd 2: Ch 1, sc in same st, ch 5, sk 2 dc, sc in next dc; repeat from * 4 more times, ch 5, join with sl st to first sc. (6 sc, 6 ch-5 loops)
These six loops form the first ring of openings.
Rnd 3: Sl st in next 3 ch to reach the center of the loop. Ch 1, (sc, ch 5, sc) in loop for a corner, ch 5; repeat in each loop around, join. (6 corner loops + 6 side loops = 12 ch-5 loops)
Rnd 4: Sl st to the center of the first corner loop. Ch 1, (sc, ch 5, sc) in corner loop, ch 5, sc in next side loop, ch 5; repeat around, join. (6 corner loops + 12 side loops = 18 ch-5 loops)
This completes the second ring of openings. The six corner loops set the hexagon shape.
Rnd 5 (conversion round): Sl st into the first corner loop. Ch 1, (2 sc, ch 2, 2 sc) in corner loop, 5 sc in each of next 2 side loops; repeat around, join. Each side has 2 + 5 + 5 + 2 = 14 sc between corner ch-2 sps. (84 sc, 6 corner ch-2 sps)
Rnd 6: Ch 1, sc in each sc, and work (sc, ch 2, sc) in each corner ch-2 sp. Join. (16 sc per side, 96 sc, 6 corner ch-2 sps)
“Per side” means the sc between two corner ch-2 sps. The corner sc are already included in the 16.
Check: 8 in (20.3 cm) point to point and 7 in (17.8 cm) flat to flat.
Walls
Rnd 7 (turning round): Ch 1, working in BLO, sc in each sc, and work 1 sc in each corner ch-2 sp. Join. (96 sc worked 1-per-stitch + 6 corner sc = 102 sc; 17 sc per side)
The unused front loops make a crisp fold, so the walls stand straight up.
Rnd 8: Ch 1, sc in first st, ch 5, sk 2, sc in next st; repeat around. For the last repeat, sk 2 and work ch 2, dc in first sc instead of ch 5. (34 loops; the ch-2 + dc counts as the last loop and puts your hook at its center)
Rnds 9–12: Ch 1, sc around the joining dc, ch 5, sc in next loop; repeat around, ending ch 2, dc in first sc. (34 loops each round)
Each round shifts the loops by half a loop, which creates the offset honeycomb cells.
Rnd 13 (conversion round): Ch 1, 3 sc in each loop around. Join. (34 loops x 3 sc = 102 sc)
Rnds 14–15: Ch 1, sc in each sc. Join. (102 sc)
Fasten off, leaving a 30 in (76.2 cm) tail. The walls should measure 3.5 in (8.9 cm) from the fold to the rim. Mark the 17 rim sts above one base side as the back of the basket.
Back Panel (Make 1)
Work flat in rows from the bottom up, using dark teal.
Filet row: Ch 4 (counts as dc + ch 1), dc in next dc, ch 1, dc in next dc across, with the last dc in the 3rd ch of the turning ch. Turn.
Increase row (+1 square at each edge): Ch 4, dc in the first dc (at the base of the chain), then continue as a filet row. In the last st, work (dc, ch 1, dc).
Decrease row (–1 square at each edge): Sl st in first dc, ch-1 sp, and next dc. Ch 4, then continue as a filet row until 1 square remains. Dc in next dc and turn, leaving the last square unworked.
Row 1: Ch 20, sc in 2nd ch from hook and each ch across. (19 sc)
Row 2: Ch 4, sk 1, dc in next st, ch 1, sk 1, dc in next st across. (9 squares, 19 sts)
Rows 3–4: Increase rows. (11, then 13 squares; 27 sts)
Rows 5–10: Filet rows. (13 squares) Rows 4–10 form basket zone 1.
Rows 11–13: Decrease rows. (11, 9, 7 squares)
Rows 14–17: Filet rows. (7 squares, 15 sts)
Rows 18–20: Increase rows. (9, 11, 13 squares)
Rows 21–26: Filet rows. (13 squares) Rows 20–26 form basket zone 2.
Rows 27–29: Decrease rows. (11, 9, 7 squares)
Rows 30–33: Filet rows. (7 squares)
Rows 34–36: Increase rows. (9, 11, 13 squares)
Rows 37–42: Filet rows. (13 squares) Rows 36–42 form basket zone 3.
Rows 43–47: Decrease rows. (11, 9, 7, 5, 3 squares)
Rows 48–53: Filet rows. (3 squares, 7 sts) This is the strap.
Do not fasten off. Continue straight into the border.
Check: 13 squares = 6.5 in (16.5 cm), 7 squares = 3.5 in (8.9 cm), and 3 squares = 1.5 in (3.8 cm). Row 1 adds 0.25 in, and 52 filet rows at 0.5 in each add 26 in, for a total of 26.25 in (66.7 cm). Each basket zone is 7 rows = 3.5 in (8.9 cm), which matches the wall height.
Hanging Ring (Make 1)
Rnd 1: Ch 24 and join with sl st without twisting. Ch 1, sc in each ch. Join. (24 sc)
Rnd 2: Ch 1, sc in next 3 sts, (sc, ch 1, sc) in next st; repeat 6 times. Join. (5 sc per side, 30 sc, 6 corner ch-1 sps)
Fasten off, leaving a 12 in (30.5 cm) tail. The ring is about 2.25 in (5.7 cm) flat to flat.
Make All Pieces
- Dark teal: 2 baskets, 1 panel, 1 ring
- Light aqua: 1 basket
      [ ring ]
      | strap |
  [ DARK TEAL basket ]   zone 3, rows 36-42
      | narrow |
  [ LIGHT AQUA basket ]  zone 2, rows 20-26
      | narrow |
  [ DARK TEAL basket ]   zone 1, rows 4-10
Joining
Border and block the panel before sewing. Join each basket with two whipstitch seams.
Seam 1 (base): On the bottom row of the zone (Row 4, 20, or 36), there are 27 sts. Skip 5 and mark sts 6–22, which gives 17 sts with 5 free on each side. Whipstitch the 17 back-side sts of basket Rnd 7 to these 17 sts, 1 to 1.
Seam 2 (rim): Whipstitch the 17 marked rim sts of Rnd 15 to sts 6–22 of the zone’s top row (Row 10, 26, or 42), 1 to 1.
Corners: Tack each back vertical corner of the wall to the panel with 4–5 small stitches.
Keep your tension snug but flat. Pulling too hard puckers the mesh and tips the basket forward. Sew the light aqua basket to zone 2.
Ring: Lay one 5-sc side of the ring across the 7 strap sts. Sew the first and last ring sc to 2 strap sts each and the middle 3 to 1 each (2 + 3 + 2 = 7).
Check: there are 9 rows, or 4.5 in (11.4 cm), between baskets, and the organizer is 29 in (73.7 cm) long.
Border
The border is worked on the panel only. The baskets already have an sc rim.
Border gauge: 1 sc per st across the top and bottom, 2 sc per filet row end, and 1 sc for the end of Row 1.
Border Rnd: After Row 53, ch 1 and turn to work down the first long edge.
- Long side 1: 1 sc (end of Row 1 is counted last on this side) + 52 x 2 sc = 105 sc
- Bottom: 19 sc, 1 per foundation st
- Long side 2: 105 sc
- Top of strap: 7 sc
- Corners: ch 1 at each of the 4 corners
Join to the first sc. (236 sc + 4 corner ch-1 sps) Fasten off.
Why the math works: a filet row is 0.5 in (1.3 cm) tall, and so are 2 sc at 4 sc per inch. Because of that, the edges neither flare nor pull, even along the stepped diagonals. The top and bottom are 1 sc per st, so the 9-square and 3-square widths stay exact. The border adds 0.25 in (0.6 cm) per edge, which brings the panel to 7 in (17.8 cm) x 26.75 in (67.9 cm).
Final Blocking
- Soak all pieces in cool water and roll them in a towel.
- Pin the panel to 7 in (17.8 cm) wide at the basket zones and 26.75 in (67.9 cm) long.
- Open each filet square into a neat square.
- Stretch each basket over a 6.5 in (16.5 cm) box and press the corners into points.
- Brush on diluted stiffener if you want firmer baskets.
- Dry everything for 24 hours before joining.
Final Quality-Control Checklist
- Each base has 96 sc, 16 per side.
- Each wall has 102 sc in Rnd 7, 34 loops in Rnds 8–12, and 102 sc in Rnds 13–15.
- Each basket is 8 in (20.3 cm) point to point and 3.5 in (8.9 cm) tall.
- The panel has 13 squares in all three zones, 7 squares in both narrow sections, and 3 squares in the strap.
- The border has 105 sc on each long side.
- Each seam has 17 matched pairs, with 5 free sts on each side.
- The organizer hangs straight.
Troubleshooting
- Base cups or ruffles: Recount the loops (6, 12, 18) and adjust your chain tension.
- Walls flare: Work Rnd 7 in BLO, and use a hook half a size smaller for the walls.
- Basket leans forward: Sew through all 17 rim sts in Seam 2.
- Wavy panel edges: Use exactly 2 sc per row end.
- Roll won’t fit: Reblock the basket over a slightly larger box.
Care
Hand wash cool, or machine wash on gentle in a laundry bag. Reshape and dry flat.
Final Notes
The measurement chain is simple. Each base reaches 96 sc and 8 in (20.3 cm), and the walls hold 102 sts over 3.5 in (8.9 cm). The panel’s 13-square zones are 6.5 in (16.5 cm) wide and 7 rows tall, which matches the walls. The border adds 0.25 in (0.6 cm) per edge, for a finished organizer 7 in (17.8 cm) wide and 29 in (73.7 cm) long.
Happy crocheting!