

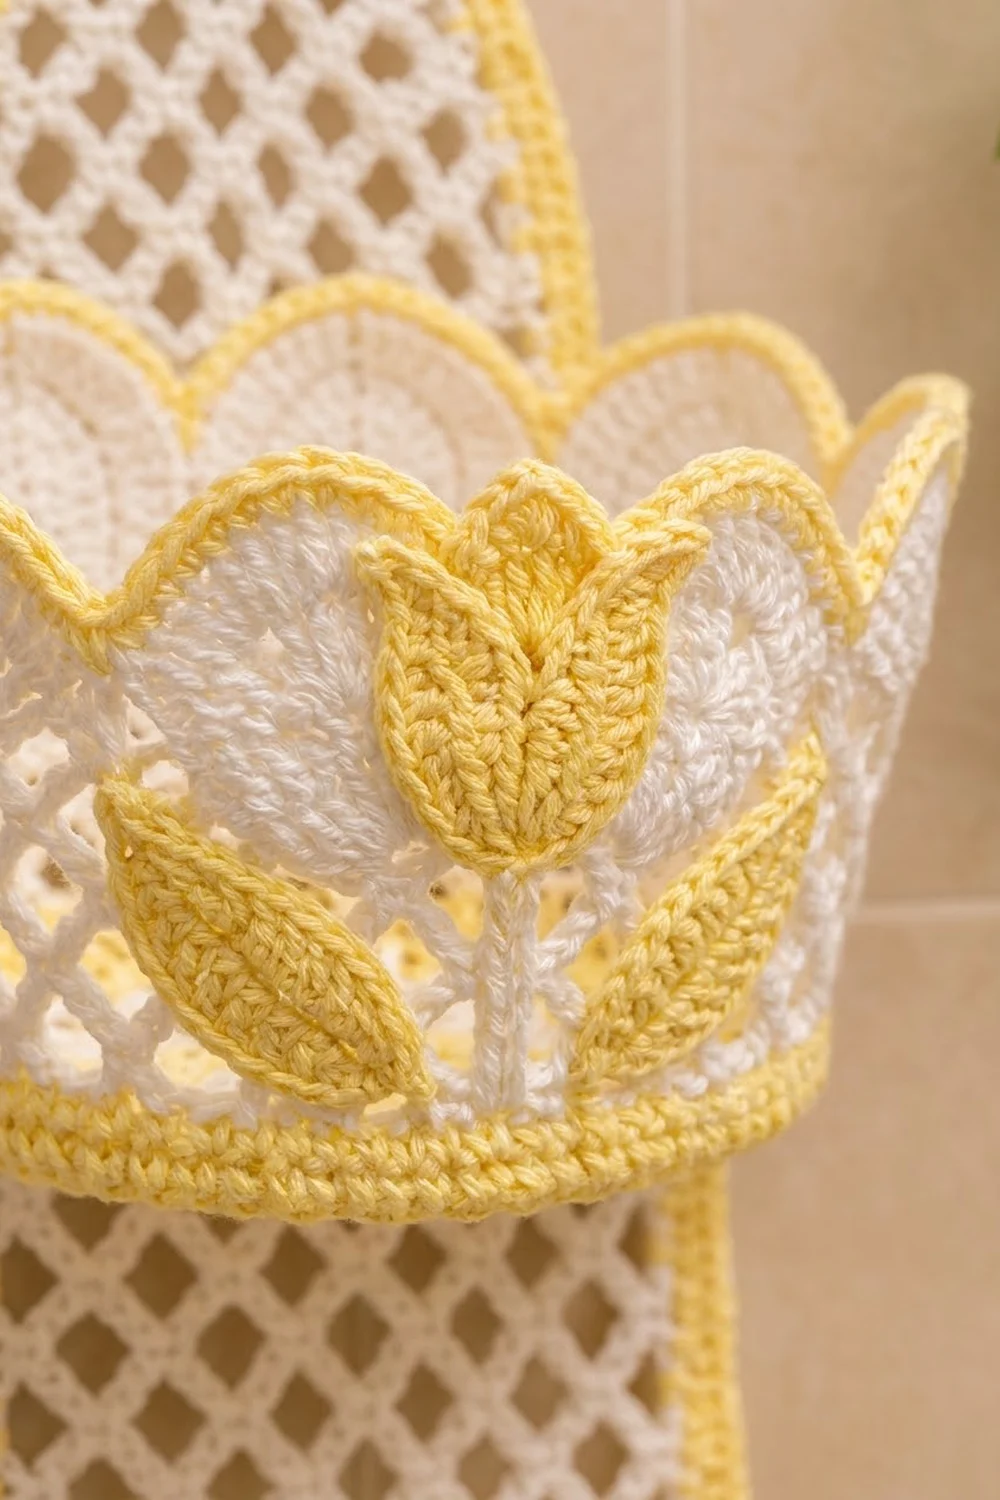
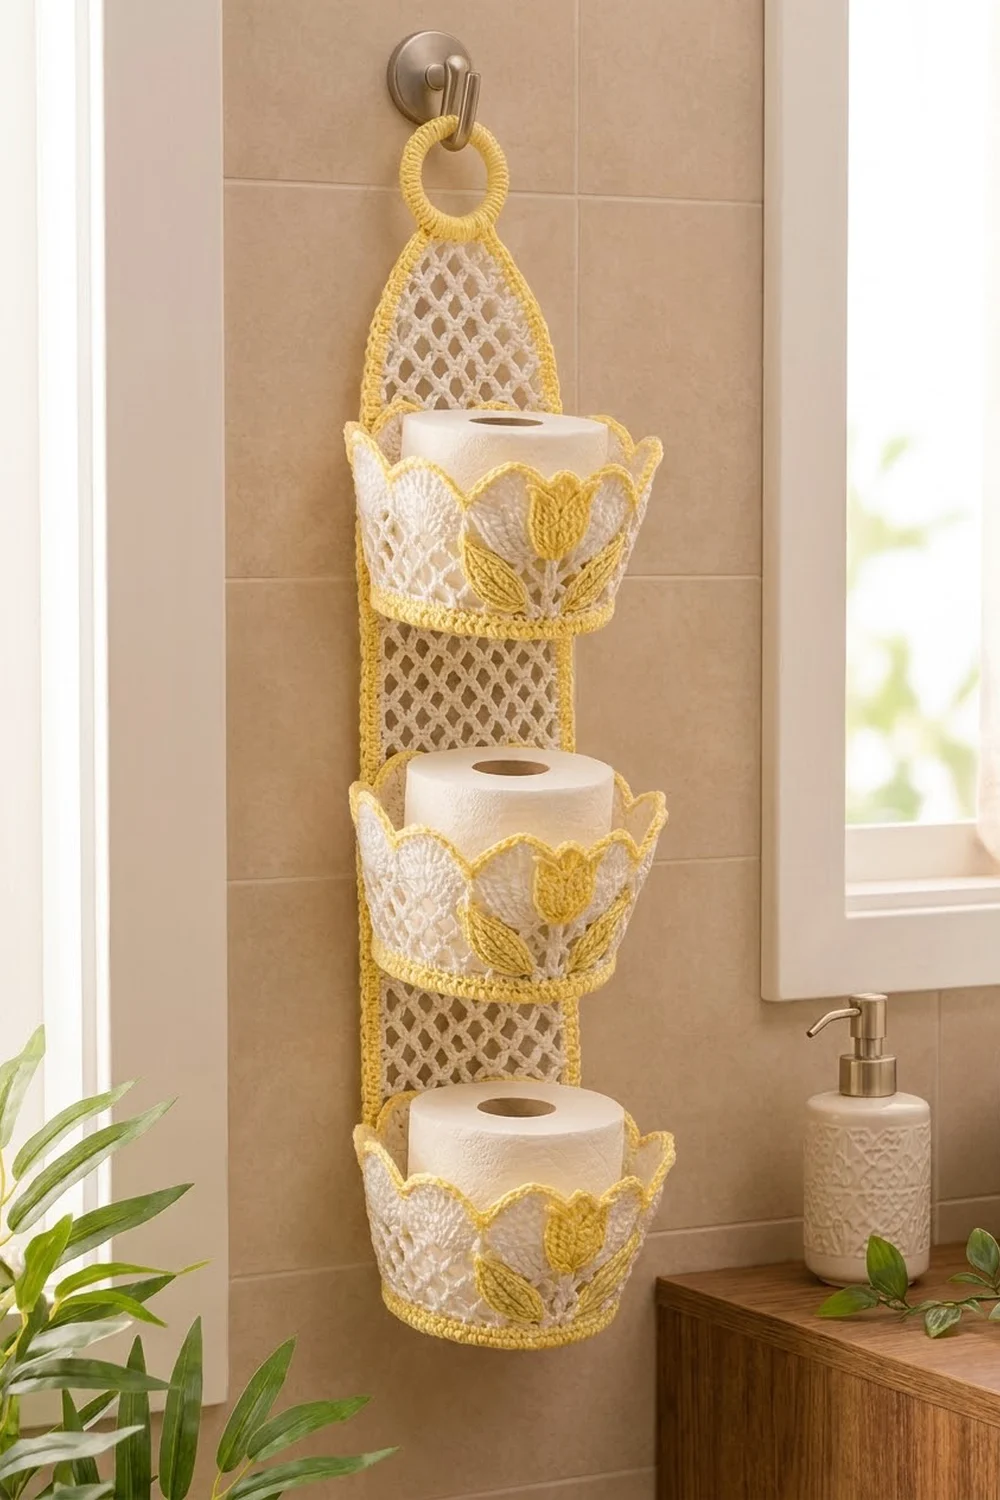
This hanging holder stacks three tulip baskets on a lattice back panel, so spare rolls stay off the floor and within reach. Each basket has a lacy base, an open diamond-mesh wall, and a crown of ten rounded petals edged in yellow.
It uses two colors: white for the mesh and petals, and soft butter yellow for the base centers, bands, edging, tulip appliqués, and panel border. The look is light and cottage-style.
The pattern uses US crochet terms. The finished holder is 22.7 in (57.7 cm) tall including the ring. The back panel is 4.4 in (11.2 cm) wide. Each basket is 6 in (15.2 cm) across the base and 4.75 in (12.1 cm) tall.
Each basket is one continuous piece, worked from the center of the base up into the wall and petals. You make the tulip appliqués separately and sew them on. The back panel is worked in rows of chain mesh, then tapered, bordered, and fitted with a covered ring. Last, you sew the baskets to the panel.
Finished Size and Construction
- Finished size: 22.7 in (57.7 cm) tall including ring; panel 4.4 in (11.2 cm) wide; baskets stick out about 6.5 in (16.5 cm) at the rim
- Skill level: Intermediate
- Terminology: US
- Yarn weight: Worsted (#4) cotton
- Hook: 4.0 mm (G-6)
- Number of pieces: 17 (3 baskets, 3 tulip heads, 3 stems, 6 leaves, 1 back panel, 1 ring cover)
- Layout: 3 baskets stacked vertically on 1 panel
- Piece size: basket base 6 in (15.2 cm) across; basket wall 4.75 in (12.1 cm) tall
- Panel size before border: 3.4 in x 19.7 in (8.6 cm x 50.0 cm)
- Border depth: 0.5 in (1.3 cm) on every edge
Materials
Use a smooth worsted-weight cotton. Cotton holds the basket shape and washes easily. Avoid acrylic, which makes the petals floppy.
- White: about 160 g / 246 m
- Butter yellow: about 110 g / 169 m
These amounts include a margin of about 15 percent for your gauge swatch and color changes.
Tools:
- 4.0 mm (G-6) crochet hook
- 1 plastic or metal ring, 2 in (5.1 cm) outer diameter
- Tapestry needle
- Stitch markers (at least 4)
- Scissors, rust-proof pins, blocking mat
- Optional: fabric stiffener
Abbreviations (US Terms)
- ch – chain
- sl st – slip stitch
- sc – single crochet
- hdc – half double crochet
- dc – double crochet
- tr – treble crochet
- BLO – back loop only
- sc2tog – single crochet 2 together
- sp – space
- rev sc – reverse single crochet (crab stitch): sc worked from left to right (if you crochet right-handed)
Special stitch – picot: ch 2, then sl st in the 2nd ch from the hook.
Gauge and Checkpoints
Gauge: 14 dc and 7 dc rows = 4 in (10.2 cm). Single crochet is the same width: 14 sc = 4 in (10.2 cm), or 3.5 stitches per inch.
Panel mesh gauge: 6 ch-3 loops (12 foundation stitches) = 3.4 in (8.6 cm) wide; 7 mesh rows = 2 in (5.1 cm).
Make one complete basket first and check it at each of these points:
- After base Round 2: 2.25 in (5.7 cm) across
- After base Round 4: 4.5 in (11.4 cm) across
- After base Round 6: 6 in (15.2 cm) across
- After wall Round 8: yellow band 0.5 in (1.3 cm) tall
- After wall Round 11: 2.25 in (5.7 cm) up from the fold line
- After wall Round 12: 2.8 in (7.1 cm) up from the fold line
- After petals and edging: 4.75 in (12.1 cm) up from the fold line
Too big? Go down to a 3.75 mm hook. Too small? Go up to a 4.5 mm hook. A standard roll is about 4.5 in (11.4 cm) across, so the base must be at least 5.5 in (14.0 cm) or the roll won’t fit.
Basket (Make 3)
Base
Join each round with a sl st to the top of the beginning ch-3 (or the first sc).
Round 1 (yellow): Magic ring, ch 3 (counts as dc), 11 dc in ring. Join. (12 dc)
Round 2 (yellow): Ch 3, dc in same st, 2 dc in each st around. Join. (24 dc) Fasten off yellow.
Round 3 (white): Join white in any st. Ch 3, 2 dc in next st, dc in next st, 2 dc in next st; repeat from * around. Join. (36 dc)
Round 4 (white): Ch 3, ch 2, skip next st, dc in next st, dc in next st, ch 2, skip next st, dc in next st; repeat from * 10 more times. Join. (24 dc and 12 ch-2 sps = 48 sts)
Round 5 (white): Ch 3, ch 3, skip ch-2 sp, dc in next dc, dc in next dc, ch 3, skip ch-2 sp, dc in next dc; repeat from * 10 more times. Join. (24 dc and 12 ch-3 sps = 60 sts) The dc now sit in pairs, making 12 spokes with open windows between them. Fasten off white.
Round 6 (yellow): Join yellow in any dc. Ch 1, sc in each dc and 3 sc in each ch-3 sp around. Join. (24 + 36 = 60 sc) The base should measure 6 in (15.2 cm) across.
Wall
Round 7 (yellow): Ch 1, sc BLO in each st around. Join. (60 sc) The unused front loops make the fold where the wall turns upward.
Round 8 (yellow): Ch 1, sc in each st around. Join. (60 sc) Fasten off yellow.
Round 9 (white, mesh): Join white in any st. Ch 1, sc in same st, ch 5, skip 2 sts, sc in next st; repeat from * 18 more times, ch 5, skip 2 sts, sl st in first sc. (20 ch-5 loops)
Rounds 10–11 (white, mesh): Sl st in each of the first 3 ch of the first loop, ch 1, sc in same loop, ch 5, sc in next loop; repeat from * 18 more times, ch 5, sl st in first sc. (20 ch-5 loops)
Round 12 (white, conversion): Sl st into the first loop, ch 3, 2 dc in same loop, 3 dc in each remaining loop. Join. (20 loops x 3 dc = 60 dc, no extra stitches) Fasten off.
Number the Round 12 stitches 1 to 60, starting with the beginning ch-3.
Petals (10 per basket)
Work each petal in rows over 6 stitches of Round 12. Petal 1 uses sts 1–6, Petal 2 uses sts 7–12, and so on, ending with Petal 10 on sts 55–60.
Row 1: Join white in the first of the 6 sts, ch 3 (counts as dc), dc in next 5 sts. (6 dc)
Row 2: Ch 3, turn, dc in first st, dc in next 4 sts, 2 dc in top of turning ch. (8 dc)
Row 3: Ch 1, turn, sc2tog, hdc in next st, dc in next 2 sts, hdc in next st, sc2tog. (6 sts) Fasten off.
Row 2 widens each petal to 8 sts on a 6-stitch base, so neighboring petals overlap slightly. That overlap makes the layered crown.
Petal Edging (yellow)
Join yellow at the base of Petal 1 on the right side. For each petal:
- Up the side: 1 sc in Row 1 end, 2 sc in Row 2 end, 1 sc in Row 3 end (4 sc)
- Across the top: sc in first st, 2 sc in next st, sc in next 2 sts, 2 sc in next st, sc in last st (8 sc)
- Down the side: 1 sc in Row 3 end, 2 sc in Row 2 end, 1 sc in Row 1 end (4 sc)
- Valley: sl st into Round 12 where two petals meet (not counted)
Each petal gets 16 sc, so the full edging is 160 sc plus 10 valley sl sts. Join and fasten off.
Tulip Appliqué (Make 3 sets)
All appliqué pieces are yellow.
Tulip head: Magic ring, ch 3 (counts as dc), 8 dc in ring. Don’t join; pull the ring closed and turn. (9 dc)
Row 2: Ch 1, sc in next dc, (dc, tr, picot, tr, dc) in next dc, sc in next dc; repeat from * 2 more times. (18 sts and 3 picots) This makes three pointed petals. Finished head: 1.75 in x 1.5 in (4.4 cm x 3.8 cm).
Stem: Ch 8, sl st in 2nd ch from hook and in each ch across. (7 sl sts) Length: 1.75 in (4.4 cm).
Leaf (make 2 per set): Ch 9. Sc in 2nd ch from hook, hdc in next ch, dc in next 3 ch, hdc in next ch, sc in next ch, 3 sc in last ch. Now work along the other side of the chain: sc in next ch, hdc in next ch, dc in next 3 ch, hdc in next ch, sc in last ch. Sl st to first sc. (7 + 3 + 7 = 17 sts) Finished leaf: 2 in x 0.75 in (5.1 cm x 1.9 cm).
Placement: Petal 6 (sts 31–36) is the front center. Sew the tulip head so its base sits on Round 12 directly below Petal 6. Sew the stem straight down over the mesh to the top of Round 8. Sew one leaf on each side of the stem, tips angled up and out.
Back Panel (Make 1)
Work in white rows, then taper the top.
Foundation: Ch 14.
Row 1: Sc in 2nd ch from hook, ch 3, skip next ch, sc in next ch; repeat from * 5 more times. (7 sc, 6 loops)
Row 2: Ch 4 (counts as dc and ch 1), turn, sc in first loop, ch 3, sc in next loop; repeat from * 4 more times, ch 1, dc in last sc. (5 full loops and 2 half loops)
Row 3: Ch 1, turn, sc in first dc, ch 3, sc in next loop; repeat from * 4 more times, ch 3, sc in 3rd ch of turning ch. (7 sc, 6 loops)
Rows 4–65: Repeat Rows 2–3 thirty-one more times. (6 loops) The panel now measures 3.4 in x 18.6 in (8.6 cm x 47.2 cm).
Taper (Rows 66–69): Ch 1, turn, sc in first loop, ch 3, sc in next loop; repeat to the end. Each row has one loop fewer than the row before: Row 66 (5 loops), Row 67 (4), Row 68 (3), Row 69 (2). Fasten off.
Before the border, the panel measures 3.4 in x 19.7 in (8.6 cm x 50.0 cm).
Border
Border gauge: 3.5 sc per inch, which matches the mesh’s 3.5 rows per inch.
Round 1 (yellow): Join yellow at the right corner of the foundation edge. Ch 1.
- Bottom: 3 sc in first foundation ch, sc in next 11 ch, 3 sc in last ch (17 sc, including both corner groups)
- Long side: 1 sc in each row end of Rows 2–65 (64 sc)
- Slanted edge: 2 sc in each row end of Rows 66–69 (8 sc)
- Top: 3 sc in first loop of Row 69, sc in center sc, 3 sc in second loop (7 sc)
- Slanted edge: 2 sc in each row end of Rows 69–66 (8 sc)
- Long side: 1 sc in each row end of Rows 65–2 (64 sc)
Join. (17 + 64 + 8 + 7 + 8 + 64 = 168 sc)
Round 2: Ch 1, sc in each st, but work 3 sc in the center sc of each bottom corner group and 3 sc in the center top sc. Join. (168 worked 1 per stitch + 6 extra = 174 sc) By section: bottom 21, each long side 64, each slant 8, top 9.
Round 3: Ch 1, rev sc in each st around. Join. (174 rev sc) Fasten off.
Why the math works: Row gauge equals stitch gauge, so one sc per row end keeps the long sides flat. Each step on the slanted edges moves sideways as well as up, so those row ends need 2 sc. The only extra stitches go at the three points. The three border rounds add 0.5 in (1.3 cm) on every edge, so the finished panel is 4.4 in x 20.7 in (11.2 cm x 52.6 cm).
Ring
Join yellow around the 2 in (5.1 cm) ring. Work about 40 sc over the ring, packed tightly enough that the ring doesn’t show. Join, leaving a long tail. Center the ring above the top point of the panel and sew it behind the 5 center top sts of Round 2.
Make All Pieces
- White with yellow: 3 baskets, 1 bordered back panel
- Yellow: 3 tulip heads, 3 stems, 6 leaves, 1 ring cover
Layout (top to bottom):
      [ RING ]
   [ panel mesh ]
   [ BASKET 3   ]
   [ panel mesh ]
   [ BASKET 2   ]
   [ panel mesh ]
   [ BASKET 1   ]
Joining
Method: Whipstitch with white yarn, sewing through the basket’s wall stitches and the panel’s mesh bars behind them.
Back center: On each basket, the back center is the middle of Petal 1, between Round 12 sts 3 and 4. Mark sts 59, 60, and 1–8 (10 sts) on both Round 8 and Round 12.
Stitch-to-stitch logic: The 10 marked stitches span 2.9 in (7.4 cm), centered on the panel’s 3.4 in (8.6 cm) mesh. Sew each marked stitch to the nearest mesh bar. Sew two lines per basket: one along Round 8 and one along Round 12.
Placement (measured from the bottom of the finished panel):
- Basket 1: bottom fold at 0 in (0 cm)
- Basket 2: bottom fold at 6 in (15.2 cm)
- Basket 3: bottom fold at 12 in (30.5 cm)
This leaves 1.25 in (3.2 cm) of mesh between baskets. The top of Basket 3 sits at 16.75 in (42.5 cm), with 4 in (10.2 cm) of mesh above it.
Tension: Sew snug but not tight. If the panel puckers behind a basket, loosen the stitches.
Size checkpoint: Hang the holder. It should be 22.7 in (57.7 cm) tall overall, and the panel should hang straight.
Final Blocking
- Soak the piece in cool water, then roll it in a towel to press out the excess.
- Pin the panel flat to 4.4 in x 20.7 in (11.2 cm x 52.6 cm).
- Fill each basket with a toilet roll wrapped in plastic.
- Shape the petals outward and smooth the edging.
- If you like, mist the petals with stiffener.
- Let everything dry for at least 24 hours before hanging.
Final Quality-Control Checklist
- Bases are 6 in (15.2 cm) across; walls are 4.75 in (12.1 cm) tall
- Each basket has 10 petals with 16 edging sc each
- Tulips are centered under Petal 6
- The panel border has 174 stitches
- Baskets are 1.25 in (3.2 cm) apart
- The ring is centered and secure; all ends are woven in
Troubleshooting
- Base ruffles: Go down a hook size.
- Base cups before Round 7: Go up a hook size.
- Mesh sags: Use ch 4 instead of ch 5 on Rounds 9–11 (still 20 loops).
- Petals flop: Use stiffener, or work Row 3 more tightly.
- Panel edges wave: Check that you have one sc per row end.
- Basket tilts forward: Add a third line of whipstitch along Round 10.
Care
Hand wash in cool water with mild soap. Reshape while damp and lay flat to dry.
Final Notes
The measurement chain: a 6 in (15.2 cm) base gives 60 stitches. That count carries through the bands, the 20 mesh loops, the 60 dc, and the 10 six-stitch petals. The panel’s 3.5 rows per inch match the border’s 3.5 sc per inch, so it finishes at 4.4 in x 20.7 in (11.2 cm x 52.6 cm). With the ring, the total height is 22.7 in (57.7 cm).
Happy crocheting!