

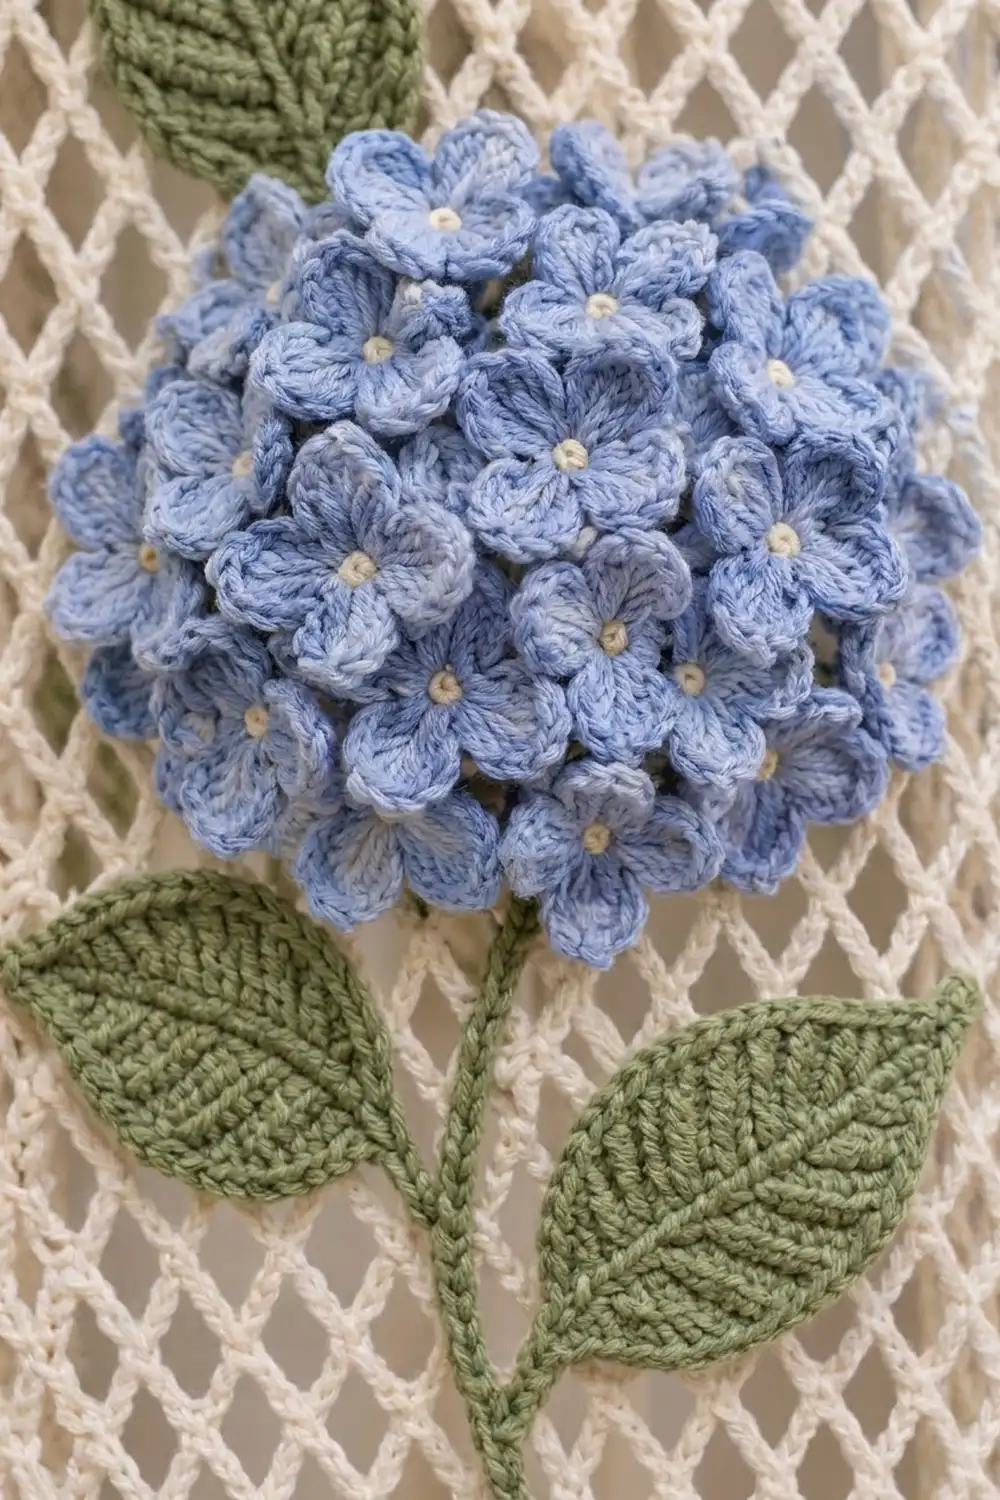
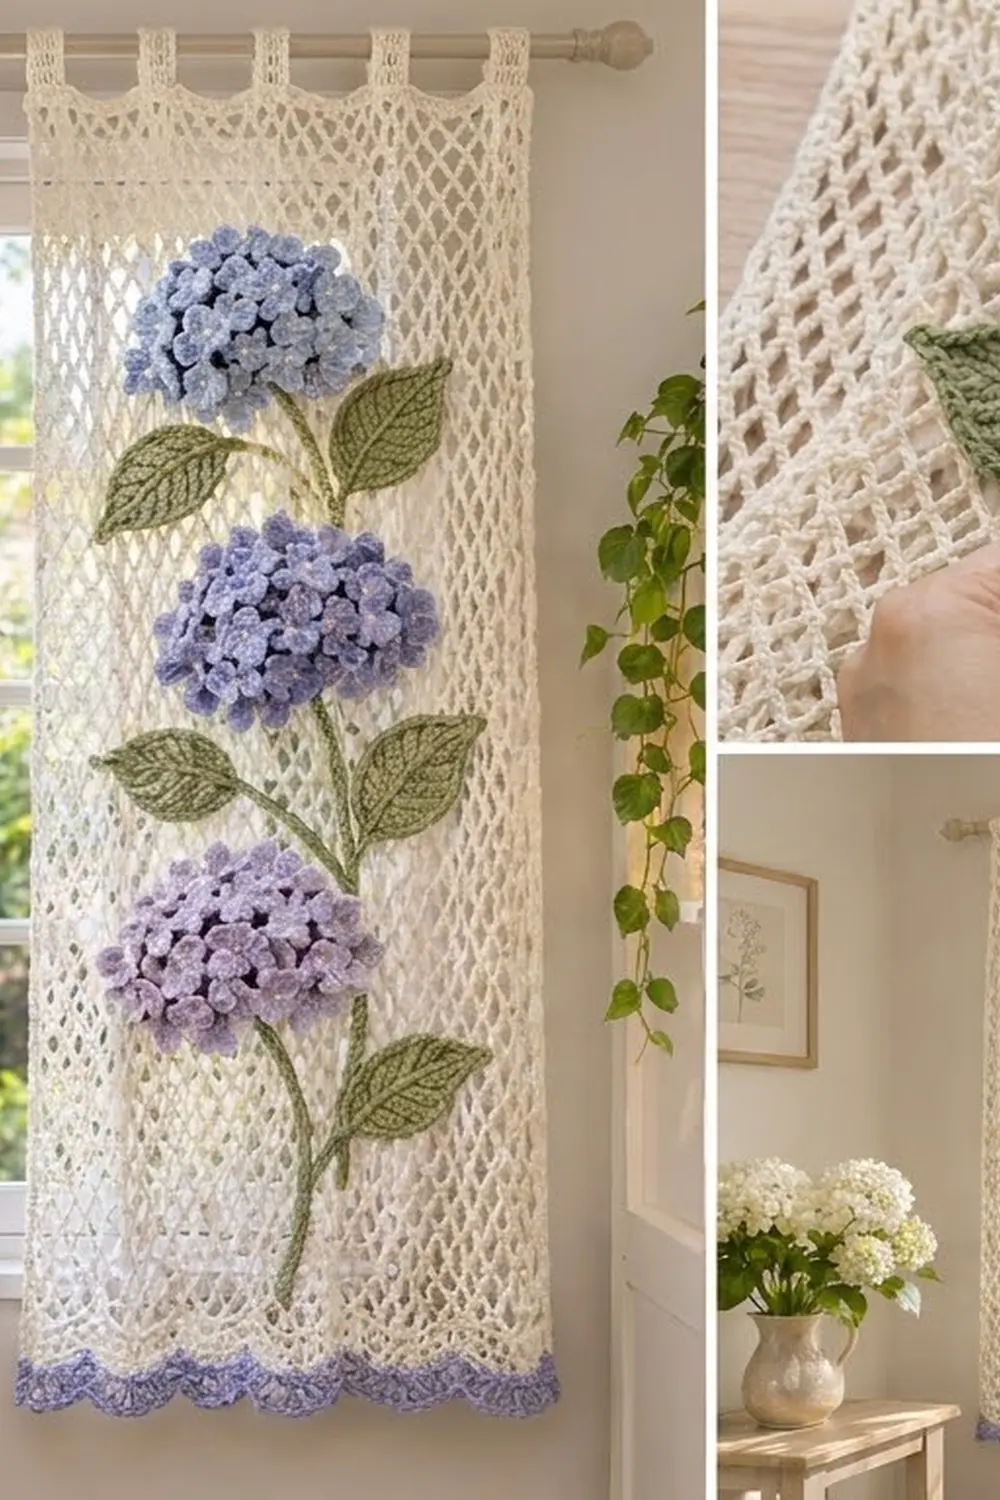
This curtain panel pairs an airy cream diamond mesh with three-dimensional hydrangea heads that climb a winding green stem. Light passes through the net, while the flowers stay full and textured, so the panel looks soft from across the room and detailed up close.
The palette is cream for the mesh; cornflower blue, periwinkle and lilac for the three flower heads; sage green for the leaves and stem; and a lilac scalloped edge that ties the bottom back to the blooms. The style is cottage-garden and romantic.
The pattern uses US crochet terms. One finished panel measures 25¼ in (64.1 cm) wide and 56.7 in (144.0 cm) long from the top of the header to the scallop points, or 58.7 in (149.1 cm) including the tabs. For a pair, make two identical panels.
Construction is simple. You work the header from the top down, add tabs into the foundation chain, work the mesh body and finish with a two-row scalloped border. Then you make the flowers, dome bases, leaves and stem separately and sew them onto the mesh.
Finished Size and Construction
- Finished size (one panel): 25¼ in (64.1 cm) wide x 56.7 in (144.0 cm) long, plus 2 in (5.1 cm) tab loops
- Skill level: Intermediate
- Terminology: US crochet terms
- Yarn weight: DK (weight 3) cotton or cotton blend
- Hooks: 4.0 mm (G-6) for the panel; 3.5 mm (E-4) for appliqués
- Number of pieces per panel: 1 mesh panel + 3 dome bases + 72 small flowers + 6 leaves + 1 stem cord
- Layout: three hydrangea heads stacked vertically down the panel center
- Size before border: 25¼ in (64.1 cm) x 55.7 in (141.5 cm)
- Border depth: 1 in (2.5 cm)
Materials
Choose a smooth, mercerized or combed DK cotton. Cotton holds the mesh shape, resists stretching on the rod and shows the petal texture clearly.
Quantities below are for a pair of panels:
- Color A, Cream: 600 g, about 1,380 m (mesh, header, tabs, dome bases, flower centers)
- Color B, Cornflower Blue: 100 g, about 230 m (top heads)
- Color C, Periwinkle: 100 g, about 230 m (middle heads)
- Color D, Lilac: 150 g, about 345 m (bottom heads and border)
- Color E, Sage Green: 100 g, about 230 m (leaves and stems)
All quantities include a margin of roughly 15 percent.
Tools:
- 4.0 mm (G-6) and 3.5 mm (E-4) crochet hooks
- Tapestry needle
- Locking stitch markers
- Rust-proof pins
- Tape measure
- Blocking mats and a towel
- Spray bottle
- Polyester fiberfill (optional)
Abbreviations (US Terms)
- ch – chain
- sl st – slip stitch
- sc – single crochet
- hdc – half double crochet
- dc – double crochet
- tr – treble crochet
- inc – 2 sc in the same stitch
- BLO – back loop only
- st(s) – stitch(es)
Special stitch – Petal: (ch 2, 2 dc in next st, 2 dc in next st, ch 2, sl st in same st). One petal uses 2 stitches.
Gauge and Checkpoints
Panel gauge (4.0 mm hook):
- Solid sc: 16 sts and 20 rows = 4 in (10.2 cm)
- Mesh: 4 ch-5 loops = 4 in (10.2 cm) wide; 8 mesh rows = 4 in (10.2 cm) tall
Appliqué gauge (3.5 mm hook): one flower = 1.5 in (3.8 cm) across.
Make a test swatch first. Chain 26, work 8 rows of sc (25 sts), then 8 rows of mesh on top (6 loops). The 25 sc should measure 6¼ in (15.9 cm), and the 6 loops should measure 6 in (15.2 cm).
Checkpoints:
- Header: 101 sts = 25¼ in (64.1 cm) wide; 6 rows = 1.2 in (3.0 cm).
- After Mesh Row 16: the mesh measures 8 in (20.3 cm) long.
- After Mesh Row 109: the mesh measures 54.5 in (138.4 cm) long.
- After the border: the panel measures 56.7 in (144.0 cm) without tabs.
- One flower: 1.5 in (3.8 cm). One leaf: 4.5 in (11.4 cm) long. One dome base: 3.5 in (8.9 cm) across.
If too big: go down one hook size (0.5 mm). If too small: go up one hook size. Keep every ch-5 loop the same length.
Part 1: Header
With Color A and the 4.0 mm hook, ch 102.
Row 1: Sc in 2nd ch from hook and in each ch across, turn. (101 sc)
Rows 2–6: Ch 1, sc in each st across, turn. (101 sc)
Checkpoint: 25¼ in (64.1 cm) x 1.2 in (3.0 cm). Do not fasten off.
Part 2: Mesh Body
Mesh Row 1: Ch 1, sc in first st, ch 5, skip 3 sts, sc in next st; repeat from * across, turn. (25 ch-5 loops, 26 sc)
Check: 1 + (25 x 4) = 101 sts used, so every header stitch is accounted for.
Mesh Row 2: Ch 5 (counts as a loop), sc in first ch-5 loop, ch 5, sc in next ch-5 loop; repeat from * across, ending with sc in last loop, ch 2, dc in last sc, turn. (1 turning loop + 24 ch-5 loops + 1 half loop)
Mesh Row 3: Ch 1, sc in top of dc, ch 5, sc in next ch-5 loop; repeat from * 23 more times, ch 5, sc in 3rd ch of turning ch-5, turn. (25 ch-5 loops)
Skip the ch-2 half loop in Row 3. The dc takes its place at the edge, which keeps the side edges straight.
Mesh Rows 4–109: Repeat Rows 2 and 3 alternately, ending with a Row 3 repeat. (Row 109: 25 ch-5 loops)
Checkpoint: the mesh measures 54.5 in (138.4 cm), and header plus mesh measures 55.7 in (141.5 cm). Fasten off.
Part 3: Tabs
With the header at the top and the right side facing, work into the free loops of the foundation chain. Number the 101 stitches from right to left. Place tabs on stitches 2–10, 20–28, 38–46, 56–64, 74–82 and 92–100. This leaves 9-stitch gaps between tabs and 1 free stitch at each edge.
Each tab: Join Color A in the first stitch of the tab group, ch 1.
Row 1: Sc in same st and next 8 sts, turn. (9 sc)
Rows 2–20: Ch 1, sc in each st across, turn. (9 sc)
Fasten off with a 12 in (30.5 cm) tail. The strip measures 4 in (10.2 cm). Fold it to the back and whipstitch the last row to Header Row 6, forming a 2 in (5.1 cm) loop. Make 6 tabs.
Part 4: Border
Border gauge: Row 1 matches the header at 16 sts = 4 in (10.2 cm). Each scallop spans 1 in (2.5 cm).
With the right side facing, join Color D in the first sc of Mesh Row 109.
Border Row 1: Ch 1, sc in first sc, 3 sc in next ch-5 loop, sc in next sc; repeat from * across, turn. (75 sc in loops + 26 sc in sc = 101 sc)
Border Row 2: Ch 1, sc in first st, skip 1 st, 5 dc in next st, skip 1 st, sc in next st; repeat from * across. (25 scallops: 125 dc + 26 sc = 151 sts) Fasten off.
Why the math works: Each of the 25 loops takes 3 sc plus 1 sc on its anchor, which gives 100 sts. Add the starting sc and you have 101. That equals the header count, so the bottom edge matches the top width and will not flare or pull in. Because 101 = 1 + (4 x 25), the 4-stitch scallop repeat fits 25 times, one scallop under each mesh loop. Border depth: 1 in (2.5 cm).
Part 5: Appliqués
Use the 3.5 mm hook for all appliqués so they stay firm and don’t sag on the open mesh.
Small Flower
With Color B, C or D, make a magic ring.
Rnd 1: Ch 1, 8 sc in ring, sl st to first sc. (8 sc)
Rnd 2: Petal over next 2 sts; repeat 3 more times, sl st in first st. (4 petals, 16 dc)
Fasten off with an 8 in (20.3 cm) tail and pull the ring tight. With Color A, work one French knot in the center. Flower: 1.5 in (3.8 cm).
Dome Base
With Color A, make a magic ring.
Rnd 1: 6 sc in ring. (6)
Rnd 2: Inc in each st. (12)
Rnd 3: Sc, inc; repeat around. (18)
Rnd 4: Sc 2, inc; repeat around. (24)
Rnd 5: Sc 3, inc; repeat around. (30)
Rnd 6: Sc 4, inc; repeat around. (36)
Rnds 7–8: Sc in each st around. (36)
Sl st to join and fasten off with a 24 in (61.0 cm) tail. The two even rounds curl the edge into a shallow cup 3.5 in (8.9 cm) across and about 1 in (2.5 cm) deep.
Leaf
With Color E, ch 13.
Rnd 1: Sc in 2nd ch from hook, hdc in next ch, dc in next 2 ch, tr in next 4 ch, dc in next 2 ch, hdc in next ch, sc in last ch, ch 2 (tip). Working along the opposite side of the chain: sc in first ch, hdc in next, dc in next 2, tr in next 4, dc in next 2, hdc in next, sc in last ch, sl st to first sc. (24 sts + ch-2 tip)
Rnd 2: Working in BLO: ch 1, sc in each of next 12 sts, (sc, ch 2, sc) in ch-2 tip, sc in each of next 12 sts, sl st to first sc. (26 sc + ch-2 tip)
Working in the back loop leaves the front loops of Rnd 1 standing as ridges, and the line where the two sides of the foundation chain meet forms the center vein. Leaf: 4.5 in (11.4 cm) x 2 in (5.1 cm).
Stem Cord
With Color E, ch 161. Sl st in the back bump of the 2nd ch from hook and in each ch across. (160 sl st) Cord: 40 in (101.6 cm).
Make All Pieces
Per panel:
- 24 flowers in Color B (top head)
- 24 flowers in Color C (middle head)
- 24 flowers in Color D (bottom head)
- 3 dome bases in Color A
- 6 leaves in Color E
- 1 stem cord in Color E
For a pair, double everything.
Layout grid (one panel; distances from the top of the mesh, centered on loop 13 of 25):
          [ HEADER + 6 TABS ]
 9 in   .......( B HEAD )........
13 in   ..LEAF....|....LEAF......
25 in   .......( C HEAD )........
29 in   ..LEAF....|....LEAF......
41 in   .......( D HEAD )........
45 in   ..LEAF....|....LEAF......
52 in   ..........|  stem end....
          [ LILAC SCALLOPS ]
Head centers: 9 in (22.9 cm), 25 in (63.5 cm) and 41 in (104.1 cm). Leaf pairs: 13 in (33.0 cm), 29 in (73.7 cm) and 45 in (114.3 cm).
Joining the Appliqués
Assemble each head first. Sew 12 flowers around the rim of a dome base, overlapping the petals slightly. Add a second ring of 8 flowers higher on the dome, then 4 flowers on top. Tack each flower at its center and at two petal tips so it stays lifted. A finished head measures about 6 in (15.2 cm) across.
Attach to the mesh. Lay the panel flat. Pin the stem cord from 12 in (30.5 cm) to 52 in (132.1 cm) with gentle S-curves through the center. Whipstitch the cord to the mesh every 0.5 in (1.3 cm), catching one strand of the cord and one sc or chain of the mesh each time. Sew each dome open side down over its center mark using the 24 in (61.0 cm) tail, stitching through the base’s last round and into the mesh loops underneath. Pin the leaves at an angle beside the stem and sew around their outer edges.
Tension advice: Keep the sewing stitches snug but not tight. If the mesh puckers around a head, loosen them until the net lies flat.
Size checkpoint: The panel should still measure 25¼ in (64.1 cm) wide at the heads.
Final Blocking
- Lay the panel face down on a towel over blocking mats.
- Pin the header and border to 25¼ in (64.1 cm) wide.
- Pin the sides straight to 56.7 in (144.0 cm), with a pin every 4 in (10.2 cm).
- Open each scallop with one pin at its point.
- Mist the mesh until damp, avoiding the flower heads.
- Ease the diamonds into even shapes with your fingers.
- Let the panel dry completely, then unpin and fluff the petals.
Final Quality-Control Checklist
- The header and border both measure 25¼ in (64.1 cm).
- Mesh Row 109 has 25 loops.
- Border Row 2 has 25 scallops.
- There are 6 evenly spaced tabs, all the same length.
- Each head has 24 flowers and sits centered.
- Leaves sit in pairs below each head.
- The stem is secured every 0.5 in (1.3 cm).
- All tails are woven in and trimmed.
Troubleshooting
- The mesh is wavy at the sides: The turning chains are too loose or too tight. Match them to the body loops.
- The loop count drifts: Every 10 rows, place markers in the first and last loops and count.
- The border flares: Some loops got 4 sc. Recount Border Row 1 to 101.
- The petals curl forward: Make the flowers with a 4.0 mm hook.
- The heads pull the mesh down: Add extra tacking stitches around the dome edge.
Care
Hand wash in cool water with mild detergent, roll the panel in a towel and dry it flat. Don’t hang it while wet, because the weight of the heads will stretch the mesh.
Final Notes
Here is how the measurements connect. 101 header stitches give 25¼ in (64.1 cm). These become 25 mesh loops of 1 in (2.5 cm) each, which return to 101 stitches in Border Row 1 and 25 scallops in Row 2. Lengthwise, 6 header rows, 109 mesh rows and the 1 in (2.5 cm) border add up to 56.7 in (144.0 cm). Check each stage and both panels will hang straight and match.
Happy crocheting!