

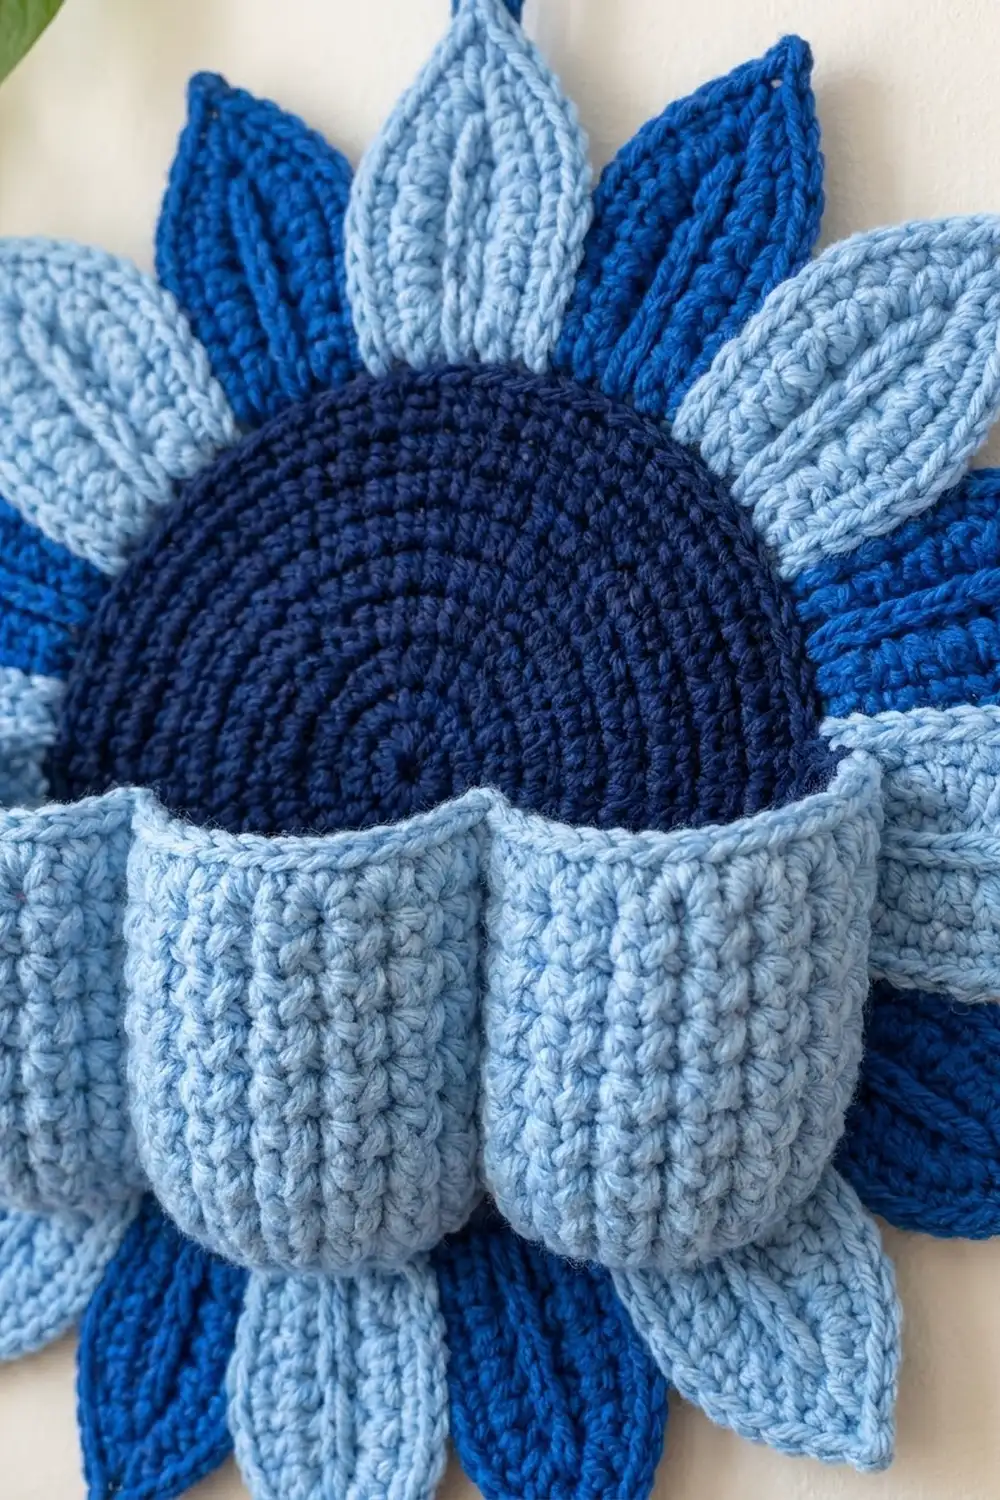
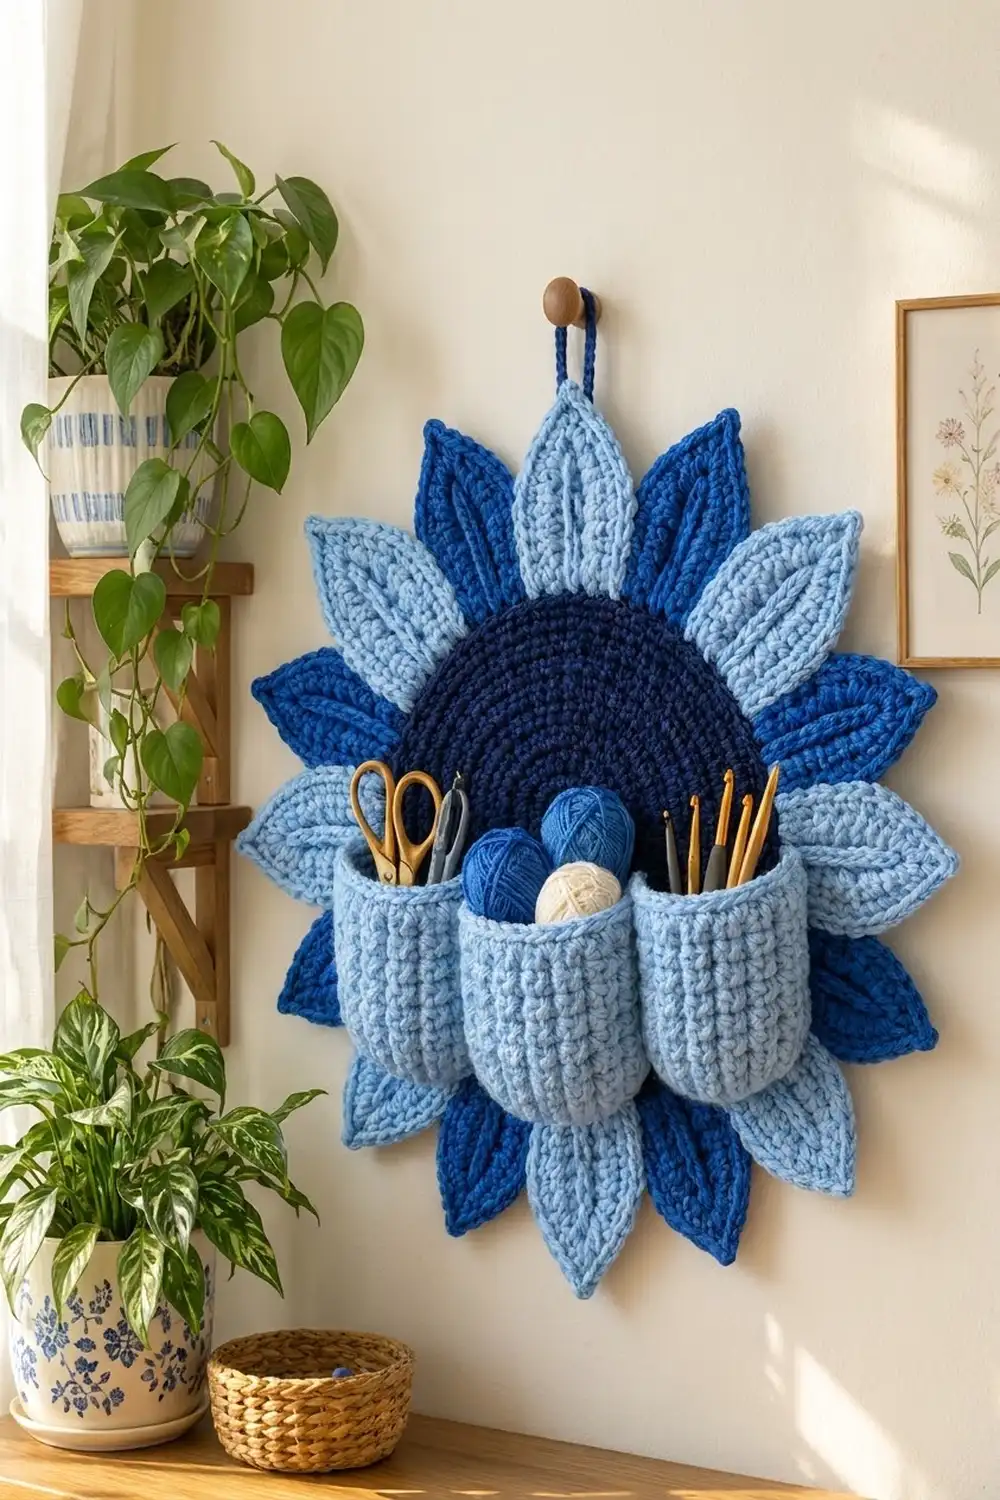
The Indigo Bloom is a flower-shaped wall organizer that keeps your small tools in sight. It has a deep navy center ringed by 16 pointed petals in light blue and royal blue. A light blue pocket panel across the lower half bulges into three rounded compartments. They hold scissors, a few mini yarn balls, and a set of hooks.
The look is calm and graphic. The center is smooth single crochet, each petal has a raised vein, and the pockets have vertical ribs that read almost like knitting. It hangs from a small navy loop at the top petal.
This pattern uses US crochet terms. The finished organizer is about 15 in (38.1 cm) across from petal tip to petal tip, and the pocket band is about 12.5 in (31.8 cm) wide.
Construction is simple and modular. You crochet a flat disc and 16 small leaves, then join the leaves to the disc with one round of single crochet. Next you work a ribbed pocket panel sideways, edge it with a border round, and sew it on. Two divider seams split it into three pockets.
Finished Size and Construction
- Finished size: about 15 in (38.1 cm) across, plus a 2 in (5.1 cm) hanging loop
- Skill level: Easy-Intermediate
- Terminology: US
- Yarn weight: worsted (#4), cotton or cotton blend
- Hook: 5.0 mm (H-8)
- Number of pieces: 1 disc, 16 petals (8 light blue, 8 royal blue), 1 pocket panel, 1 hanging loop
- Layout: petals in a ring around the disc, alternating colors; pocket centered across the lower half
- Disc size: 8 in (20.3 cm) before the join round, 8.5 in (21.6 cm) after
- Petal size: 3.5 in (8.9 cm) long, 1.75 in (4.4 cm) wide
- Pocket panel before border: 12 in x 3.4 in (30.5 cm x 8.6 cm)
- Border depth: 0.25 in (0.6 cm), one round of sc
Materials
Cotton or a cotton blend works best because it holds the petal points and keeps the pockets in shape. Soft acrylic works too, but the pockets will sag a little more under weight.
- Navy: 45 g / about 90 m (disc, join round, hanging loop)
- Royal blue: 30 g / about 60 m (8 petals)
- Light blue: 55 g / about 110 m (8 petals, pocket panel, sewing)
These quantities include a margin of about 15 percent for your gauge swatch and for sewing.
Tools:
– 5.0 mm (H-8) crochet hook
– Tapestry needle
– 4 to 6 stitch markers
– Rust-proof pins and a blocking mat
– Measuring tape
– Spray bottle
Abbreviations (US Terms)
- ch: chain
- sl st: slip stitch
- sc: single crochet
- hdc: half double crochet
- dc: double crochet
- MR: magic ring
- BLO: back loop only
- sp: space
- st(s): stitch(es)
Special technique: surface slip stitch. Hold the working yarn behind the fabric. Insert the hook from front to back between stitches, pull up a loop, and draw it through the loop on the hook. Repeat along a straight line to make a raised chain on the front.
Gauge and Checkpoints
Gauge: 14 sc and 16 rows = 4 in (10.2 cm) with a 5.0 mm hook.
Test one piece before committing. Work the disc through Round 8 and measure it. That first checkpoint tells you more than a flat swatch, because it shows how your tension behaves in rounds.
Checkpoints:
– Disc after Round 8: 4 in (10.2 cm) across
– Disc after Round 12: 6 in (15.2 cm)
– Disc after Round 16: 8 in (20.3 cm)
– Disc after Round 17 (join round): 8.5 in (21.6 cm)
– One petal: 3.5 in x 1.75 in (8.9 cm x 4.4 cm)
– Pocket panel after Row 48: 12 in x 3.4 in (30.5 cm x 8.6 cm)
If you’re too big, switch to a 4.5 mm hook. If you’re too small, switch to a 5.5 mm hook. Change hooks for every piece so they stay in proportion. A disc that ruffles means your stitches are too loose for the increase rate, so go down a hook size.
Disc (Navy)
Each round is joined. The ch 1 at the start of a round does not count as a stitch. Join with a sl st to the first sc of the round.
Round 1: Make a MR. Ch 1, 6 sc in ring, join. (6 sts)
Round 2: Ch 1, 2 sc in each st around, join. (12 sts)
Round 3: Ch 1, sc in next st, 2 sc in next st; repeat 6 times, join. (18 sts)
Round 4: Ch 1, sc in next st, 2 sc in next st, sc in next 2 sts, 2 sc in next st; repeat 5 times, sc in next st, join. (24 sts)
Rounds 5–16: Each round adds 6 sts. On odd rounds, work sc in each st until 1 st remains before the next increase spot, 2 sc in that st, keeping the increases evenly spaced. On even rounds, place the increases halfway between the previous ones. This keeps the circle round instead of hexagonal.
Round totals:
– Round 5: 30 sts
– Round 6: 36 sts
– Round 7: 42 sts
– Round 8: 48 sts (check 4 in / 10.2 cm)
– Round 9: 54 sts
– Round 10: 60 sts
– Round 11: 66 sts
– Round 12: 72 sts (check 6 in / 15.2 cm)
– Round 13: 78 sts
– Round 14: 84 sts
– Round 15: 90 sts
– Round 16: 96 sts (check 8 in / 20.3 cm)
Don’t fasten off. Place a marker in the working loop and set the disc aside.
Petals (Make 16)
Make 8 in light blue and 8 in royal blue.
Foundation: Ch 12.
Round 1: Sc in the 2nd ch from the hook (this end is the tip), hdc in next ch, dc in next 6 ch, hdc in next ch, sc in next ch, 3 sc in last ch (this end is the base). Rotate to work along the other side of the chain: sc in next ch, hdc in next ch, dc in next 6 ch, hdc in next ch, sc in next ch. Ch 2 for the tip point, and join with a sl st to the first sc. (23 sts + ch-2 tip sp)
That’s 10 sts down one side, 3 at the base, and 10 up the other side. The dc in the middle make the widest part of the leaf, and the sc at each end taper it.
Round 2: Ch 1, sc in each st to the center base sc, 3 sc in the center base sc, sc in each st to the tip, then work (sc, ch 2, sc) in the ch-2 tip sp. Join. (27 sts + ch-2 tip sp)
That’s 23 sts worked 1 per stitch, plus 2 extra at the base and 2 extra at the tip.
Vein: Leave a short tail. With the same color, work surface slip stitch along the line of the foundation chain, from the base up to about 0.5 in (1.3 cm) below the tip. Fasten off and weave in the ends.
Petal base: The base is the center base sc of Round 2 plus 2 sts on each side of it: the sc before the 3-sc group, the 3 sc, and the sc after. That’s 5 sts. Mark them.
Check your first petal: 3.5 in (8.9 cm) long and 1.75 in (4.4 cm) wide.
Make All Pieces
- Navy: 1 disc (Rounds 1–16), 1 hanging loop
- Royal blue: 8 petals
- Light blue: 8 petals, 1 pocket panel
Layout, clockwise from the top (L = light blue, R = royal blue):
Position:  1  2  3  4  5  6  7  8  9 10 11 12 13 14 15 16
Color:     L  R  L  R  L  R  L  R  L  R  L  R  L  R  L  R
Position 1 is at 12 o’clock and position 9 is at 6 o’clock. Both are light blue.
Joining: Petals to Disc (Round 17)
Put the disc’s live loop back on the hook. Hold each petal behind the disc, with both right sides facing you and the petal base lined up along the disc edge.
Round 17: Ch 1. Sc in the next disc st alone (gap st). Hold a petal behind and work 5 sc, each one through the next disc st and the next petal base st together. Repeat 16 times, changing petal color each time. Join. (96 sts)
Stitch-to-stitch logic: Each petal uses 6 disc sts, 1 gap st plus 5 joined sts. 16 petals x 6 sts = 96, which is exactly the Round 16 count. Nothing is added or skipped. The gap sts let each petal fan out a little, so neighbors touch at their widest point without overlapping.
Tension: Work Round 17 slightly firmer than the disc. A loose join lets the petals flop forward. Don’t tighten so much that the disc cups, though.
Checkpoint: Disc 8.5 in (21.6 cm), overall flower 15 in (38.1 cm) tip to tip. Each petal sticks out about 3.25 in (8.3 cm) past the disc edge.
Fasten off. Pick a light blue petal as the top.
Hanging loop: From the back, join navy with a sl st in the ch-2 tip sp of the top petal. Ch 16, sl st in the same sp, ch 1, and work 22 sc over the chain loop. Join and fasten off. The loop stands about 2 in (5.1 cm) tall.
Pocket Panel (Light Blue)
The panel is worked sideways, so the BLO ridges run vertically once it’s sewn on.
Foundation: Ch 13.
Row 1: Sc in the 2nd ch from the hook and in each ch across. (12 sts)
Rows 2–48: Ch 1, turn, sc in BLO of each st across. (12 sts)
Checkpoint: 12 in wide x 3.4 in tall (30.5 cm x 8.6 cm). The 48 rows split into 3 pockets of 16 rows each, and each pocket is 4 in (10.2 cm) of fabric.
Don’t fasten off.
Border (Pocket Panel)
Border gauge: 3.5 sc per in (14 sc per 4 in / 10.2 cm) along every edge. Row ends come at 4 per in, so the long edges need a regular skip to lie flat.
Round 1: Ch 1, turn the panel 90 degrees to work along the row ends of the long top edge.
- Long top edge: sc in each of the next 7 row ends, skip 1 row end; repeat 6 times. (42 sc)
- Corner: ch 1
- Short edge: sc in each st across the foundation chain loops. (12 sc)
- Corner: ch 1
- Long bottom edge: repeat from * to * 6 times. (42 sc)
- Corner: ch 1
- Short edge: sc in each st of Row 48. (12 sc)
- Corner: ch 1, join.
Total: 42 + 12 + 42 + 12 = 108 sc, plus 4 ch-1 corner spaces. The ch-1 corners aren’t counted on any side, so there’s no double counting.
Why the math works: 48 row ends at 4 per in make 12 in. Working 7 sc for every 8 row ends gives 42 sc, which at 3.5 sc per in is also 12 in, so the edge lies flat. Each pocket has 16 row ends, which is exactly 2 repeats, or 14 sc. The divider seams fall cleanly between sc 14 and 15 and between sc 28 and 29.
Checkpoint: 12.5 in x 3.9 in (31.8 cm x 9.9 cm).
Fasten off, leaving a 40 in (101.6 cm) tail for sewing.
Attaching the Pocket
- Lay the flower face up. Place the pocket’s top edge 0.5 in (1.3 cm) below the disc’s horizontal center line, centered side to side.
- Mark an attachment line 9.75 in (24.8 cm) long along the bottom. Divide it into 3 sections of 3.25 in (8.3 cm). The line reaches past the disc edge onto the side petals, which is correct.
- Whipstitch each short edge (12 sc) flat and straight to the flower.
- Sew the bottom edge. Ease each pocket’s 14 sc into its 3.25 in (8.3 cm) section, gathering slightly. The extra 0.75 in (1.9 cm) per pocket makes the rounded bulge.
- Backstitch the 2 dividers in vertical lines, from the top border down to the bottom. Run them from the gap between border sc 14 and 15 to the first 3.25 in (8.3 cm) mark, and from the gap between sc 28 and 29 to the second mark.
- Weave in all ends on the back.
Final Blocking
- Lightly spray the whole piece with water until it’s damp but not soaked.
- Lay it face up on a blocking mat and pin the disc to a true 8.5 in (21.6 cm) circle.
- Pin each petal tip straight out from the center, 15 in (38.1 cm) tip to tip across opposite pairs.
- Shape each petal point with your fingers and press each vein flat.
- Stuff each pocket loosely with plastic wrap or a rolled cloth to hold the rounded shape.
- Let it dry completely, at least 24 hours, before you unpin and hang it.
Final Quality-Control Checklist
- Disc measures 8.5 in (21.6 cm) and lies flat with no ruffling or cupping
- Round 17 has 96 sts: 16 gap sts and 80 joined sts
- 16 petals alternate colors, with light blue at the top and bottom
- Each petal is about 3.5 in x 1.75 in (8.9 cm x 4.4 cm) with a straight, centered vein
- Pocket border has 42/12/42/12 sc and 4 ch-1 corners
- Dividers line up at sc 14/15 and 28/29
- All three pockets bulge evenly
- Hanging loop sits centered above the top petal tip
- All ends are woven in on the back
Troubleshooting
Disc ruffles: Your tension is too loose. Rework it with a smaller hook, or check that each round adds exactly 6 sts.
Disc cups: You’re missing increases or working too tightly. Count every round against the list.
Disc looks hexagonal: Stagger the increase points on alternate rounds.
Petals overlap or show gaps: Recount Round 17. Every petal needs exactly 1 gap st plus 5 joined sts.
Petals flop forward: Work the join round more firmly, or tack each petal’s sides to the back of the disc.
Pocket top edge waves: You skipped too few row ends. Keep strictly to 7 sc for every 8 row ends.
Pockets look flat: Gather the bottom edge more, so each pocket’s 14 sc fit into 3.25 in (8.3 cm).
Organizer tilts on the wall: Recenter the hanging loop on the top petal tip.
Care
Spot clean or hand wash cool, then reshape and dry flat. Don’t put heavy metal tools in the pockets for long periods, because they stretch the bottom seams.
Final Notes
Here’s the whole measurement chain:
- Gauge is 14 sc and 16 rows = 4 in (10.2 cm).
- The disc grows to 8 in (20.3 cm) at 96 sts.
- The 16 petals use 6 disc sts each, so the join round stays at 96 sts and the disc reaches 8.5 in (21.6 cm).
- The petals extend the flower to 15 in (38.1 cm).
- The 48-row pocket panel borders to 42 sc per long side, or 14 sc per pocket.
- Easing each 4 in (10.2 cm) pocket front into 3.25 in (8.3 cm) gives three rounded compartments.
If each checkpoint matches, the next stage will fit. Hang it near your workspace and fill it with your favorite tools.
Happy crocheting!