

This curtain panel is made from ivory lace medallions. Each one has a small open center, a ring of double crochet spokes, petal-shaped chain loops and an edge of 12 fan scallops. The motifs touch only at their fan tips, so light comes through the diamond-shaped gaps between them.
The look is soft cottage style in one color only: ivory, cream or off-white cotton. The pattern uses US crochet terms throughout.
The finished panel measures 42 in (106.7 cm) wide across the motifs and 85.5 in (217.2 cm) long including the rod-pocket band. Each medallion is 6 in (15.2 cm) across from fan tip to fan tip.
You make the first motif in 7 rounds. Every motif after that is joined to its neighbors during its last round (join-as-you-go), so you don’t sew any seams. A solid single crochet band across the top folds over to make a rod pocket.
Finished Size and Construction
- Finished size: 42 in × 85.5 in (106.7 cm × 217.2 cm)
- Skill level: Intermediate
- Terminology: US crochet terms
- Yarn weight: #1 super fine (fingering) mercerized cotton
- Hook: 2.5 mm
- Number of pieces: 98 identical motifs
- Layout: 7 motifs wide × 14 motifs tall
- Motif size: 6 in (15.2 cm) across
- Size before border: 42 in × 84 in (106.7 cm × 213.4 cm)
- Border depth: top band only, 1.5 in (3.8 cm) after folding. The sides and bottom keep the fan scallops as their edge.
Materials
Choose a smooth mercerized cotton with clear stitch definition. Cotton blocks crisply and hangs well in sunlight. Avoid fuzzy or very stretchy fibers, because the open lace will sag over a long drop.
- Ivory (one color only): about 450 g / 1,530 m (1,673 yd). That is nine 50 g balls of 170 m (186 yd) each.
- Each motif uses about 3.5 g / 12 m (13 yd).
- The top band uses about 32 g / 110 m (120 yd).
Tools:
– 2.5 mm crochet hook
– Tapestry needle
– Scissors
– Stitch markers
– Rust-proof pins
– Blocking mats
– Spray bottle
– Tape measure
The quantities include a margin of about 15% for gauge differences and weaving in ends.
Abbreviations (US Terms)
- ch – chain
- sl st – slip stitch
- sc – single crochet
- dc – double crochet
- sp – space
- st(s) – stitch(es)
- RS – right side
Special stitch – drop-loop join (DLJ): Remove the hook from the working loop. Insert the hook from front to back into the top of the stitch you’re joining to on the neighboring motif. Pick up the dropped loop and draw it through. This adds no stitches.
Gauge and Checkpoints
Make one complete motif first and block it before starting the rest.
- Motif gauge: one blocked motif = 6 in (15.2 cm) from fan tip to opposite fan tip.
- Band gauge: 24 sc and 28 rows = 4 in (10.2 cm).
Measurement checkpoints (unblocked, lying flat):
– After Round 2: 1.75 in (4.4 cm) across
– After Round 4: 3.5 in (8.9 cm)
– After Round 6: 5 in (12.7 cm)
– After Round 7: 6 in (15.2 cm)
If your motif is more than 1/4 in (0.6 cm) too large, change to a 2.25 mm hook. If it is too small, try a 2.75 mm hook. Even a small difference adds up: if each motif is 1/4 in (0.6 cm) too wide, the panel ends up 1.75 in (4.4 cm) too wide across 7 motifs.
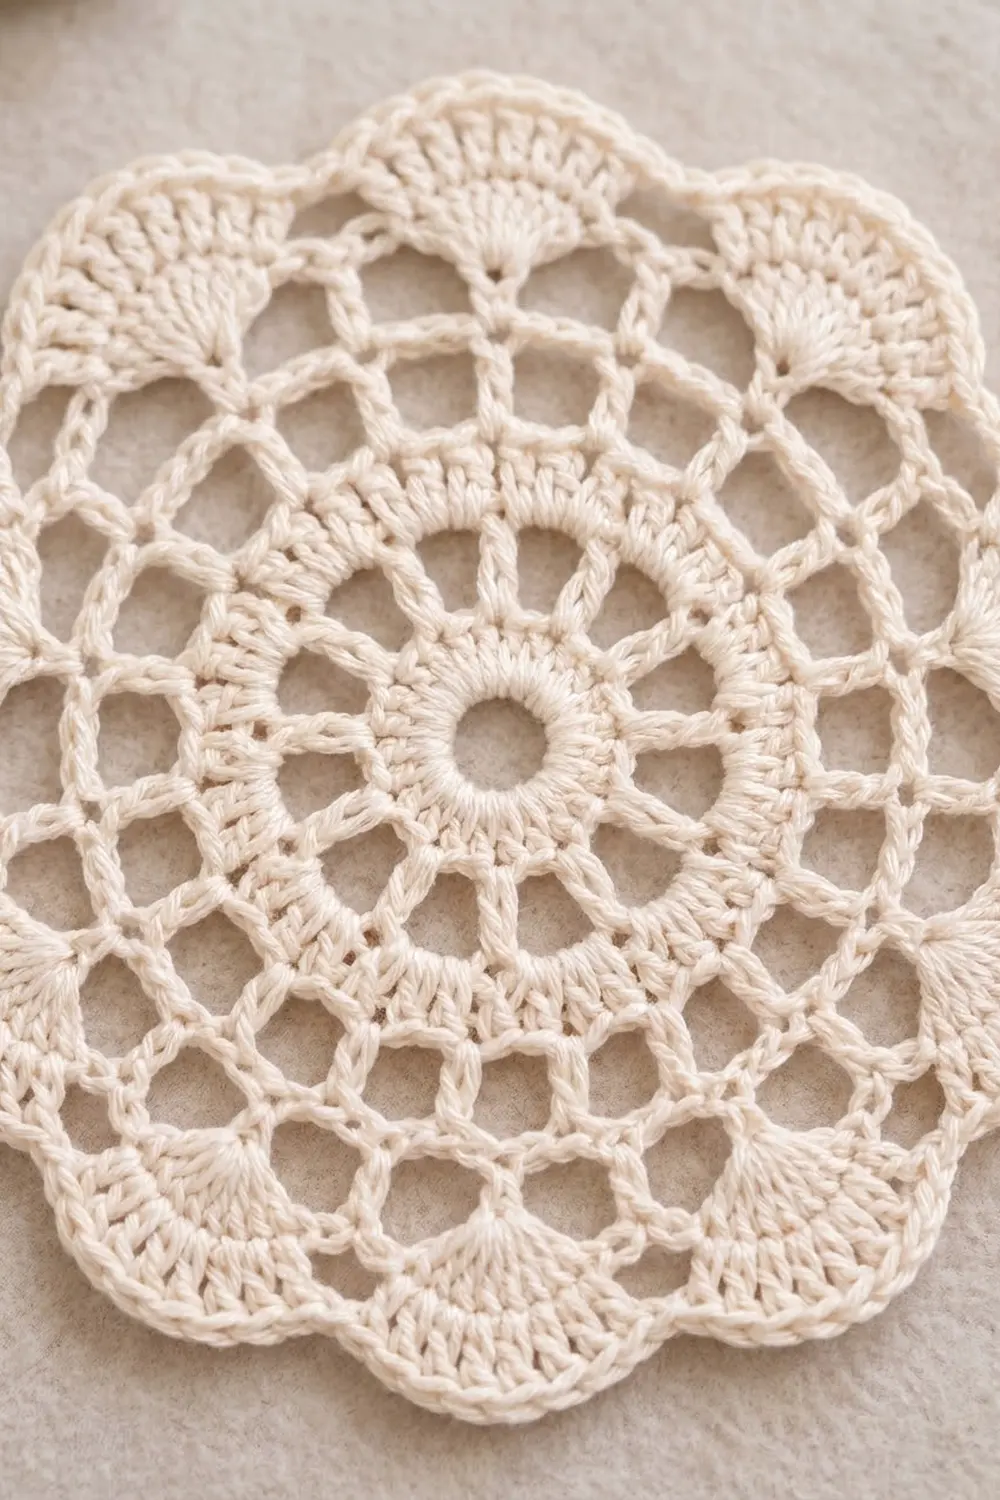
Motif Pattern
Round 1: Ch 6 and sl st to the first ch to form a ring. Ch 3 (counts as dc), then work 23 dc into the ring. Sl st to the top of the beginning ch-3. (24 dc)
The center hole should stay open, about 3/8 in (1 cm) wide. Don’t pull the ring closed.
Round 2: Ch 3 (counts as dc), dc in next st, ch 3, dc in each of the next 2 sts, ch 3; repeat from * 10 more times. Sl st to the top of the beginning ch-3. (24 dc in 12 pairs, 12 ch-3 sps)*
The dc pairs form the first ring of spokes.
Round 3: Sl st in the next dc and into the next ch-3 sp. Ch 1, sc in the same sp, ch 6, sc in the next ch-3 sp, ch 6; repeat from * 10 more times. Sl st to the first sc. (12 sc, 12 ch-6 loops)*
Round 4: Sl st in each of the next 3 ch to reach the middle of the loop. Ch 1, sc in the same loop, ch 7, sc in the next ch-6 loop, ch 7; repeat from * 10 more times. Sl st to the first sc. (12 sc, 12 ch-7 loops)*
Rounds 3 and 4 make the petal loops.
Round 5: Sl st in each of the next 3 ch. Ch 3 (counts as dc), then work 2 dc in the same loop, ch 3. Work 3 dc in the next ch-7 loop, ch 3; repeat from * 10 more times. Sl st to the top of the beginning ch-3. (36 dc in 12 groups of 3, 12 ch-3 sps)*
Round 6: Sl st in the next dc, which is the middle dc of the group. Ch 1, sc in the same st, ch 5, sc in the next ch-3 sp, ch 5. Sc in the middle dc of the next 3-dc group, ch 5, sc in the next ch-3 sp, ch 5; repeat from * 10 more times. Sl st to the first sc. (24 sc, 24 ch-5 loops)*
This round doubles the 12 loops to 24, which creates the inner mesh ring.
Round 7 (fan scallops): Sl st in each of the next 2 ch. Ch 1, sc in the same loop, then work 9 dc in the next loop (this is fan 1). Sc in the next loop, 9 dc in the next loop; repeat from * 10 more times. Sl st to the first sc and fasten off. (12 sc + 108 dc = 120 sts; 12 fans)*
The 5th dc of each fan is its tip and the joining point. Number the fans 1–12 in the order you work them. With RS facing and fan 1 at the top, right-handed crocheters will find:
– fan 4 on the left
– fan 7 at the bottom
– fan 10 on the right
Left-handed crocheters should mirror these positions.
Make All Pieces
You need 98 motifs, all in ivory: 7 across × 14 down.
Motif 1 is made in full as written. Motifs 2–98 are joined to their neighbors while you work Round 7.
Top (rod band)
[ 1][ 2][ 3][ 4][ 5][ 6][ 7]   Row 1
[ 8][ 9][10][11][12][13][14]   Row 2
 ...                           ...
[92][93][94][95][96][97][98]   Row 14
Bottom (free fan scallops)
Work the motifs left to right, one row at a time.
Joining (Join-As-You-Go)
Method: Work Rounds 1–6 of the new motif as usual. In Round 7, when you reach a fan that has to be joined:
1. Work 5 dc in the loop.
2. Work a DLJ into the 5th dc of the matching fan on the neighboring motif.
3. Work 4 dc in the same loop to finish the fan.
Every fan still has 9 dc, so each motif keeps its 120 stitches.
Which fans to join:
– Motif to the right of another motif: join its fan 4 to fan 10 of the motif on its left.
– Motif below another motif: join its fan 1 to fan 7 of the motif above it.
– A motif with both neighbors: make both joins, fan 1 first and then fan 4.
Each motif is joined at one point per side, at most 4 points in total.
Joins:
– 6 per row × 14 rows = 84 horizontal joins
– 7 per column × 13 = 91 vertical joins
– 175 joins in total
Tension: Keep the DLJ snug but not tight. After each join, the two fan tips should touch without overlapping or puckering. If the fans curl toward each other, loosen the drawn-through loop.
Size checkpoint: After Row 1 of motifs, the strip should measure 42 in (106.7 cm) wide. After every 2 rows, check that the length grows by 12 in (30.5 cm). After all 14 rows, the panel should be 84 in (213.4 cm) long.
Border: Top Rod-Pocket Band
The sides and bottom get no border rounds and 0 added stitches. The fan scallops are the finished edge there, just like in the photo.
Only the top gets a band, worked in rows across the top of motifs 1–7.
Band gauge: 24 sc = 4 in (10.2 cm), which is 6 sc per inch. Each motif is 6 in (15.2 cm) wide, so the band needs about 36 sts per motif.
Row 1 (RS): Join yarn to the 5th dc of fan 12 on the top-right motif (motif 7). Ch 1, then:
1. Sc in the same st, ch 8, sc in the 5th dc of fan 1, ch 8, sc in the 5th dc of fan 2.
2. *Ch 17. Sc in the 5th dc of fan 12 on the next motif, ch 8, sc in the 5th dc of fan 1, ch 8, sc in the 5th dc of fan 2; repeat from * across the remaining 6 motifs.
(235 sts)
Count per motif: 3 sc + 16 ch = 19 sts per motif × 7 motifs = 133. Add the 17-ch bridge × 6 gaps = 102. The total is 133 + 102 = 235.
Row 2: Ch 1 and turn. Sc in each sc and each ch across. (235 sc)
Rows 3–21: Ch 1, turn, sc in each st across. (235 sc in every row)
After Row 21, fasten off and leave a 60 in (152.4 cm) tail.
Why the math works: 235 sts ÷ 6 sts per inch = 39.2 in (99.6 cm). That is about 39 in (99.1 cm), the distance from the fan 12 tip of motif 7 to the fan 2 tip of motif 1. The 17-ch bridge spans the 3 in (7.6 cm) V-notch between neighboring motifs. The ch-8 spans run over the arcs between fan tips. Fans 3 and 11 on the two end motifs stay free as decorative scallops.
Rod pocket: At 7 rows per inch, 21 rows = 3 in (7.6 cm). Fold the band in half to the wrong side so that Row 21 lies along the back of Row 1. Whipstitch the edges together stitch for stitch. This makes a pocket 1.5 in (3.8 cm) deep that fits rods up to 3/4 in (1.9 cm) in diameter.
Final Blocking
- Weave in all ends along chain loops, splitting the yarn so the ends stay hidden.
- Lay the panel on blocking mats, RS up, working in sections if your space is limited.
- Pin the 4 corner motifs first so the panel measures 42 in × 84 in (106.7 cm × 213.4 cm).
- Pin the 5th dc of every fan along the sides and bottom so the scallops open evenly.
- Pin the top band straight at 39 in (99.1 cm).
- Spray until damp, not soaked.
- Leave it to dry completely, at least 12 hours.
- Unpin and hang it right away so the cotton relaxes under its own weight.
Final Quality-Control Checklist
- All 98 motifs have 12 fans of 9 dc each.
- Every center hole is open and round.
- All 175 joins are at fan centers, with no twisted fans.
- The diamond gaps are even across the whole panel.
- Width is 42 in (106.7 cm) and length is 85.5 in (217.2 cm).
- The band has 235 sts in every row and a straight, even rod pocket.
- No loose ends show on the right side.
Troubleshooting
- Motif cups: The chains are too tight. Go up 0.25 mm for the chain rounds only.
- Motif ruffles: The fans are too loose. Pull each dc snug, or work the motif with a hook 0.25 mm smaller.
- Join puckers: The DLJ was pulled too tight. Undo the join and redo it with a looser loop.
- Joined the wrong fan: Count fans from fan 1 again. Mark fan 1 on every motif with a stitch marker.
- Band too wide or narrow: Check your band gauge. If needed, adjust only the 17-ch bridges by 1 ch each, and recalculate the row total.
- Curtain stretches when hung: Re-block it and dry it flat before hanging.
Care
Hand wash in cool water with mild soap and press out the water in a towel. Dry flat, reshape, and hang again once fully dry.

Final Notes
The size of the curtain depends on a chain of measurements. One 6 in (15.2 cm) motif, repeated 7 across, gives 42 in (106.7 cm). Repeated 14 down, it gives 84 in (213.4 cm). The folded band adds 1.5 in (3.8 cm), for a total of 85.5 in (217.2 cm).
Check your gauge on the first motif and measure after each row of motifs, and the finished panel will come out the planned size.
Happy crocheting!