

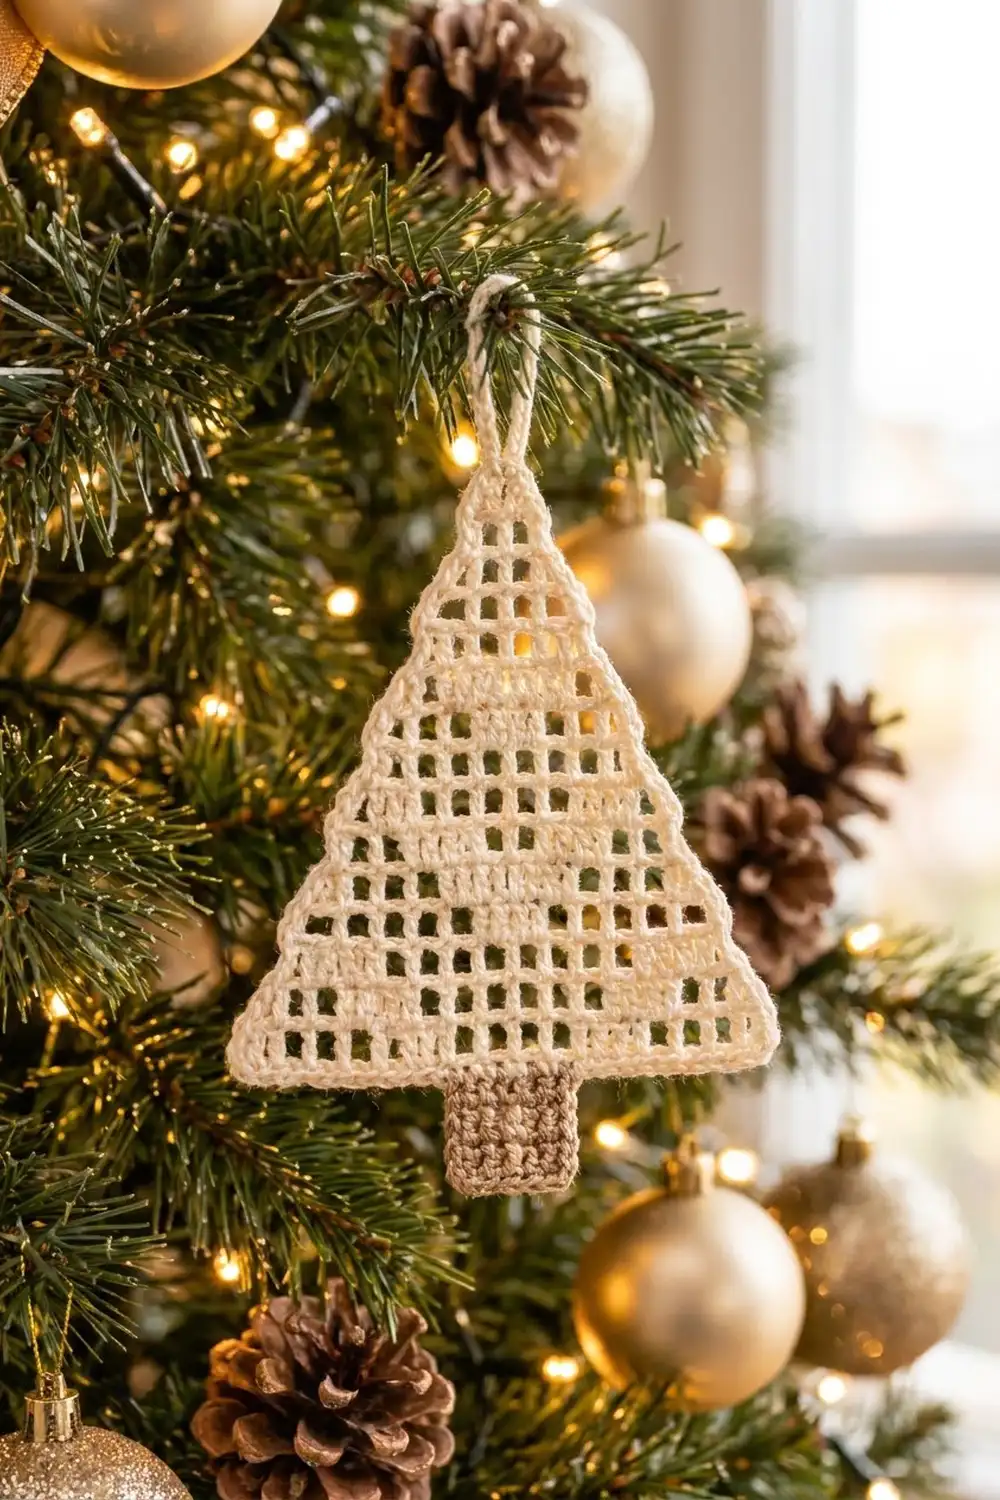
This filet crochet tree ornament is light, airy and quick to make. It is a flat triangle of open square meshes in ivory cotton thread. Solid blocks form two short diagonal garlands and a small “star” near the top. A taupe single-crochet trunk sits under the base, and a wrapped loop at the top lets you hang it right away.
The colors are simple: warm ivory for the tree and soft taupe for the trunk. With gold baubles and warm lights, it looks classic and a little vintage, like lace your grandmother might have tucked into the branches.
This pattern uses US crochet terms. The finished ornament is about 4.1 in (10.4 cm) wide at the base and 4.9 in (12.4 cm) tall from apex to trunk bottom, not counting the loop. With the hanging loop, it is about 5.9 in (15.0 cm) tall.
You work the tree bottom-up in filet rows, losing one mesh at each side every second row. Then you add one round of single-crochet border, a wrapped hanging loop at the apex, and finally the trunk, worked down from the center of the base border.
Finished Size and Construction
- Finished size: 4.1 in (10.4 cm) wide × 4.9 in (12.4 cm) tall, plus a loop of about 1 in (2.5 cm)
- Skill level: Easy-intermediate (basic filet crochet)
- Terminology: US
- Yarn weight: Size 3 crochet thread (fingering-weight mercerized cotton)
- Hook: 2.25 mm (US B-1)
- Number of pieces: 1 (single ornament)
- Layout: One filet triangle with a trunk and loop attached; no joining
- Triangle before border: 3.9 in (9.9 cm) wide × 3.9 in (9.9 cm) tall (13 meshes × 13 rows)
- Border depth: about 0.1 in (0.3 cm), one round of sc
- Trunk: 1 in (2.5 cm) wide × 0.8 in (2.0 cm) tall
Materials
Use smooth, mercerized cotton thread. It gives crisp, square meshes and blocks well. Avoid fuzzy or very soft yarns, because the open grid will look blurry.
- Color A, Ivory/Cream: 8 g, about 30 m (32.8 yd)
- Color B, Taupe (a metallic blend is fine): 2 g, about 6 m (6.6 yd)
Tools:
– 2.25 mm (US B-1) crochet hook
– Tapestry needle
– Small scissors
– Blocking mat and rust-proof pins
– Spray bottle with water (optional: light spray starch)
– Ruler or tape measure
These quantities include a margin for a gauge swatch and weaving in ends.
Abbreviations (US Terms)
- ch – chain
- sl st – slip stitch
- sc – single crochet
- dc – double crochet
- sk – skip
- sp – space
- st(s) – stitch(es)
- RS / WS – right side / wrong side
Special stitches:
– Mesh (sp): ch 2, sk 2 sts, dc in next dc. At the start of a row, ch 5 (counts as dc + ch 2), sk 2 sts, dc in next dc makes the first mesh.
– Block (bl): dc in each of next 2 sts (ch or dc), dc in next dc. At the start of a row, ch 3 (counts as dc), dc in next 2 sts, dc in next dc makes the first block.
– Decrease at row start: sl st in each of next 2 sts and in next dc (3 sl sts). This moves you in one mesh.
– Decrease at row end: stop after the dc in the second-to-last dc and leave the last mesh unworked.
A row of N meshes or blocks always has 3N + 1 stitches.
Gauge and Checkpoints
Filet gauge: 10 meshes and 10 rows = 3 in (7.6 cm), so each mesh is 0.3 in (0.8 cm) square.
Single-crochet gauge: 10 sc and 10 rows = 1 in (2.5 cm).
Make one ornament before you make a batch. The tree pattern works as its own gauge test.
Checkpoints (unblocked, lightly pressed flat):
– After Row 2: 3.9 in (9.9 cm) wide, 0.6 in (1.5 cm) tall
– After Row 4: 1.2 in (3.0 cm) tall
– After Row 6: 1.8 in (4.6 cm) tall
– After Row 8: 2.4 in (6.1 cm) tall
– After Row 10: 3.0 in (7.6 cm) tall
– After Row 13: 3.9 in (9.9 cm) tall
– After the border: 4.1 in (10.4 cm) wide at the base
– After the trunk: 4.9 in (12.4 cm) total height without the loop
If the piece is too big: go down to a 2.0 mm hook, or keep your ch-2 spaces tighter.
If the piece is too small: go up to a 2.5 mm hook.
If the meshes are rectangles rather than squares: tall meshes mean your dc are loose, so pull up a shorter loop. Wide meshes mean your chains are loose.
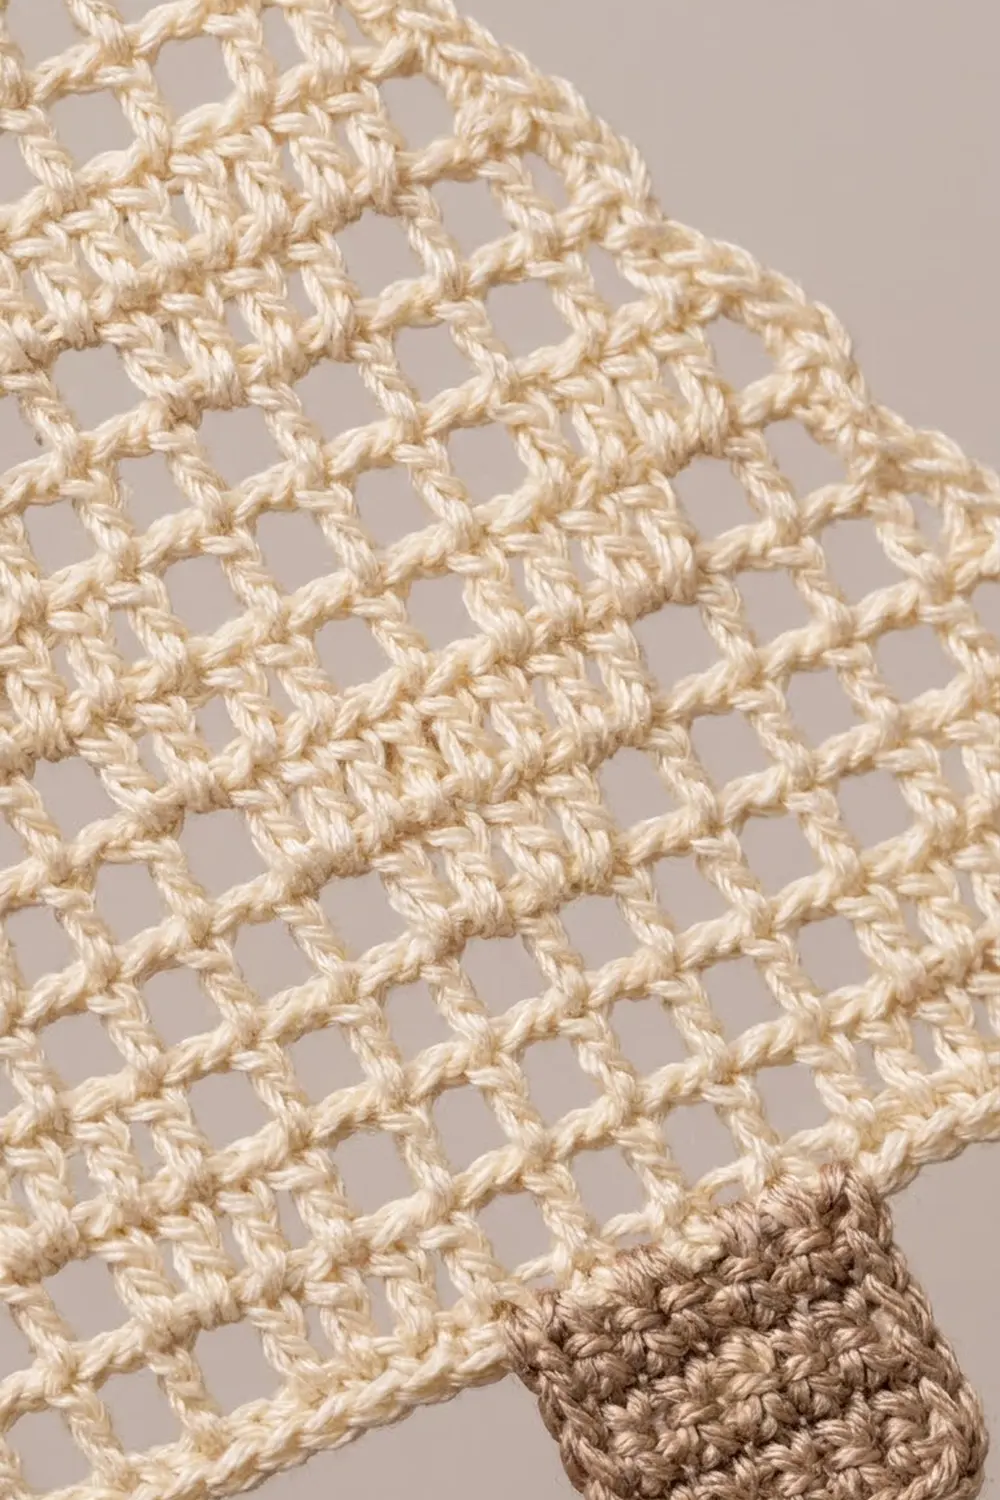
Tree (Color A)
Rows are numbered from the bottom. Odd rows are RS. Row 1 runs right to left on the RS.
Foundation: With Color A, ch 44.
Row 1 (RS): Dc in 8th ch from hook. The 7 skipped ch count as the first dc, a ch-2 sp and 2 skipped base ch. [Ch 2, sk 2 ch, dc in next ch] 12 times. (13 sp; 40 sts: 14 dc + 13 ch-2 sps)
Row 2 (WS): Ch 5, turn, dc in next dc (1 sp made). [Ch 2, dc in next dc] 11 times. Ch 2, sk 2 ch, then dc in the 3rd ch counted from the top corner of the beginning ch. (13 sp; 40 sts)
Row 3 (RS, decrease): Turn, decrease at row start. Ch 3, [dc in next 2 ch, dc in next dc] 3 times (3 bl). [Ch 2, sk 2 ch, dc in next dc] 8 times. Leave the last mesh unworked. (3 bl, 8 sp = 11 meshes; 34 sts)
Row 4 (WS): Ch 5, turn, dc in next dc. [Ch 2, sk 2 ch, dc in next dc] 4 times (5 sp total). [Dc in next 2 ch, dc in next dc] 3 times (3 bl). [Ch 2, sk 2 dc, dc in next dc] 3 times, with the last dc in the top of the turning ch. (5 sp, 3 bl, 3 sp = 11; 34 sts)
Row 5 (RS, decrease): Turn, decrease at row start. Ch 5, sk 2 sts, dc in next dc. Work 4 more sp (5 sp total). Work 3 bl, then 1 sp. Leave the last mesh unworked. (5 sp, 3 bl, 1 sp = 9; 28 sts)
Row 6 (WS): Ch 5, turn, dc in next dc. Work 8 more sp, with the last dc in the top of the turning ch. (9 sp; 28 sts)
Row 7 (RS, decrease): Turn, decrease at row start. Ch 5, sk 2 ch, dc in next dc. Work 4 more sp (5 sp total), then 2 bl. Leave the last mesh unworked. (5 sp, 2 bl = 7; 22 sts)
Row 8 (WS): Ch 3, turn, dc in next 2 dc, dc in next dc (1 bl). Work 1 more bl, then 1 sp, which sets up the next garland. Work 1 bl, then 3 sp, with the last dc in the top of the turning ch. (2 bl, 1 sp, 1 bl, 3 sp = 7; 22 sts)
Design note: Rows 7 and 8 together make the second garland: a short slanted band of four filled blocks.
Row 9 (RS, decrease): Turn, decrease at row start. Ch 5, sk 2 sts, dc in next dc. Work 2 more sp (3 sp total), then 2 bl. Leave the last mesh unworked. (3 sp, 2 bl = 5; 16 sts)
Row 10 (WS): Ch 5, turn, dc in next dc. Work 4 more sp, with the last dc in the top of the turning ch. (5 sp; 16 sts)
Row 11 (RS, decrease): Turn, decrease at row start. Ch 5, sk 2 ch, dc in next dc (1 sp). Work 1 bl, then 1 sp. Leave the last mesh unworked. (sp, bl, sp = 3; 10 sts)
The single block in Row 11 is the “star” near the top of the tree.
Row 12 (WS): Ch 5, turn, dc in next dc. Work 2 more sp, with the last dc in the top of the turning ch. (3 sp; 10 sts)
Row 13 (RS, decrease): Turn, decrease at row start. Ch 5, sk 2 ch, dc in next dc. Leave the last mesh unworked. (1 sp; 4 sts)
Fasten off. Measure the triangle: 3.9 in (9.9 cm) wide × 3.9 in (9.9 cm) tall.
Stitch-count summary: 40, 40, 34, 34, 28, 28, 22, 22, 16, 16, 10, 10, 4. Each decrease row loses 6 sts (3 per side, one mesh per side).
Border (Color A)
Border gauge: about 10 sc per 1 in (2.5 cm) along the base.
The border is one round of sc. Every corner gets a 3-sc group. Each side has 38 sc between corner groups.
Round 1 (RS): Join Color A with a sl st in the ch-2 sp of Row 13 (the apex).
– Apex: ch 1, 3 sc in the apex ch-2 sp.
– First slanted side: work down the edge. Put 2 sc around each row-end post (13 rows = 26 sc). Put 2 sc in each exposed ch-2 sp at the steps; there are 6 steps per side, giving 12 sc. (38 sc)
– Bottom corner: 3 sc in the free loop of the corner foundation ch.
– Base: 1 sc in the free loop of each of the next 38 foundation ch. (38 sc)
– Bottom corner: 3 sc in the free loop of the last corner ch.
– Second slanted side: repeat the first side in reverse. (38 sc)
– Sl st to the first sc.
Total: 3 sides × 38 sc + 3 corners × 3 sc = 114 + 9 = 123 sc.
Why the math works: The foundation chain has 40 ch. The two corner chains get the 3-sc groups, so 38 ch remain between them, and one sc in each gives 38. Along each slanted side, a dc row end is about as tall as 2 sc, so 13 rows × 2 = 26. Each step is one exposed mesh with 2 sc, so 6 × 2 = 12, and 26 + 12 = 38. The base comes out at about 9.7 sc per inch (3.8 per cm), close to sc gauge. Each slanted side is about 4.4 in (11.2 cm) long, so its 38 sc sit a little looser, at about 8.6 per inch (3.4 per cm). That keeps the diagonal edges straight instead of ruffled.
Hanging loop: Sl st into the center sc of the apex group. Ch 20, then sl st in the same sc to form a loop. Ch 1, work 28 sc into the loop, and sl st in the center apex sc. Fasten off. The loop should stand about 1 in (2.5 cm) tall.
Checkpoint: The bordered triangle is 4.1 in (10.4 cm) wide and 4.1 in (10.4 cm) tall.
Trunk (Color B)
Hold the tree RS facing with the base at the top. Count the 38 base sc between the corner groups: the trunk uses sc 15–24, leaving 14 sc on each side (14 + 10 + 14 = 38).
Row 1: Join Color B with a sl st in the 15th base sc. Ch 1, sc in the same st and in each of the next 9 sc. (10 sc)
Rows 2–8: Ch 1, turn, sc in each sc across. (10 sc)
Fasten off. The trunk measures 1 in (2.5 cm) wide × 0.8 in (2.0 cm) tall.
Weave in all ends inside the solid blocks or the border so they don’t show through the open meshes.
Final Blocking
- Soak the ornament in cool water for 5 minutes, then press out the water in a towel. Do not wring it.
- Optional: spray it lightly with starch for a stiffer ornament.
- Lay it RS up on the blocking mat.
- Pin the three corners first: base corners 4.1 in (10.4 cm) apart, apex 4.1 in (10.4 cm) above the base.
- Pin along each slanted side so the edge is a straight line, not scalloped.
- Use a pin or the hook tip to nudge each mesh into a square, 0.3 in (0.8 cm) per side.
- Pin the trunk into a neat 1 in × 0.8 in (2.5 cm × 2.0 cm) rectangle.
- Pin the loop upright and let everything dry completely before unpinning.
Final Quality-Control Checklist
- Row stitch counts match the summary (40 down to 4).
- Each side steps in one mesh every two rows, with 6 steps per side.
- The garland blocks are fully filled with no gaps.
- The border has 123 sc with a 3-sc group at each corner.
- The trunk is centered, with 14 border sc on each side.
- The size is 4.1 in (10.4 cm) wide and 4.9 in (12.4 cm) tall without the loop.
- The loop is firmly anchored at the apex center.
- No ends show through the open meshes.
Troubleshooting
- The triangle leans to one side: you probably decreased on one side only. Check that every odd row from Row 3 starts with 3 sl sts and leaves the last mesh unworked.
- The meshes look slanted: your turning chains are loose. Make the ch 5 snugger, or replace it with ch 4 plus one extra chain worked tighter.
- The border ruffles: use 1 sc in some exposed step spaces instead of 2 (keep it symmetrical), or go down a hook size for the border.
- The border pulls and cups: add 1 sc at each step instead of removing one.
- The trunk is off-center: count the base sc again from the corner group. The 3 corner sc do not count.
- The loop flops over: add starch to the loop, or work the sc around it more tightly.
Care
Hand wash in cool water with mild soap, press dry in a towel and reshape flat. Store the ornament flat between tissue paper so the meshes stay square.
Final Notes
Each mesh is 0.3 in (0.8 cm), so 13 meshes and 13 rows make a 3.9 in (9.9 cm) triangle. The 123-sc border adds 0.1 in (0.3 cm) on each edge, bringing it to 4.1 in (10.4 cm). The 0.8 in (2.0 cm) trunk brings the total height to 4.9 in (12.4 cm), and the loop brings it to about 5.9 in (15.0 cm). Check your gauge at the first checkpoint, and every ornament after that should come out the same size.
Happy crocheting!