

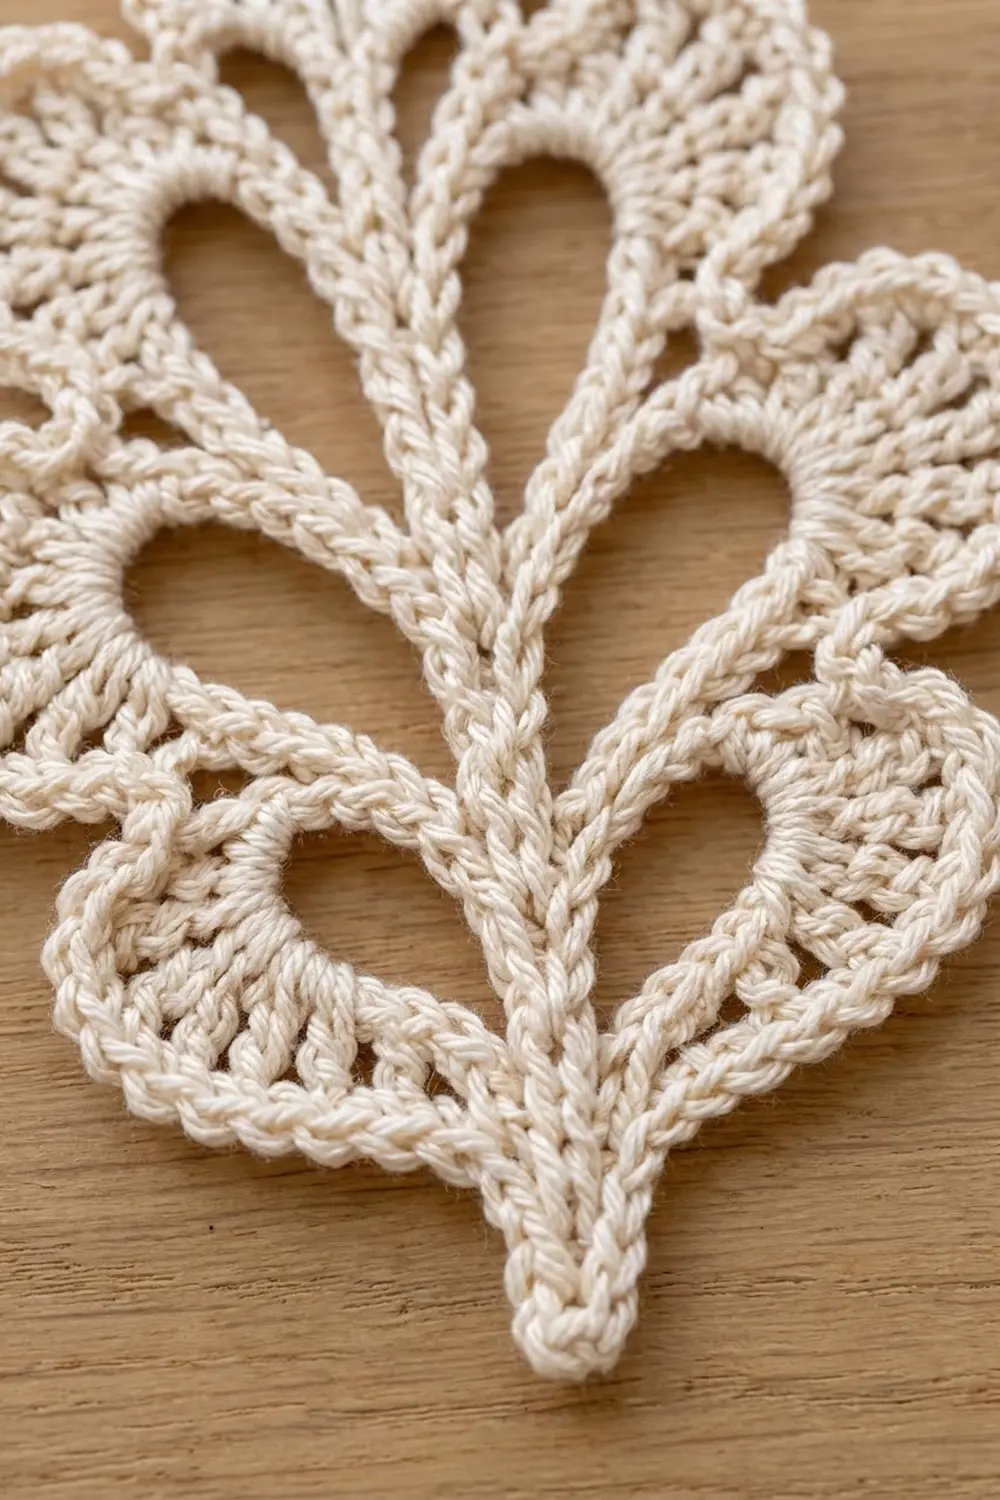
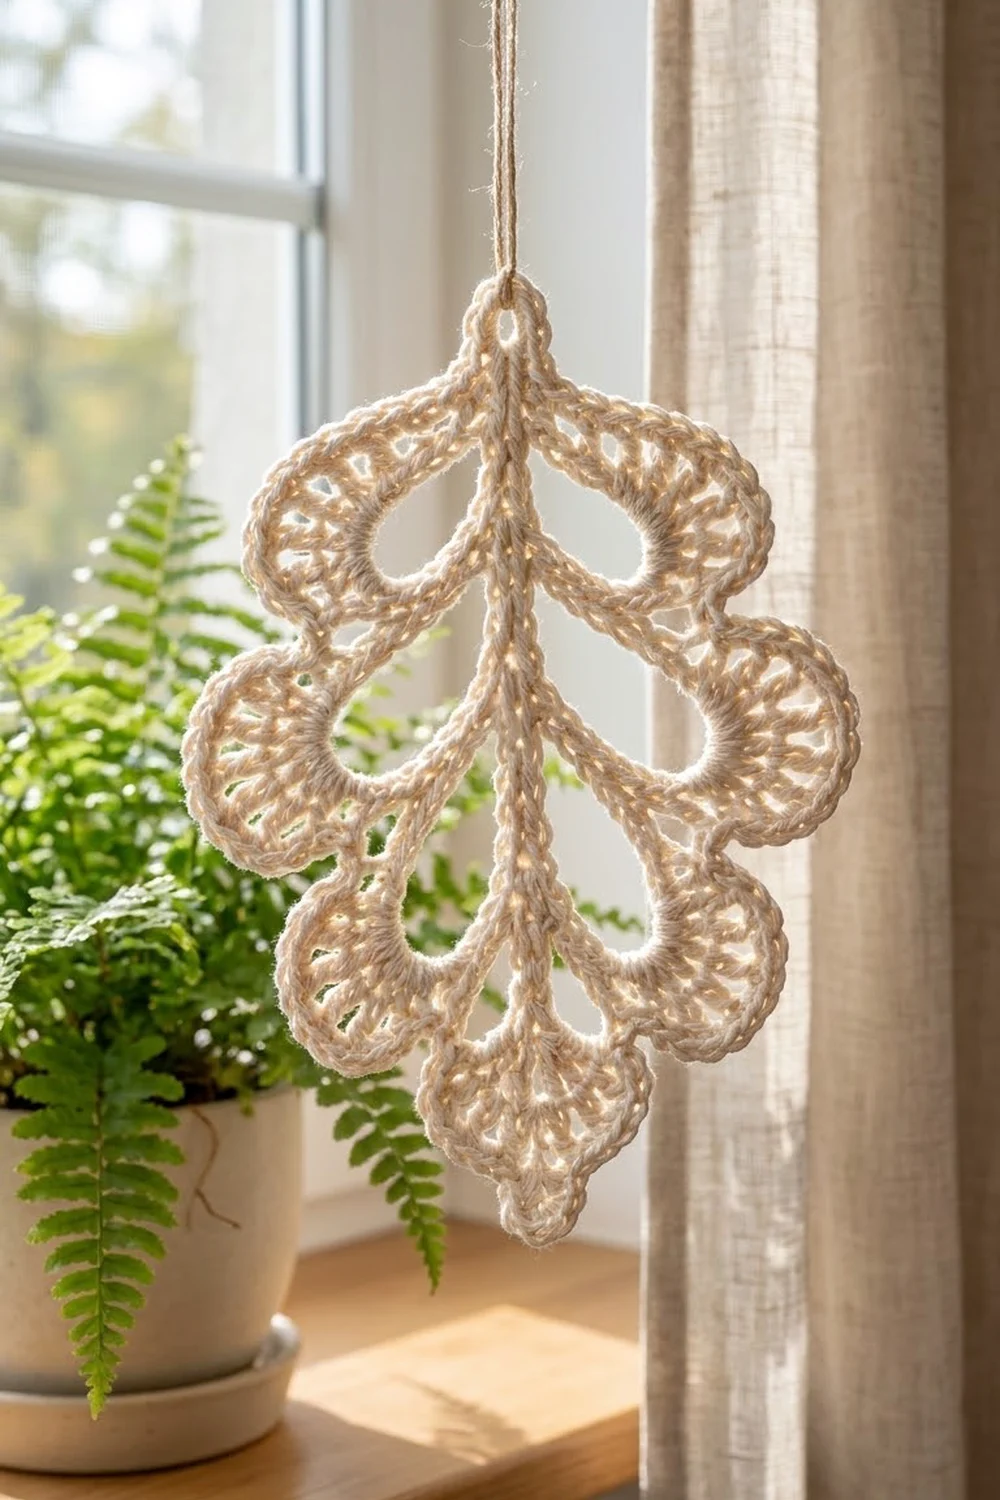
The Ivory Oakleaf Lace Leaf is a single, lacy leaf motif with a raised central spine, three pairs of scalloped side lobes, and one rounded top lobe. Each lobe frames an open teardrop hole beside the spine, so light shines through the leaf in a pattern that reads like veins.
The sample is worked in one cream cotton, which shows off the corded edge and the fans of double crochet. The style sits between Irish crochet and modern home décor: crisp, textural, and calm. It looks just as good pinned to a wall as it does tucked into a gift.
This pattern uses US crochet terms. The finished leaf measures 5 in (12.7 cm) wide and 7 in (17.8 cm) tall, plus a 0.5 in (1.3 cm) hanging loop.
The construction is simple once you see it. You make a single crochet oval around a foundation chain to form the spine, then add chain loops on both sides to frame the holes. Next you fill each loop with a fan, and finish with a shaping round and a reverse single crochet edge. The whole leaf is one piece, with no sewing.
Finished Size and Construction
- Finished size: 5 in (12.7 cm) wide × 7 in (17.8 cm) tall, plus a 0.5 in (1.3 cm) loop
- Skill level: Intermediate
- Terminology: US crochet terms
- Yarn weight: Fine (CYC 2) mercerized cotton or size 3 cotton thread
- Hook: 2.75 mm (C-2)
- Number of pieces: 1 single motif
- Layout: One leaf worked in the round around a central spine
- Piece size: 5 in × 7 in (12.7 cm × 17.8 cm)
- Size before edging (after Rnd 4): 4.75 in × 6.75 in (12.1 cm × 17.1 cm)
- Edging depth: about 0.125 in (0.3 cm) per side from Rnd 5
Materials
Choose a smooth, mercerized cotton with a firm twist. It gives the crisp stitch definition and rope-like edge seen in the photo. Avoid fuzzy or very soft cotton, which blurs the holes.
- Cream / ivory cotton: 20 g, about 85 m (93 yd)
One leaf uses about 12–13 g. The quantity above includes a margin for your gauge swatch and tails.
Tools:
- 2.75 mm (C-2) crochet hook
- Tapestry needle
- Scissors
- Rustproof pins and a blocking mat or folded towel
- Spray bottle with water
- Ruler or tape measure
- Stitch marker
Abbreviations (US Terms)
- ch: chain
- sl st: slip stitch
- sc: single crochet
- hdc: half double crochet
- dc: double crochet
- tr: treble crochet
- sk: skip
- st(s): stitch(es)
- sp: space
- Rnd: round
- rev sc: reverse single crochet
Special stitch: reverse single crochet (rev sc, also called crab stitch). Working from left to right (if you are right-handed), insert the hook into the next st to the right, yarn over and pull up a loop, then yarn over and pull through both loops. This makes the corded, twisted edge.
Gauge and Checkpoints
Gauge: 22 sc and 24 rows = 4 in (10.2 cm) in sc worked in rows.
Gauge matters because the spine length sets the size of the whole leaf. Make one test leaf first, then measure at each checkpoint below.
- After Rnd 1: the spine is 5.5 in (14.0 cm) long and 0.5 in (1.3 cm) wide.
- After Rnd 3: the leaf is about 4.5 in (11.4 cm) wide × 6.5 in (16.5 cm) tall, with the lobes cupping slightly.
- After Rnd 4: 4.75 in × 6.75 in (12.1 cm × 17.1 cm).
- After Rnd 5: 5 in × 7 in (12.7 cm × 17.8 cm) after blocking.
If your spine is longer than 5.75 in (14.6 cm), go down to a 2.5 mm hook. If it is shorter than 5.25 in (13.3 cm), go up to a 3 mm hook. Check the spine again before you continue. Fixing it here saves you from redoing the whole leaf.
Pattern
The leaf is worked in continuous joined rounds without turning. The right side faces you the whole time.
Rnd 1: The Spine
Ch 31.
Sc in 2nd ch from hook and in next 28 ch, then 3 sc in last ch (top of leaf). Rotate and work along the other side of the foundation chain: sc in next 28 ch, then 2 sc in the same ch as the first sc. Join with sl st to first sc.
Stitch count: 62 sc = 3 sc bottom group + 28 sc side A + 3 sc top group + 28 sc side B.
Place a marker in the center st of the bottom group. Side A runs from bottom to top, and side B runs from top to bottom.
Rnd 2: Lobe Frames
This round builds 7 chain loops. The gap between each loop and the spine becomes an open teardrop hole.
Side A (bottom to top): Sl st in first 4 sts of side A (stem). *Ch 16, sk 5 sts, sl st in next 3 sts. Repeat from * 2 more times (3 lobe loops). You are now at the top of side A.
Check: 4 + (5 skipped + 3 sl st) × 3 = 28 sts of side A used.
Top lobe: Ch 18, sk all 3 sts of the top group.
Side B (top to bottom): *Sl st in next 3 sts, ch 16, sk 5 sts. Repeat from * 2 more times, then sl st in last 4 sts of side B.
Check: (3 + 5) × 3 + 4 = 28 sts of side B used.
Bottom: Sl st in each of the 3 sts of the bottom group. Join with sl st to first sl st.
Count: 29 sl sts (13 on side A + 13 on side B + 3 at the bottom), 6 ch-16 loops, and 1 ch-18 loop.
Rnd 3: Lobe Fans
Work into the chains of each loop, not around them, so the holes stay open.
Start with a sl st in each of the 4 stem sl sts on side A.
Side lobe (work into each ch-16 loop): Sc in first 2 ch, hdc in next 2 ch, 2 dc in each of next 8 ch, hdc in next 2 ch, sc in next 2 ch. 24 sts per side lobe (2 + 2 + 16 + 2 + 2).
Valley: Sl st in each of the 3 sl sts between loops.
Work side lobe, valley, side lobe, valley, side lobe, valley. Side A is done.
Top lobe (work into the ch-18 loop): Sc in first 2 ch, hdc in next 2 ch, 2 dc in each of next 2 ch, 2 tr in each of next 6 ch, 2 dc in each of next 2 ch, hdc in next 2 ch, sc in next 2 ch. 28 sts (2 + 2 + 4 + 12 + 4 + 2 + 2).
Work a valley, then side B: side lobe, valley, side lobe, valley, side lobe. Sl st in each of the 4 stem sl sts and the 3 bottom sl sts. Join.
Stitch count: 201 sts = 29 sl sts + (6 × 24) + 28.
The dc fans should radiate outward around each hole, and the spine should look like a raised braid.
Rnd 4: Shaping Round
This round rounds out the scallops and pulls the valleys in tight.
Stem, side A: Sc in each of the 4 stem sl sts.
Side lobe: Sc in first 4 sts, (2 sc in next st, sc in next st) 8 times, sc in last 4 sts. 32 sts per side lobe. This uses all 24 sts of the lobe (4 + 16 + 4).
Valley: Sk 1 sl st, sl st in the center sl st, sk 1 sl st. 1 st per valley.
Work side lobe, valley 3 times on side A.
Top lobe: Sc in first 4 sts, (2 sc in next st, sc in next st) 10 times, sc in last 4 sts. 38 sts. This uses all 28 sts (4 + 20 + 4).
Work valley, side lobe 3 times on side B.
Stem, side B: Sc in each of the 4 stem sl sts.
Bottom point: Sc in next st, 3 sc in marked st, sc in next st. 5 sts. Join.
Stitch count: 249 sts = 4 + (6 × 32) + 6 valleys + 38 + 4 + 5.
Rnd 5: Corded Edge and Hanging Loop
This is a conversion round. You work 1 rev sc in each existing sc and 1 sl st in each valley sl st, and add a chain loop at the tip.
Ch 1. Working in rev sc, work 1 rev sc in each sc and 1 sl st in each valley st all the way around. When you reach the 19th st of the top lobe, work the rev sc, then ch 10 and sl st in the same st. Continue around. Join with sl st to first st and fasten off.
Stitch count: 249 sts (243 rev sc + 6 sl sts, worked 1 per existing st) + 1 ch-10 loop (extra).
Edging (Border) Details
Rnds 4 and 5 act as the border of this single motif. Border gauge matches the main gauge of 22 sts per 4 in (10.2 cm). Because the stitches sit on curves, measure along the outer arc of one middle lobe instead; it should be about 2.25 in (5.7 cm).
Rnd 4 counts per half:
- Left half (side A): 4 stem + (3 × 32) + 3 valleys = 103 sts
- Top lobe: 38 sts
- Right half (side B): 3 valleys + (3 × 32) + 4 stem = 103 sts
- Bottom point: 5 sts
- Total: 103 + 38 + 103 + 5 = 249 sts
Rnd 5 counts per half: These match Rnd 4 exactly, because every st gets exactly one st. The ch-10 loop sits at the center of the top lobe, between st 19 and st 20 of its 38.
Why the math works: Each lobe edge curves outward, so it needs more stitches on the outside than on the inside.
- Side lobes: increasing in every other stitch across the center 16 sts adds 8 sts (24 to 32).
- Top lobe: the same increase across the center 20 sts adds 10 sts (28 to 38).
That is enough to keep each scallop flat without ruffling. The valleys do the opposite: skipping 2 of every 3 sl sts pulls them inward and makes the deep notches between lobes.
Final Blocking
- Weave in all tails along the spine, where they hide inside the braid.
- Soak the leaf in cool water for 10 minutes, then press the water out in a towel. Do not wring.
- Lay the leaf on a blocking mat, right side up.
- Pin the bottom point and the base of the hanging loop first, 7 in (17.8 cm) apart.
- Straighten the spine between those two pins.
- Pin the tip of each middle lobe so the leaf measures 5 in (12.7 cm) at its widest.
- Pin each scallop edge into a smooth curve, and pin each valley tight against the spine.
- Open each teardrop hole by pressing it gently with a fingertip.
- Let the leaf dry completely, at least 24 hours. For extra crispness, mist it with light spray starch before drying.
Final Quality-Control Checklist
- The leaf measures 5 in × 7 in (12.7 cm × 17.8 cm), not counting the loop.
- The spine is straight and centered.
- The left and right lobes mirror each other in size and position.
- All 7 holes are open, and each pair matches in shape.
- Every side lobe has 32 sts in Rnd 4, and the top lobe has 38.
- The valleys are snug and point toward the spine.
- The corded edge is even all the way around, with no loose loops.
- The hanging loop sits at the exact top center.
- All tails are woven in and trimmed.
Troubleshooting
Lobes ruffle: Your increases are too loose or your hook is too large. Rework Rnd 4 with a hook 0.25 mm smaller.
Lobes cup and won’t lie flat: Rnd 4 is too tight. Go up 0.25 mm for Rnd 4 only.
Holes close up: You worked around the chain loops instead of into each ch. Rework Rnd 3 into the chains.
Leaf is lopsided: Recount the skipped sts in Rnd 2. Each lobe must skip exactly 5.
Spine twists: Your foundation chain twisted. Restart Rnd 1 and keep the chain flat.
Rev sc edge looks flat: Keep the loop on the hook slightly loose and insert the hook fully under both loops.
Care
Hand wash in cool water with mild soap and dry flat, reshaping and pinning as needed. Starch it again after washing if you want the crisp finish back.
Final Notes
The measurements build in four steps:
- Spine (Rnd 1): 5.5 in (14.0 cm) long.
- After the fans (Rnd 3): 4.5 in × 6.5 in (11.4 cm × 16.5 cm).
- After shaping (Rnd 4): 4.75 in × 6.75 in (12.1 cm × 17.1 cm).
- After the corded edge and blocking (Rnd 5): 5 in × 7 in (12.7 cm × 17.8 cm).
Get the spine right and count each side lobe at 24 sts, then 32 sts, and the rest falls into place. The hanging loop lets you display the leaf on its own as an ornament, bookmark tassel, or small wall accent.
Happy crocheting!