

The Rosewood Lattice Curtain is a light, open window panel made from small granny diamonds joined tip to tip. Burgundy-framed diamonds with cream flower centers alternate with cream-framed diamonds with burgundy centers, so the panel shows horizontal bands of color when it hangs.
The style is cottage-inspired and a little bohemian. The diamond-shaped gaps between motifs let daylight through, burgundy tabs hold the panel on a rod, and a burgundy tassel finishes the bottom of every strand.
This pattern uses US crochet terms. Before trims, the curtain measures 69 in (175.3 cm) wide and 40.25 in (102.2 cm) long. With the tabs and tassels, it is 46.25 in (117.5 cm) long.
You make each motif in four rounds and join it to its neighbors in the last round (join-as-you-go). You add the tabs and tassels at the end. There is no sewing between motifs.
Finished Size and Construction
- Finished size: 69 in (175.3 cm) wide x 46.25 in (117.5 cm) long, including tabs and tassels
- Skill level: Intermediate
- Terminology: US crochet terms
- Yarn weight: Worsted (#4)
- Hook: 5 mm (H-8)
- Number of pieces: 84 motifs (48 Motif A, 36 Motif B), plus 12 tabs and 12 tassels
- Layout: 12 columns x 7 rows, set on point and joined at the tips
- Motif size: 4 in (10.2 cm) per side and 5.75 in (14.6 cm) from tip to tip
- Size before border: 69 in x 40.25 in (175.3 cm x 102.2 cm)
- Border depth: Tabs add 2 in (5.1 cm) at the top. Tassels add 4 in (10.2 cm) at the bottom.
Materials
Choose a smooth worsted-weight cotton, cotton blend, or acrylic. Cotton hangs straight and blocks crisply, which suits a window. Avoid fuzzy yarns, because they blur the cluster petals.
- Burgundy: 600 g (about 1,200 m)
- Cream: 420 g (about 840 m)
These quantities include a margin of about 10% for swatching, tails, and tassel trimming.
Tools:
- 5 mm (H-8) crochet hook
- Tapestry needle
- Scissors
- Stitch markers
- Rust-proof pins and a blocking surface
- Spray bottle
- Ruler or tape measure
- A piece of cardboard 8 in (20.3 cm) long, for tassels
Abbreviations (US Terms)
- ch: chain
- sl st: slip stitch
- sc: single crochet
- dc: double crochet
- dc2tog / dc3tog: 2 or 3 double crochet worked together
- sp: space
- st(s): stitch(es)
- MR: magic ring
Special stitches
- Beginning cluster (beg-cl): Ch 3, then dc2tog into the ring.
- Cluster (cl): Dc3tog into the ring. Yarn over, insert the hook, and pull up a loop three times. Each time, yarn over and pull through 2 loops. Then yarn over and pull through all 4 loops on the hook.
- Joining corner (j-corner): Use this in place of the ch 3 in a Round 4 corner. Ch 1, sl st into the matching ch-3 corner sp of the neighbor motif, then ch 1.
Gauge and Checkpoints
Make one Motif A before you start the full panel. Block it, let it dry, and then measure it.
- After Round 1: The flower is about 1.5 in (3.8 cm) across.
- After Round 2: The square is about 2.75 in (7.0 cm) per side.
- After Round 3: The square is 3.5 in (8.9 cm) per side.
- After Round 4: The square is 4 in (10.2 cm) per side and 5.75 in (14.6 cm) from tip to tip.
Tab gauge: 16 sc x 16 rows = 4 in (10.2 cm).
If your motif is larger than 4 in (10.2 cm) per side, go down half a hook size. If it is smaller, go up half a size. A difference of 0.25 in (0.6 cm) on one motif adds up to 3 in (7.6 cm) across 12 columns, so check this carefully.
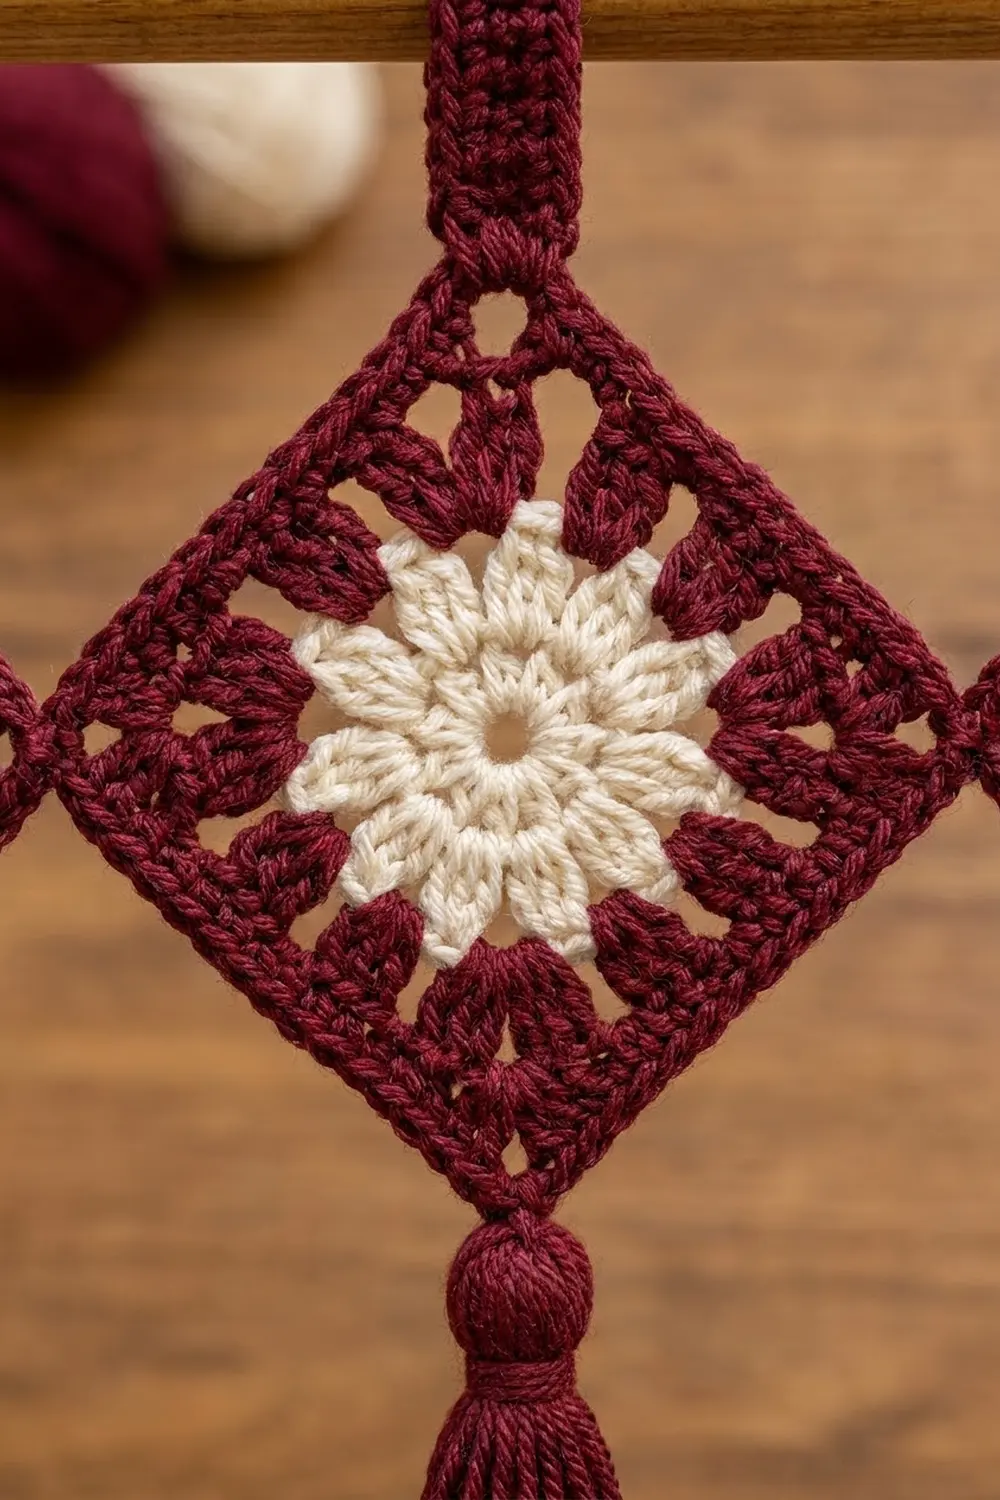
Motif A (Burgundy Frame, Cream Center)
Round 1 (cream): Make a MR. Work a beg-cl, then ch 3. Cl in the ring, ch 3. Repeat from * 6 more times. Sl st to the top of the beg-cl.
Count: 8 clusters and 8 ch-3 sps. Fasten off.
Round 2 (burgundy): Join burgundy in any ch-3 sp. Ch 3 (counts as dc). Work (2 dc, ch 2, 3 dc) in the same sp for the corner, then 3 dc in the next sp. Work (3 dc, ch 2, 3 dc) in the next sp, then 3 dc in the next sp. Repeat from * 2 more times. Sl st to the top of the ch 3.
Count: 36 dc, which is 9 dc per side (counting both corner groups), and 4 ch-2 corner sps.
Round 3 (burgundy): Sl st across to the first corner ch-2 sp. Ch 3 (counts as dc). Work (dc, ch 2, 2 dc) in the same sp. Dc in each of the next 9 dc, then work (2 dc, ch 2, 2 dc) in the corner sp. Repeat from * 2 more times. Dc in each of the last 9 dc, then sl st to the top of the ch 3.
Count: 52 dc. Each side has 13 dc: 2 + 9 + 2. There are 4 ch-2 corner sps.
Round 4 (burgundy): Ch 1. Work (sc, ch 3, sc) in the corner sp. Sc in each of the next 13 dc, then work (sc, ch 3, sc) in the corner sp. Repeat from * 2 more times. Sc in each of the last 13 dc, then sl st to the first sc.
Count: 60 sc and 4 ch-3 corner tips. Each side has 15 sc: 13 worked one into each existing dc, plus 2 corner sc added. These 15 sc already include that side’s 2 corner sc.
On every motif except the first, replace the ch 3 with a j-corner wherever the motif touches a neighbor (see Joining). Fasten off and weave in the ends.
Motif B (Cream Frame, Burgundy Center)
Work Motif B exactly like Motif A, with the colors swapped. Use burgundy for Round 1 and cream for Rounds 2–4. The stitch counts are the same: 8 clusters, then 36 dc, then 52 dc, then 60 sc with 4 ch-3 tips.
Make All Pieces
- Motif A: 48 motifs. Each one uses about 1.5 g cream and 8.5 g burgundy.
- Motif B: 36 motifs. Each one uses about 1.5 g burgundy and 8.5 g cream.
Each motif is set on point, with one corner at the top, one at each side, and one at the bottom.
Layout (12 columns x 7 rows):
Row 1: A A A A A A A A A A A A
Row 2: B B B B B B B B B B B B
Row 3: A A A A A A A A A A A A
Row 4: B B B B B B B B B B B B
Row 5: A A A A A A A A A A A A
Row 6: B B B B B B B B B B B B
Row 7: A A A A A A A A A A A A
Row 1 is at the top, and Row 7 is at the bottom, where the tassels go.
Joining
Method: Join as you go in Round 4, at the corner tips only. The sides of the motifs never touch, and that is what creates the open diamond gaps.
Stitch-to-stitch logic: Each tip of a new motif joins to exactly one tip of one neighbor:
- The new motif’s left tip joins the right tip of the motif to its left.
- The new motif’s top tip joins the bottom tip of the motif above it.
- Tips that face a neighbor are joined. Outer tips and the bottom tips of Row 7 keep their full ch 3.
No stitches are added or removed. A j-corner has the same length as ch 3 (ch 1 + sl st + ch 1), so every motif keeps 60 sc and 4 tips.
Order:
- Make Motif 1 (Row 1, Column 1) completely.
- Join each following Row 1 motif by its left tip only.
- In Row 2 and below, the first motif in each row joins by its top tip only. Every other motif joins by its top and left tips.
Tension: Keep the slip stitch in a j-corner loose enough that it sits flat. If you pull it tight, the tips pucker and the strands bend.
Size checkpoint: After Row 1, lay the strip flat. It should be 69 in (175.3 cm) wide, which is 12 x 5.75 in (14.6 cm). After Row 2, the piece should be 11.5 in (29.2 cm) long. If your numbers are off, check your gauge before you continue.
Border: Hanging Tabs and Tassels
On a lattice curtain, the border is the edge finishing at the top and bottom tips. You work one tab into the top tip of each of the 12 Row 1 motifs, and you tie one tassel to the bottom tip of each of the 12 Row 7 motifs.
Border gauge: 16 sc x 16 rows = 4 in (10.2 cm). Each tab is 5 sc wide, which is 1.25 in (3.2 cm).
Top Edge Tabs (burgundy)
Row 1: With the right side facing, join burgundy in the top ch-3 tip of a Row 1 motif. Ch 1 and work 5 sc into the tip.
Count: 5 sc.
Rows 2–16: Ch 1, turn, and sc in each st across.
Count: 5 sc in every row. The strip is now 4 in (10.2 cm) long.
Fold the strip toward the back. Whipstitch Row 16 to the back of Row 1 to make a loop 2 in (5.1 cm) tall. Fasten off.
Repeat for all 12 tips.
Top edge total: 12 tabs x 5 sc = 60 sc in Row 1, one tab for each of the 12 Row 1 motifs.
Bottom Edge Tassels (burgundy)
Wrap burgundy 20 times around the 8 in (20.3 cm) cardboard, then cut along one edge. This gives you 20 strands, each 8 in (20.3 cm) long.
Fold the bundle in half through the bottom ch-3 tip of a Row 7 motif. Tie a separate strand tightly around the bundle 0.75 in (1.9 cm) below the tip and hide its ends inside the tassel. Trim the tassel to 4 in (10.2 cm).
Make 12 tassels in total: 12 Row 7 motifs x 1 bottom tip each.
Why the math works: Each column is exactly 5.75 in (14.6 cm) wide. Because every tab and every tassel sits on a center tip, they are spaced 5.75 in (14.6 cm) apart and line up straight down each strand. A ch-3 tip holds 5 sc without flaring, so the tabs stay as wide as the tip and don’t pull the motif out of shape.
Final Blocking
- Weave in all remaining ends along the sc edges, away from the openwork.
- Lay the curtain flat, right side up, on blocking mats or a clean towel.
- Pin Row 1 straight across to 69 in (175.3 cm), with one pin in each tip.
- Pin each strand down the center so the tips line up vertically, 5.75 in (14.6 cm) apart.
- Pin the side tips so each motif measures 4 in (10.2 cm) per side.
- Mist the curtain until it is evenly damp, not soaked.
- Let it dry completely, then unpin it.
- Steam the tassels lightly and trim them evenly to 4 in (10.2 cm).
Final Quality-Control Checklist
- [ ] All 84 motifs have 60 sc and 4 tips.
- [ ] The colors alternate A and B by row, with A at the top and bottom.
- [ ] Every interior tip is joined once, and no tip is joined twice.
- [ ] The panel measures 69 in x 40.25 in (175.3 cm x 102.2 cm).
- [ ] There are 12 tabs, each 5 sc wide and 2 in (5.1 cm) tall.
- [ ] There are 12 tassels, each 4 in (10.2 cm) long.
- [ ] All ends are woven in securely.
Troubleshooting
- The motif cups: Your Round 2 or 3 tension is tight. Loosen up, or go up half a hook size.
- The motif ruffles: Check that Round 3 has 13 dc per side, not more.
- The strands lean sideways: You may have joined a side tip to a top tip. Undo the j-corner and rejoin it to the correct tip.
- The tips pucker: Your j-corner sl st is too tight. Redo it more loosely.
- The tabs twist on the rod: Make sure you folded every tab toward the back before sewing.
- The tassels look uneven: Trim them while they are slightly damp, using the cardboard as a guide.
Care
Hand wash in cool water, or machine wash on a gentle cycle in a mesh bag. Lay flat to dry and reshape the tips while the curtain is damp.

Final Notes
Everything in this pattern depends on the first motif. Round 3 should measure 3.5 in (8.9 cm) per side, and Round 4 should measure 4 in (10.2 cm) per side and 5.75 in (14.6 cm) from tip to tip. Twelve columns of 5.75 in (14.6 cm) give a width of 69 in (175.3 cm). Seven rows give a length of 40.25 in (102.2 cm). The 2 in (5.1 cm) tabs and 4 in (10.2 cm) tassels bring the total length to 46.25 in (117.5 cm). If you keep your gauge, every one of those numbers will match.
Happy crocheting!