

This little bow ornament looks like a ribbon bow drawn in thick cord. Two oval loops sit at the top, two open triangle tails hang below, and a small wrapped knot holds the center. Inside the top of each loop sits a crescent of short upright stitches, which gives the bow a lacy look while it stays light and open.
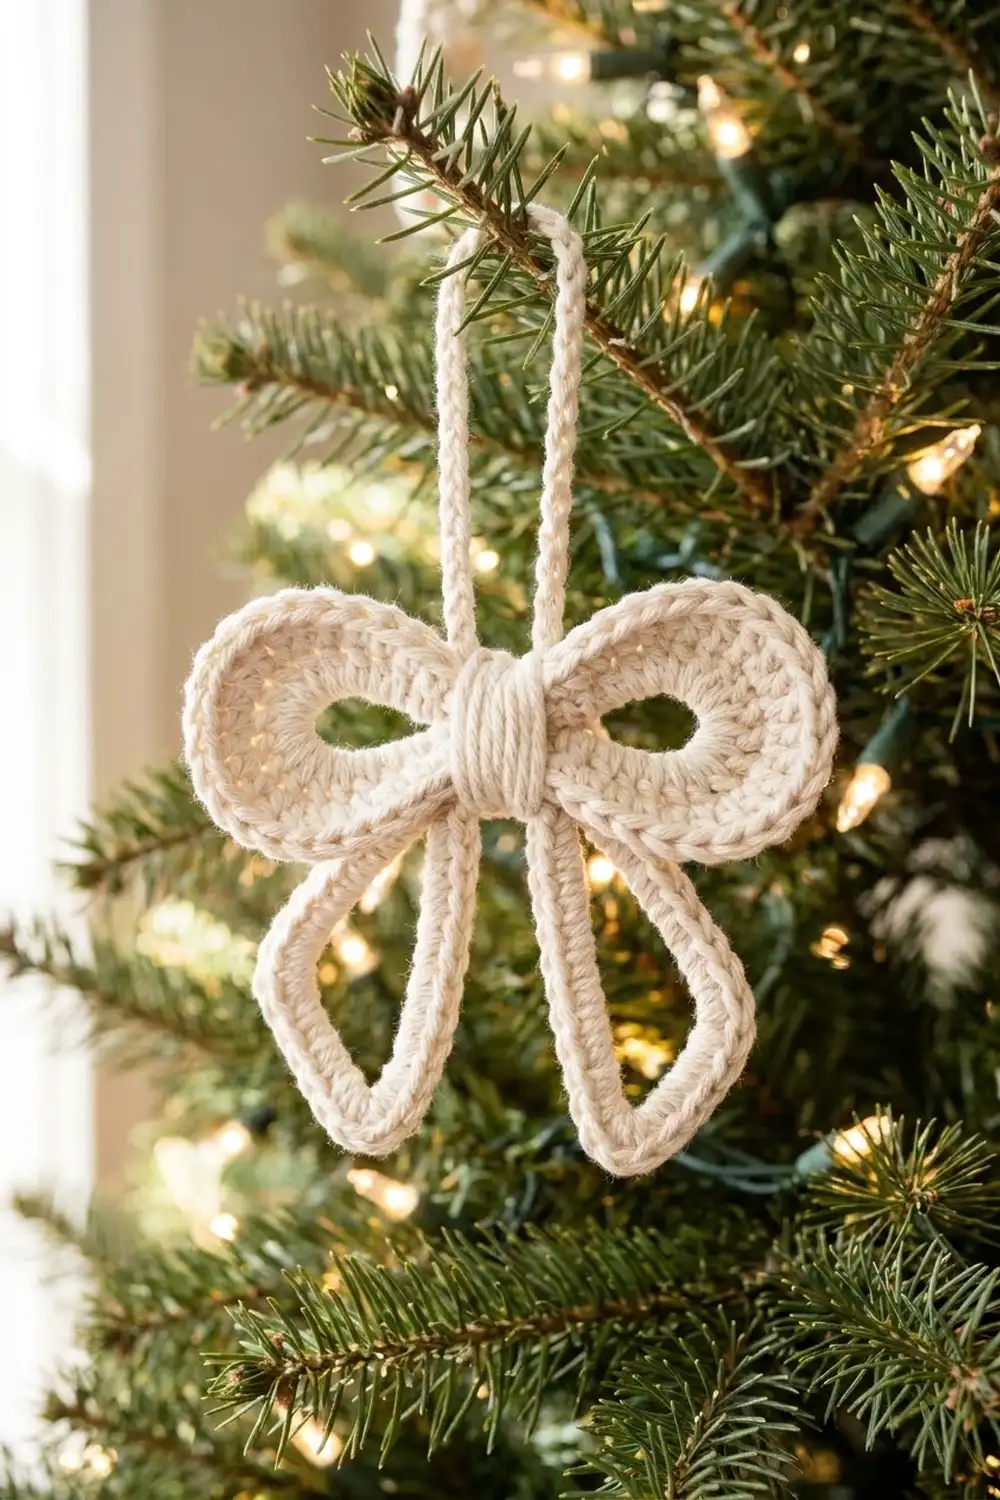
The sample is worked in one color, a soft ivory cotton. It looks calm and classic on a green tree with warm lights, and it works just as well on a gift package or a wreath. A slim crocheted hanging loop rises from the knot, so the ornament is ready to hang as soon as it’s blocked.
This pattern uses US crochet terms. The finished bow measures about 5 in (12.7 cm) wide and 3.75 in (9.5 cm) tall, not counting the hanging loop, which adds about 2 in (5.1 cm) above the knot.
The ornament is a single piece. You start with one center chain and build four chain rings out from it: two loops and two tails. Next you work a crescent inside the top of each loop. A cord-like single crochet border then goes around every ring. To finish, a small band is wrapped around the center to form the knot, and the hanging loop is chained from it.
Finished Size and Construction
- Finished size: 5 in (12.7 cm) wide x 3.75 in (9.5 cm) tall, plus a 2 in (5.1 cm) hanging loop
- Skill level: Easy to intermediate
- Terminology: US crochet terms
- Yarn weight: Worsted (#4), cotton
- Hook: 4.0 mm (G-6)
- Number of pieces: 1 (worked continuously, nothing sewn on)
- Layout: 2 upper loops, 2 lower triangle tails, center knot, hanging loop
- Each loop after border: 2.25 in (5.7 cm) wide x 1.75 in (4.4 cm) tall
- Each tail after border: long sides 2.4 in (6.1 cm), bottom edge 1.5 in (3.8 cm)
- Size before border: each loop’s chain ring is about 2 in (5.1 cm) wide when laid flat as an oval
- Border depth: 1 round of single crochet, about 0.2 in (0.5 cm)
Materials
Pick a smooth, tightly plied cotton or cotton blend. A firm, rounded yarn gives the crisp, rope-like outline seen on the sample. Fuzzy or loosely spun yarns hide the crescent stitches and make the ornament floppy.
- Ivory / cream (worsted cotton): 15 g, about 27 m (30 yd)
One ornament uses about 9 g. The amount above includes a margin for your gauge swatch, joins, and weaving in ends. If you’re making a set, plan on about 9 g, or roughly 16 m (17.5 yd), for each extra bow.
Tools:
- 4.0 mm (G-6) crochet hook
- Tapestry needle
- 2 stitch markers
- Scissors
- Blocking mat and rustproof pins
- Spray bottle with water
- Optional: liquid fabric stiffener
Abbreviations (US Terms)
- ch – chain
- sl st – slip stitch
- sc – single crochet
- hdc – half double crochet
- dc – double crochet
- st(s) – stitch(es)
- RS – right side
Special technique – back bump: Turn the chain over. The small horizontal bar running along the back of each chain is the back bump. If you work into the back bump only, the two top loops (the “V”) stay free for a later round.
Gauge and Checkpoints
Gauge: 18 sc and 20 rows = 4 in (10.2 cm) in sc.
Before starting the bow, crochet the center knot band as your test piece. Ch 6, then work 6 rows of 5 sc (see “Center Knot” below). It should measure 1.1 in (2.8 cm) wide and 1.2 in (3.0 cm) tall. Then pull it out and reuse the yarn.
Checkpoints:
- After the foundation: Lay the first loop’s chain ring flat as an oval. It should measure about 2 in (5.1 cm) wide.
- After the crescents: Each crescent should be about 0.5 in (1.3 cm) deep at its center, and the opening below it should still be clearly visible.
- After the border: Each loop measures 2.25 in (5.7 cm) x 1.75 in (4.4 cm). Each tail’s long side measures 2.4 in (6.1 cm), and the bottom edge measures 1.5 in (3.8 cm).
- After blocking: The full bow measures 5 in (12.7 cm) x 3.75 in (9.5 cm).
If your piece is too big: Go down to a 3.5 mm hook, and keep your chains snug. Loose chains are the most common reason the rings come out too large.
If your piece is too small: Go up to a 4.5 mm hook. Keep the stitch counts the same. Changing the counts will throw off the crescent placement and the tail corners.
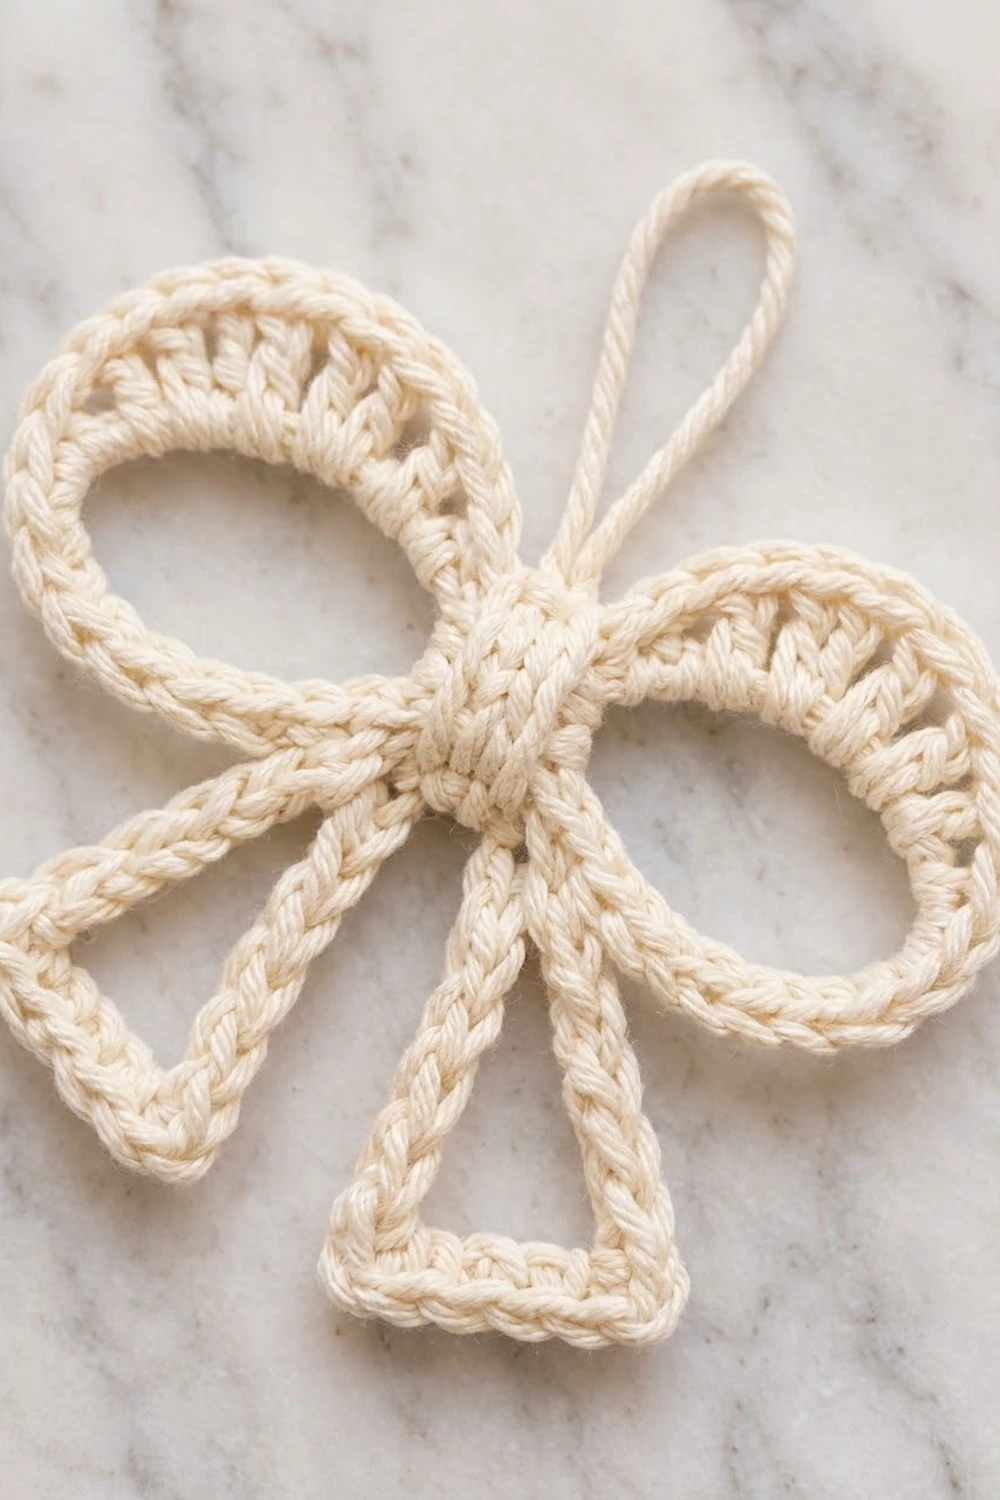
Foundation: Center and Four Chain Rings
Each ring starts and ends at the same center chain. Count only the new chains in each ring. The center chain is never counted.
Make a slip knot, then ch 1. This is the center ch. Place a marker in it.
Loop 1 (left): Ch 28, then sl st into the center ch. This gives a ring of 28 ch.
Loop 2 (right): Ch 28, then sl st into the center ch. This gives a ring of 28 ch.
Tail 1 (left): Ch 25, then sl st into the center ch. This gives a ring of 25 ch.
Tail 2 (right): Ch 25, then sl st into the center ch. This gives a ring of 25 ch.
Foundation total: 1 center ch + 28 + 28 + 25 + 25 = 107 ch.
Fasten off, leaving a 6 in (15.2 cm) tail. Lay the piece flat. Turn Loop 1 out to the left, Loop 2 out to the right, and the two tails downward with a small gap between them.
Number each ring’s chains starting from the chain right after the center. For the loops, ch 1–14 form the top arc and ch 15–28 form the bottom arc.
Crescents (Work on Each Loop)
The crescent is worked into the back bumps of the top arc. With the inside of the loop facing up, the stitches lean toward the center of the opening, which forms the inner arc of upright posts.
Row 1 (RS): Join yarn with a standing sc in the back bump of ch 3. Hdc in the back bump of ch 4. Dc in the back bump of each of ch 5–11 (7 dc). Hdc in the back bump of ch 12. Sc in the back bump of ch 13. (11 sts: 2 sc, 2 hdc, 7 dc)
Row 2: Ch 1, turn. Sc in each st across, keeping the tension slightly firm so the edge curves into an arc. (11 sc) Sl st in the back bump of ch 2 to anchor the end. Fasten off.
The 7 dc form the tall middle posts. The hdc and sc at each end step down to meet the ring smoothly, so the crescent comes to a point at both ends, just like the sample. Ch 1, 2, and 14 have no crescent stitches, which leaves a clean gap at the center and at the outer tip of each loop.
Repeat on Loop 2. Lay the bow flat before you start, so the crescent sits on the top arc of both loops. This means you work Loop 2 from its own ch 3 to ch 13.
Border (Cord Edge)
Border gauge: 4.5 sc per 1 in (2.5 cm), the same as the main gauge. Every border sc is worked into the free top loops (the “V”) of a foundation chain. The back bumps are already used on the loop crescents. On the tails, work through the top loops as well, to keep the edge even.
Join yarn with a sl st in the center ch.
Loop 1: Sc in each of ch 1–14 (top arc, 14 sc). Sc in each of ch 15–28 (bottom arc, 14 sc). Sl st in the center ch. (28 sc)
Loop 2: Work the same as Loop 1. (28 sc) Sl st in the center ch.
Tail 1: Sc in each of ch 1–9 (first long side, 9 sc). 3 sc in ch 10 (corner). Sc in each of ch 11–15 (bottom, 5 sc). 3 sc in ch 16 (corner). Sc in each of ch 17–25 (second long side, 9 sc). Sl st in the center ch. (29 sc)
Tail 2: Work the same as Tail 1. (29 sc) Sl st in the center ch. Do not fasten off.
Border total: 28 + 28 + 29 + 29 = 114 sc, plus 4 sl sts into the center ch.
Tail counts by side: On the tails, the corner stitches are counted separately from the sides. Each long side has 9 sc, the bottom has 5 sc, and each of the two bottom corners has 3 sc: 9 + 3 + 5 + 3 + 9 = 29. The top point of each triangle is the center itself, so it gets no extra stitches.
Why the math works: Working 1 sc in each chain keeps each loop the same length as its chain ring, so the loops stay flat and don’t ruffle. At 4.5 sc per inch, 28 sc makes an outline of about 6.2 in (15.7 cm), which blocks into a 2.25 in (5.7 cm) x 1.75 in (4.4 cm) oval. On the tails, the 3-sc corners give the turn its extra length, so the triangles have sharp bottom corners and don’t cup. The long side of 9 sc plus its corner reaches about 2.4 in (6.1 cm), and the bottom of 5 sc plus corners spans about 1.5 in (3.8 cm).
Center Knot
The yarn is still attached at the center ch.
Row 1: Ch 6. Sc in the 2nd ch from the hook and in each ch across. (5 sc)
Rows 2–6: Ch 1, turn. Sc in each st across. (5 sc each row)
The band now measures 1.1 in (2.8 cm) x 1.2 in (3.0 cm). Wrap it from front to back around the gathered center, so it covers all four sl st joins. Then sl st Row 6 to the free loops of the band’s starting chain, working through both layers. (5 sl sts) Turn the knot so the seam sits at the back.
Hanging Loop
Sl st along the back of the knot to its top edge. Ch 20. Sl st into the same st on top of the knot. This gives a 20-ch loop about 2 in (5.1 cm) tall when folded. Fasten off and weave in all ends through the back of the knot.
Final Blocking
- Lightly mist the ornament with water until it is damp, not soaked.
- Lay it RS up on the blocking mat.
- Shape each loop into an oval 2.25 in (5.7 cm) wide x 1.75 in (4.4 cm) tall, tilted slightly upward at the outer tip. Pin at the tip, at the top, and at the bottom.
- Gently push each crescent into a smooth arc, with the dc standing evenly side by side.
- Pull each tail into a triangle. Pin both bottom corners so each long side measures 2.4 in (6.1 cm) and the bottom measures 1.5 in (3.8 cm). Angle the tails slightly outward.
- Check the full bow: 5 in (12.7 cm) wide and 3.75 in (9.5 cm) tall.
- Pin the hanging loop straight up from the knot.
- If you want a stiffer ornament, brush on fabric stiffener now.
- Let it dry completely before you unpin it.
Final Quality-Control Checklist
- Each loop has 28 border sc and each tail has 29 border sc.
- Both crescents have 11 sts in each row and sit on the top arcs.
- The tails have 3 sc at each bottom corner, and the corners are sharp.
- The knot covers all four joins at the center.
- The bow measures 5 in (12.7 cm) x 3.75 in (9.5 cm).
- The hanging loop is about 2 in (5.1 cm) tall and firmly anchored.
- All ends are woven into the knot or border and are invisible from the front.
Troubleshooting
The loops ruffle or wave: Your border tension is looser than your chain tension. Rework the border with a smaller hook, or chain the foundation a little looser.
The loops cup or curl inward: Your chains are looser than your border sc. Tighten the foundation chain, or check that you didn’t skip a chain in the border.
The crescent fills the whole loop: Your dc are too tall. Pull up shorter loops, or use hdc in place of the outer 2 dc on each side.
The tails are rounded instead of triangular: Make sure you worked 3 sc into ch 10 and ch 16. Pin the corners firmly while blocking.
The center looks bulky: Pull the four sl sts into the center ch snug, and keep the knot band at exactly 6 rows.
The ornament tilts when hung: The hanging loop is off center. Move it to the middle st on top of the knot.
Care
Hand wash in cool water with mild soap, press out the water in a towel, and reshape the bow while it dries flat. Stiffened ornaments should only be spot cleaned.
Final Notes
The size of this bow comes from a simple chain of measurements. Gauge of 18 sc = 4 in (10.2 cm) gives 28-ch loop rings about 2 in (5.1 cm) wide. One border sc per chain turns each loop into a 2.25 in (5.7 cm) x 1.75 in (4.4 cm) oval. Each tail’s 9-5-9 sides and 3-sc corners give 2.4 in (6.1 cm) long sides on a 1.5 in (3.8 cm) bottom. Put together around the knot, the bow measures 5 in (12.7 cm) x 3.75 in (9.5 cm), with a 2 in (5.1 cm) hanging loop on top.
Make one in ivory for a classic tree, or make a set as quick gift toppers.
Happy crocheting!