

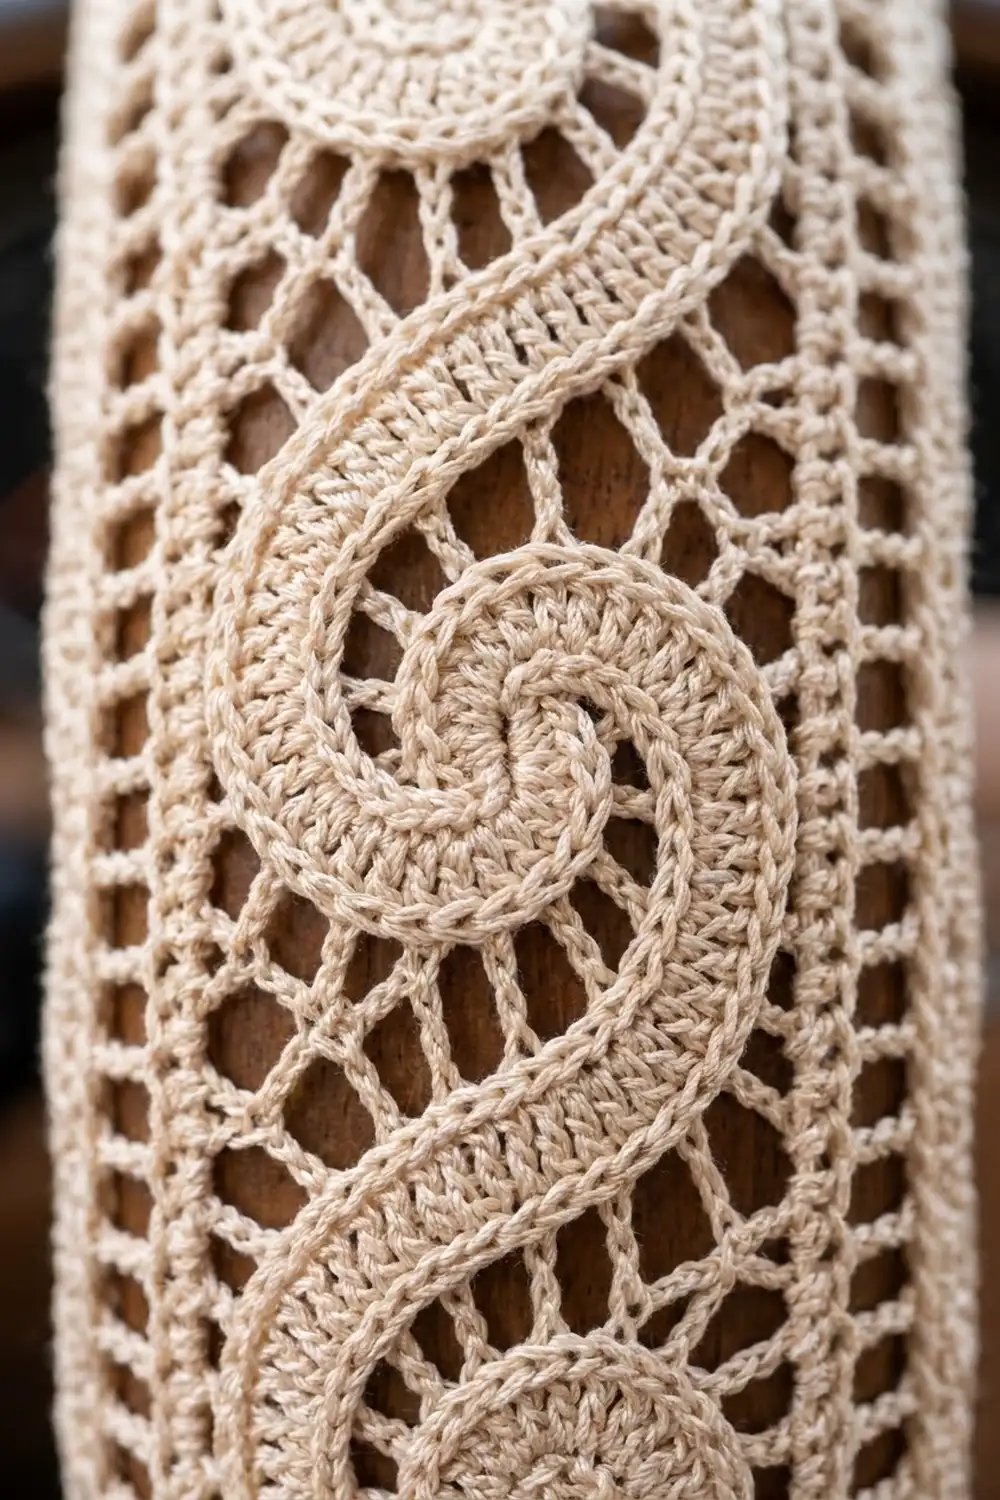
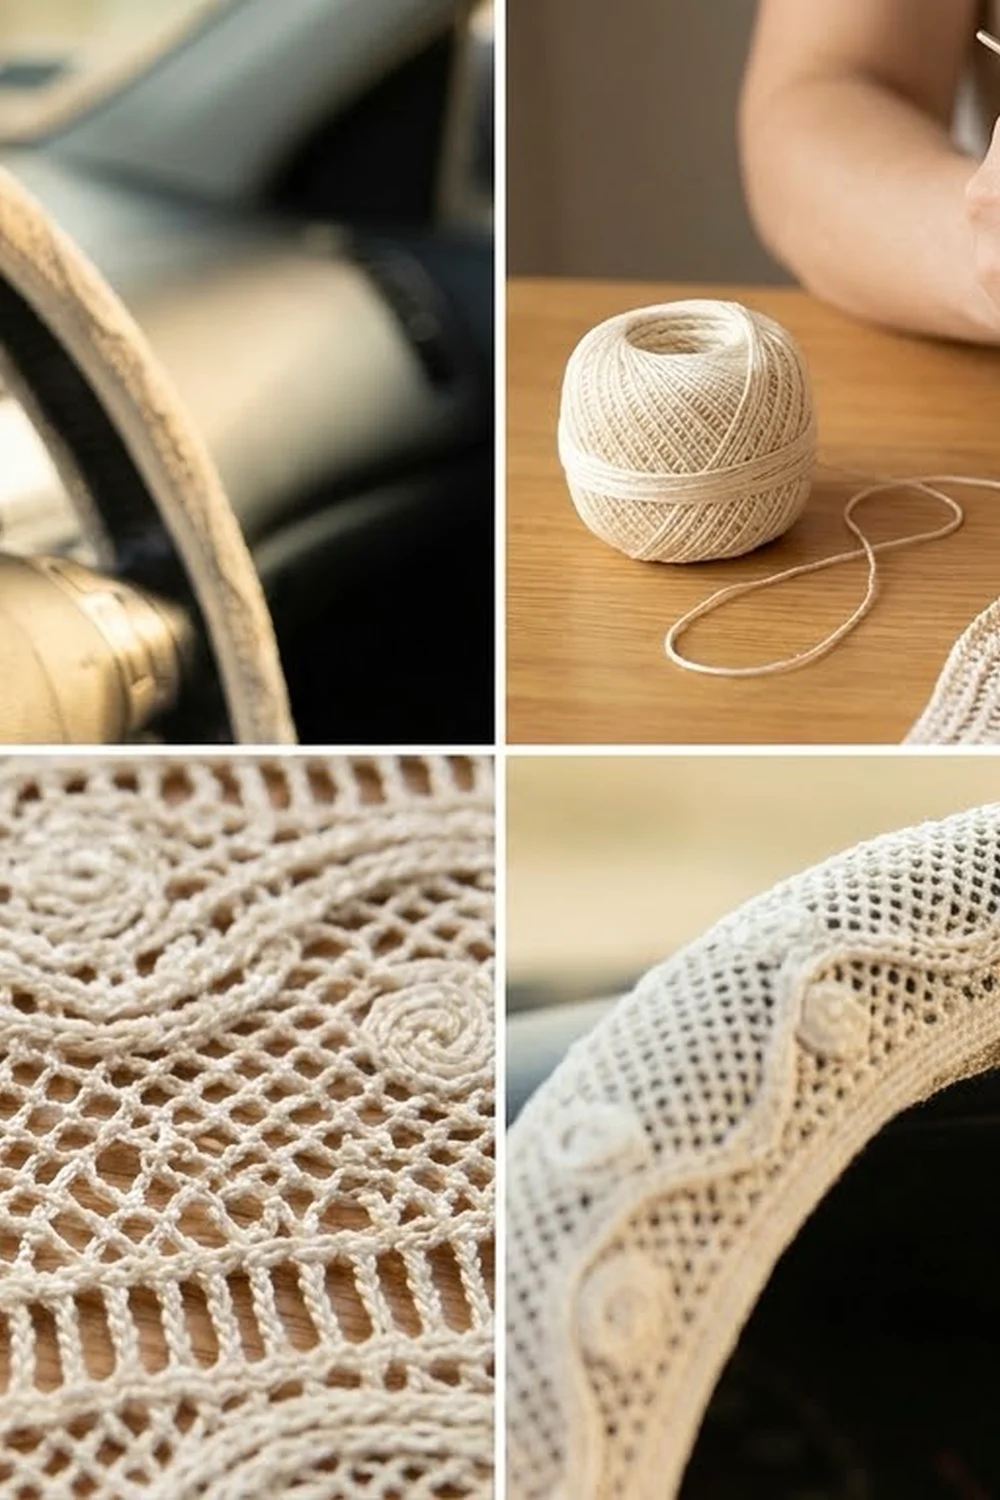
The Ivory Scroll Steering Wheel Cover is a single band of fine cream lace that wraps the rim of your steering wheel. A wave of solid filet blocks runs along the whole band, and raised surface-crochet cords trace both sides of it. Each turn of the wave curls into a small coil, which gives the band a soft scrolled look.
The cover uses one color, ivory or cream mercerized cotton. That keeps it elegant and lets it suit tan, beige or wood-trim interiors. Open ladder mesh runs along both long edges, so the lace stays light and breathable under your hands.
This pattern uses US crochet terms. The finished band measures 5.0 in (12.7 cm) wide and 44.8 in (113.8 cm) long after blocking. It fits wheels of about 14.5–15.5 in (36.8–39.4 cm) outer diameter with a grip circumference of about 4.75–5.25 in (12.1–13.3 cm).
Here is the construction in brief. You work a flat filet strip in short rows across its width, then add a loop edging along both long edges and the surface cords. Finally you seam the short ends into a ring and lace the band closed around the rim.
Finished Size and Construction
- Finished size: 5.0 in x 44.8 in (12.7 cm x 113.8 cm), blocked
- Skill level: Intermediate
- Terminology: US crochet terms
- Yarn weight: Size 3 mercerized cotton crochet thread (super fine, #1)
- Hook: 3.25 mm (US D-3)
- Number of pieces: 1
- Layout: One long band, with the short ends seamed into a ring and the long edges laced together on the inside of the rim
- Piece size before border: 4.4 in x 44.8 in (11.2 cm x 113.8 cm), which is 11 squares wide and 112 rows long
- Border depth: 0.3 in (0.8 cm) on each long edge, so the width becomes 5.0 in (12.7 cm)
Materials
Thread: Use a smooth mercerized cotton. It holds its shape on a wheel that gets handled every day, it resists pilling, and it gives the cords a crisp chain texture. Avoid acrylic, which can feel slippery while you drive, and fuzzy fibers, which blur the cords.
- Ivory/Cream: 60 g, about 168 m (184 yd)
Tools:
- 3.25 mm (US D-3) crochet hook
- Tapestry needle
- 2 locking stitch markers
- Scissors
- Rustproof pins and a blocking mat
- Measuring tape
The quantity above includes a margin of about 40% for the gauge swatch, the lacing lengths and any differences in tension.
Abbreviations (US Terms)
- ch – chain
- sc – single crochet
- dc – double crochet
- slst – slip stitch
- sk – skip
- sp – space
- st(s) – stitch(es)
- RS / WS – right side / wrong side
Special stitches:
- Sp (filet space): ch 2, sk 2 sts, dc in next st. Each space counts as 3 sts.
- Blk (filet block): dc in each of the next 3 sts. If you are working over a space from the previous row, work 2 dc in the ch-2 sp and 1 dc in the next dc. Each block counts as 3 sts.
- Surface slst: Hold the thread behind the work. Insert the hook from the RS through the fabric, pull up a loop and draw it through the loop on your hook.
Gauge and Checkpoints
Gauge: 10 filet squares and 10 rows = 4 in (10.2 cm) square in filet mesh, blocked.
Make a test swatch first. Ch 33, dc in the 8th ch from the hook, then ch 2, sk 2 ch, dc in next ch across. That gives 10 spaces. Work 9 more rows of spaces, then block the swatch.
- Swatch larger than 4.25 in (10.8 cm): go down one hook size.
- Swatch smaller than 3.75 in (9.5 cm): go up one hook size.
Checkpoints:
- After Row 1, the strip is 4.4 in (11.2 cm) wide.
- After Row 11, the strip is 4.4 in (11.2 cm) long, so the first section is square.
- After Row 56, the strip is 22.4 in (56.9 cm) long, which is half the length.
- After Row 112, the strip is 44.8 in (113.8 cm) long, blocked.
Each row is 0.4 in (1.0 cm) tall. If you lose length, check that your turning chains are not too tight.
Main Band
Every row has 11 squares: a ch-3 (counted as the first dc) plus 11 squares of 3 sts each, for 34 sts per row (1 + 11 x 3). Start every row with ch 3, which counts as the first dc. The final dc of every row goes into the top of the previous row’s turning ch.
Foundation: Ch 36, leaving a 6 in (15.2 cm) tail. Place a marker in the slip knot end. This is Edge A, and the other long edge is Edge B.
Row 1 (solid): Dc in the 4th ch from the hook and in each ch across. Turn. (34 sts: the skipped ch-3 + 33 dc) You end at Edge A.
Even rows begin at Edge A and odd rows begin at Edge B. Mark the side facing you on Row 2 as the RS.
Wave repeat (Rows 2–11): Each row is written in working order: Sp x the first number, Blk x 2, Sp x the last number. Every row has 9 spaces + 2 blocks = 11 squares = 34 sts.
- Row 2: Ch 3, Sp x 2, Blk x 2, Sp x 7. Turn.
- Row 3: Ch 3, Sp x 6, Blk x 2, Sp x 3. Turn.
- Row 4: Ch 3, Sp x 4, Blk x 2, Sp x 5. Turn.
- Row 5: Ch 3, Sp x 4, Blk x 2, Sp x 5. Turn.
- Row 6: Ch 3, Sp x 6, Blk x 2, Sp x 3. Turn.
- Row 7: Ch 3, Sp x 2, Blk x 2, Sp x 7. Turn.
- Row 8: Ch 3, Sp x 6, Blk x 2, Sp x 3. Turn.
- Row 9: Ch 3, Sp x 4, Blk x 2, Sp x 5. Turn.
- Row 10: Ch 3, Sp x 4, Blk x 2, Sp x 5. Turn.
- Row 11: Ch 3, Sp x 6, Blk x 2, Sp x 3. Turn.
How the wave forms: Number the squares from Edge A, 1 to 11. The block pair sits in columns 3–4 on Row 2 and moves one column toward Edge B on each row, reaching columns 8–9 on Row 7. It then moves back to columns 4–5 on Row 11, and the next repeat starts again at columns 3–4.
Each pair overlaps the previous row’s pair by one column, so the blocks join into a continuous diagonal wave. Columns 1, 2, 10 and 11 never hold blocks, which keeps an open ladder mesh along both edges.
Rows 12–111: Repeat Rows 2–11 ten more times. Rows 2–111 make 110 rows, which is 11 wave repeats.
Row 112 (solid): Ch 3, then work a dc in each dc and 2 dc in each ch-2 sp across. (34 sts) Fasten off and leave a 24 in (61.0 cm) tail for the end seam.
Check: The strip has 112 rows and measures 4.4 in x 44.8 in (11.2 cm x 113.8 cm).
Surface Scroll Cords
The cords give the wave its raised, chain-textured outline. Work them with the RS facing. Each row of the band gets 2 surface slst per cord: one at the base of the row and one at its top.
Cord 1 (Edge B side of the wave):
- Hold the thread behind the work and insert the hook in the ch-2 sp just beyond the Edge B side of the Row 2 blocks. Pull up a loop.
- Work 2 surface slst per row up the Edge B side of the block band. Follow the outer dc of each block pair, stepping one column sideways where the wave shifts.
- Coil: On each crest row (Rows 7, 17, 27 … 107), the outer neighbor is the open column-10 square. Work 8 surface slst around the opening of that square, 2 per side. Finish where you started, then continue up the wave. Each coil measures about 0.5 in (1.3 cm).
- Fasten off at the top of Row 111.
Cord 1 total: 110 rows x 2 = 220 slst, plus 11 coils x 8 = 88 slst, for 308 slst.
Cord 2 (Edge A side of the wave): Work the same way along the Edge A side of the blocks. On each trough row (Rows 2, 12, 22 … 102), work the 8-slst coil around the open column-2 square.
Cord 2 total: 220 + 88 = 308 slst.
The coils alternate sides along the band, crest coils toward Edge B and trough coils toward Edge A, which turns the zigzag into a flowing S-scroll. Keep your slst loose so the fabric does not pucker. They should be no tighter than the mesh.
Border
The border goes along the two long edges only. The short ends are seamed later.
Border gauge: 3 sc per row end. That is 7.5 sc per inch (3 sc per 0.4 in / 1.0 cm).
Edge Row 1: With the RS facing, join the thread at the Row 112 corner of Edge A. Work 3 sc around the end post of each row, across all 112 rows. Turn. (336 sc: 112 rows x 3)
Edge Row 2 (lacing loops): Ch 1, sc in the first sc, ch 3, sk 1 sc, sc in each of the next 2 sc. Repeat from * 111 times, then ch 3, sk 1 sc and sc in the last sc. Fasten off.
Edge Row 2 count: 1 + (111 x 3) + 2 = 336 sts used. That makes 112 ch-3 loops and 224 sc.
Repeat Edge Rows 1–2 on Edge B, starting at the Row 1 corner.
Why the math works: You get exactly one lacing loop per row, so the loops sit every 0.4 in (1.0 cm). They line up directly across from each other on the two edges, so the lacing pulls straight and the wave does not twist. The two edgings add 0.3 in (0.8 cm) per side, bringing the 4.4 in (11.2 cm) band to 5.0 in (12.7 cm).
Final Blocking
- Weave in all ends except the long seam tail.
- Soak the band in cool water with a little wool wash for 15 minutes. Press out the water in a towel, without wringing.
- Lay the band flat with the RS up. Pin it to 5.0 in x 44.8 in (12.7 cm x 113.8 cm), measuring the center line every 11 rows.
- Pin each lacing loop open and in line with the loop across from it.
- Gently shape each coil into a round with your fingertip.
- Let the band dry completely, usually overnight. Do not use starch, because the cover should stay soft to grip.
Fitting and Lacing
- Test fit: Wrap the dry band around the rim with the RS facing out and the edges meeting on the inner side of the rim. The ends should meet with light stretch. If there is a gap of more than 1 in (2.5 cm), add one or two solid rows to one end before you seam.
- End seam: Bring Row 112 and Row 1 together, with the 34 sts of Row 112 against the 34 stitch bases of Row 1. Whipstitch them through both layers with the tail, 1 st to 1 st, so the seam is flat. Turn the seam so it sits at the bottom of the wheel.
- Lacing: Cut one 60 in (152.4 cm) length of thread for each section between spokes. Lace each section in a zigzag, threading one Edge A loop and then the opposite Edge B loop. Ease the long edges snug so they meet on the inside of the rim.
- Spokes: At each spoke, tie the lacing in a square knot on the inside of the rim, then weave the ends into the edging.
Final Quality-Control Checklist
- [ ] Every row has 34 sts and 11 squares.
- [ ] The band measures 4.4 in (11.2 cm) wide before the border and 5.0 in (12.7 cm) after.
- [ ] The length is 44.8 in (113.8 cm), which is 112 rows.
- [ ] There are 11 complete wave repeats, with no doubled or skipped block positions.
- [ ] Each cord has 22 coils in total across the band, 11 per cord.
- [ ] Each long edge has 112 lacing loops, opposite each other.
- [ ] The end seam is flat and sits at the bottom of the wheel.
- [ ] The lacing is knotted securely at every spoke, with no loose ends on the grip.
Troubleshooting
- The wave looks jagged or broken: You probably counted squares from the wrong edge. Check that even rows start at Edge A, then compare with the row list.
- The band is narrower than 4.4 in (11.2 cm): Your ch-2 spaces are too tight. Go up a hook size, or loosen your chains.
- The band is too long for your wheel: Remove a full 10-row repeat (4 in / 10.2 cm), and remove 30 sc and 10 loops from each edge to match.
- The band puckers along the cords: Your surface slst are too tight. Pull them out and rework them with a looser tension or a hook one size larger.
- The edges ripple: You probably worked more than 3 sc per row end. Recount to 336 per edge.
- The cover slides on the rim: Lace it more firmly, and add a second pass of lacing near the spokes.
Care
Hand wash the cover in cool water with mild soap, and lay it flat to dry at its blocked measurements. Remove it from the wheel before washing, and keep it out of the dryer.
Final Notes
The measurement chain runs like this. Your gauge of 10 squares x 10 rows = 4 in (10.2 cm) gives a 34-st, 11-square row that is 4.4 in (11.2 cm) wide. 112 rows of 0.4 in (1.0 cm) make 44.8 in (113.8 cm). Edge Row 1 places 3 sc on each row end for 336 sc, and Edge Row 2 turns those into 112 loops. The 0.3 in (0.8 cm) edging on each side brings the band to 5.0 in (12.7 cm), which wraps a 4.75–5.25 in (12.1–13.3 cm) grip. Check each link in this chain as you go, and the finished cover will fit closely and look neat.
Happy crocheting!