

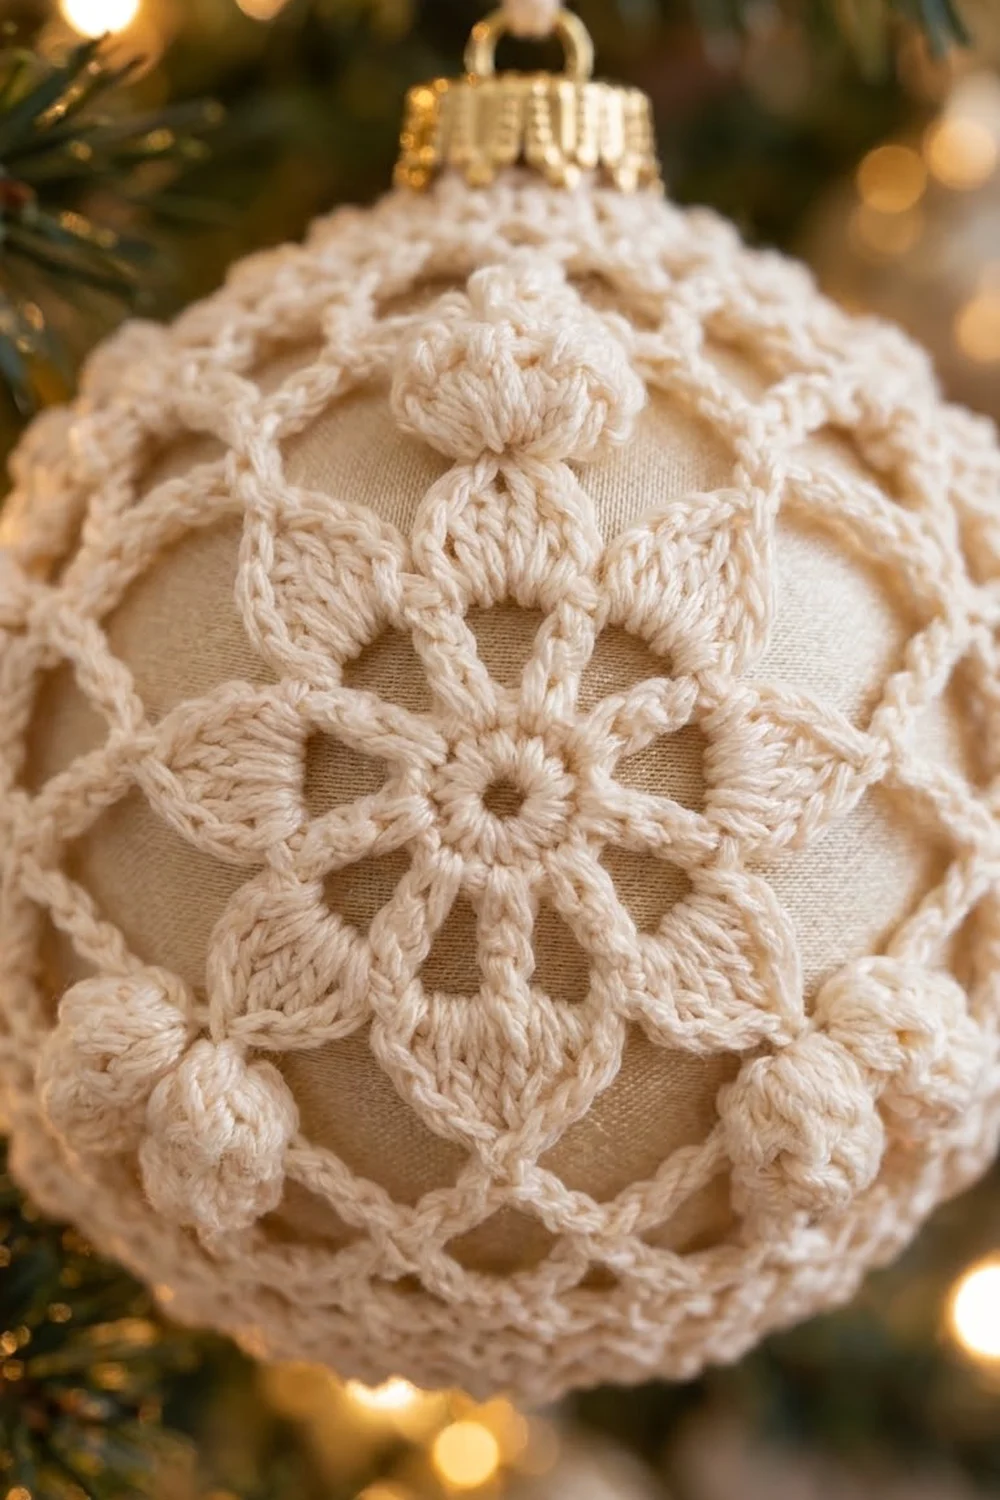
The Ivory Snowflower Lace Ornament Cover turns a plain satin Christmas ball into an heirloom-style decoration. An eight-petal lace flower sits on the front of the ball. Around it, a chain-mesh net with puffy bobbles wraps the rest of the ornament. The ornament’s metallic cap and a crocheted chain loop finish the top.
The palette is soft: ivory or cream cotton yarn over an ivory satin ball, with the ornament’s own gold cap as the only accent. The look is vintage and a little cottage-style, and it fits any neutral or gold-and-white tree theme.
This pattern uses US crochet terms. The finished ornament measures 3 in (7.6 cm) across and about 3.5 in (8.9 cm) tall including the cap, plus a 2 in (5.1 cm) hanging loop.
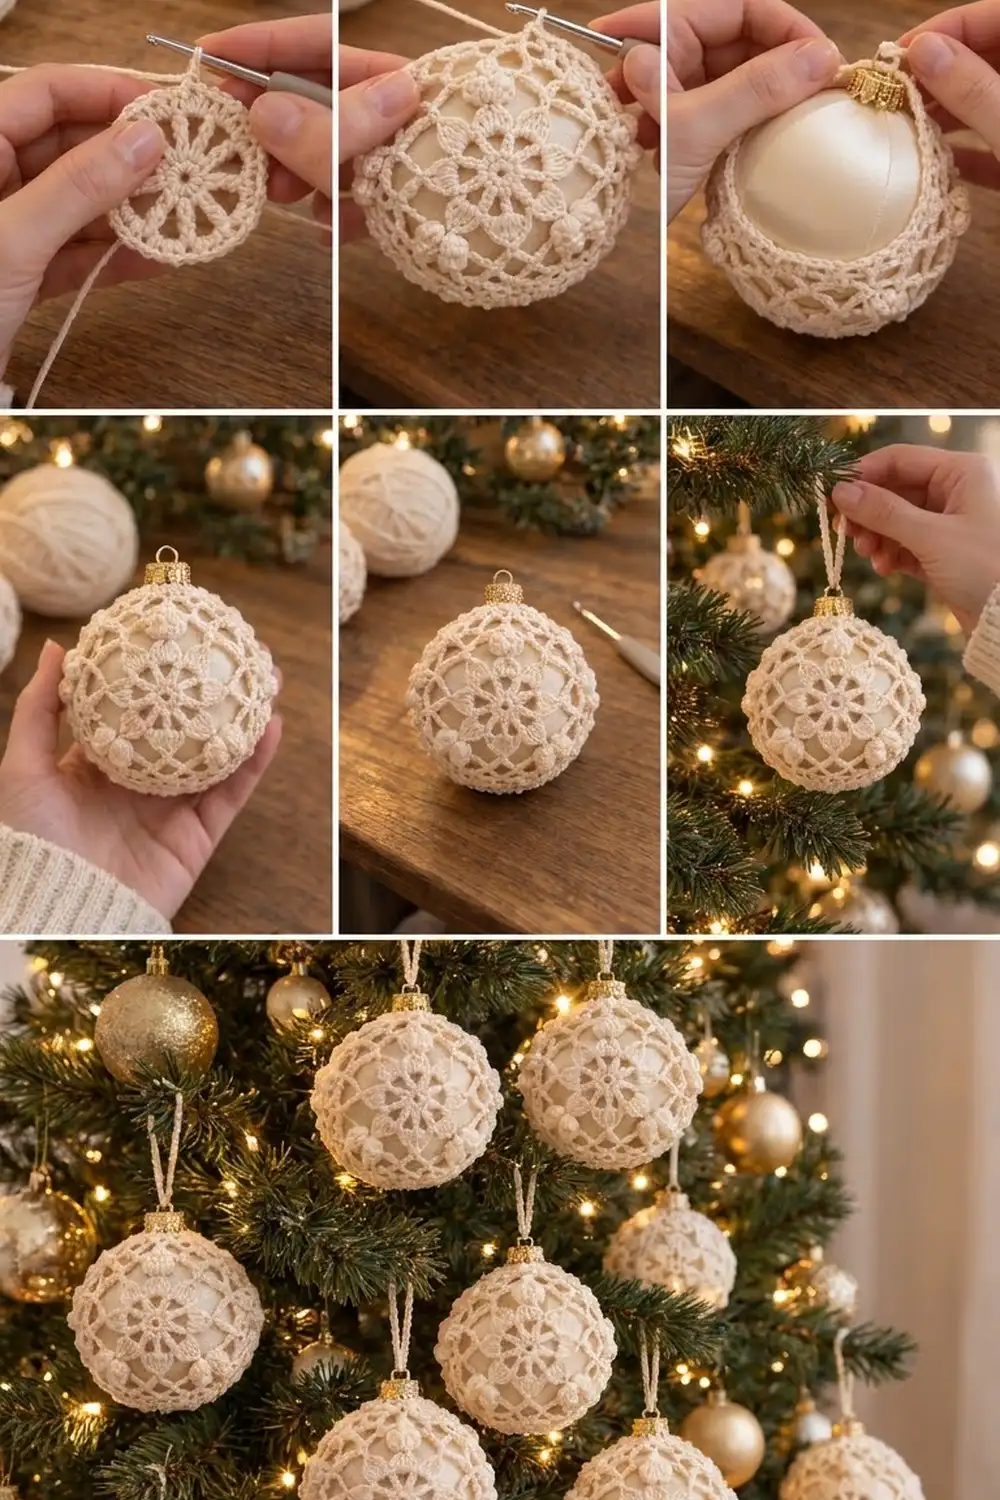
The cover is one continuous piece worked in the round. You start at the center of the flower and work the petals flat, then add mesh rounds that cup around the ball. Partway through, you slip the ball inside. Short sc rounds then close the back, and you add the hanging loop to the cap last.
Finished Size and Construction
- Finished size: fits a 3 in (7.6 cm) ball ornament; 9.4 in (23.9 cm) circumference
- Skill level: Intermediate (bobbles, working around a 3D form)
- Terminology: US crochet terms
- Yarn weight: DK / light (3), 100% mercerized or matte cotton
- Hook: 3.25 mm (US D/3)
- Number of pieces: 1 (the cover), plus a chain loop worked directly onto the cap
- Layout: flower on the front, mesh net around the sides, closed at the back, cap at the top
- Flower size (Rnds 1–3): 2.25 in (5.7 cm) from petal tip to petal tip
- Size before closing trim (after Rnd 10): about 8 in (20.3 cm) around Rnd 10, stretched on the ball
- Closing trim depth (Rnds 11–13): about 0.5 in (1.3 cm)
Materials
Yarn: Choose a smooth DK cotton or cotton blend. Cotton keeps the stitches crisp and helps the bobbles stand up, while a fuzzy yarn would blur the lace. Pick an ivory, cream, or natural white that’s slightly warmer than the ball so the mesh stands out against it.
- Ivory / cream DK cotton: 12 g, about 30 m (33 yd)
That’s enough for one ornament. For a set, plan on 12 g per ornament. All quantities include a margin of about 25% for swatching and weaving in ends.
Tools and supplies:
- 3.25 mm (US D/3) crochet hook
- One 3 in (7.6 cm) ball ornament with a gold cap, ivory satin or matte finish
- Tapestry needle
- Scissors
- Stitch marker
- Flexible measuring tape
- Spray bottle with water, for light blocking
Abbreviations (US Terms)
- ch – chain
- sl st – slip stitch
- sc – single crochet
- hdc – half double crochet
- dc – double crochet
- tr – treble crochet
- sc2tog – single crochet 2 together
- sp / sps – space / spaces
- st / sts – stitch / stitches
- MR – magic ring
- rep – repeat
Special stitch – Bobble (worked into a chain space): *Yarn over, insert the hook into the space, yarn over and pull up a loop, yarn over and draw through 2 loops; rep from * 4 more times (6 loops on hook), then yarn over and draw through all 6 loops. Each bobble counts as 1 stitch and stands about 0.25 in (0.6 cm) tall.
Gauge and Checkpoints
Gauge isn’t critical for a stretchy lace cover, but it decides whether the cover fits snugly or sags. Work the flower (Rnds 1–3) first and measure it before you go on.
Gauge: Rnds 1–3 = 2.25 in (5.7 cm) from tip to tip, measured flat.
Checkpoints:
- After Rnd 1: the center ring is 0.5 in (1.3 cm) across.
- After Rnd 2: the piece is 1.25 in (3.2 cm) across.
- After Rnd 3: the flower is 2.25 in (5.7 cm) from tip to tip.
- After Rnd 6: the piece cups. Set it on the ball; the edge should stop about 0.4 in (1.0 cm) short of the widest point.
- After Rnd 7: stretched around the ball’s widest point, the round measures about 9.5 in (24.1 cm). It should sit snug without gaps.
Too big? If the flower is wider than 2.5 in (6.4 cm), go down to a 3.0 mm hook. A loose cover slides around, and the flower drifts off center.
Too small? If the flower is under 2 in (5.1 cm), go up to a 3.5 mm (US E/4) hook. A tight cover won’t stretch over the ball after Rnd 9.
Pattern
Work in joined rounds with the right side facing you. Do not turn. The beginning ch 1 does not count as a stitch.
Part 1: The Flower
Rnd 1: MR, ch 1, 8 sc in ring, sl st to first sc. Pull the ring closed, leaving a small hole in the center. (8 sc)
Rnd 2: Ch 3 (counts as dc), dc in same st, ch 2, *2 dc in next sc, ch 2; rep from * 6 more times, sl st to top of beginning ch-3. (16 dc, 8 ch-2 sps)
This makes eight spokes of paired dc with open spaces between them.
Rnd 3 (petals): Sl st in next dc and into next ch-2 sp, ch 1, *(hdc, dc, tr, ch 2, tr, dc, hdc) in ch-2 sp, skip next 2 dc; rep from * 7 more times, sl st to first hdc. (8 petals: 48 sts and 8 ch-2 tips)
Each petal is a pointed leaf shape with its ch-2 tip facing out. The skipped dc pairs leave a small gap between neighboring petals.
Part 2: The Front Net
Rnd 4: Sl st in next 2 sts and into the ch-2 tip, ch 1, *sc in ch-2 tip, ch 4, sc in the gap between petals (insert the hook between the 2 dc of Rnd 2 below), ch 4; rep from * 7 more times, sl st to first sc. (16 sc, 16 ch-4 sps)
This round links each petal tip to the next gap and sets up the diamond lattice.
Rnd 5: Sl st in next 2 ch, ch 1, sc in same ch-4 sp, ch 4, *sc in next ch-4 sp, ch 4; rep from * 14 more times, sl st to first sc. (16 sc, 16 ch-4 sps)
Each sc sits in the middle of a loop from the round below. That shifts the mesh by half a space and creates the diamond shapes.
Rnd 6 (bobble round): Sl st in next 2 ch, ch 1, sc in same sp, ch 4, *bobble in next ch-4 sp, ch 4, sc in next ch-4 sp, ch 4; rep from * 6 more times, bobble in last ch-4 sp, ch 4, sl st to first sc. (8 sc, 8 bobbles, 16 ch-4 sps)
Push each bobble out to the right side with a finger. The piece now cups, so check it against the ball (see Checkpoints).
Rnd 7 (widest round): Sl st in next 2 ch, ch 1, sc in same sp, ch 5, *sc in next ch-4 sp, ch 5; rep from * 14 more times, sl st to first sc. (16 sc, 16 ch-5 sps)
This round goes around the widest part of the ball. Later, the cap will poke out through one of these ch-5 sps.
Part 3: The Back Net
Rnd 8: Sl st in next 3 ch, ch 1, sc in same ch-5 sp, ch 4, *sc in next ch-5 sp, ch 4; rep from * 14 more times, sl st to first sc. (16 sc, 16 ch-4 sps)
Rnd 9 (bobble round): Sl st in next 2 ch, ch 1, sc in same sp, ch 3, *bobble in next ch-4 sp, ch 3, sc in next ch-4 sp, ch 3; rep from * 6 more times, bobble in last ch-4 sp, ch 3, sl st to first sc. (8 sc, 8 bobbles, 16 ch-3 sps)
Insert the ball now. Put a stitch marker in the working loop so it can’t unravel. Hold the ball with its cap pointing up and slip it in through the opening, centering the flower on the front. Push the cap out through the Rnd 7 ch-5 sp directly above the flower. Remove the marker and keep working around the ball.
Rnd 10: Sl st in next ch, ch 1, sc in same ch-3 sp, ch 2, *sc in next ch-3 sp, ch 2; rep from * 14 more times, sl st to first sc. (16 sc, 16 ch-2 sps)
Border: Closing Trim
On this piece, the border is a solid sc trim that closes the back of the cover. The cover has no straight sides, so counts are given per repeat. One mesh repeat is 1 sc plus 1 ch-2 sp, and there are 16 repeats around.
Border gauge: 11 sc = 2 in (5.1 cm), so 32 sc = 5.8 in (14.7 cm) relaxed.
Rnd 11 (conversion round): Ch 1, sc in same sc, sc in next ch-2 sp, *sc in next sc, sc in next ch-2 sp; rep from * 14 more times, sl st to first sc. (16 sc worked 1 per existing sc + 16 sc added in the ch-2 sps = 32 sc, or 2 sc per repeat)
Rnd 12: Ch 1, sc2tog 16 times, sl st to first st. (16 sts, 1 per repeat)
Rnd 13: Ch 1, sc2tog 8 times, sl st to first st. (8 sts, 1 per 2 repeats)
Fasten off, leaving a 6 in (15.2 cm) tail. Thread the tail through the front loop of all 8 sts, pull tight to close the center, and weave the end into the trim.
Why the math works: Each round has half as many stitches as the round before (32, then 16, then 8). The back of the ball narrows toward its pole at about the same rate, so the trim lies flat without ruffling. Rnd 11 adds exactly 1 sc in each ch-2 sp beside the 16 existing sc, so the edge of the mesh stays even all the way around.
Hanging Loop
Leaving a 4 in (10.2 cm) tail, join the yarn to the cap’s wire hoop with a sl st. Ch 24, sl st back into the wire hoop, and fasten off, leaving another 4 in (10.2 cm) tail. The loop stands about 2 in (5.1 cm) above the cap. Knot the two tails together under the cap, then use the needle to hide them in the mesh.
Final Blocking
- With the cover on the ball, mist it lightly. Don’t soak it, because satin can water-spot.
- Use your fingertips to center the flower on the front, with the cap straight above it.
- Spread the petals evenly and pinch each ch-2 tip into a point.
- Ease the mesh until all the diamonds are even and no loop is strained.
- Push every bobble outward so it sits round and raised.
- Check that the closing trim is centered on the back.
- Hang the ornament by its loop to dry for at least 8 hours.
Final Quality-Control Checklist
- The flower has 8 even, pointed petals and a small, tidy center hole.
- Rnd 4 has 16 sc, and Rnds 5 and 7 each have 16 loops.
- Rnds 6 and 9 each have 8 bobbles, for 16 bobbles total.
- The cap comes out cleanly through one Rnd 7 ch-5 sp, with no yarn caught in it.
- The cover measures about 9.5 in (24.1 cm) around the widest point.
- Rnd 11 has 32 sc, Rnd 12 has 16 sts, and Rnd 13 has 8 sts, and the back is fully closed.
- The hanging loop is about 2 in (5.1 cm) tall, and all ends are hidden.
Troubleshooting
The flower ruffles. The tr stitches are too tall. Pull up each loop evenly, or use a hook half a size smaller for Rnd 3 only.
The flower curls into a bowl. Rnd 2 is too tight. Work its ch-2 sps more loosely.
The bobbles lie flat. Make sure you work all 5 partial dc, and push each bobble out to the right side as you go.
The cover is loose on the ball. Work Rnd 10 more tightly, or use ch-1 sps instead of ch-2 sps in Rnd 10. Rnd 11 still has 32 sc.
The cover won’t stretch over the ball. Add 1 chain to every chain space in Rnds 7–9, or go up a hook size for the whole piece.
The cap sits off center. Before Rnd 10, take the ball out and push the cap through the Rnd 7 ch-5 sp directly above the center of the flower.
Care
Spot-clean gently with a damp cloth and let the cover air-dry on the ball. Store the ornament wrapped in tissue so the bobbles don’t get crushed.
Final Notes
The measurements are quick to check at each stage:
- After Rnd 3, the flower is 2.25 in (5.7 cm) across.
- After Rnd 6, the cover stops about 0.4 in (1.0 cm) short of the widest point.
- Rnd 7 measures 9.5 in (24.1 cm) around the ball.
- Rnd 10 measures about 8 in (20.3 cm) around.
- Rnds 11–13 close the back with 32, 16, and 8 sts.
If those numbers check out, the cover fits a 3 in (7.6 cm) ball snugly and the flower stays centered on the front. Each ornament takes about an evening, so you can make one to top a gift or a whole set for the tree.
Happy crocheting!