

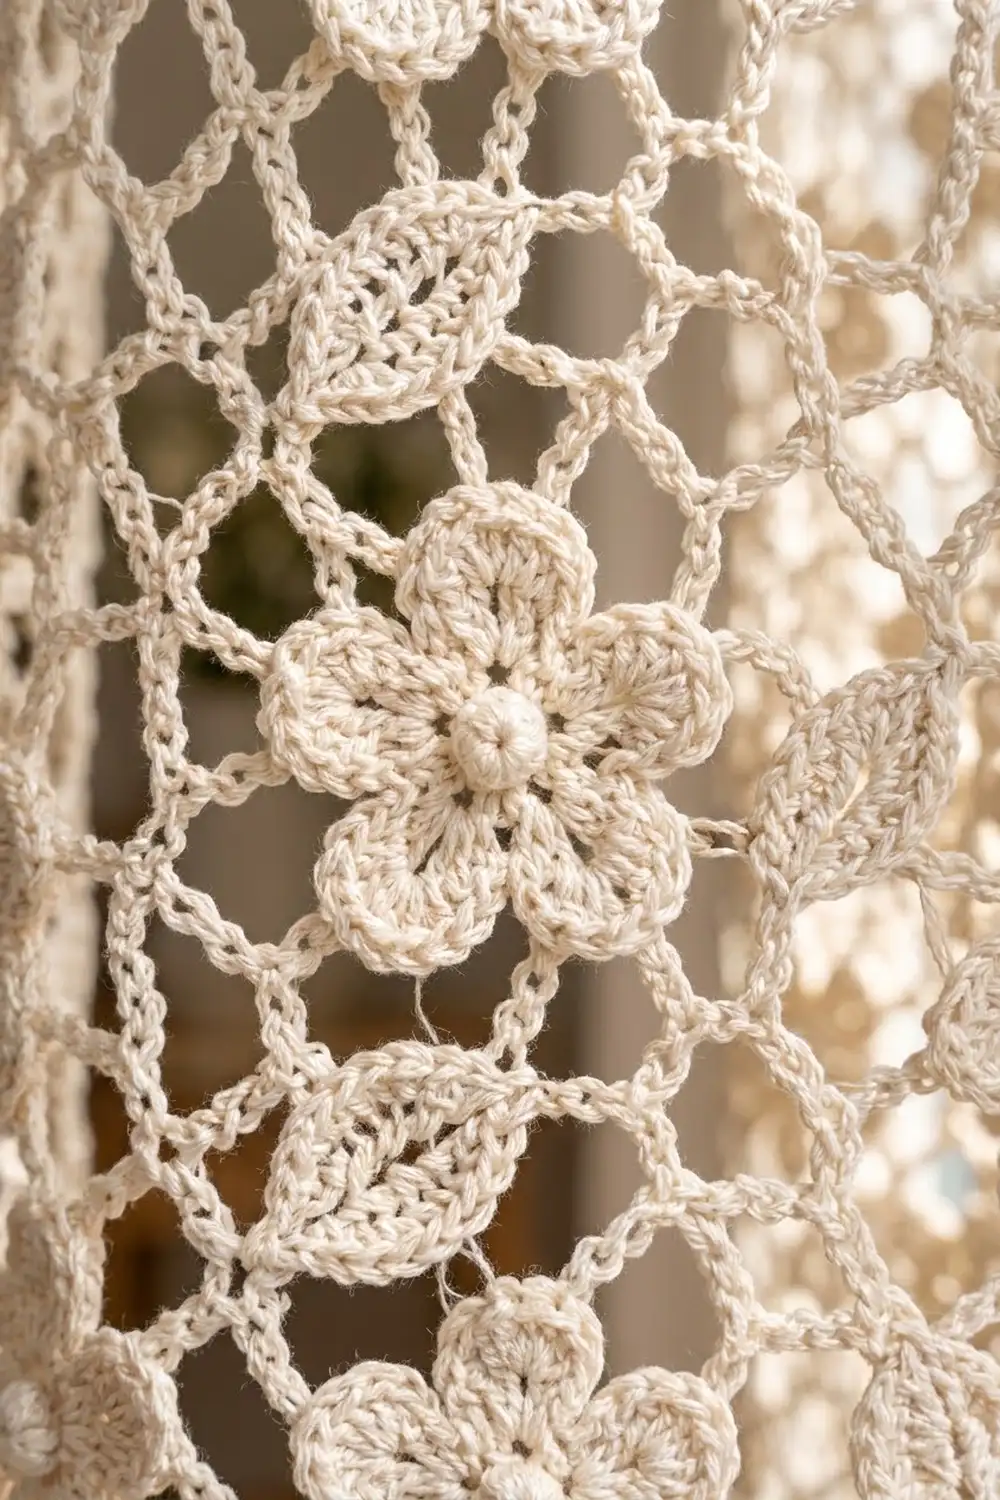
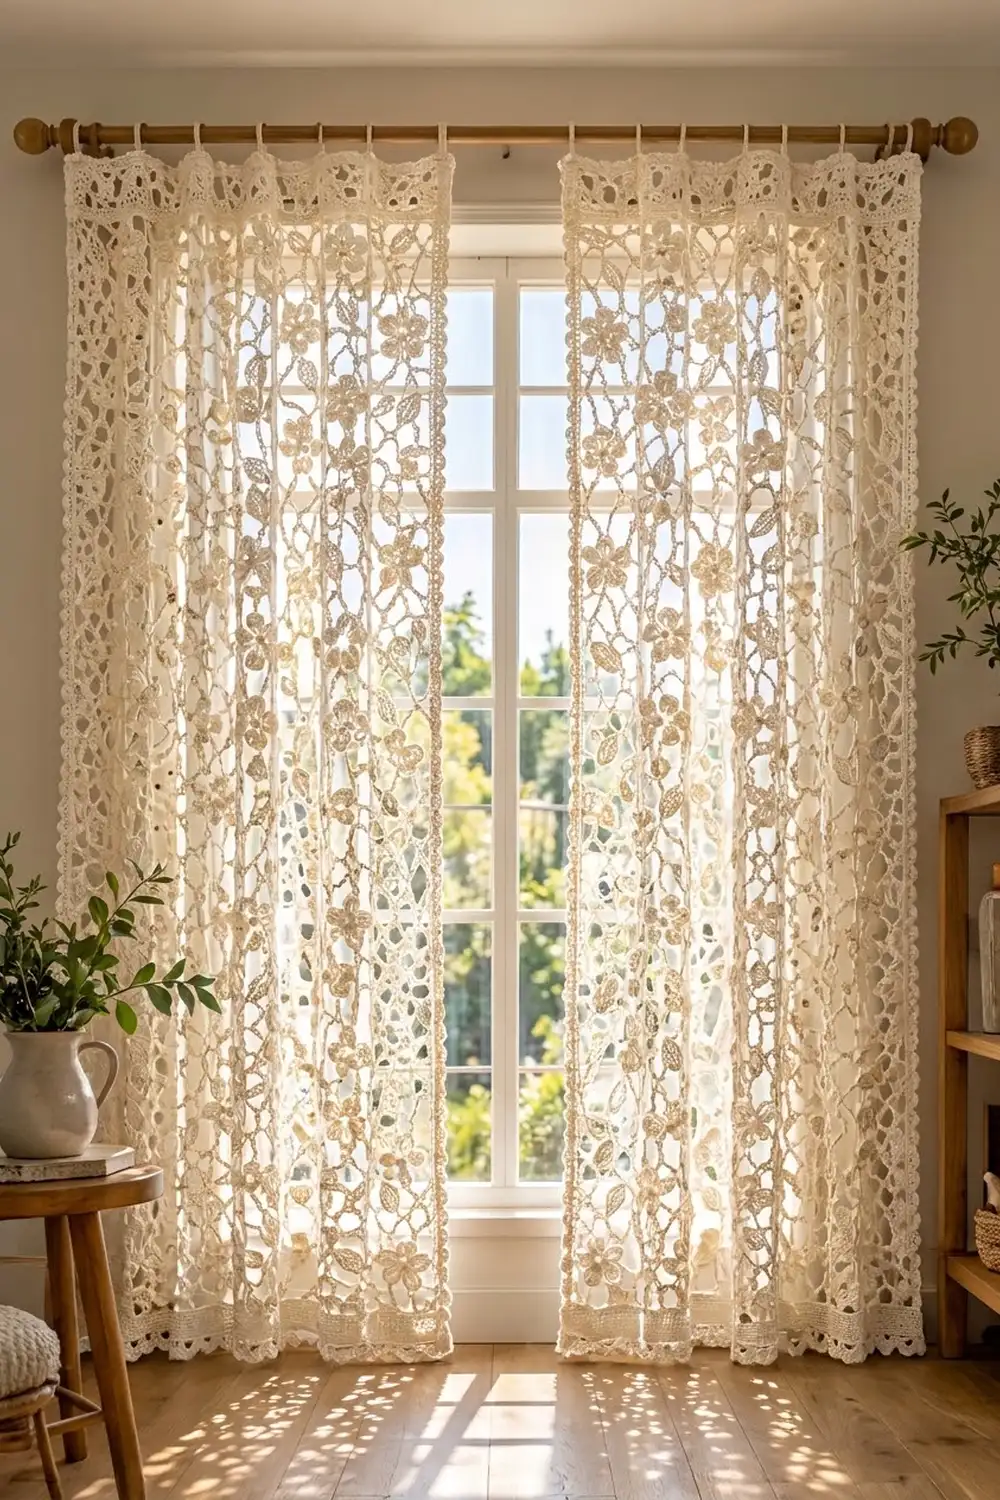
The Cottage Bloom curtain is a soft, airy lace panel made from repeating flower-and-leaf squares. Each square has a raised-center five-petal flower framed by four slim leaves that point to its corners. When the squares are joined, the leaf tips meet in little four-leaf stars between the flowers, and an open chain mesh holds everything together.
The sample uses one color: a warm cream cotton that glows when light comes through it. The style is cottage-vintage and suits farmhouse, boho, and classic rooms equally well. The pattern uses US crochet terms throughout.
Each finished panel measures 42.4 x 82.4 in (107.7 x 209.3 cm) after blocking, not counting the hanging loops. Make two panels for a pair, as shown.
Construction is simple and repetitive. You crochet 128 squares per panel and join each one to its neighbors on its last round (join-as-you-go). Then you work a four-round border all around and add nine hanging loops across the top.
Finished Size and Construction
- Finished panel size: 42.4 x 82.4 in (107.7 x 209.3 cm)
- Skill level: Intermediate
- Terminology: US
- Yarn weight: DK / light (#3) cotton
- Hook: 3.5 mm (E/4)
- Number of pieces: 128 squares per panel (256 for a pair)
- Layout: 8 squares wide x 16 squares tall
- Square size: 5 in (12.7 cm) per side, blocked
- Size before border: 40 x 80 in (101.6 x 203.2 cm)
- Border depth: 1.2 in (3.0 cm)
Materials
Use a smooth, mercerized 100% cotton or cotton blend in DK weight. Choose one at about 105 m per 50 g (210 m per 100 g). Mercerized cotton gives crisp petals and clear stitch definition, and it holds up well to sunlight and washing.
- Cream (one color): 760 g / 1,596 m per panel; 1,520 g / 3,192 m for a pair
- 3.5 mm (E/4) crochet hook
- Tapestry needle
- Stitch markers
- Blocking mats or a clean carpet, rustproof pins, and a spray bottle
- Measuring tape
- Kitchen scale (optional but useful)
These quantities include about a 10% margin. One square uses about 5 g (10.5 m).
Abbreviations (US Terms)
- ch – chain
- sl st – slip stitch
- sc – single crochet
- hdc – half double crochet
- dc – double crochet
- tr – treble crochet
- BLO – back loop only
- sp(s) – space(s)
- st(s) – stitch(es)
Special stitches:
- Leaf corner: The leaf is worked down both sides of a 9-chain. Full steps are in Round 7.
- Shell: 5 dc in the same stitch.
- Join-as-you-go chain (JAYG ch-5): ch 2, sl st into the matching ch-5 sp of the neighbor square, ch 2.
- JAYG corner: In the tip sp, work (sc, ch 1, sl st into the neighbor’s tip ch-3 sp, ch 1, sc).
Gauge and Checkpoints
Gauge: 22 sc = 4 in (10.2 cm) in DK cotton with a 3.5 mm hook.
Make one full square before you start the panel. Wet-block it, let it dry, then measure.
- After Round 3 (center dome): about 0.75 in (1.9 cm) across
- After Round 5 (flower): about 2.75 in (7.0 cm) across
- After Round 6 (mesh ring): about 3.25 in (8.3 cm) across
- After Round 8, unblocked: about 4.75 in (12.1 cm) per side
- After Round 8, blocked: 5 in (12.7 cm) per side, tip to tip
If your square is too big: Go down to a 3.25 mm hook, or tighten the chains in Rounds 6–8.
If your square is too small: Go up to a 3.75 mm hook. Small differences add up fast: a square that is 1/4 in (0.6 cm) off changes the panel width by 2 in (5.1 cm) and the length by 4 in (10.2 cm).
Square Motif
Flower
Round 1: Make a magic ring, ch 1, work 5 sc in the ring, sl st to the first sc. (5 sc)
Round 2: Ch 1, work 2 sc in each st, sl st to the first sc. (10 sc)
Round 3: Ch 1, sc in BLO of each st, sl st to the first sc. (10 sc) Pull the magic ring tight. The unincreased round cups forward into a small dome. Tuck the beginning tail inside the dome to pad it.
Round 4: Ch 1, sc in the first st, ch 3, skip the next st. Sc in the next st, ch 3, skip the next st. Repeat from * to * 3 more times, then sl st to the first sc. (5 sc, 5 ch-3 sps)
Round 5 (petals): Sl st into the first ch-3 sp. In each ch-3 sp, work: sc, hdc, 2 dc, 3 tr, 2 dc, hdc, sc. Sl st to the first sc. (5 petals, 11 sts each, 55 sts)
For reference, here are the stitch positions within each petal: 1 sc, 2 hdc, 3–4 dc, 5–7 tr, 8–9 dc, 10 hdc, 11 sc.
Mesh and Leaves
Round 6: Sl st in the next 2 sts, so you are in the 3rd st of the petal. Ch 1, then work around each petal as follows: sc in the 3rd st, ch 4, sc in the 6th st (center tr), ch 4, sc in the 9th st, ch 4, sc in the gap between this petal and the next, ch 4. Repeat on all 5 petals. Sl st to the first sc. (20 sc, 20 ch-4 loops)
Round 7 (leaf corners): Sl st into the first ch-4 loop. Corner loops are the 1st, 6th, 11th, and 16th loops.
Work each leaf corner in a corner loop like this:
- Ch 1, sc in the loop (this is the leaf base), ch 9.
- Side 1: Sc in the 2nd ch from hook, hdc in the next ch, dc in the next 3 ch, hdc in the next ch, sc in the next ch, sl st in the last ch. (8 sts) Sl st in the base sc.
- Side 2: Working into the opposite side of the chain, sl st, sc, hdc, dc in the next 3 ch, hdc, sc. (8 sts)
- Tip: Work (sc, ch 3, sc) in the skipped tip chain.
The leaf ends with your hook at its tip. The vein line forms naturally down the middle of the chain.
Now work one side and the next leaf: ch 7, sc in the next loop, (ch 5, sc in the next loop) 3 times, ch 7. Work a leaf corner in the next loop. On later corners, skip the “ch 1” in step 1.
Repeat this side-and-leaf sequence around. After the last ch 7, sl st to the first base sc and fasten off.
Count: 4 leaves, 20 anchor sc (4 leaf bases + 16 side sc), 8 ch-7 sps, 12 ch-5 sps.
Round 8 (square edge): Join the yarn in any leaf-tip ch-3 sp.
- Work (sc, ch 3, sc) in the tip sp.
- Ch 5, sc in the next ch-7 sp, (ch 5, sc in the next ch-5 sp) 3 times, ch 5, sc in the next ch-7 sp, ch 5, (sc, ch 3, sc) in the next tip sp.
- Repeat from * to * around, omitting the final tip group. Sl st to the first sc.
Count: 28 sc and 24 ch-5 sps, with 6 ch-5 sps per side plus 4 corner ch-3 sps.
Weave in the ends invisibly through the petal backs.
Make All Pieces
- Cream: 128 squares per panel (256 for a pair)
- Work the first square completely. Every square after that is worked through Round 7 and then joined to its neighbors on Round 8.
The layout grid is 8 squares wide by 16 tall. Each ■ is one square, and the top row is the hanging edge.
■■■■■■■■
■■■■■■■■
■■■■■■■■
■■■■■■■■
■■■■■■■■
■■■■■■■■
■■■■■■■■
■■■■■■■■
■■■■■■■■
■■■■■■■■
■■■■■■■■
■■■■■■■■
■■■■■■■■
■■■■■■■■
■■■■■■■■
■■■■■■■■
Joining
Method: Join-as-you-go on Round 8. Work across the panel row by row, from left to right.
Stitch-to-stitch logic: Each square side has 6 ch-5 sps between two tip sps. Along any shared side, match the sps one to one.
- Each ch-5 of the new square becomes a JAYG ch-5 that joins into the matching ch-5 sp of its neighbor.
- Each shared tip becomes a JAYG corner.
- Where four squares meet, sl st into the existing join sl st rather than into a fresh ch-3 sp. This keeps all four leaf tips locked at one point and forms the four-leaf star.
Order:
- Squares in Row 1 join on one side only.
- In later rows, the first square joins on its top side.
- Every other square joins on its top and left sides.
Tension: Keep JAYG chains the same length as a normal ch-5. Tight joins pucker the lattice, and loose joins sag when the curtain hangs.
Size checkpoints:
- After Row 1, the strip should measure about 38 in (96.5 cm) unblocked.
- The finished joined grid is about 38 x 76 in (96.5 x 193.0 cm) unblocked. It blocks to 40 x 80 in (101.6 x 203.2 cm).
Border
Border gauge: 28 sc per square side (5.6 sc per inch) matches the 22 sc = 4 in (10.2 cm) gauge, so the edge lies flat. Each square side contributes 4 sc in each of its 6 ch-5 sps (24 sc) plus 2 sc in each of its 2 tip sps (4 sc), for 28 sc. Those tip sc are already part of the 28, so nothing is added at seams.
Round 1: Join in the top-right corner tip sp and work (2 sc, ch 2, 2 sc) there. Then work along each side:
- 4 sc in each ch-5 sp.
- 2 sc in each tip sp where two squares meet, so there are 4 sc at each seam point.
- (2 sc, ch 2, 2 sc) in each of the panel’s other 3 corner tip sps.
Sl st to the first sc.
- Width sides: 8 x 28 = 224 sc each
- Length sides: 16 x 28 = 448 sc each
- Round total: 1,344 sc, plus 4 corner ch-2 sps
Round 2: Sl st into the corner sp. Ch 3 (counts as dc), then work (dc, ch 2, 2 dc) in the same sp. Dc in each sc along each side, and work (2 dc, ch 2, 2 dc) in each corner sp. Sl st to the top of the ch-3.
- Width sides: 224 + 4 = 228 dc each
- Length sides: 448 + 4 = 452 dc each
- Round total: 1,360 dc
Round 3: Ch 1. Sc in each dc along each side, and work (sc, ch 2, sc) in each corner sp. Sl st to the first sc.
- Width sides: 228 + 2 = 230 sc each
- Length sides: 452 + 2 = 454 sc each
- Round total: 1,368 sc
Round 4 (scallops): Sl st into the corner sp and work a shell there. Then work each side as follows:
- Sc in the first st.
- Skip 1, shell in the next st, skip 1, sc in the next st. Repeat across.
- Sc in the last st.
- Work a shell in the corner sp.
Repeat for all 4 sides, then sl st to the top of the first shell and fasten off.
- Width sides: 1 + (4 x 57) + 1 = 230, so 57 shells each
- Length sides: 1 + (4 x 113) + 1 = 454, so 113 shells each
Why the math works: The 4-stitch shell repeat plus 2 end sc fits 230 and 454 exactly, so there are no partial scallops. The rounds add 4, then 2, stitches per side, and those extras sit only at the corners. That lets the corners turn while the sides stay straight.
Hanging Loops
The top edge has 57 shells. Add a loop at shells 1, 8, 15, 22, 29, 36, 43, 50, and 57, which spaces them every 5 in (12.7 cm) across the top. That is 9 loops in total.
For each loop:
- Join in the center dc of the shell and ch 26.
- Sl st in the same dc.
- Ch 1 and work 32 sc into the chain loop.
- Sl st to finish.
Each loop is about 2.75 in (7.0 cm) long when flattened.
Final Blocking
- Soak the panel in cool water with a little wool wash for 15 minutes.
- Press the water out gently in a towel. Do not wring.
- Lay the panel flat and pin it to 42.4 x 82.4 in (107.7 x 209.3 cm).
- Pin each scallop point, then pin the lattice so the seams run straight.
- Shape every flower: open the petals and push each center dome forward from the back.
- Straighten the leaves along the diagonals, with their tips meeting cleanly.
- Mist again if needed and let the panel dry completely before you unpin it.
Final Quality-Control Checklist
- Every square has 5 petals, 4 leaves, and 24 edge ch-5 sps.
- All four-square meeting points are joined into a single sl st.
- The panel is 8 x 16 squares, with no twisted or rotated squares.
- Border counts are 224/448, then 228/452, then 230/454.
- There are 57 shells on each width side and 113 on each length side.
- The 9 hanging loops are evenly spaced, and all ends are woven in securely.
- The blocked panel measures 42.4 x 82.4 in (107.7 x 209.3 cm), within 1 in (2.5 cm).
Troubleshooting
- Center dome is flat: Work Round 3 in BLO, pull the ring tighter, and pad the dome with the tail.
- Petals ruffle: Your tr stitches are too tall. Pull through more snugly or go down a hook size.
- Leaves curl: Leaves curl when the chain is tight. Make the ch-9 a little looser and block the leaves flat.
- Square isn’t square: Recount Round 6 (20 loops) and check that the corner loops are every 5th loop.
- Border ripples: Make sure Round 1 has 4 sc per ch-5 sp, not 5.
- Border cups: Use a larger hook for Rounds 1–3.
- Panel too short: Block a little firmer lengthwise, or add a row of 8 squares.
Care
Hand wash cool or machine wash on a gentle cycle in a mesh bag. Then lay the panel flat to dry, reshaping it to the blocked measurements.
Final Notes
The measurement chain is easy to follow:
- Blocked square: 5 in (12.7 cm) per side.
- 8 x 16 squares: 40 x 80 in (101.6 x 203.2 cm).
- A 1.2 in (3.0 cm) border on every side: 42.4 x 82.4 in (107.7 x 209.3 cm).
- Hanging loops: about 2.75 in (7.0 cm) on top.
Check the test square, and the rest of the panel follows from it. Happy crocheting!