

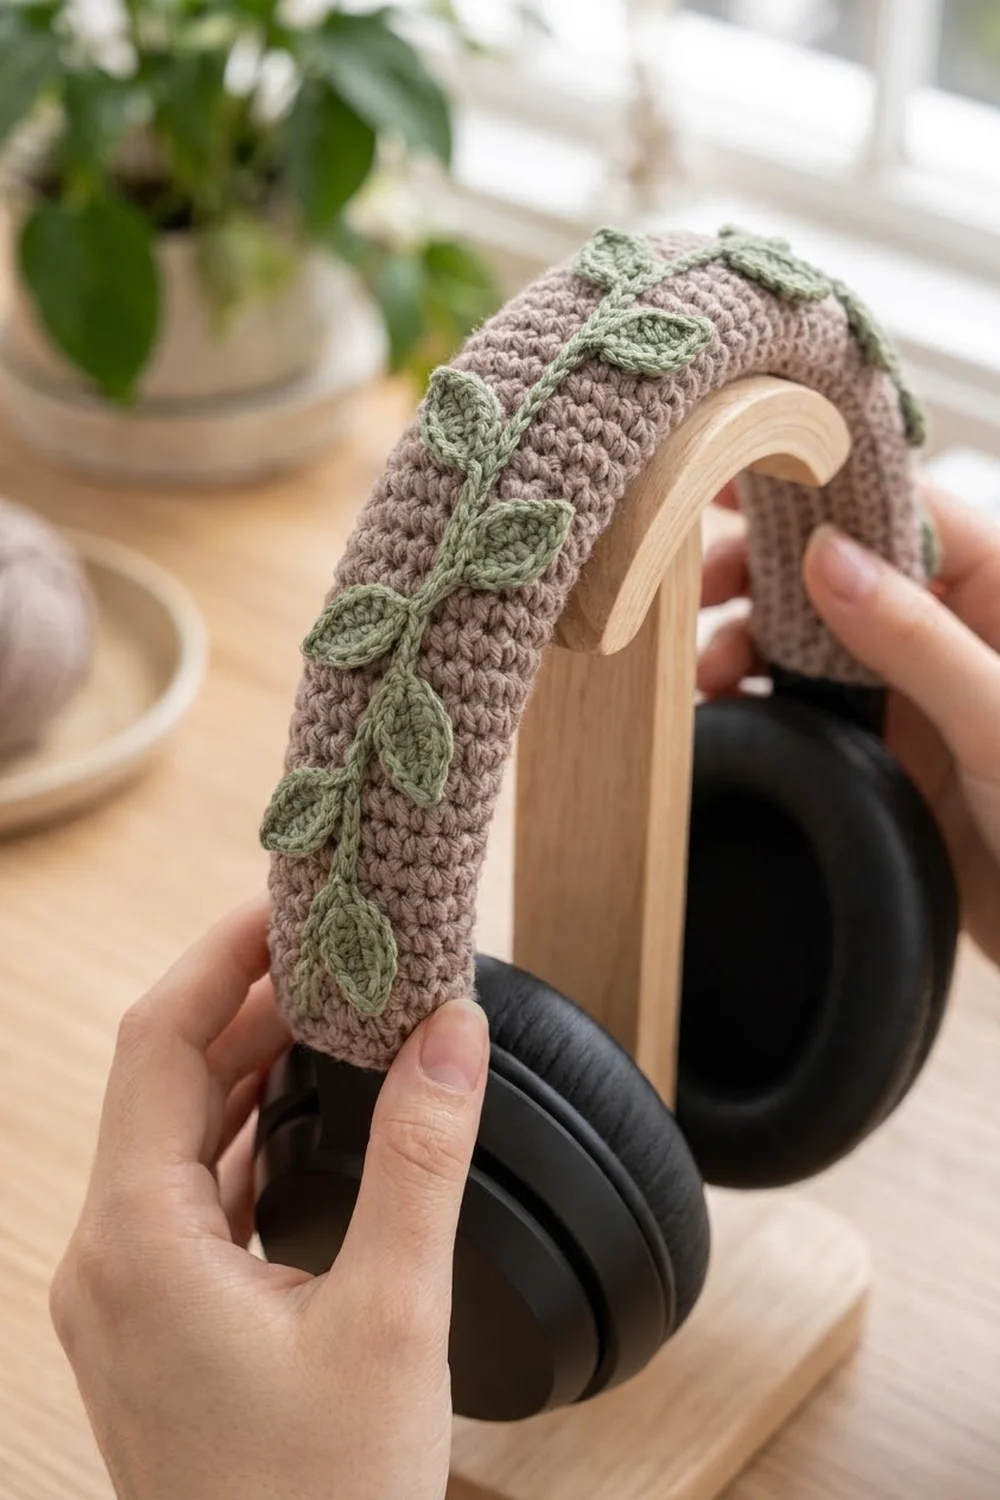
This cozy headphone cover turns a plain black headband into a small piece of botanical decor. A soft taupe single crochet sleeve wraps the headband, and a sage green vine with little pointed leaves winds along the top.
The palette is calm and earthy: warm taupe for the cover and soft sage green for the vine. The style is minimal and cottage-inspired, and it looks just as good on your head as on a desk stand. The pattern uses US crochet terms throughout.
Laid flat, the finished cover measures 3.4 in x 12.4 in (8.6 cm x 31.5 cm). It wraps into a snug sleeve for a headband that measures about 3.25-3.75 in (8.3-9.5 cm) around and 12-13 in (30.5-33.0 cm) along the outer curve. The vine is about 13 in (33.0 cm) long and has 13 leaves.
The construction is simple. You crochet one flat rectangle in rows of single crochet, add a one-round border, and block it. Then you wrap it around the headband and seam the long edges together on the underside. Last, you crochet the vine in one continuous strand and sew it along the top.
Finished Size and Construction
- Finished size (flat): 3.4 in x 12.4 in (8.6 cm x 31.5 cm)
- Skill level: Advanced beginner
- Terminology: US crochet terms
- Yarn weight: Worsted (#4)
- Hook: 4.0 mm (G-6)
- Number of pieces: 1 cover + 1 vine appliqué
- Layout: one strip, seamed into a tube on the headband, with the vine along the outer curve
- Piece size before border: 3 in x 12 in (7.6 cm x 30.5 cm)
- Border depth: 1 round of sc, about 0.2 in (0.5 cm) on every side
- Vine: 13 in (33.0 cm) stem with 13 leaves, each about 1 in x 0.6 in (2.5 cm x 1.5 cm)
Materials
Choose a smooth worsted weight yarn with good stitch definition. A cotton-acrylic blend works well: it’s soft against the skin, holds its shape, and doesn’t get too warm. Avoid fuzzy yarns for the vine, because they blur the leaf shapes.
Yarn:
- Color A, Taupe (cover): 30 g, about 60 m (66 yd)
- Color B, Sage Green (vine): 10 g, about 20 m (22 yd)
These quantities include enough extra yarn for a gauge check and small size adjustments.
Tools:
- 4.0 mm (G-6) crochet hook
- Tapestry needle
- 4-6 locking stitch markers
- Rust-proof pins
- Blocking mat or folded towel
- Spray bottle with water
- Soft tape measure
- Scissors
Abbreviations (US Terms)
- ch – chain
- sl st – slip stitch
- sc – single crochet
- hdc – half double crochet
- dc – double crochet
- sk – skip
- st(s) – stitch(es)
- RS – right side
- rep – repeat
Special stitch – Picot point: Ch 2, sl st in 2nd ch from hook. This makes the small, sharp tip of each leaf.
Special stitch – Loop Leaf: Ch 9, then sl st in the 9th ch from hook to form a ch-9 loop. That 9th ch is the last stem ch you made before this ch-9. Working over the loop, work (sc, hdc, 3 dc, picot point, 3 dc, hdc, sc) into the loop. Then sl st into the same stem ch at the base. Each leaf has 10 stitches plus 1 picot and ends exactly where it started, so the stem can continue.
Gauge and Checkpoints
Gauge: 16 sc and 20 rows = 4 in (10.2 cm) in sc worked in rows.
That works out to 4 sc and 5 rows per 1 in (2.5 cm). Every number in this pattern comes from those two figures, so take a moment to check them.
Test first: Work Rows 1-10 of the cover and measure before you go further. This small section is both your swatch and the start of your project.
Checkpoints:
- After Row 10: 3 in x 2 in (7.6 cm x 5.1 cm)
- After Row 30: 3 in x 6 in (7.6 cm x 15.2 cm)
- After Row 60: 3 in x 12 in (7.6 cm x 30.5 cm)
- After the border: 3.4 in x 12.4 in (8.6 cm x 31.5 cm)
If your piece is too big: Switch to a 3.75 mm hook. If it’s too small: Switch to a 4.5 mm hook. Measure again after 10 rows.
Fitting to your headband: Measure around the thickest part of your headband. Then measure along its outer curve from one yoke to the other.
- Each sc you add to or remove from the foundation changes the width by 0.25 in (0.6 cm).
- Each 5 rows change the length by 1 in (2.5 cm).
- Keep the row count a multiple of 5 so the border math below stays exact.
Part 1: The Cover
Use Color A.
Foundation: Ch 13.
Row 1 (RS): Sc in 2nd ch from hook and in each ch across. (12 sc)
Rows 2-60: Ch 1, turn. Sc in each st across. (12 sc)
Measure at Rows 10, 30, and 60. The fabric should be firm and dense, with no gaps that let the black headband show through.
Tip: Place a stitch marker in the first and last stitch of every tenth row. This makes it easy to count rows later, which matters for the border repeat.
Don’t fasten off. Go straight into the border.
Part 2: The Vine
Use Color B. Chain loosely and evenly. A tight vine will pull the cover out of shape when you sew it on.
Chain gauge: 5 ch = 1 in (2.5 cm). Check this on your first stem section.
Start: Leaving a 12 in (30.5 cm) tail, ch 5. (1 in / 2.5 cm of stem)
Leaf repeat: Work 1 Loop Leaf, ch 5. Rep from * 11 more times. (12 leaves, each followed by 1 in / 2.5 cm of stem)
End leaf: Work 1 Loop Leaf. (13 leaves total)
Fasten off, leaving a 24 in (61.0 cm) tail for sewing.
Stem check: 5 + (12 x 5) = 65 stem chains. At 5 ch per inch, that’s 13 in (33.0 cm).
Each leaf naturally sits a little to one side of the stem. When you attach the vine, you’ll turn the leaves alternately left and right so they fan out along the band.
Leaf check: Each leaf should measure about 1 in (2.5 cm) from base to tip and 0.6 in (1.5 cm) across at its widest point. If the leaves cup or curl, block them gently. Don’t add stitches.
Tip: When you work the stitches over the ch-9 loop, push them together firmly. Tight packing gives the leaf its oval shape and lets the picot stand out as a clear point.
Border
Use Color A, continuing from the end of Row 60.
Border gauge: The border uses the same 4 sc per inch as the body. On the long edges you work into row ends, and there are 5 rows per inch. So you work 4 sc into every 5 row ends to match.
Round 1: Ch 1, turn.
- Short side 1 (top of Row 60): 3 sc in first st (corner), sc in each of next 10 sts, 3 sc in last st (corner). (16 sc)
- Long side 1 (row ends): Sc in each of next 4 row ends, sk 1 row end. Rep from * 12 times in total. (48 sc)
- Short side 2 (free loops of foundation ch): 3 sc in first ch (corner), sc in each of next 10 ch, 3 sc in last ch (corner). (16 sc)
- Long side 2 (row ends): Sc in each of next 4 row ends, sk 1 row end. Rep from * 12 times in total. (48 sc)
Join with sl st to first sc. (128 sc)
Fasten off, leaving a 24 in (61.0 cm) tail for seaming.
Why the math works:
- Each short side: 12 sts worked 1-per-stitch + 4 extra corner sts (2 extra at each corner) = 16 sc, corners included.
- Each long side: 60 row ends ÷ 5 = 12 repeats, and 12 x 4 = 48 sc between the corner groups.
- Round total: (24 sts worked 1-per-stitch) + (8 corner extras) + (96 row-end sc) = 128 sc.
- Long side length: 48 sc ÷ 4 sc per inch = 12 in (30.5 cm). That matches the body exactly, so the edge stays flat without ruffling or pulling in.
The border adds about 0.2 in (0.5 cm) on each side, or 0.4 in (1.0 cm) in each direction. That gives 3 in + 0.4 in = 3.4 in (8.6 cm) wide and 12 in + 0.4 in = 12.4 in (31.5 cm) long.
Final Blocking
Block the pieces:
- Weave in all ends except the two long sewing tails.
- Lay the cover flat, RS up, on a blocking mat. Pin it to 3.4 in x 12.4 in (8.6 cm x 31.5 cm), with a pin at each corner and every 2 in (5.1 cm) along the edges.
- Lay the vine out in a gentle wave. Pin each leaf flat at its tip and base, opening up the picot point.
- Mist both pieces evenly with water until they’re damp, not soaked.
- Let them dry completely, for at least 6-8 hours, before you unpin them.
Assemble on the headband:
- With the RS facing out, wrap the cover around the headband so the long edges meet on the underside (the inner curve that rests on your head). Center the cover so the same amount of headband shows at each yoke.
- Clip the long edges together with locking stitch markers every 3 in (7.6 cm).
- Using the Color A tail, whipstitch the long edges together through the back loops only. Match stitch to stitch: start in the center sc of one corner group, seam the 48 border sc, and end in the center sc of the opposite corner group. That’s 50 stitch pairs per edge. Pull each stitch just snug enough to close the seam without cinching it.
- Lay the vine along the top (outer curve) in a soft wave. Turn the leaves alternately left and right, and pin them in place.
- Using the Color B tail, sew the stem down with small running stitches through the cover fabric only, never around the headband. Tack each leaf at its base and tip so it lies flat.
- Weave all remaining ends into the inside of the cover.
To remove the cover later, snip the seaming yarn and pull it out.
Final Quality-Control Checklist
- The flat cover measured 3.4 in x 12.4 in (8.6 cm x 31.5 cm) before fitting.
- Every row has 12 sc, and the border round has 128 sc.
- Each short side has 16 sc, and each long side has 48 sc.
- The corners are square and lie flat.
- The seam runs along the underside and isn’t visible from the top.
- The vine has 13 leaves, each with a crisp picot point.
- The leaves alternate sides and lie flat.
- No sewing stitches go around the headband itself.
- The headband adjusters slide freely below the cover.
- All ends are hidden inside the tube.
Troubleshooting
The cover is too loose on the headband. Remove 1 sc from the foundation for every 0.25 in (0.6 cm) of extra width, or go down one hook size.
The cover won’t close around the headband. Add 1 sc to the foundation for every 0.25 in (0.6 cm) you need, or go up one hook size.
The long edges ruffle after the border. You probably worked 1 sc in every row end. Rework the round with the sc-4, skip-1 repeat.
The long edges pull in. You skipped too often. Recount: there should be 48 sc on each long side.
The leaves look round instead of pointed. Make sure you worked the picot point between the two dc groups, and pin it open during blocking.
The vine puckers the cover. Your stem chain is too tight. Remake it with a hook one size larger, or sew it on with looser stitches.
The cover twists on the headband. The seam has drifted. Unpin it, line the seam up along the inner curve again, and reseam stitch to stitch.
Care
To wash the cover, snip the seam and take it off the headband. Hand wash it in cool water with mild soap, press out the water in a towel, and dry it flat. Never wash it on the headphones.

Final Notes
Everything in this pattern follows one measurement chain. A gauge of 4 sc and 5 rows per inch gives a body of 12 sc and 60 rows that measures 3 in x 12 in (7.6 cm x 30.5 cm). The border puts 16 sc on each short side and 48 sc on each long side, for 128 sc and a finished cover of 3.4 in x 12.4 in (8.6 cm x 31.5 cm). The cover wraps into a snug sleeve on the headband, and a 13 in (33.0 cm) vine with 13 leaves trails across the top.
Check your gauge and keep your row count a multiple of 5, and your cover will fit neatly.
Happy crocheting!